
Christmas Tree Rolls are more than just a delightful addition to your holiday table; they are an invitation to create cherished memories. As the festive season approaches, I always find myself drawn to recipes that combine heartwarming flavors with a touch of visual magic. These charming, pull-apart rolls, artfully shaped like miniature evergreen trees, bring an undeniable cheer that transforms any meal into a special occasion. While their specific origin might be a modern twist on traditional dinner rolls, their spirit harks back to generations of holiday baking – a time when families gathered to prepare beautiful, delicious food as an expression of love and celebration. The act of shaping and sharing these unique rolls becomes a new, cherished tradition in itself.
I believe people adore these delightful Christmas Tree Rolls not just for their stunning presentation, but also for their incredibly soft, fluffy texture and subtle, inviting flavor. Imagine biting into a warm, tender roll, fresh from the oven, with just a hint of sweetness or savory herbs, perfectly complementing your holiday feast. They offer the comforting familiarity of a classic dinner roll, elevated with a festive design that genuinely captures the spirit of Christmas. It’s truly wonderful how such a simple shaping technique can evoke so much joy and wonder, making them an instant showstopper that everyone, from children to adults, eagerly anticipates and remembers long after the last crumb is gone.

Ingredients:
- For the Dough:
- 1 cup (240ml) warm milk, ideally between 105°F to 115°F (40°C to 46°C) – this is crucial for activating the yeast properly.
- 2 ¼ teaspoons (7g or 1 standard packet) active dry yeast – make sure it’s fresh!
- ¼ cup (50g) granulated sugar, plus a pinch for the yeast – just enough to give the yeast a little boost and add a touch of sweetness to our rolls.
- ½ cup (113g) unsalted butter, melted and slightly cooled – we want it liquid but not hot enough to kill our yeast friends.
- 1 large egg, at room temperature, plus 1 additional egg for an egg wash later – room temperature eggs incorporate better into dough.
- 1 teaspoon salt – a vital ingredient that balances the sweetness and strengthens the gluten structure.
- 4 to 4 ½ cups (480g to 540g) all-purpose flour, spooned and leveled, plus more for dusting – starting with 4 cups and adding more as needed ensures a soft, pliable dough.
- For the Optional Garlic Herb Filling (Savory Christmas Tree Rolls):
- ¼ cup (57g) unsalted butter, softened – for easy spreading.
- 2-3 cloves garlic, minced – adjust to your love for garlic!
- 2 tablespoons fresh parsley, finely chopped – adds a beautiful green hue and fresh flavor.
- 1 tablespoon fresh rosemary, finely chopped – quintessential Christmas herb flavor.
- ½ teaspoon salt.
- ¼ teaspoon black pepper.
- ¼ cup grated Parmesan cheese (optional, but highly recommended for an extra savory kick).
- For the Optional Sweet Glaze (Sweet Christmas Tree Rolls):
- 1 cup (120g) powdered sugar.
- 2-3 tablespoons milk or water – to achieve your desired consistency.
- ½ teaspoon vanilla extract – for that classic sweet aroma.
- For Decoration:
- Fresh rosemary sprigs or fresh dill sprigs – for “pine needles” on top of your savory tree.
- Small cherry tomatoes, roasted red pepper pieces, or star-shaped cheese cutouts – for “ornaments” on your savory tree.
- Red and green sprinkles, candied cranberries, or small edible silver balls – for “ornaments” on your sweet tree.
Equipment You’ll Need:
- Large mixing bowl
- Stand mixer with dough hook attachment (optional, but highly recommended)
- Measuring cups and spoons
- Rubber spatula or wooden spoon
- Clean kitchen towel or plastic wrap
- Rolling pin
- Sharp knife or pizza cutter
- Large baking sheet (at least 13×18 inches), lined with parchment paper
- Small bowl for egg wash
- Pastry brush
- Wire cooling rack
Phase 1: Preparing the Dough for Your Christmas Tree Rolls
- Activate the Yeast: In your large mixing bowl (or the bowl of your stand mixer), combine the warm milk, 1 teaspoon of the granulated sugar, and the active dry yeast. Give it a gentle stir. Let this mixture sit for 5-10 minutes. You’re looking for a foamy, bubbly top to appear. This is your sign that the yeast is alive and ready to do its magic! If it doesn’t foam, your yeast might be old, or your milk wasn’t the right temperature, and you’ll need to start again. This initial activation is a crucial step for light and airy Christmas Tree Rolls.
- Combine Wet Ingredients: Once your yeast is nice and bubbly, add the melted and cooled butter, the remaining ¼ cup of granulated sugar, the single room temperature egg, and the salt to the yeast mixture. Whisk everything together until it’s well combined. The mixture should look slightly milky and uniform.
- Gradually Add Flour: Now, it’s time for the flour. Add 3 cups of the all-purpose flour to the wet ingredients. If you’re using a stand mixer, attach the dough hook and mix on low speed until just combined. If you’re doing this by hand, use a sturdy wooden spoon or rubber spatula to mix. Gradually add the remaining 1 to 1 ½ cups of flour, a half cup at a time, until the dough comes together and starts to pull away from the sides of the bowl. You might not need all the flour, or you might need a tiny bit more – it all depends on the humidity in your kitchen and the flour itself. The goal is a dough that is soft, slightly sticky but manageable, and not overly dry or stiff. Don’t be tempted to add too much flour, as this can result in tough rolls.
-
Knead the Dough:
- By Stand Mixer: Increase the mixer speed to medium-low and knead for 7-10 minutes. The dough should become smooth, elastic, and pass the “windowpane test” (where you can stretch a small piece of dough thin enough to see light through it without tearing).
- By Hand: Turn the dough out onto a lightly floured surface. Knead the dough for 10-15 minutes. This involves pushing the dough away from you with the heels of your hands, folding it back over, rotating, and repeating. It’s a wonderful arm workout and a very satisfying process! You’ll notice the dough becoming smoother and more pliable as the gluten develops.
Kneading is essential for developing the gluten structure, which gives our Christmas Tree Rolls their characteristic chewiness and helps them rise beautifully.
- First Rise (Bulk Fermentation): Lightly grease a clean large bowl with a little oil or cooking spray. Place the kneaded dough in the bowl, turning it once to coat the entire surface. Cover the bowl tightly with plastic wrap or a clean kitchen towel. Place it in a warm, draft-free place to rise for 1 to 1 ½ hours, or until it has doubled in size. A warm oven (turned off, with just the pilot light on if you have one, or briefly warmed and then turned off) or a sunny spot on your countertop works perfectly. This first rise is critical for developing flavor and creating a light texture for your “Christmas Tree Rolls”.
Phase 2: Shaping Your Festive Christmas Tree Rolls
- Prepare Your Work Surface and Filling: While your dough is on its first rise, prepare your chosen filling if you are making savory rolls. For the garlic herb filling, simply combine the softened butter, minced garlic, chopped parsley, chopped rosemary, salt, pepper, and Parmesan cheese (if using) in a small bowl. Mix until well combined. If you’re going the sweet route, you can prepare the glaze later. Line a large baking sheet with parchment paper. This will be the base for your Christmas Tree Rolls.
- Punch Down the Dough: Once the dough has doubled, gently punch it down to release the air. This redistributes the yeast and evens out the temperature in the dough. Turn the dough out onto a lightly floured surface.
- Divide and Roll Out: Divide the dough in half. Return one half to the bowl and cover it while you work with the first half. Using a rolling pin, roll the dough out into a large rectangle, approximately 18×12 inches (45×30 cm) and about ¼ inch thick. Try to keep the edges as straight as possible – this will make shaping easier.
- Spread the Filling (for Savory Rolls): If you’re making savory rolls, evenly spread the garlic herb butter mixture over the entire surface of the rolled-out dough, leaving about a ½-inch border along one of the longer edges. This prevents the filling from oozing out too much when you roll it.
-
Cut and Shape the Rolls:
- For Individual Rolls: Using a sharp knife or pizza cutter, cut the dough rectangle (either plain or filled) into strips about 1 to 1 ½ inches wide along the longer side. Then, cut these strips into smaller pieces, roughly 1 to 1 ½ inches long, creating small squares or rectangles. These will be your individual “branches” of the tree.
- For the Christmas Tree Shape: Now for the fun part! Arrange these small dough pieces on your prepared baking sheet in the shape of a Christmas tree. Start at the top with one roll, then two beneath it, then three, and so on, creating a triangular shape. Leave a little space between each roll for them to expand during the second rise and baking, but not too much, as we want them to bake together to form a cohesive tree. You can also add a “tree trunk” at the bottom using a couple of pieces. Be creative with your arrangement!
Repeat this process with the second half of your dough, or save it for another purpose if your baking sheet is full. The key is to arrange them neatly to form a recognizable tree shape.
- Second Rise (Proofing): Once your Christmas Tree Rolls are artfully arranged on the baking sheet, lightly cover them with plastic wrap or a clean kitchen towel. Place them back in that warm, draft-free spot for another 30-45 minutes, or until they look noticeably puffy and have increased in size by about 50%. This second rise is crucial for light, tender rolls. Don’t rush this step!
Phase 3: Baking Your Beautiful Christmas Tree Rolls
- Preheat Oven: About 15-20 minutes before the end of the second rise, preheat your oven to 375°F (190°C). Make sure an oven rack is in the middle position. Consistent oven temperature is key for even baking.
- Prepare Egg Wash: In a small bowl, whisk the remaining egg with 1 tablespoon of water or milk until well combined. This is your egg wash.
- Apply Egg Wash: Gently brush the egg wash over the tops of all the Christmas Tree Rolls. The egg wash will give them a beautiful golden-brown color and a lovely sheen. If you’re making savory rolls, you can also sprinkle a little extra grated Parmesan cheese or coarse sea salt on top at this stage for added flavor and texture. For sweet rolls, a plain egg wash is fine.
- Bake: Carefully transfer the baking sheet to your preheated oven. Bake for 18-25 minutes, or until the Christmas Tree Rolls are deeply golden brown on top and sound hollow when tapped on the bottom (you might need to carefully lift one to check). If you notice them browning too quickly, you can loosely tent them with aluminum foil for the last 5-10 minutes of baking.
- Cool: Once baked to perfection, remove the Christmas Tree Rolls from the oven. Let them cool on the baking sheet for 5-10 minutes before carefully transferring the entire “tree” to a wire cooling rack. This brief resting period allows them to firm up slightly before you handle them.
Phase 4: Glazing and Decorating Your Christmas Tree Rolls
- Prepare Glaze (for Sweet Rolls): While your sweet Christmas Tree Rolls are cooling (they should still be warm), whisk together the powdered sugar, 2-3 tablespoons of milk or water, and the vanilla extract in a small bowl until smooth and of a pourable consistency. If it’s too thick, add more liquid a teaspoon at a time. If it’s too thin, add more powdered sugar.
- Glaze Application (Sweet Rolls): Drizzle the sweet glaze generously over the warm Christmas Tree Rolls. The warmth of the rolls will help the glaze set beautifully.
-
Decorate Your Christmas Tree Rolls:
- For Sweet Christmas Tree Rolls: Immediately after glazing, sprinkle with festive red and green sprinkles, candied cranberries, or edible silver balls to mimic ornaments. You could even use a star-shaped cookie cutter to make a star out of a fruit leather for the top!
- For Savory Christmas Tree Rolls: While still warm, you can brush them with a little extra melted butter (if desired) for an even richer flavor and shine. Then, arrange small sprigs of fresh rosemary or dill among the rolls to represent pine needles. Place small cherry tomatoes, pieces of roasted red pepper, or star-shaped cutouts from cheese slices strategically on top as “ornaments.” A small pretzel stick can serve as a rustic “tree trunk” if you didn’t form one with dough.
This decoration step truly brings your Christmas Tree Rolls to life!
- Serve Warm: These Christmas Tree Rolls are best served warm, allowing the flavors to truly shine. They make a fantastic centerpiece for any holiday meal and are sure to impress your guests! Pull them apart right at the table for a fun, interactive experience.
Pro Tips for Perfect Christmas Tree Rolls:
- Temperature is Key for Yeast: Always ensure your milk is warm, but not hot (105-115°F is ideal). Too hot will kill the yeast, too cold won’t activate it. An instant-read thermometer is your best friend here.
- Don’t Over-Flour: A common mistake is adding too much flour, which results in dry, tough rolls. The dough should be soft, a little sticky, but manageable. Resist the urge to keep adding flour during kneading if it feels a bit tacky; proper kneading will develop the gluten and reduce stickiness.
- Room Temperature Ingredients: Ingredients like eggs and butter incorporate much more smoothly into dough when they are at room temperature. Plan ahead!
- Warm Proofing Environment: For the best rise, find a warm, draft-free spot. A turned-off oven with the light on, or a microwave (turned off!) with a cup of hot water in it, can create an ideal environment. Humidity also helps!
- Customization is Encouraged:
- Spice it Up: For savory rolls, consider adding a pinch of red pepper flakes to the garlic herb butter for a little kick.
- Cheese Lovers Rejoice: Beyond Parmesan, you could incorporate a blend of Italian cheeses like mozzarella and provolone into the savory filling.
- Sweet Variations: Instead of a simple glaze, you could make a cream cheese frosting for your sweet rolls, or even a citrus glaze using orange or lemon zest and juice. You could also fill them with a cinnamon sugar mixture before rolling them up for a classic “cinnamon roll” twist!
- Storage: Leftover Christmas Tree Rolls can be stored in an airtight container at room temperature for up to 2-3 days. For longer storage, you can freeze them for up to 1 month. Reheat gently in the oven or microwave.
- Make Ahead Option: You can prepare the dough up to the first rise, then punch it down, cover it tightly, and refrigerate overnight. Take it out the next day, let it come to room temperature for about 30-60 minutes, and then proceed with shaping and baking.
- Gift Giving: These “Christmas Tree Rolls” make a delightful edible gift during the holidays! Arrange them beautifully on a festive platter, cover with cellophane, and tie with a ribbon. Your friends and family will surely appreciate this thoughtful and delicious homemade treat.
Conclusion:
Well, there you have it, my friends! We’ve journeyed through the creation of what I genuinely believe will become a new holiday tradition in your home. These aren’t just any ordinary rolls; they are a delightful combination of soft, pillowy dough, rich, savory (or sweet, depending on your twist!) filling, and an undeniable festive charm. The reason I’m so passionate about this recipe, and why I consider it an absolute must-try, goes beyond just the ingredients. It’s about the experience. It’s about the joy of pulling a tray of beautifully shaped, golden-brown delights from your oven, filling your home with an irresistible aroma that instantly brings warmth and cheer. Imagine the smiles, the oohs and aahs, as your family and friends gather around the table and see these unique creations. They’re impressive without being overly complicated, offering that perfect balance of homemade goodness and visual appeal. I truly feel this recipe brings a little extra magic to any gathering, transforming a simple bread basket into a conversation starter, a centerpiece of edible art. They are the epitome of comfort food, elevated for a special occasion, yet accessible enough for any home baker.
Now, let’s talk about how to make these showstoppers truly shine on your table, or how to tweak them to suit your unique taste. For a classic savory presentation, these rolls are absolutely divine served warm, fresh from the oven, alongside a hearty holiday roast chicken or turkey. Their fluffy texture makes them perfect for soaking up rich gravies and pan juices. They also pair beautifully with a warm bowl of creamy tomato soup or a robust butternut squash soup on a chilly evening. Don’t underestimate their potential as an appetizer either! Offer them with a small bowl of herbed butter, a homemade garlic olive oil dip, or even a sophisticated cranberry chutney for an extra layer of flavor. They are substantial enough to feel special, yet light enough not to spoil the main course. For those who prefer a sweeter touch, a simple brush of melted butter mixed with a sprinkle of cinnamon sugar just after baking transforms them into a delightful breakfast treat or a unique dessert roll. Imagine them alongside your morning coffee or as an after-dinner indulgence. You could even glaze them lightly with a powdered sugar and milk icing for a truly decadent experience.
But why stop there? The beauty of baking is in the experimentation! These Christmas Tree Rolls are incredibly versatile. For a savory variation, consider kneading in some finely chopped fresh rosemary and grated Parmesan cheese into the dough, or perhaps a hint of sun-dried tomato and basil. You could even replace a portion of the milk with vegetable broth for an added savory depth. If you’re feeling adventurous, try a filling of cream cheese and chives, or a spicy jalapeño and cheddar. For a sweeter twist, you could incorporate orange zest and dried cranberries into the dough, or fill them with a generous spread of cinnamon-sugar and chopped pecans before shaping. A simple lemon glaze or a sprinkle of coarse sugar can elevate their sweetness even further. Think about seasonal flavors; perhaps a pumpkin spice variation in the autumn, or a lighter, fruit-filled version for a spring brunch. The possibilities are truly endless, limited only by your imagination and the contents of your pantry. These rolls are a canvas, just waiting for your personal artistic touch.
I genuinely hope you feel inspired to give this recipe a try. There’s an immense satisfaction that comes from creating something so beautiful and delicious from scratch, especially when it brings so much joy to those you share it with. Don’t be intimidated by the shaping process; it’s surprisingly intuitive, and even if your first one isn’t perfect, it will still taste incredible! Trust me, the effort is truly worth the reward. Once you’ve experienced the warmth of these homemade treats, I’m confident they’ll become a cherished part of your culinary repertoire. I absolutely adore hearing about your kitchen adventures, so please, when you make these enchanting rolls, don’t keep it to yourself! Share your photos, your triumphs, and even your little tweaks in the comments below. Let me know what variations you tried, who you shared them with, and what kind of feedback you received. Your experiences inspire me and the entire baking community. Let’s spread the joy of homemade baking, one delicious, festive roll at a time. Happy baking, everyone!
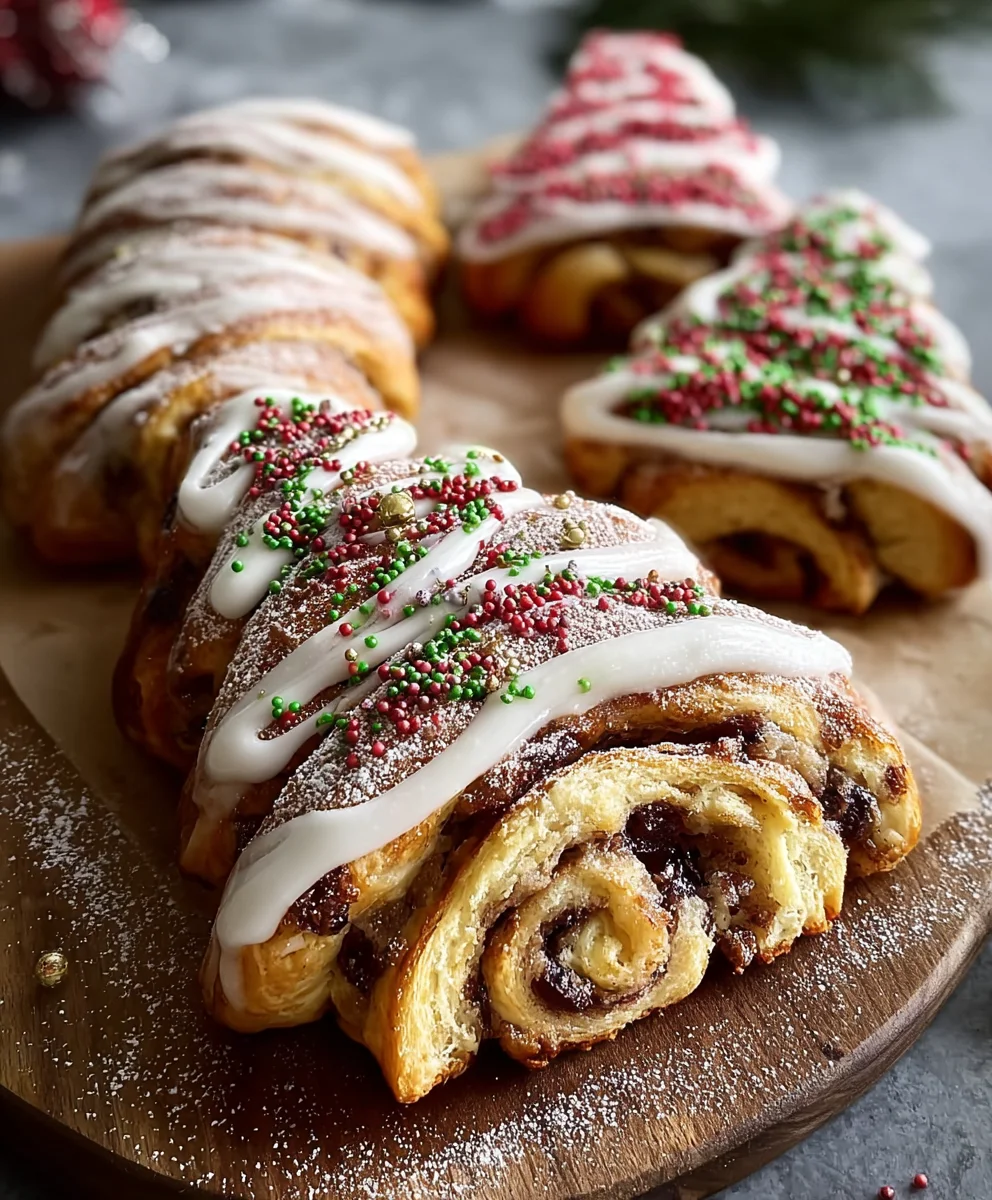
Christmas Tree Rolls
Christmas Tree Rolls are a delightful addition to your holiday table, artfully shaped like miniature evergreen trees. These charming, pull-apart rolls bring undeniable cheer, offering an incredibly soft, fluffy texture and inviting flavor. They capture the spirit of Christmas, making them an instant showstopper that everyone will adore, from children to adults.
Ingredients
-
1 cup (240ml) warm milk (105-115°F)
-
2 ¼ teaspoons (7g) active dry yeast
-
¼ cup (50g) granulated sugar, plus a pinch
-
½ cup (113g) unsalted butter, melted, slightly cooled
-
1 large egg, room temperature (plus 1 additional egg for egg wash)
-
1 teaspoon salt
-
4 to 4 ½ cups (480g to 540g) all-purpose flour
-
¼ cup (57g) unsalted butter, softened (for savory filling)
-
2-3 cloves garlic, minced (for savory filling)
-
2 tablespoons fresh parsley, finely chopped (for savory filling)
-
1 tablespoon fresh rosemary, finely chopped (for savory filling)
-
½ teaspoon salt (for savory filling)
-
¼ teaspoon black pepper (for savory filling)
-
¼ cup grated Parmesan cheese (optional, for savory filling)
-
1 cup (120g) powdered sugar (for sweet glaze)
-
2-3 tablespoons milk or water (for sweet glaze)
-
½ teaspoon vanilla extract (for sweet glaze)
-
Fresh rosemary sprigs or fresh dill sprigs (for savory decoration)
-
Small cherry tomatoes, roasted red pepper pieces, or star-shaped cheese cutouts (for savory decoration)
-
Red and green sprinkles, candied cranberries, or small edible silver balls (for sweet decoration)
Instructions
-
Step 1
In a large mixing bowl, combine warm milk, 1 teaspoon of sugar, and active dry yeast. Stir gently and let sit for 5-10 minutes until foamy and bubbly. -
Step 2
Once yeast is activated, add the melted butter, remaining ¼ cup sugar, 1 room temperature egg, and salt to the yeast mixture. Whisk until well combined. -
Step 3
Add 3 cups of all-purpose flour to the wet ingredients. Mix on low speed with a dough hook or by hand with a spatula. Gradually add the remaining 1 to 1 ½ cups of flour, a half cup at a time, until the dough comes together and pulls away from the sides of the bowl. The dough should be soft and slightly sticky, not dry or stiff. -
Step 4
Knead the dough for 7-10 minutes with a stand mixer on medium-low speed, or 10-15 minutes by hand on a lightly floured surface, until it becomes smooth, elastic, and passes the windowpane test. -
Step 5
Lightly grease a clean bowl. Place the kneaded dough in the bowl, turning once to coat. Cover tightly with plastic wrap or a kitchen towel and let rise in a warm, draft-free place for 1 to 1 ½ hours, or until doubled in size. -
Step 6
While the dough rises, prepare the savory garlic herb filling: combine softened butter, minced garlic, chopped parsley, chopped rosemary, ½ tsp salt, black pepper, and optional Parmesan cheese in a small bowl. Mix well. Line a large baking sheet with parchment paper. -
Step 7
Once dough has doubled, gently punch it down to release air. Turn onto a lightly floured surface, divide in half, and roll one half into an 18×12 inch (45×30 cm) rectangle, about ¼ inch thick. -
Step 8
If making savory rolls, evenly spread the garlic herb butter mixture over the rolled-out dough, leaving a ½-inch border along one long edge. -
Step 9
Cut the dough rectangle into strips 1 to 1 ½ inches wide along the longer side, then cut these strips into smaller pieces, roughly 1 to 1 ½ inches long. Arrange these small dough pieces on the prepared baking sheet in the shape of a Christmas tree (e.g., 1 roll at top, then 2, then 3, etc., with a small space between each). Add 2-3 pieces for a trunk at the bottom. Repeat with the second half of the dough if making a larger tree or two smaller ones. -
Step 10
Lightly cover the shaped Christmas Tree Rolls with plastic wrap or a clean kitchen towel. Place in a warm, draft-free spot for another 30-45 minutes, or until noticeably puffy and about 50% larger. -
Step 11
Preheat your oven to 375°F (190°C) about 15-20 minutes before the end of the second rise. In a small bowl, whisk the remaining egg with 1 tablespoon of water or milk for an egg wash. -
Step 12
Gently brush the egg wash over the tops of all the rolls. For savory rolls, you may sprinkle extra grated Parmesan or coarse sea salt. Carefully transfer to the preheated oven and bake for 18-25 minutes, or until deeply golden brown. If browning too quickly, loosely tent with aluminum foil. Make sure to pinch the dough firmly together before baking. If it starts separating, quickly push it back together while still baking. -
Step 13
Remove from oven and let cool on the baking sheet for 5-10 minutes before carefully transferring the entire ‘tree’ to a wire cooling rack. -
Step 14
While sweet Christmas Tree Rolls are cooling (still warm), whisk powdered sugar, 2-3 tablespoons milk/water, and vanilla extract in a small bowl until smooth and pourable. Drizzle the glaze generously over the warm rolls. -
Step 15
For sweet rolls: Immediately after glazing, sprinkle with festive red and green sprinkles, candied cranberries, or edible silver balls. For savory rolls: Arrange small sprigs of fresh rosemary or dill among the rolls for ‘pine needles,’ and place small cherry tomatoes, roasted red pepper pieces, or star-shaped cheese cutouts as ‘ornaments.’ A small pretzel stick can serve as a rustic ‘tree trunk’. -
Step 16
These Christmas Tree Rolls are best served warm. Pull them apart right at the table for an enjoyable, interactive experience.
Important Information
Nutrition Facts (Per Serving)
It is important to consider this information as approximate and not to use it as definitive health advice.
Allergy Information
Please check ingredients for potential allergens and consult a health professional if in doubt.


Leave a Comment