
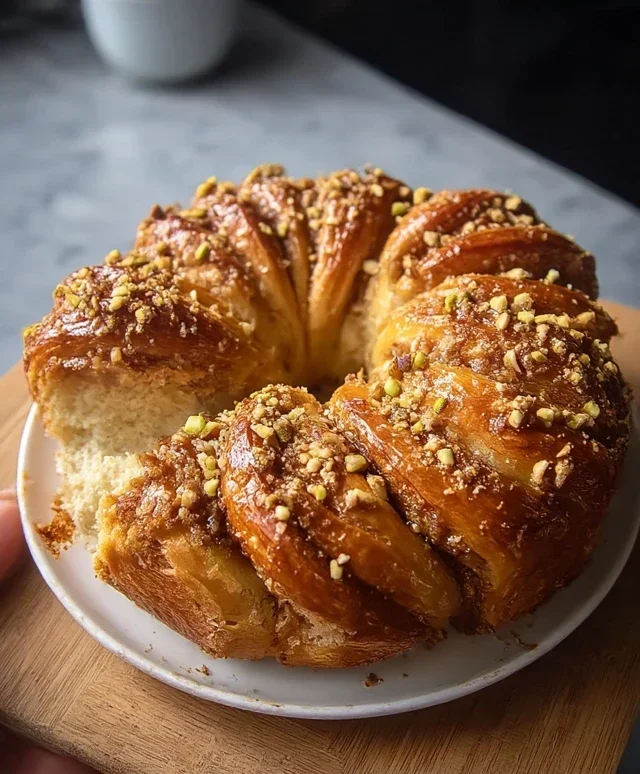
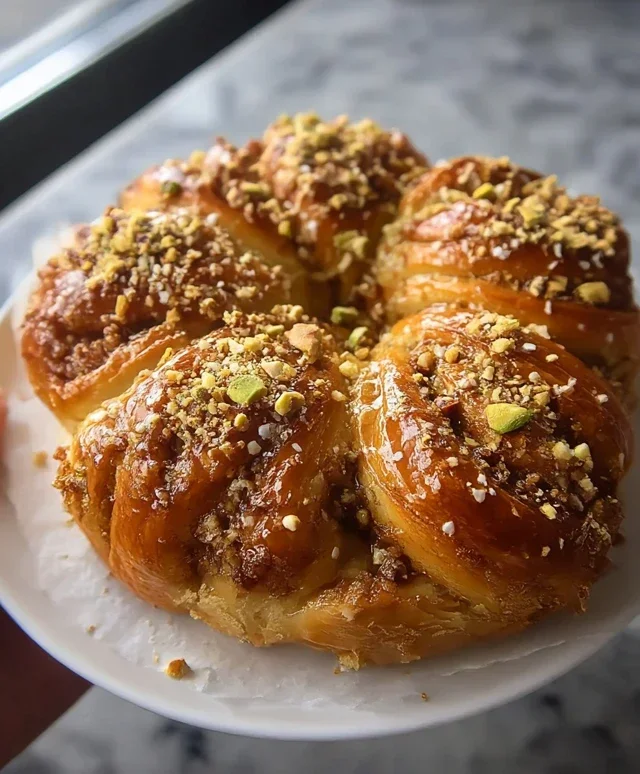
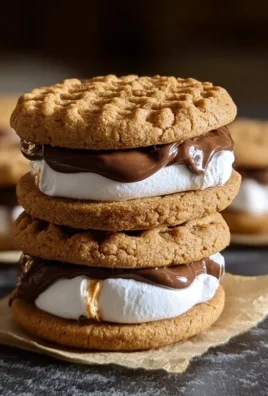
Baklava Babka Buns are about to redefine your breakfast and dessert horizons, and trust me, you’re going to want to dive headfirst into this delicious creation. Imagin extracte the shatteringly crisp, honey-drenched layers of classic baklava, swirled with the rich, cinnamon-spiced decadence of a perfect babka, all enrobed in a tender, fluffy bun. It’s a flavor and texture explosion that’s utterly irresistible. People adore this fusion because it takes two beloved comfort foods and elevates them into something entirely new and exciting. The inherent sweetness and nutty goodness of baklava, combined with the comforting warmth of babka, create a symphony for the taste buds. What truly makes these Baklava Babka Buns special is the ingenious marriage of textures and tastes – the crispy edges giving way to a soft, chewy interior, all infused with that non-intoxicating aroma of cinnamon and toasted nuts. Get ready for a treat that’s both familiar and thrillingly novel.
Baklava Babka Buns
Get ready for a flavor explosion that’s truly the best of both worlds! My Baklava Babka Buns are a delightful fusion of the rich, nutty, syrupy goodness of baklava and the tender, swirled delight of a classic babka. These aren’t your average buns; they’re a labor of love that results in a truly decadent treat. Imagin extracte a soft, enriched dough swirled with a spiced nut filling, baked to golden perfection, and then drizzled with a fragrant honey syrup. It sounds complicated, but I promise, with a little patience and this guide, you’ll be pulling these beauties out of your oven with pride. They’re perfect for a special brunch, a holiday gathering, or just when you need to seriously impress yourself (and anyone lucky enough to be around).
Ingredients:
Making the Dough: The Foundation of Flavor
The journey to these incredible buns begin extracts with a soft, enriched dough. This dough is similar to what you’d use for challah or brioche, meaning it’s packed with flavor and will develop a wonderfully tender crum extractb.
Crafting the Nutty Filling
While our dough is happily rising, let’s prepare the star of our filling – the spiced nuts! This is where that beautiful baklava flavor really starts to shine.
Assembling the Baklava Babka Buns
This is the fun part where we create those signature swirls. Patience is key here, so don’t rush the process!
Baking and Syrupy Sweetness
The final stages are all about getting that golden crust and infusing them with that irresistible honey syrup.
Enjoy every single bite of these sweet, nutty, fluffy marvels! They are truly a testament to how combining beloved flavors can create something entirely new and utterly delicious.
Conclusion:
And there you have it – your very own batch of delicious Baklava Babka Buns! I truly hope you enjoyed this journey into creating these wonderfully sweet and flaky pastries. This recipe is a true celebration of flavors, bringin extractg together the rich, nutty sweetness of baklava with the delightful chegrape juicess of babka, all in a convenient, individual bun format. They’re surprisingly achievable and offer a fantastic payoff in terms of taste and presentation. I encourage you to dive in and give them a try; I promise you won’t be disappointed!
These Baklava Babka Buns are incredibly versatile. They’re perfect as a decadent breakfast treat, a sophisticated dessert after a meal, or even a delightful afternoon pick-me-up with a cup of coffee or tea. For serving, I love them warm, straight from the oven, but they are also delicious at room temperature. Consider dusting them with a little extra powdered sugar or a drizzle of honey for an added touch of elegance.
Feel free to experiment with variations! You could swap the walnuts for pistachios or almonds, or add a pinch of cardamom or cinnamon to the nut mixture for a warmer spice profile. If you’re feeling adventurous, a little orange zest in the syrup could offer a lovely citrusy note.
Frequently Asked Questions:
How do I store leftover Baklava Babka Buns?
You can store any leftover buns in an airtight container at room temperature for up to 3 days. They might lose a little of their initial crispiness, but they’ll still be wonderfully flavorful. For longer storage, you can freeze them, tightly wrapped, for up to 1 month. Reheat gently in a low oven to refresh.
Can I make the dough ahead of time?
Absolutely! The babka dough can be made and refrigerated overnight after its first rise. This can actually improve the flavor and texture. Let it come to room temperature for about 30-60 minutes before shaping and baking.
What’s the best way to get those distinct babka layers?
The key to those beautiful swirls lies in how you spread the filling and how tightly you roll the dough. Ensure an even layer of the nut mixture, then roll the dough firmly but without stretching it too much. Cutting the dough log in half lengthwise and twisting the two halves together before shaping into buns is crucial for creating those signature layers.
Baklava Babka Buns
A delightful fusion of rich baklava flavors and soft babka buns, perfect for a sweet treat.
Ingredients
-
3 ½ cups all-purpose flour
-
¼ cup granulated sugar
-
1 packet (2 ¼ tsp) instant yeast
-
½ cup warm milk
-
2 eggs
-
½ cup unsalted butter, melted
-
½ tsp salt
-
1 cup walnuts, finely chopped
-
½ cup pistachios, finely chopped
-
¼ cup granulated sugar
-
1 tbsp cinnamon
-
¼ cup unsalted butter, melted
-
½ cup honey
-
¼ cup water
-
1 tsp vanilla extract
Instructions
-
Step 1
In a large bowl, combine flour, ¼ cup sugar, yeast, and salt. In a separate bowl, whisk together milk, eggs, and ½ cup melted butter. Add the wet ingredients to the dry ingredients and mix until a shaggy dough forms. Knead on a floured surface for 8-10 minutes until smooth and elastic. -
Step 2
Place the dough in a greased bowl, cover, and let rise in a warm place for 1 hour, or until doubled in size. -
Step 3
While the dough rises, prepare the filling: In a bowl, combine chopped walnuts, pistachios, ¼ cup sugar, and cinnamon. -
Step 4
Punch down the risen dough and divide it into two equal pieces. On a lightly floured surface, roll each piece into a rectangle approximately 12×9 inches. Spread the remaining ¼ cup melted butter evenly over each rectangle. Sprinkle the nut and cinnamon mixture over the butter. -
Step 5
Roll up each rectangle tightly, starting from the long side. Cut each roll in half lengthwise, then twist the two halves together to create a spiral. Cut each twisted log into 6 equal pieces. Place the buns cut-side up in a greased 9×13 inch baking pan. -
Step 6
Cover the pan and let the buns rise for another 30 minutes. -
Step 7
Preheat oven to 375°F (190°C). Bake the buns for 25-30 minutes, or until golden brown. -
Step 8
While the buns are baking, prepare the glaze: In a small saucepan, combine honey, water, and vanilla extract. Bring to a simmer over medium heat and cook for 2 minutes. Remove from heat. -
Step 9
Brush the warm glaze over the hot buns immediately after they come out of the oven. Let cool slightly before serving.
Important Information
Nutrition Facts (Per Serving)
It is important to consider this information as approximate and not to use it as definitive health advice.
Allergy Information
Please check ingredients for potential allergens and consult a health professional if in doubt.
Leave a Comment