
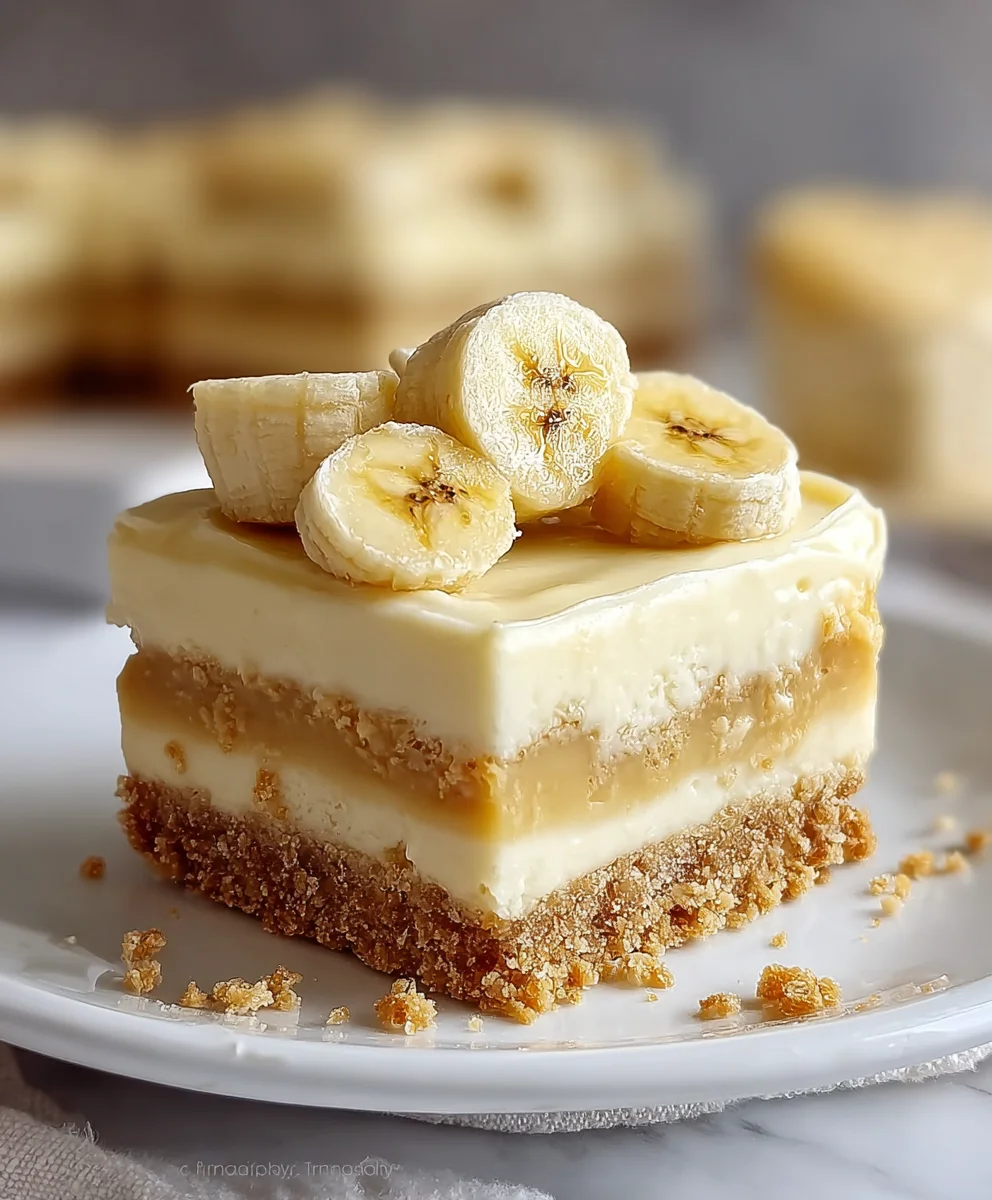
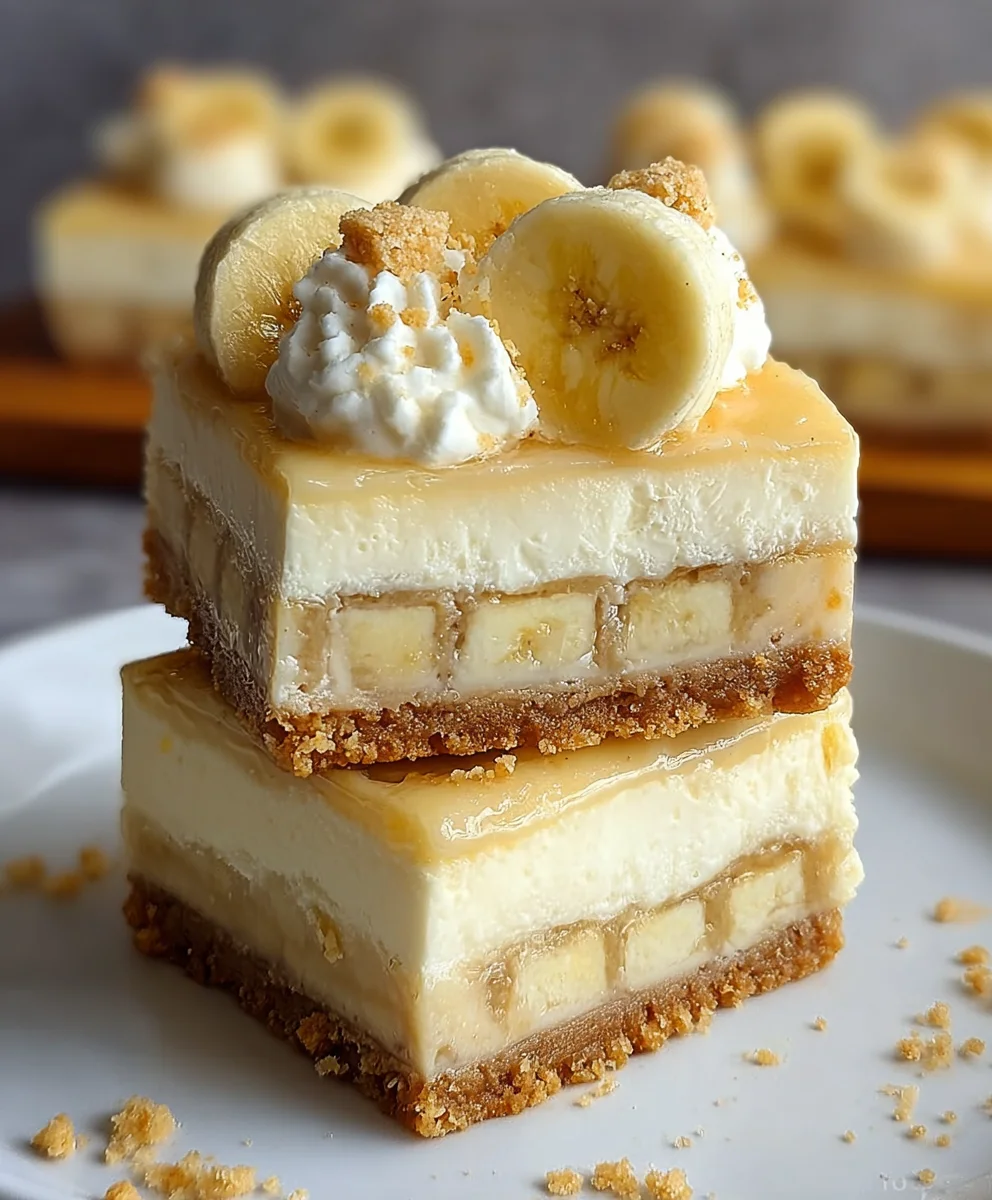
Banana Pudding Cheesecake Bars – oh, what a delightful combination! If you’ve ever found yourself torn between a creamy, dreamy banana pudding and a rich, decadent cheesecake, then prepare to have your dessert prayers answered. These Banana Pudding Cheesecake Bars are the ultimate fusion of two beloved classics, bringing together the best of both worlds in every single bite. Imagine a velvety smooth cheesecake layer, infused with the comforting sweetness of ripe bananas, all nestled on a buttery graham cracker crust. Then, top that with a generous swirl of luscious banana pudding, fluffy whipped cream, and maybe even a sprinkle of crushed vanilla wafers. It’s a symphony of textures and flavors that makes it incredibly hard to resist. People adore this dessert because it taps into that nostalgic comfort of classic banana pudding while elevating it with the sophisticated indulgence of cheesecake. What truly makes these bars special is the perfect balance achieved – not too heavy, not too light, just pure, unadulterated bliss that will have everyone asking for seconds, and maybe even thirds!
Ingredients:
- 1 1/2 cups Crushed Nilla Wafers
- 5 tbsp Butter, melted
- 2 tbsp Sugar
- Pinch Sea salt
- 12 oz Cream cheese (1 1/2 blocks), softened
- 1/2 cup Sugar
- 1 1/2 cups Whipped topping (for filling)
- 1 (3.4 oz) package Instant banana pudding mix
- 1 3/4 cups Whole milk
- Whipped topping, for garnish
- 1/2 Banana, sliced (for topping)
- 9 Nilla Wafers (for topping)
Preparing the Crust
Step 1: Combine Crust Ingredients
First, let’s get our delicious crust ready. In a medium bowl, combine the 1 1/2 cups of crushed Nilla Wafers, 5 tablespoons of melted butter, 2 tablespoons of sugar, and a pinch of sea salt. Stir everything together until the crushed wafers are evenly moistened with the butter. This mixture should resemble damp sand. It’s important that all the crumbs are coated in butter for a cohesive crust that holds its shape.
Step 2: Press Crust into Pan
Now, take an 8×8 inch baking pan. You can line it with parchment paper, leaving some overhang on the sides. This makes it super easy to lift the finished bars out later. Evenly press the Nilla Wafer mixture into the bottom of the prepared pan. Use the bottom of a glass or your fingers to create a firm, compact layer. This step is crucial for a sturdy crust that won’t crumble when you cut the bars. Make sure the edges are as even as the center. Place the pan in the freezer while you prepare the filling. This will help the crust set and firm up.
Making the Banana Pudding Cheesecake Filling
Step 3: Cream the Cheesecake Base
In a large bowl, beat the 12 ounces of softened cream cheese (that’s 1 1/2 blocks) until it’s completely smooth and creamy. Make sure your cream cheese is truly softened; this will prevent any lumps in your filling. Next, gradually add the 1/2 cup of sugar and continue beating until well combined and the mixture is light and fluffy. Scrape down the sides of the bowl occasionally to ensure everything is incorporated.
Step 4: Fold in Whipped Topping
Gently fold in 1 1/2 cups of whipped topping into the cream cheese mixture. Be careful not to overmix at this stage. We want to keep the filling light and airy. The goal is to combine it just enough so there are no streaks of cream cheese visible. Overmixing can deflate the whipped topping, resulting in a denser filling. Set this mixture aside for a moment.
Step 5: Prepare the Banana Pudding
In a separate medium bowl, whisk together the 1 (3.4 oz) package of instant banana pudding mix and 1 3/4 cups of whole milk. Whisk vigorously for about 2 minutes, or until the pudding begins to thicken. It’s important to use whole milk for the richest flavor and best texture. Let this pudding mixture sit for about 5 minutes to fully set up. It should be quite thick at this point.
Step 6: Combine Filling Components
Now, add the thickened banana pudding to the cream cheese and whipped topping mixture. Gently fold them together until everything is just combined and you have a smooth, uniform banana pudding cheesecake filling. Again, avoid overmixing. You want a cohesive filling that’s full of flavor and has a lovely texture.
Assembling and Chilling the Bars
Step 7: Layer and Chill
Retrieve the pan with the chilled crust from the freezer. Pour the banana pudding cheesecake filling evenly over the crust. Spread it out smoothly using a spatula, ensuring it reaches all the corners. Cover the pan tightly with plastic wrap. Refrigerate the Banana Pudding Cheesecake Bars for at least 4 hours, or preferably overnight. This chilling time is absolutely essential for the bars to set properly, making them firm enough to cut and enjoy. The longer they chill, the cleaner your cuts will be.
Step 8: Garnish and Serve
Once the bars are firmly set, carefully lift them out of the pan using the parchment paper overhang. Place them on a cutting board. Garnish the top with dollops of whipped topping. Arrange the 1/2 sliced banana and the 9 Nilla Wafers artistically over the whipped topping. You can break the Nilla Wafers in half or quarters if you prefer a more scattered look. Cut the chilled bars into squares using a sharp knife, wiping the knife clean between cuts for neat edges. Serve immediately and enjoy these delightful Banana Pudding Cheesecake Bars!
Conclusion:
And there you have it – your guide to creating the most delightful Banana Pudding Cheesecake Bars! We’ve walked through each step, from the buttery graham cracker crust to the creamy, banana-infused cheesecake filling and the topping of fluffy whipped cream and Nilla wafers. These bars are a wonderful fusion of two beloved desserts, offering a taste of pure comfort and indulgence in every bite. They are perfect for potlucks, family gatherings, or simply treating yourself after a long week. I truly hope you enjoy making and sharing these Banana Pudding Cheesecake Bars as much as I do!
For serving, these bars are fantastic chilled. You can also elevate them with a drizzle of caramel sauce or a sprinkle of toasted chopped pecans. For variations, consider adding a layer of sliced fresh bananas between the cheesecake filling and the whipped cream, or even incorporating a hint of rum extract into the cheesecake for an adult twist. Don’t be afraid to experiment and make these bars your own!
Frequently Asked Questions:
Can I make these Banana Pudding Cheesecake Bars ahead of time?
Absolutely! These bars are best made a day in advance, allowing the flavors to meld and the cheesecake to set fully. Simply cover them tightly with plastic wrap and refrigerate until ready to serve.
What is the best way to store leftovers?
Leftover Banana Pudding Cheesecake Bars can be stored in an airtight container in the refrigerator for up to 3-4 days. Make sure they are well-covered to prevent them from drying out.
Can I use ripe bananas instead of mashed?
While mashed ripe bananas are ideal for incorporating evenly into the cheesecake batter and flavor, you could try very finely diced ripe bananas. However, mashed bananas will yield a smoother texture and more consistent banana flavor throughout the bars.
Banana Pudding Cheesecake Bars
Decadent and creamy cheesecake bars with a Nilla Wafer crust and a rich banana pudding filling, topped with whipped cream, banana slices, and Nilla Wafers.
Ingredients
-
1 1/2 cups Crushed Nilla Wafers
-
5 tbsp Butter, melted
-
2 tbsp Sugar
-
Pinch Sea salt
-
12 oz Cream cheese, softened
-
1/2 cup Sugar
-
1 1/2 cups Whipped topping
-
1 (3.4 oz) package Instant banana pudding mix
-
1 3/4 cups Whole milk
-
Whipped topping, for garnish
-
1/2 Banana, sliced
-
9 Nilla Wafers
Instructions
-
Step 1
Prepare the crust by combining crushed Nilla Wafers, melted butter, sugar, and sea salt. Stir until evenly moistened and resembling damp sand. Press the mixture firmly into the bottom of an 8×8 inch baking pan lined with parchment paper. Freeze for at least 15 minutes. -
Step 2
Make the cheesecake base by beating softened cream cheese until smooth. Gradually add 1/2 cup sugar and continue beating until light and fluffy. Scrape down the sides of the bowl as needed. -
Step 3
Gently fold 1 1/2 cups of whipped topping into the cream cheese mixture until just combined, being careful not to overmix. -
Step 4
Prepare the banana pudding by whisking the instant banana pudding mix with whole milk for about 2 minutes until thickened. Let it sit for 5 minutes to fully set. -
Step 5
Combine the thickened banana pudding with the cream cheese and whipped topping mixture. Gently fold until smooth and uniform. Pour the filling evenly over the chilled crust and spread smoothly. -
Step 6
Cover the pan tightly and refrigerate for at least 4 hours, or preferably overnight, until firmly set. Once set, lift the bars out using the parchment paper, garnish with whipped topping, sliced banana, and Nilla Wafers. Cut into squares and serve.
Important Information
Nutrition Facts (Per Serving)
It is important to consider this information as approximate and not to use it as definitive health advice.
Allergy Information
Please check ingredients for potential allergens and consult a health professional if in doubt.
Leave a Comment