
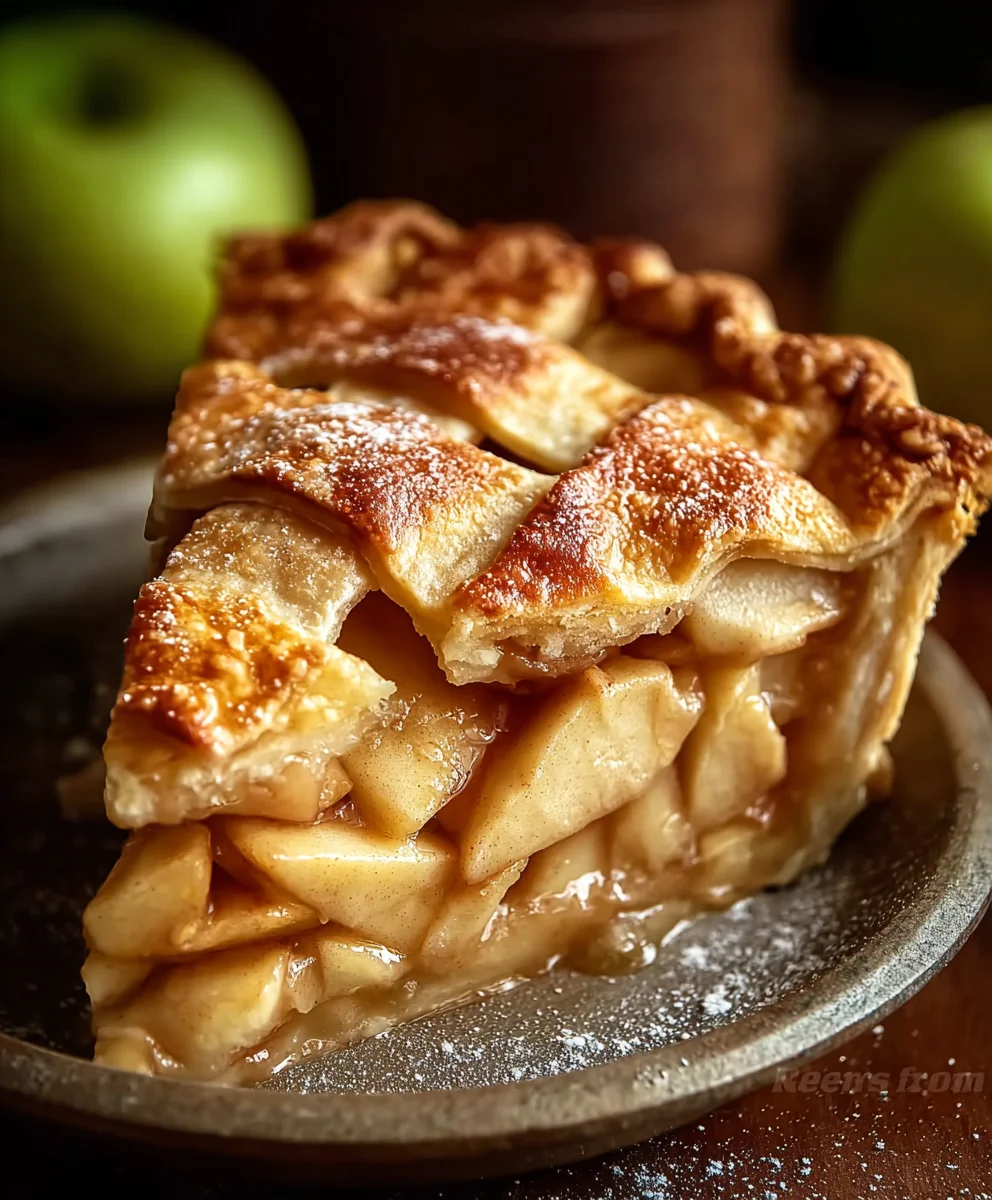
Homemade Apple Pie. There’s something undeniably magical about the aroma of cinnamon, baked apples, and flaky crust wafting from the oven. It’s not just a dessert; it’s a hug in a slice, a timeless symbol of comfort and joy that evokes cherished memories. As I prepare to share this treasured recipe with you, I feel a genuine excitement, knowing the delight it will bring to your home.
This beloved classic holds a special place in the hearts of many, particularly in American culture, often synonymous with holidays, family gatherings, and the simple pleasures of home. While the phrase “as American as apple pie” is common, its origins are surprisingly European, with medieval English recipes featuring apples baked in pastry. However, it was in America that the pie truly found its iconic status, evolving into the sweet, spiced delight we know and adore today. It’s a dish that transcends generations, always welcome at any table.
What makes Homemade Apple Pie so universally adored? Is it the perfect balance of tart and sweet apples, softened to perfection and infused with warm spices? Perhaps it’s the rich, buttery, golden-brown crust, offering a delightful crunch before melting in your mouth. Or maybe it’s the sense of accomplishment and warmth that comes from baking something so wonderfully traditional from scratch. Beyond its incredible taste and comforting texture, it’s the feeling it inspires – a sense of nostalgia, generosity, and pure, unadulterated happiness. Making your own is an experience, and the reward is truly unparalleled.

Ingredients:
For the Pie Crust (Double Crust):
- 2 ½ cups (300g) all-purpose flour: This forms the structure of our incredibly flaky pie crust. Using standard all-purpose flour is perfect for a tender yet sturdy base.
- 1 teaspoon salt: Essential for enhancing the flavor of the crust and balancing the sweetness of the apple filling. Don’t skip it!
- 1 cup (226g) unsalted butter, very cold and cut into ½-inch cubes: Cold butter is the secret to a flaky crust. The small pieces create pockets of steam during baking, separating the layers of dough. Using unsalted butter allows us to control the salt content precisely.
- ½ cup (120ml) ice water, plus 2-4 tablespoons more if needed: The ice water binds the dough together without developing too much gluten. It’s crucial for keeping the butter bits cold and ensuring a tender crust.
- 1 tablespoon granulated sugar (optional, for a slightly sweeter crust): A touch of sugar can add a subtle sweetness to the crust, complementing the apple pie filling beautifully.
For the Apple Filling:
- 6-8 medium-sized apples (about 2 ½ to 3 pounds), a mix of varieties is best: For the quintessential Homemade Apple Pie, I love using a blend of apples. Granny Smith (for tartness and firm texture), Honeycrisp (for sweetness and crispness), and Fuji or Braeburn (for a balanced flavor) work wonderfully. This combination ensures a complex flavor profile and prevents the filling from becoming too mushy or too firm.
- ¾ cup (150g) granulated sugar: This provides the primary sweetness for our filling. Adjust to your preference and the sweetness of your chosen apples.
- ¼ cup (50g) packed light brown sugar: Brown sugar adds a lovely caramel note and depth of flavor that complements the apples beautifully.
- 2 tablespoons all-purpose flour or cornstarch: This is our thickening agent. It helps to absorb the apple juices released during baking, preventing a watery filling and ensuring a beautifully cohesive slice of Homemade Apple Pie.
- 1 teaspoon ground cinnamon: The classic spice for apple pie, offering warmth and aromatic complexity.
- ½ teaspoon ground nutmeg: A touch of nutmeg enhances the cinnamon and adds another layer of cozy spice.
- ¼ teaspoon ground allspice (optional): For an even deeper, more complex spice profile, allspice is a fantastic addition.
- 1 tablespoon fresh lemon juice: A splash of lemon juice brightens the apple flavor, prevents browning, and helps to balance the sweetness. It’s a small but mighty ingredient!
- 2 tablespoons unsalted butter, cut into small pieces: Dotting the top of the filling with butter adds richness and helps create that glossy, caramelized filling.
For the Egg Wash & Finishing:
- 1 large egg: Beaten with a splash of water or milk, this creates a beautiful, golden-brown, shiny crust during baking.
- 1 tablespoon water or milk: To thin out the egg for an even wash.
- 1 tablespoon granulated sugar (optional, for sprinkling): A sprinkle of sugar on top of the crust not only adds extra sparkle but also a delightful crunch and hint of sweetness.
Preparing the Perfect Pie Crust for Your Homemade Apple Pie
Creating a truly remarkable homemade pie crust is the foundation of an unforgettable Homemade Apple Pie. This process requires patience and attention to detail, but I promise, the results are incredibly rewarding – far superior to any store-bought crust!
-
Combine Dry Ingredients:
In a large mixing bowl, combine the 2 ½ cups of all-purpose flour, 1 teaspoon of salt, and the optional 1 tablespoon of granulated sugar. Whisk these together gently until they are well combined. This ensures an even distribution of flavor throughout the crust. Make sure to use a bowl that’s large enough to comfortably mix in the butter without spilling.
-
Incorporate the Cold Butter:
Now, this is where the magic begins for a flaky crust! Add the 1 cup of very cold, ½-inch cubed unsalted butter to the flour mixture. It’s absolutely crucial that your butter is as cold as possible; you can even pop it into the freezer for 10-15 minutes before this step. Using a pastry blender, two knives, or even your fingertips (working quickly!), cut the butter into the flour until the mixture resembles coarse crumbs with some pea-sized pieces of butter still visible. Do not overmix! We want those distinct pieces of butter because they are what will create those wonderful flaky layers as they melt and release steam in the oven. If you use your hands, work very fast to prevent the butter from warming up from your body heat.
-
Add Ice Water Gradually:
Gradually add the ½ cup of ice water, one tablespoon at a time, mixing lightly with a fork after each addition. The goal is to bring the dough together just enough so it holds when squeezed, but it shouldn’t be sticky or wet. You might need a little more or less water depending on the humidity and your flour, so start with ½ cup and add 2-4 tablespoons more, if needed. If the dough seems too dry and crumbly to form, add another tablespoon of water. Be careful not to add too much, as this will make the dough tough. Once it just barely comes together, stop.
-
Form and Chill the Dough:
Turn the dough out onto a lightly floured surface and divide it into two equal portions. Gently form each portion into a flattened disc. Avoid kneading the dough vigorously, as this develops gluten and will lead to a tough crust. Wrap each disc tightly in plastic wrap and refrigerate for at least 1 hour, or preferably 2 hours, or even overnight. This chilling period is essential: it allows the gluten to relax, makes the dough easier to roll out, and, most importantly, keeps those butter pieces cold and firm, ensuring that glorious flakiness for your Homemade Apple Pie.
Crafting the Delectable Apple Filling for Your Homemade Apple Pie
The heart of our Homemade Apple Pie is undoubtedly the filling. A well-balanced apple filling should be sweet, tart, subtly spiced, and have a lovely, thick consistency. Let’s get those apples ready!
-
Prepare the Apples:
First, wash, peel, core, and slice your 6-8 medium-sized apples. I like to slice them about ¼-inch thick. This thickness allows them to soften perfectly during baking without turning into applesauce. A variety of apple types really makes a difference here, providing different textures and flavors that meld beautifully. Place all the sliced apples into a very large mixing bowl. The larger the bowl, the easier it will be to toss everything without bruising the apples.
-
Season the Apples:
To the bowl of sliced apples, add the ¾ cup granulated sugar, ¼ cup packed light brown sugar, 2 tablespoons all-purpose flour or cornstarch, 1 teaspoon ground cinnamon, ½ teaspoon ground nutmeg, and the optional ¼ teaspoon ground allspice. Pour in the 1 tablespoon of fresh lemon juice. Now, using a large spoon or your clean hands, gently toss all the ingredients together until the apples are evenly coated with the sugars and spices. Take care not to break the apple slices. The lemon juice prevents the apples from browning and adds a zesty brightness that cuts through the richness.
-
Let the Filling Macerate (Optional but Recommended):
For an even more flavorful and less watery filling, you can let the apple mixture sit for about 15-30 minutes at room temperature. The sugars will draw out some of the liquid from the apples, creating a delicious syrup. If you choose to do this, you might notice a small amount of liquid at the bottom of the bowl; this is perfectly normal and will contribute to a wonderfully rich filling.
Assembling Your Magnificent Homemade Apple Pie
This is where all our hard work comes together, transforming simple ingredients into what will soon become your glorious Homemade Apple Pie. Precision and a gentle touch are key here.
-
Roll Out the Bottom Crust:
Remove one disc of chilled pie dough from the refrigerator. On a lightly floured surface, using a rolling pin, roll out the dough into a 12-inch circle, about ⅛-inch thick. Make sure to roll from the center outwards, rotating the dough frequently to prevent sticking and ensure an even circle. If the dough starts to crack, it’s too cold; let it sit for a few minutes. If it’s too warm and sticky, chill it again briefly. Carefully transfer the rolled-out dough into a standard 9-inch pie plate. The easiest way to do this is to gently roll the dough around your rolling pin and then unroll it over the pie plate. Fit the dough snugly into the bottom and up the sides of the plate without stretching it, as stretching can cause it to shrink during baking. Trim any excess dough, leaving about a ½-inch overhang around the edge.
-
Add the Apple Filling:
Pour the prepared apple filling into the pie crust, mounding it slightly in the center. The apples will cook down, so a generous mound is exactly what we want. Distribute the 2 tablespoons of unsalted butter, cut into small pieces, evenly over the top of the apple filling. These small pats of butter will melt into the filling, adding extra richness and a luscious texture.
-
Add the Top Crust:
Now, roll out the second disc of pie dough into another 12-inch circle. You have a few options for your top crust:
- Full Top Crust: Simply lay the rolled-out dough directly over the filling.
- Lattice Top: For a beautiful and classic look, cut the dough into 1-inch wide strips using a sharp knife or a pastry wheel. Arrange half of the strips parallel over the filling, leaving gaps between them. Then, fold back every other strip and lay a new strip perpendicular to the first set. Continue weaving until you have a beautiful lattice pattern. This takes a little more time but is so worth it for the visual appeal of a Homemade Apple Pie.
-
Trim, Crimp, and Vent:
Once your top crust is in place (either full or lattice), trim the edges, leaving a 1-inch overhang. Fold the overhang of the top crust underneath the bottom crust’s overhang, creating a thick edge. Now, crimp the edges together to seal the pie. You can do this by pressing with your fingers, using a fork, or employing a decorative crimping technique. This seals in all those delicious juices and creates a beautiful border for your Homemade Apple Pie. If you chose a full top crust, don’t forget to cut several slits (about 1-inch long) in the top to allow steam to escape during baking. This prevents the crust from puffing up excessively and ensures the filling cooks evenly. If you have a lattice top, the gaps already provide venting.
-
Apply Egg Wash and Sugar (Optional):
In a small bowl, whisk together the 1 large egg and 1 tablespoon of water or milk until well combined. Using a pastry brush, gently brush the entire top crust with this egg wash. This will give your Homemade Apple Pie a gorgeous, golden-brown, shiny finish. For an extra touch, sprinkle the top with the optional 1 tablespoon of granulated sugar. This adds a lovely sparkle and a slight crunch to the crust.
Baking Your Golden-Brown Homemade Apple Pie to Perfection
The final step in our journey to creating an amazing Homemade Apple Pie is the baking. This stage requires careful attention to temperature and timing to ensure both a perfectly cooked filling and a beautifully golden, flaky crust.
-
Preheat the Oven and Prepare for Baking:
Position an oven rack in the lower-middle position of your oven. Preheat your oven to a robust 400°F (200°C). While the oven preheats, place your assembled pie on a large baking sheet. This baking sheet is crucial; it will catch any bubbling juices that might overflow during baking, saving you from a messy oven cleanup. It also helps to conduct heat to the bottom of the pie, ensuring a crisp bottom crust.
-
Initial High-Heat Bake:
Place the pie, still on its baking sheet, into the preheated 400°F (200°C) oven. Bake for 15-20 minutes. This initial burst of high heat helps to set the crust quickly, creating those desirable flaky layers, and gives it a head start on browning. It also helps the butter in the crust to create steam, contributing to the overall flakiness. Keep a close eye on it during this phase; if the edges start to brown too quickly, you’ll need to protect them.
-
Reduce Heat and Continue Baking:
After the initial 15-20 minutes, reduce the oven temperature to 375°F (190°C). Continue baking for an additional 40-50 minutes. During this longer baking period, the apples will soften beautifully, and the filling will thicken.
Protecting the Crust:
If you notice the edges of your Homemade Apple Pie crust are browning too much before the rest of the pie is ready, you’ll want to create a foil shield. You can either use a store-bought pie crust shield or fashion one yourself by tearing off a large piece of aluminum foil, folding it into a square, and cutting out the center to create a ring. Carefully place this foil ring over the edges of your pie to protect them from further browning while the center continues to cook.
-
Check for Doneness:
Your Homemade Apple Pie is done when the crust is deeply golden brown, and the filling is visibly bubbling through the vents or lattice openings. The bubbling should not be watery; it should appear thick and syrupy. If you’re unsure, you can carefully insert a thin, sharp knife through a vent into the center of the pie; the apples should feel tender with very little resistance. You can also listen for the gentle bubbling sound.
-
The All-Important Cooling Process:
Once baked to perfection, carefully remove the pie from the oven (still on its baking sheet) and place it on a wire rack to cool. This is perhaps the most challenging, yet most crucial, step: let your Homemade Apple Pie cool completely for at least 3-4 hours, or even longer, before slicing and serving. As tempting as it is to dive right in, the filling needs this time to fully set and thicken. Slicing it too soon will result in a runny, messy pie. Patience is truly a virtue here, and it will be richly rewarded with perfectly structured slices of delicious Homemade Apple Pie.
Serving Your Homemade Apple Pie:
After cooling, slice your pie and serve it warm or at room temperature. It’s absolutely delightful on its own, but a scoop of vanilla bean ice cream or a dollop of freshly whipped cream elevates it to an even more heavenly dessert experience. Enjoy the fruits of your labor!
Conclusion:
And there you have it, my friends! As we wrap up this journey, I truly hope you’re feeling inspired to roll up your sleeves and dive into the heartwarming world of baking. This isn’t just another recipe; it’s an invitation to create something truly special, something that transcends mere ingredients and becomes a cherished memory. I promise you, the effort is not only worth it but immensely rewarding. From the moment that first incredible aroma of cinnamon and baked apples fills your kitchen, you’ll know you’re on your way to something spectacular. This particular rendition of our beloved dessert is, in my humble opinion, an absolute masterpiece, perfected over countless attempts to bring you the best balance of flaky crust, tender, perfectly spiced fruit, and that irresistible, golden-brown finish.
What makes this recipe a must-try, you ask? Well, it’s the meticulous balance we’ve achieved – not too sweet, allowing the natural tartness and sweetness of the apples to shine through, complemented by a hint of warming spices that evoke a sense of comfort and home. The crust, oh the crust! It’s designed to be buttery, flaky, and golden, providing the perfect textural counterpoint to the luscious apple filling. You simply won’t find this depth of flavor and texture in any store-bought version, no matter how premium. There’s an undeniable magic that happens when simple, quality ingredients are brought together with love and care, and that’s precisely what this recipe delivers. It’s an edible hug, a slice of pure joy, and a testament to the fact that some of life’s greatest pleasures are found in the simplest of homemade delights. Trust me when I say, once you taste your own Homemade Apple Pie crafted with this guide, you’ll understand exactly what I mean.
Serving Suggestions:
While this pie is phenomenal on its own, there are countless ways to elevate your experience. Here are a few of my favorites:
- A La Mode: A classic for a reason! A generous scoop of velvety vanilla bean ice cream, melting slowly over a warm slice of pie, creates an intoxicating blend of temperatures and textures.
- Whipped Cream Dream: For something a little lighter, a dollop of freshly whipped cream, perhaps infused with a hint of vanilla or a touch of bourbon, adds a cloud-like richness.
- Sharp Cheddar: Don’t knock it ’til you try it! A thin slice of sharp cheddar cheese served alongside your pie offers a delightful savory counterpoint that many find surprisingly addictive.
- Coffee or Tea: For a simple, comforting treat, enjoy your pie with a freshly brewed cup of coffee or a warming mug of spiced tea. It’s the perfect afternoon pick-me-up or evening indulgence.
Creative Variations:
One of the beautiful things about baking is the freedom to experiment! Once you’ve mastered the basic recipe, feel free to put your own spin on it:
- Spice It Up: Don’t be afraid to play with your spice blend. A pinch of ground cardamom, a dash of allspice, or even a tiny amount of fresh ginger can add new layers of warmth and complexity to the apple filling.
- Fruit Medley: While apples are the star, they play wonderfully with others. Consider adding a handful of cranberries for a tart burst, or diced pears for an extra layer of sweetness and texture.
- Crust Designs: Beyond a traditional double crust, try a beautiful lattice top, a rustic crumble topping made with oats and brown sugar, or even cute cut-outs for a whimsical touch.
- Boozy Kick: A splash of brandy, bourbon, or apple liqueur added to the apple filling just before baking can impart a sophisticated depth of flavor.
- Sweetener Swap: Experiment with different sugars. While granulated sugar is standard, a portion of brown sugar can add a lovely molasses note, or a drizzle of maple syrup for a more nuanced sweetness.
So, what are you waiting for? This recipe is more than just instructions; it’s a gateway to creating something truly unforgettable in your own kitchen. I’ve poured my heart into perfecting it, and now I pass the baton to you. I genuinely encourage you to carve out some time this week, gather your ingredients, and embark on this delicious adventure. You’ll be so glad you did. And please, please, please, once you’ve baked your pie and savored every last crumb, come back and tell me all about it! Share your photos, your triumphs, any little tweaks you made, or even just your thoughts on how much you enjoyed it. I absolutely love hearing from you and seeing your wonderful creations. Let’s make some delicious memories together!
Best Homemade Apple Pie Recipe – Sweet & Flavorful!
Experience the magic of homemade apple pie! This timeless dessert features a perfect balance of tart and sweet apples, infused with warm spices, all encased in a rich, buttery, flaky crust. A symbol of comfort and joy, it’s an unparalleled reward for your baking efforts.
Ingredients
-
2 ½ cups (300g) all-purpose flour
-
1 teaspoon salt
-
1 cup (226g) unsalted butter, very cold, cut into ½-inch cubes
-
½ cup (120ml) ice water, plus 2-4 tablespoons more if needed
-
1 tablespoon granulated sugar (optional, for crust)
-
6-8 medium-sized apples (2 ½ to 3 pounds), mixed varieties (e.g., Granny Smith, Honeycrisp, Fuji)
-
¾ cup (150g) granulated sugar
-
¼ cup (50g) packed light brown sugar
-
2 tablespoons all-purpose flour or cornstarch
-
1 teaspoon ground cinnamon
-
½ teaspoon ground nutmeg
-
¼ teaspoon ground allspice (optional)
-
1 tablespoon fresh lemon juice
-
2 tablespoons unsalted butter, cut into small pieces (for filling)
-
1 beaten egg
-
1 teaspoon water
-
1 tablespoon granulated sugar (optional, for sprinkling)
Instructions
-
Step 1
In a large bowl, combine flour, salt, and optional sugar. Cut in very cold butter until mixture resembles coarse crumbs with pea-sized pieces. Gradually add ice water, mixing lightly, until dough just comes together. Avoid overmixing. Divide dough into two flattened discs, wrap tightly, and refrigerate for at least 1-2 hours. -
Step 2
Wash, peel, core, and slice apples (about ¼-inch thick). Place in a large bowl. Add granulated sugar, brown sugar, flour/cornstarch, cinnamon, nutmeg, optional allspice, and lemon juice. Gently toss until apples are evenly coated. (Optional: Let sit 15-30 minutes for a richer syrup). -
Step 3
Roll one chilled dough disc into a 12-inch circle and carefully transfer it to a 9-inch pie plate. Trim excess, leaving a ½-inch overhang. Pour prepared apple filling into the crust, mounding it slightly. Dot the top of the filling with the 2 tablespoons of unsalted butter pieces. Roll the second dough disc into a 12-inch circle for the top crust (full or lattice). -
Step 4
Place the top crust over the filling. Trim excess dough, leaving a 1-inch overhang. Fold the top crust’s overhang under the bottom crust’s overhang, creating a thick edge. Crimp the edges to seal. If using a full top crust, cut several slits (1-inch long) for venting. In a small bowl, whisk 1 beaten egg with 1 teaspoon water. Brush the entire top crust with this egg wash for a golden-brown finish. Optionally, sprinkle with 1 tablespoon granulated sugar. -
Step 5
Preheat oven to 400°F (200°C). Place the assembled pie on a large baking sheet. Bake for 15-20 minutes at 400°F (200°C). Reduce oven temperature to 375°F (190°C) and continue baking for an additional 40-50 minutes. If crust edges brown too quickly, shield them with foil. The pie is done when the crust is deeply golden brown and the filling is visibly bubbling and thick. -
Step 6
Carefully remove the pie from the oven and place it on a wire rack to cool completely for at least 3-4 hours (or longer) before slicing and serving. This allows the filling to set properly. Serve warm or at room temperature, perhaps with vanilla bean ice cream or whipped cream.
Important Information
Nutrition Facts (Per Serving)
It is important to consider this information as approximate and not to use it as definitive health advice.
Allergy Information
Please check ingredients for potential allergens and consult a health professional if in doubt.
Leave a Comment