
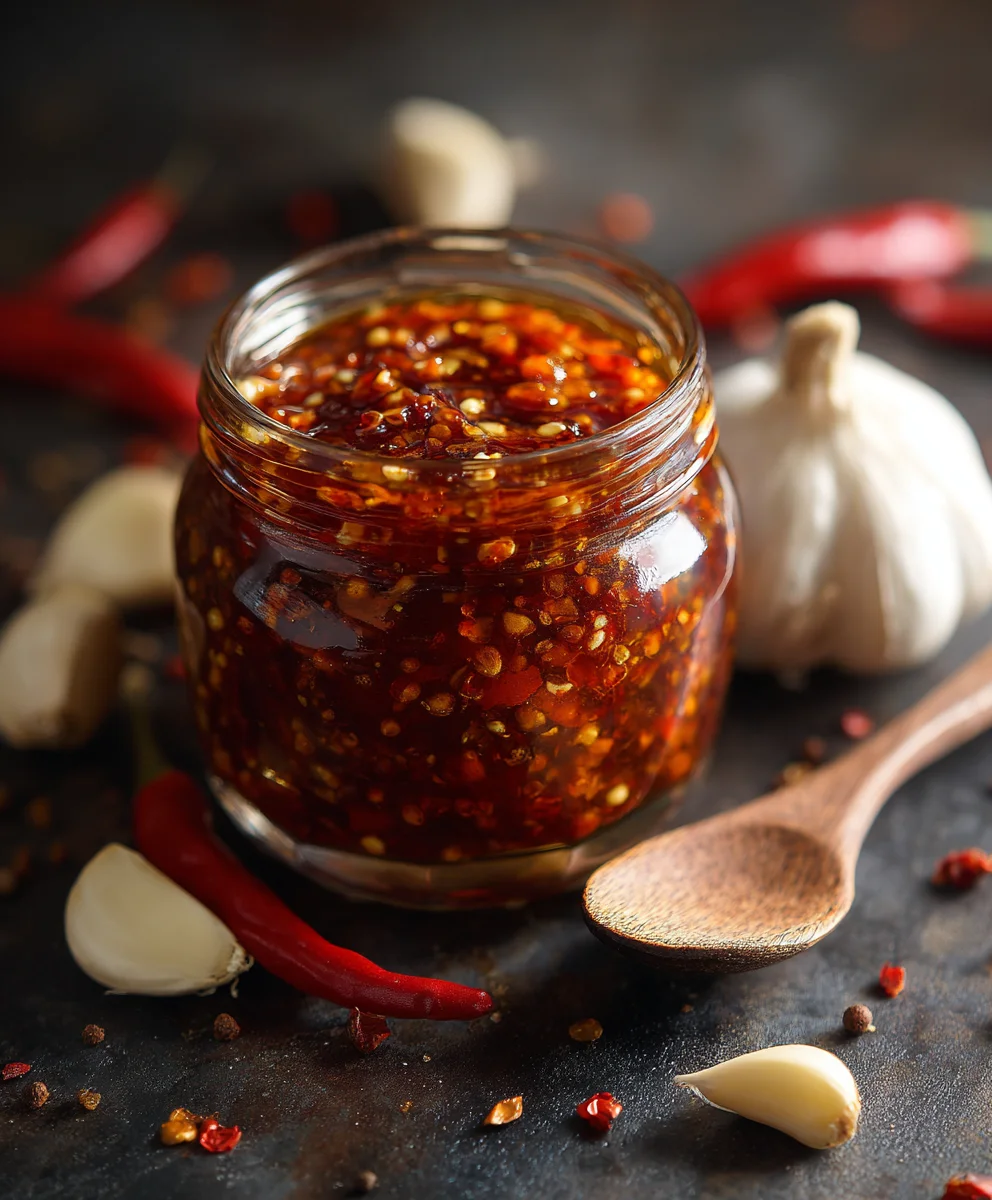
Homemade Chili Garlic Sauce is more than just a condiment; it’s a truly transformative ingredient that can elevate almost any dish from good to absolutely unforgettable. If you’ve ever longed for that perfect balance of fiery heat, pungent garlic, and a savory depth that simply isn’t found in mass-produced jars, then you’re in for a delightful culinary journey. The unparalleled freshness and vibrant flavor profile of a homemade version truly sets it apart, promising an explosion of taste with every spoonful.
This beloved sauce, a staple in countless vibrant Asian cuisines from the bustling markets of Vietnam to the sophisticated tables of Szechuan, boasts a rich heritage of bringing complex flavors and a satisfying kick to a vast array of dishes. It’s the secret weapon that awakens the palate, adding not just spice, but a profound layer of umami and an aromatic charm. People adore this dish for its incredible versatility, its ability to complement everything from noodle bowls and stir-fries to marinades and dipping sauces, and of course, for its irresistible taste and satisfyingly chunky texture.
Making your own Homemade Chili Garlic Sauce gives you complete control over the intensity and nuances of its flavor.
It’s surprisingly simple to prepare, yet the rewards are immense, offering a potent, versatile elixir that will become an indispensable part of your kitchen arsenal. Imagine tailoring the heat precisely to your liking, ensuring every batch perfectly suits your preferences. This homemade iteration is not just about heat; it’s about adding a burst of fresh, savory, and spicy goodness that will redefine your cooking.
Ingredients:
- 2 pounds (about 900g) fresh red chilies: I love using a mix here for a truly complex flavor and heat profile. About 1.5 pounds of long red chilies (like Fresno or Thai red chilies, stems removed) for the bulk of the flavor and medium heat, and about 0.5 pounds of hotter chilies (like bird’s eye or Habanero, stems removed) if you really want to bring the heat. You can adjust this ratio based on your spice preference. Choose chilies that are vibrant, firm, and unblemished.
- 1 cup (about 250g) peeled fresh garlic cloves: Yes, that’s a lot of garlic, and trust me, it’s essential for that signature pungent, aromatic flavor in your Homemade Chili Garlic Sauce. I usually buy pre-peeled garlic to save time, but fresh-peeled always has a superior aroma.
- 1.5 cups neutral oil: Canola oil, vegetable oil, or grapeseed oil work perfectly. We need a generous amount to really “fry” the garlic and chilies and infuse their flavors, creating a luscious base for our sauce.
- 2 tablespoons granulated sugar: This is crucial for balancing the heat and acidity, adding a subtle sweetness that rounds out the overall flavor profile. Don’t skip it!
- 2 tablespoons sea salt (or to taste): Salt not only seasons the sauce but also acts as a natural preservative. I prefer sea salt for its cleaner taste.
- 1/4 cup white vinegar or rice vinegar: Provides a tangy counterpoint to the richness and heat, brightens the flavors, and also aids in preservation.
- Optional additions for an extra layer of flavor:
- 1 tablespoon soy sauce: For an umami kick.
- 1 teaspoon sesame oil: For a nutty aroma, best added at the very end.
- 1 teaspoon Sichuan peppercorns: Toasted and ground, for a unique floral and numbing sensation.
- 1-inch piece fresh ginger: Peeled and finely minced, for an extra layer of warmth and spice.
- 1/2 teaspoon MSG (monosodium glutamate): For an undeniable depth of savory umami, if you’re open to using it.
Gathering and Preparing Your Fresh Ingredients
-
Sanitize Your Workspace and Tools:
Before you even touch those vibrant chilies, ensure your kitchen counter, cutting boards, knives, and any other tools you’ll be using are spotlessly clean. When making any homemade condiment, especially one destined for a jar, hygiene is paramount to prevent spoilage and ensure a long shelf life. I always give everything a good wash with hot, soapy water and then dry thoroughly.
-
Prepare the Red Chilies:
First things first, don’t skip the gloves! Handling a large quantity of chilies, especially hot ones, can lead to severe irritation if you get the capsaicin on your skin, and even worse if you accidentally touch your eyes. Trust me, I’ve learned this the hard way! With gloved hands, thoroughly wash all your chilies under cold running water. Pat them completely dry with a clean kitchen towel or paper towels. Any excess water can affect the texture and potentially cause splattering during cooking. Once dry, carefully snip off the green stems from each chili. For a milder sauce, you can also slice the chilies lengthwise and remove some or all of the seeds and membranes, as this is where a significant portion of the heat resides. However, for a truly authentic Homemade Chili Garlic Sauce, I usually leave most of the seeds in for that robust heat and texture.
-
Prepare the Garlic:
Measure out your generous portion of peeled garlic cloves. If they’re not pre-peeled, take your time to peel them all. The easiest way I find is to lightly smash each clove with the flat side of a knife, which usually loosens the skin for easy removal. Once peeled, give them a quick rinse and pat dry. We want them as dry as possible before processing to avoid diluting the sauce or causing excessive splattering when they hit the hot oil.
Crafting the Flavor Base: Chopping and Mincing
-
Coarsely Chop the Chilies:
This is where the magic really starts to happen for the texture of our Homemade Chili Garlic Sauce. Working in batches if necessary, place your stemmed (and optionally deseeded) chilies into a food processor. Pulse the chilies until they are finely chopped but still have some texture. We are aiming for a consistency that’s not quite a paste, but not large chunks either—think along the lines of a coarse relish. Over-processing will turn it into a watery purée, which isn’t ideal for the sauce’s characteristic texture. If you don’t have a food processor, you can finely mince them by hand with a very sharp knife, which will give you a slightly chunkier, more rustic result, but it will definitely take more time and effort. Transfer the chopped chilies to a clean bowl.
-
Process the Garlic:
Next, place your peeled and dried garlic cloves into the food processor. Again, pulse until the garlic is finely minced. Similar to the chilies, we want a fine chop, not a paste. If the garlic is too finely processed into a watery mush, it can burn more easily during cooking and won’t contribute the same texture. If you’re mincing by hand, ensure the garlic is very finely chopped; uniform pieces will cook more evenly. Set the minced garlic aside in a separate bowl from the chilies. Keeping them separate for now is important because they will be added to the hot oil at different times.
-
Prepare Optional Aromatics (if using):
If you’ve decided to add fresh ginger, peel it and finely mince it. If using Sichuan peppercorns, gently toast them in a dry pan over medium heat for 1-2 minutes until fragrant, then let them cool and grind them into a powder using a spice grinder or mortar and pestle. Having all your ingredients prepped and ready before you start cooking is key to a smooth process.
The Cooking Process: Infusing Flavors
-
Heat the Oil:
Choose a large, heavy-bottomed pot or a deep skillet for this step. A heavy bottom ensures even heat distribution, which is crucial for not burning our precious ingredients. Pour the 1.5 cups of neutral oil into the pot. Heat the oil over medium-low heat. We are looking for the oil to be shimmering, but not smoking. You can test it by dropping a tiny piece of garlic into the oil; if it sizzles gently, it’s ready. The key here is low and slow to really extract the maximum flavor without burning.
-
Gently Fry the Garlic:
Once the oil is at the right temperature, add the finely minced garlic to the pot. Stir frequently to ensure even cooking. We are aiming for the garlic to turn a beautiful golden-brown color, releasing its intense aroma and sweetening slightly. This process usually takes about 5-8 minutes, but keep a close eye on it because garlic can go from perfectly golden to burnt and bitter in a matter of seconds. A burnt garlic taste will ruin the entire sauce, so don’t rush this step. The aroma filling your kitchen right now is absolutely incredible and is the foundation of your Homemade Chili Garlic Sauce!
-
Add the Chopped Chilies:
When the garlic has reached that perfect golden hue, carefully add the finely chopped red chilies to the pot. Be mindful as the mixture might splatter a little due to the moisture content in the chilies. Stir well to combine the chilies with the garlic and ensure they are thoroughly coated in the fragrant oil.
-
Simmer and Infuse:
Reduce the heat to low. Now, we’re going to let this mixture gently simmer, stirring occasionally, for a good 25-35 minutes. During this time, the chilies will soften, their vibrant red color will deepen, and their flavor will meld beautifully with the garlic-infused oil. The goal is to cook out some of the raw chili flavor and allow the oil to become deeply saturated with the essence of both the chilies and garlic. You’ll notice the oil changing color and the texture of the chilies becoming jammy. This long, slow cook is essential for developing the complex, rich flavor that defines a good Homemade Chili Garlic Sauce. If you’re adding finely minced ginger, you can add it at this stage along with the chilies.
-
Incorporate the Seasonings:
After the simmering period, when the chilies and garlic are tender and fragrant, it’s time to add our key seasonings. Stir in the granulated sugar, sea salt, and white or rice vinegar. If you are using soy sauce, MSG, or ground Sichuan peppercorns, add them now as well. Stir everything thoroughly to ensure the seasonings are evenly distributed throughout the sauce.
-
Continue to Cook and Develop Flavors:
Let the sauce continue to simmer for another 5-10 minutes, stirring occasionally. This allows the newly added seasonings to dissolve and their flavors to fully integrate into the chili-garlic base. The vinegar will cook off some of its harsh acidity, leaving behind a pleasant tang. Taste a tiny bit (carefully, it’s hot!). If you feel it needs a bit more sweetness, salt, or tang, now is the time to adjust. Remember, it’s easier to add more than to take away. This step is about personalizing your Homemade Chili Garlic Sauce to your exact preference.
Balancing and Perfecting Your Homemade Chili Garlic Sauce
-
Final Flavor Adjustments:
This is perhaps one of the most important steps in ensuring your Homemade Chili Garlic Sauce is truly perfect for your palate. Once the sauce has simmered with all the seasonings, take another small taste. Does it need more salt to enhance the flavors? A little more sugar to round out the heat? Or perhaps another splash of vinegar for extra brightness? Adjust these elements gradually, adding a small amount at a time and stirring well, then tasting again. Remember, the flavors will concentrate slightly as the sauce cools, so don’t over-season. I usually aim for a bold, balanced flavor that’s spicy, savory, slightly sweet, and tangy.
-
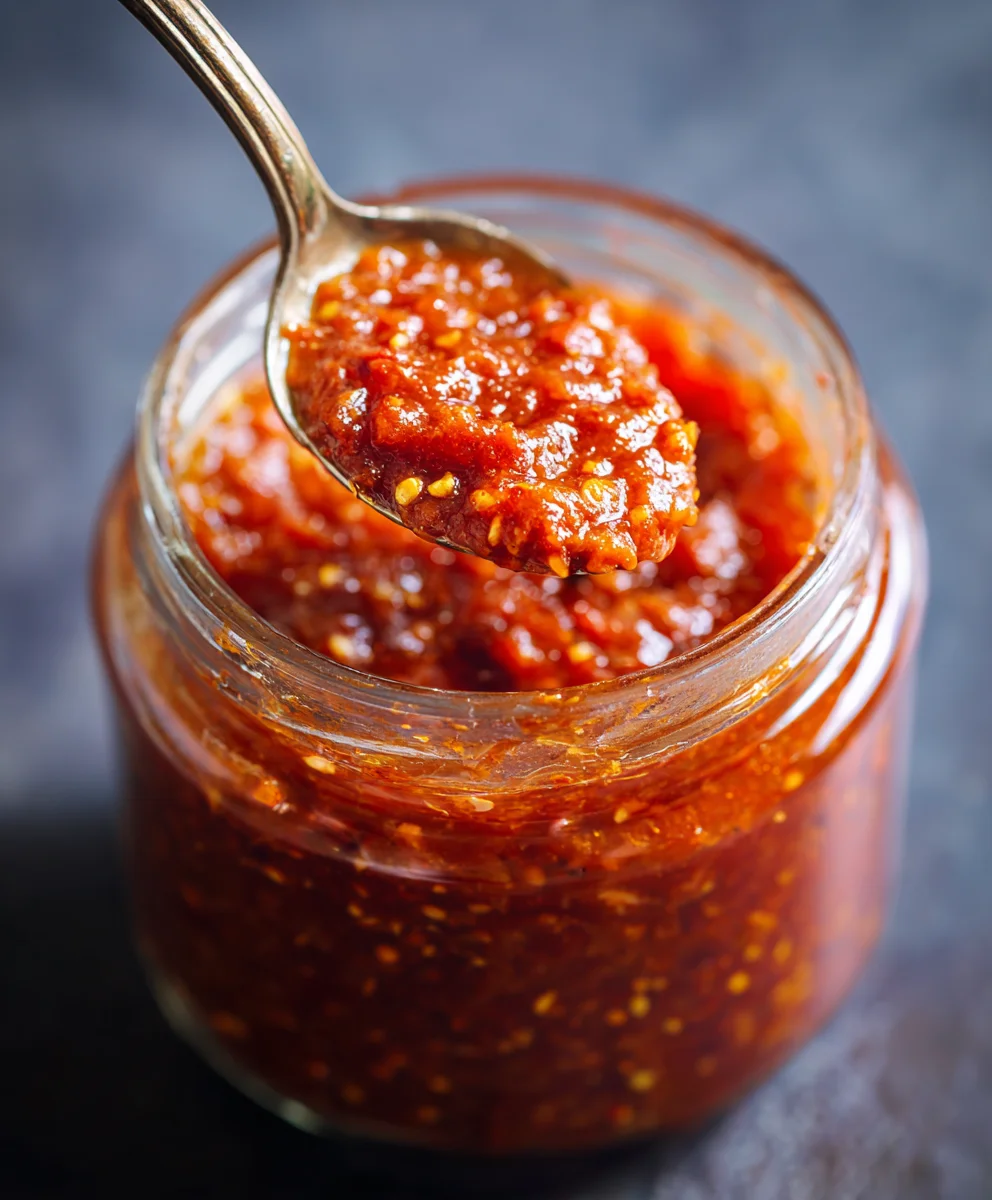
Consider Consistency (Optional Blending):
At this point, your sauce will likely have a rustic, chunky texture, which is classic for Homemade Chili Garlic Sauce. However, if you prefer a smoother sauce, you can carefully transfer a portion (or all) of the sauce to a blender or use an immersion blender directly in the pot. Pulse it a few times until you reach your desired consistency. Be careful not to over-blend, as we don’t want a completely smooth paste; a little texture is desirable. Always be cautious when blending hot liquids; ensure the lid is properly secured, and start on a low speed, gradually increasing. I personally love the chunky texture, so I often skip this step.
-
Add Delicate Aromatics (if using sesame oil):
If you opted to include sesame oil, this is the time to stir it in. Sesame oil has a very distinct, potent flavor that can become bitter if cooked for too long. Adding it at the very end, once the heat is off, ensures its delicate nutty aroma shines through beautifully, adding a final layer of complexity to your Homemade Chili Garlic Sauce. Give it a final good stir.
Cooling, Storing, and Enjoying Your Creation
-
Cool Completely:
Once you’re satisfied with the flavor and consistency, remove the pot from the heat. Allow the Homemade Chili Garlic Sauce to cool down completely to room temperature. This is a critical step for food safety and preventing condensation in your jars, which can lead to spoilage. I usually let it sit for several hours, or even overnight, uncovered, stirring occasionally to help it cool evenly. The flavors will also continue to meld and deepen as it cools.
-
Prepare Storage Jars:
While the sauce is cooling, prepare your storage jars. Sterilize glass jars and their lids by washing them thoroughly in hot, soapy water, then rinsing well. You can then sterilize them in a boiling water bath for at least 10 minutes, or run them through a hot cycle in your dishwasher. Alternatively, you can place them on a baking sheet in a 250°F (120°C) oven for 10-15 minutes. Make sure the jars and lids are completely dry before filling. This step is incredibly important for extending the shelf life of your Homemade Chili Garlic Sauce and keeping it safe to eat.
-
Jar Your Homemade Chili Garlic Sauce:
Once the sauce is completely cool, carefully spoon it into your sterilized, dry jars. Leave about half an inch of headspace at the top of each jar. Ensure there are no large air pockets by gently tapping the jars on the counter or using a clean utensil to push down any trapped air. If desired, you can pour a thin layer of neutral oil over the top of the sauce in each jar before sealing. This creates an extra barrier against air and helps to preserve the sauce.
-
Seal and Store:
Wipe the rims of the jars clean with a damp cloth to ensure a tight seal, then securely screw on the lids. Store your Homemade Chili Garlic Sauce in the refrigerator. Properly stored in sterilized jars, it will last for several months – often up to 3-4 months, or even longer due to the salt, oil, and vinegar content. However, I recommend enjoying it within 2-3 months for the best flavor and freshness.
-
Enjoy Your Hard Work:
Now comes the best part – enjoying your incredible creation! Your Homemade Chili Garlic Sauce is ready to be used as a condiment, a cooking ingredient, or a delicious flavor enhancer. Spoon it over noodles, stir into stir-fries, add to marinades, drizzle over eggs, or use it as a dipping sauce for dumplings and spring rolls. The depth of flavor, the perfect balance of heat, and the incredible aroma will elevate any dish. I love how versatile it is, and knowing I made it myself makes it even more satisfying!
Conclusion:
And there you have it, my friends! We’ve journeyed through the simple yet incredibly rewarding process of creating your very own batch of this magical condiment. If there’s one recipe I genuinely implore you to try, it’s this one. Why is it a must-try, you ask? Because what we’ve crafted here is more than just a sauce; it’s an explosion of fresh, vibrant flavors that store-bought versions simply cannot replicate. You’re in control of the spice, the garlic intensity, and that perfect balance of umami that elevates virtually any dish it touches. The aroma alone, as it simmers gently on your stovetop, is enough to tell you that something truly special is brewing. It’s fresh, it’s potent, and it’s customized to your exact liking, offering a depth of flavor that is genuinely transformative. Forget those jarred imitations laden with preservatives; this homemade creation brings an unparalleled zest and character to your kitchen, making everyday meals feel like a gourmet experience. It’s the kind of staple that, once you start making it, you’ll wonder how you ever lived without it. The satisfaction of knowing you’ve created such a versatile and delicious condiment from scratch is immense, and I promise you, the flavor payoff is absolutely worth every moment of effort. This Homemade Chili Garlic Sauce is not just a condiment; it’s a culinary game-changer, promising to infuse an exciting new dimension into your cooking repertoire.
Now, let’s talk about the endless possibilities this fantastic sauce opens up. Its versatility is truly one of its greatest assets. Don’t just relegate it to dipping spring rolls, although it excels spectacularly in that role! Think broader, think bolder. For your breakfast, a dollop stirred into scrambled eggs or spread thinly over avocado toast can kickstart your day with an invigorating zing. For lunch, it transforms a simple instant noodle bowl into a gourmet ramen experience, or adds a vibrant punch to a plain turkey sandwich or a hearty salad. When dinner rolls around, it becomes the star of your show. Use it as a dynamic marinade for chicken, pork, beef, or even firm tofu before grilling, baking, or pan-frying – the garlic and chili will infuse deep into the protein, creating an incredible crust and flavor profile. It’s a sensational addition to stir-fries, providing that essential fiery kick and aromatic depth that makes Asian-inspired dishes sing. Spoon it over steamed fish or roasted vegetables to brighten their flavors. Mix a little into mayonnaise or plain yogurt for a zesty, creamy dipping sauce for fries, sweet potato wedges, or raw vegetable sticks. It’s also phenomenal drizzled over pizza, stirred into a hearty soup or stew for an extra layer of warmth, or even as an unexpected twist in your pasta sauce. Imagine a spicy mac and cheese, or a puttanesca with an extra fiery kick – the possibilities are truly limitless and bound only by your culinary imagination. This sauce doesn’t just add heat; it adds character, depth, and an irresistible savory note that will have everyone asking for your secret ingredient.
And speaking of secrets, this recipe also encourages you to play around and make it uniquely yours. While our core recipe provides a perfect foundation, feel free to experiment with variations to suit your palate and preferences. Want more heat? Add an extra few chilies, or choose a hotter variety like habanero or scotch bonnet (with caution!). Prefer it milder? Deseed some of the chilies before processing. For an added layer of complexity, consider incorporating a tiny pinch of brown sugar or a drizzle of maple syrup to balance the heat and acidity, creating a lovely sweet and spicy dynamic. A splash of rice vinegar or lime juice can brighten the flavors even further. Some enthusiasts love to add other aromatics like a thumb-sized piece of fresh ginger, finely minced, or a few shallots for an additional layer of pungent sweetness. If you enjoy a nuttier profile, a sprinkle of toasted sesame seeds or even finely ground peanuts stirred in at the end can add fantastic texture and flavor. Don’t be afraid to adjust the consistency either – if you prefer a chunkier sauce, pulse it less; if you like it super smooth, blend it longer. The beauty of making your own is the freedom to customize, to create a condiment that perfectly reflects your personal taste and elevates your favorite dishes in exactly the way you envision. This adaptability truly makes it a staple in any adventurous kitchen.
So, now it’s your turn! I genuinely hope you’re feeling inspired and excited to roll up your sleeves and give this recipe a try. Trust me, the aroma alone as it simmers will make your kitchen smell incredible, and the taste will undoubtedly impress not just you, but anyone you share it with. There’s a profound satisfaction that comes from creating something so delicious and versatile with your own hands, knowing exactly what goes into it. Once you experience the vibrant flavor and incredible freshness of this homemade version, you’ll find it hard to go back to anything store-bought. Don’t hesitate; gather your ingredients, follow the steps, and prepare to elevate your culinary game. And please, please, please, when you’ve made your batch of this phenomenal Homemade Chili Garlic Sauce, I would absolutely love to hear about it! Share your triumphs, your serving suggestions, your ingenious variations, and any delicious meals you’ve created with it. Snap a photo, leave a comment below, or share your experience on social media – let’s build a community of chili garlic sauce aficionados! Your feedback and creativity inspire not just me, but countless other home cooks who are looking for new ways to add excitement to their meals. Happy cooking, and may your kitchen always be filled with incredible aromas and even more incredible flavors!
Best Homemade Chili Garlic Sauce – Flavorful & Fiery
Homemade Chili Garlic Sauce is a transformative condiment that elevates any dish. Achieve a perfect balance of fiery heat, pungent garlic, and savory depth with this versatile staple, essential in Asian cuisines. Tailor the intensity and enjoy unparalleled freshness.
Ingredients
-
2 lbs (900g) fresh red chilies (mix of medium and hot)
-
1 cup (250g) peeled fresh garlic cloves
-
1.5 cups neutral oil (canola, vegetable, or grapeseed)
-
2 tbsp granulated sugar
-
2 tbsp sea salt (or to taste)
-
1/4 cup white vinegar or rice vinegar
-
Optional: 1 tbsp soy sauce
-
Optional: 1 tsp sesame oil (add at end)
-
Optional: 1 tsp Sichuan peppercorns (toasted & ground)
-
Optional: 1-inch fresh ginger (peeled & minced)
-
Optional: 1/2 tsp MSG
Instructions
-
Step 1
Sanitize workspace. Wearing gloves, wash and thoroughly dry chilies; remove stems. For milder sauce, remove some seeds. Wash and dry peeled garlic cloves. Keep chilies and garlic separate. -
Step 2
In a food processor, coarsely chop chilies until finely textured but not a paste. Transfer to a bowl. Separately, mince garlic in the food processor (or by hand) until finely chopped but not a paste. Prepare any optional aromatics (mince ginger, toast & grind Sichuan peppercorns). -
Step 3
Heat 1.5 cups neutral oil in a large, heavy-bottomed pot over medium-low heat until shimmering. Add minced garlic and fry, stirring frequently, for 5-8 minutes until golden-brown and fragrant. Do not burn. -
Step 4
Add chopped chilies to the pot. If using ginger, add it now. Stir well, then reduce heat to low. Gently simmer for 25-35 minutes, stirring occasionally, until chilies soften, deepen in color, and flavors meld with the oil. -
Step 5
Stir in sugar, salt, and vinegar. If using soy sauce, MSG, or ground Sichuan peppercorns, add them now. Continue to simmer for another 5-10 minutes, allowing flavors to integrate and vinegar’s harshness to cook off. -
Step 6
Taste and adjust seasonings (salt, sugar, vinegar) to your preference. For a smoother sauce, carefully blend a portion (or all) using a blender or immersion blender. If using sesame oil, stir it in now (after heat is off). -
Step 7
Remove from heat and let the sauce cool completely to room temperature (several hours or overnight). Meanwhile, sterilize glass jars and lids. Once cooled, spoon sauce into dry jars, leaving 0.5 inch headspace. Remove air pockets, and optionally, pour a thin layer of neutral oil on top. Seal and refrigerate. Enjoy within 2-3 months for best freshness.
Important Information
Nutrition Facts (Per Serving)
It is important to consider this information as approximate and not to use it as definitive health advice.
Allergy Information
Please check ingredients for potential allergens and consult a health professional if in doubt.


Leave a Comment