
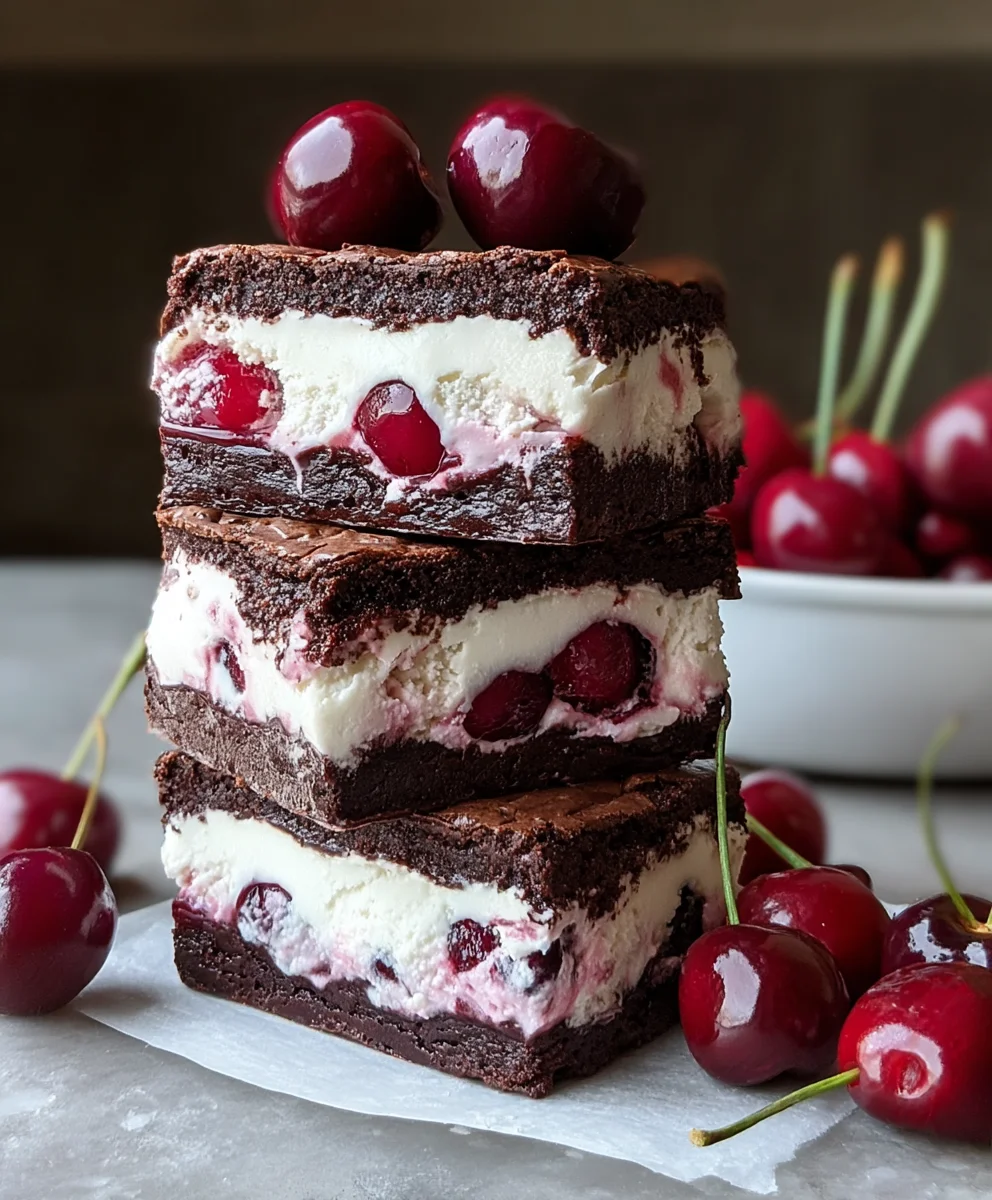
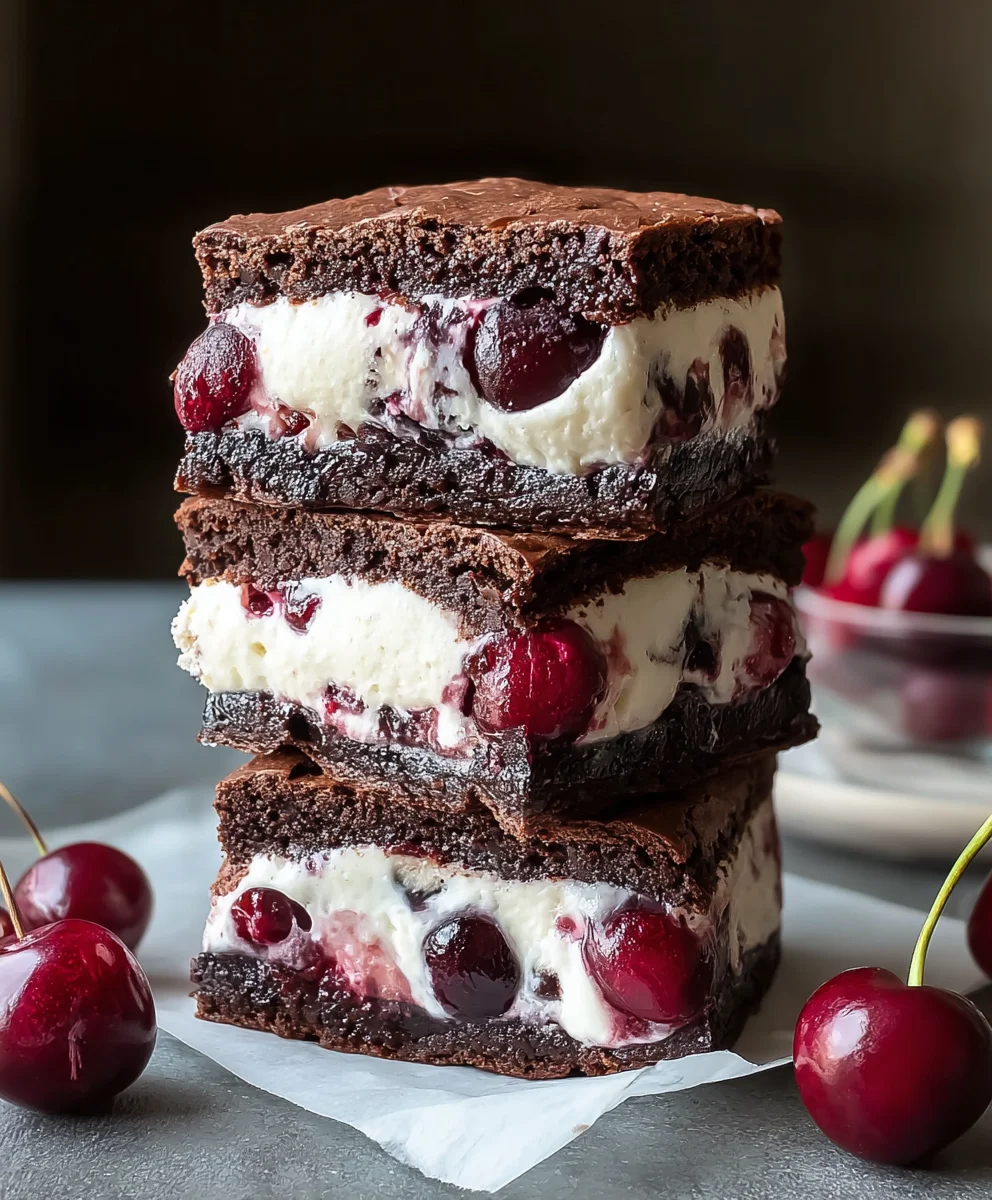
Cherry Brownie Ice Cream Sandwiches are more than just a dessert; they are a portal to pure, unadulterated joy. Imagin extracte sinking your teeth into a decadent, fudgy brownie, giving way to the cool, creamy embrace of luscious cherry ice cream. This symphony of textures and flavors is precisely why these treats have captured the hearts (and taste buds) of so many. It’s the perfect marriage of two beloved classics – rich chocolate brownies and vibrant cherry ice cream – elevated into something truly magical. What sets these Cherry Brownie Ice Cream Sandwiches apart is that delightful textural contrast, the slight tang of the cherries cutting through the deep sweetness of the chocolate, and the sheer celebratory feeling they evoke. They’re not just a snack; they’re an experience, perfect for summer gatherings, a special occasion, or simply when you need a little slice of happiness.
Ingredients:
- ½ cup unsalted butter
- ½ cup granulated sugar
- ½ cup packed light brown sugar
- 2 large eggs
- 1 teaspoon vanilla extract
- ⅓ cup unsweetened cocoa powder
- ½ cup all-purpose flour
- ¼ teaspoon salt
- 1½ cups vanilla ice cream, slightly softened
- ½ cup chopped cherries (fresh or frozen)
- ¼ cup melted chocolate (for drizzling)
Baking the Brownie Layers
Step 1: Prepare the Brownie Batter
To begin extract crafting these delightful Cherry Brownie Ice Cream Sandwiches, preheat your oven to 350 degrees Fahrenheit (175 degrees Celsius). While the oven heats up, line a baking sheet with parchment paper. This will prevent sticking and make it easier to lift the baked brownies later. In a medium-sized mixing bowl, cream together the ½ cup of unsalted butter with the ½ cup of granulated sugar and the ½ cup of packed light brown sugar. Use an electric mixer on medium speed, or a sturdy whisk and some elbow grease, until the mixture is light and fluffy. This creaming process incorporates air, which is crucial for a tender brownie. Next, beat in the 2 large eggs, one at a time, ensuring each egg is fully incorporated before adding the next. Stir in the 1 teaspoon of vanilla extract until combined.
Step 2: Combine Dry Ingredients and Mix
In a separate, smaller bowl, whisk together the ⅓ cup of unsweetened cocoa powder, ½ cup of all-purpose flour, and ¼ teaspoon of salt. Whisking these dry ingredients together before adding them to the wet ingredients helps to ensure that the cocoa powder and salt are evenly distributed throughout the batter, preventing any pockets of bitterness or saltiness. Gradually add this dry ingredient mixture to the wet ingredients in the larger bowl. Mix on low speed or stir with a spatula until just combined. Be careful not to overmix at this stage; overmixing can develop the gluten in the flour, leading to tougher brownies. The batter should be thick and fudgy.
Step 3: Bake the Brownie Layers
Divide the brownie batter into two equal portions. Drop spoonfuls of each portion onto the prepared baking sheet, spacing them about 3-4 inches apart. Gently flatten each portion with the back of a spoon or your fingers to create two distinct brownie rounds, roughly 5-6 inches in diameter. These will form the top and bottom of your ice cream sandwiches. Bake for 12-15 minutes, or until a toothpick inserted into the center comes out with moist crum extractbs attached, but not wet batter. The edges should look set. It’s better to slightly underbake than overbake them, as they will continue to cook a little as they cool. Let the brownies cool completely on the baking sheet before attempting to move them. This is a critical step; warm brownies are fragile.
Assembling the Ice Cream Sandwiches
Step 4: Prepare the Ice Cream Filling
While the brownies are cooling, take your 1½ cups of vanilla ice cream out of the freezer and let it soften slightly at room temperature. You want it soft enough to spread easily but not so melted that it becomes liquid. This usually takes about 10-15 minutes. Once softened, gently fold in the ½ cup of chopped cherries (whether fresh or frozen, ensure they are thawed and patted dry if frozen to prevent excess moisture). The goal here is to distribute the cherries evenly throughout the ice cream without overmixing and melting the ice cream further. You should have streaks of cherry throughout the vanilla ice cream, creating a beautiful marbled effect.
Step 5: Construct and Freeze the Sandwiches
Once the brownie layers are completely cool, carefully peel them off the parchment paper. Place one brownie layer on a clean surface. Spread half of the cherry vanilla ice cream mixture evenly over the surface of this brownie, reaching close to the edges. Don’t worry if it’s not perfectly smooth; the rustic look is part of the charm! Place the second brownie layer on top of the ice cream. Gently press down to create a stable sandwich. You can trim any excess ice cream that might ooze out, or embrace the messiness. Immediately place the assembled sandwiches onto a flat plate or baking sheet and return them to the freezer for at least 2-3 hours, or until firm. This freezing time is essential for them to hold their shape when you cut and serve them.
Step 6: Decorate and Serve
Once your Cherry Brownie Ice Cream Sandwiches are well-frozen and firm, it’s time for the final flourish. Gently melt ¼ cup of chocolate chips in a microwave-safe bowl in 30-second intervals, stirring between each, until smooth. Use a spoon or a piping bag with a small tip to drizzle the melted chocolate decoratively over the tops of the frozen sandwiches. You can create stripes, zigzags, or even a web-like pattern. For an extra touch, you could sprinkle a few extra chopped cherries or some colorful sprinkles onto the still-wet chocolate. Allow the chocolate to set completely in the freezer for another 15-20 minutes before serving. To serve, you may need to run a sharp knife under hot water to easily cut through the frozen sandwiches. Enjoy your homemade decadent treat!
Conclusion:
There you have it – the ultimate guide to crafting delicious and decadent Cherry Brownie Ice Cream Sandwiches! We’ve walked through each step, from baking the fudgy brownies to assembling these delightful treats. The rich chocolate combined with the sweet tang of cherries and the cool creaminess of ice cream creates a symphony of flavors and textures that is truly irresistible. These Cherry Brownie Ice Cream Sandwiches are perfect for any occasion, whether it’s a summer barbecue, a birthday celebration, or just a well-deserved indulgence.
I encourage you to give this recipe a try! Don’t be afraid to experiment with different ice cream flavors or even add some chocolate chips to your brownie batter for an extra layer of indulgence. Serve these up as a crowd-pleasing dessert or a special treat for yourself. Get ready for rave reviews – these Cherry Brownie Ice Cream Sandwiches are sure to be a hit!
Frequently Asked Questions:
Q: Can I make the brownies ahead of time for the Cherry Brownie Ice Cream Sandwiches?
Absolutely! The brownies can be baked up to 2 days in advance and stored in an airtight container at room temperature. This will save you time when you’re ready to assemble your Cherry Brownie Ice Cream Sandwiches.
Q: What are some good variations for the Cherry Brownie Ice Cream Sandwiches?
You can swap out the cherry ice cream for vanilla bean, strawberry, or even a dark chocolate ice cream. For an added crunch, consider adding chopped nuts or chocolate chips to your brownie batter before baking. You could also drizzle a chocolate ganache or a raspberry sauce over the finished Cherry Brownie Ice Cream Sandwiches for extra flair.
Cherry Brownie Ice Cream Sandwiches
A delightful recipe for homemade ice cream sandwiches featuring rich brownie layers and a sweet cherry-vanilla ice cream filling, drizzled with chocolate.
Ingredients
-
½ cup unsalted butter
-
½ cup granulated sugar
-
½ cup packed light brown sugar
-
2 large eggs
-
1 teaspoon vanilla extract
-
⅓ cup unsweetened cocoa powder
-
½ cup all-purpose flour
-
¼ teaspoon salt
-
1½ cups vanilla ice cream, slightly softened
-
½ cup chopped cherries (fresh or frozen)
-
¼ cup melted chocolate (for drizzling)
Instructions
-
Step 1
Preheat oven to 350°F (175°C). Line a baking sheet with parchment paper. Cream butter and sugars until light and fluffy. Beat in eggs one at a time, then vanilla extract. -
Step 2
In a separate bowl, whisk together cocoa powder, flour, and salt. Gradually add dry ingredients to wet ingredients, mixing until just combined. Do not overmix. -
Step 3
Divide batter into two equal portions. Drop spoonfuls onto the baking sheet, spacing them apart. Flatten into two rounds, about 5-6 inches in diameter. Bake for 12-15 minutes until a toothpick comes out with moist crumbs. Cool completely. -
Step 4
Let vanilla ice cream soften slightly. Gently fold in chopped cherries. Mix until cherries are evenly distributed. -
Step 5
Place one cooled brownie on a clean surface. Spread half of the cherry ice cream mixture evenly over it. Top with the second brownie layer. Gently press down. -
Step 6
Place assembled sandwiches on a plate or baking sheet and freeze for at least 2-3 hours, or until firm. Melt chocolate and drizzle decoratively over the frozen sandwiches. Freeze for another 15-20 minutes until chocolate sets. Serve.
Important Information
Nutrition Facts (Per Serving)
It is important to consider this information as approximate and not to use it as definitive health advice.
Allergy Information
Please check ingredients for potential allergens and consult a health professional if in doubt.


Leave a Comment