
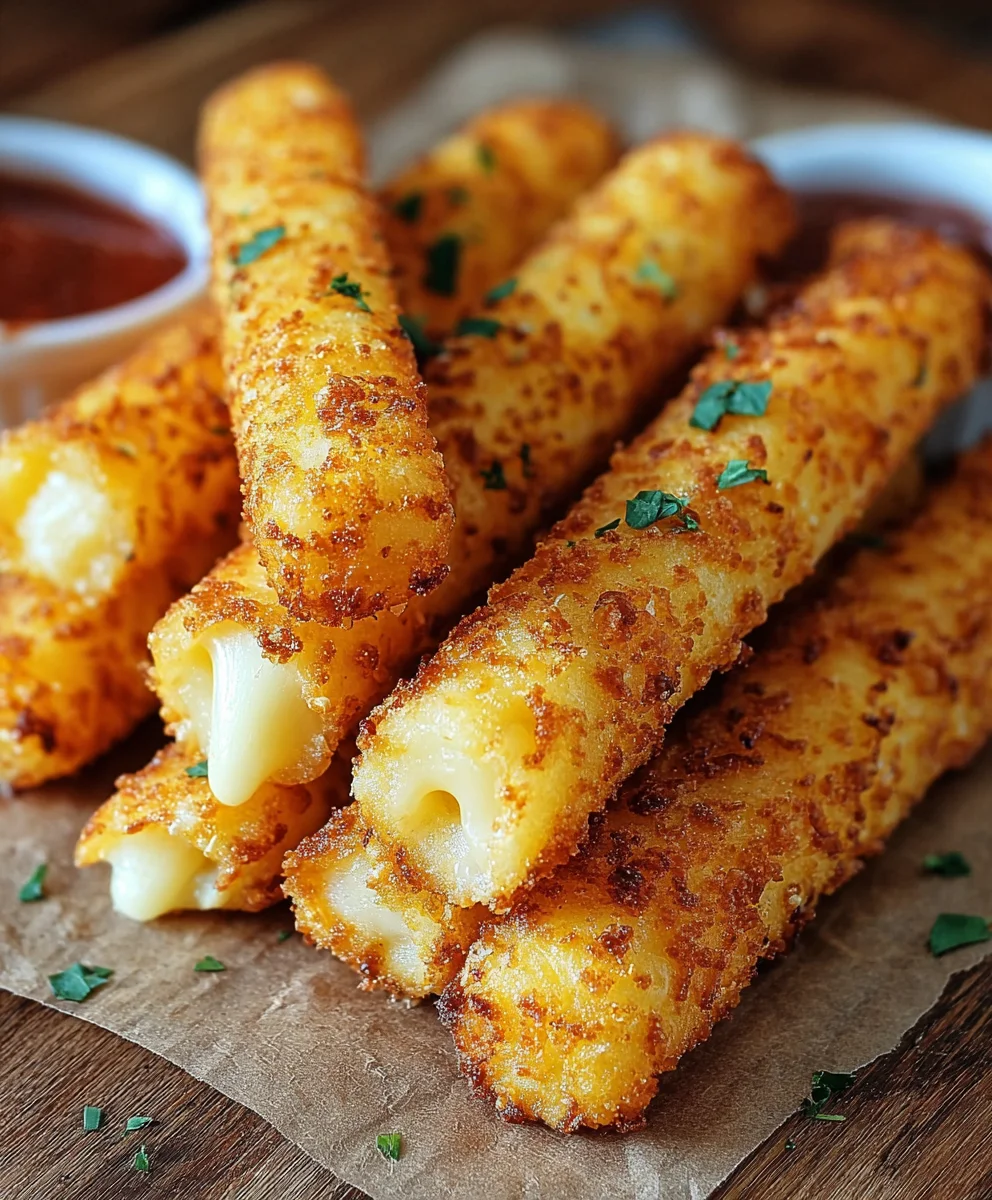
Potato Cheese Sticks Crispy And Tasty Homemade Snack are more than just a delightful treat; they are an invitation to a world of culinary comfort that brings smiles to faces of all ages. There’s an undeniable magic in the combination of humble potatoes and luscious cheese, transformed into golden-brown perfection that simply begs to be savored. While the exact origins of combining these two beloved ingredients in a crispy stick form might be debated, these savory bites have certainly earned their cherished place in the pantheon of ultimate comfort foods across various cultures, evolving from simple street food to beloved party appetizers and everyday indulgences.
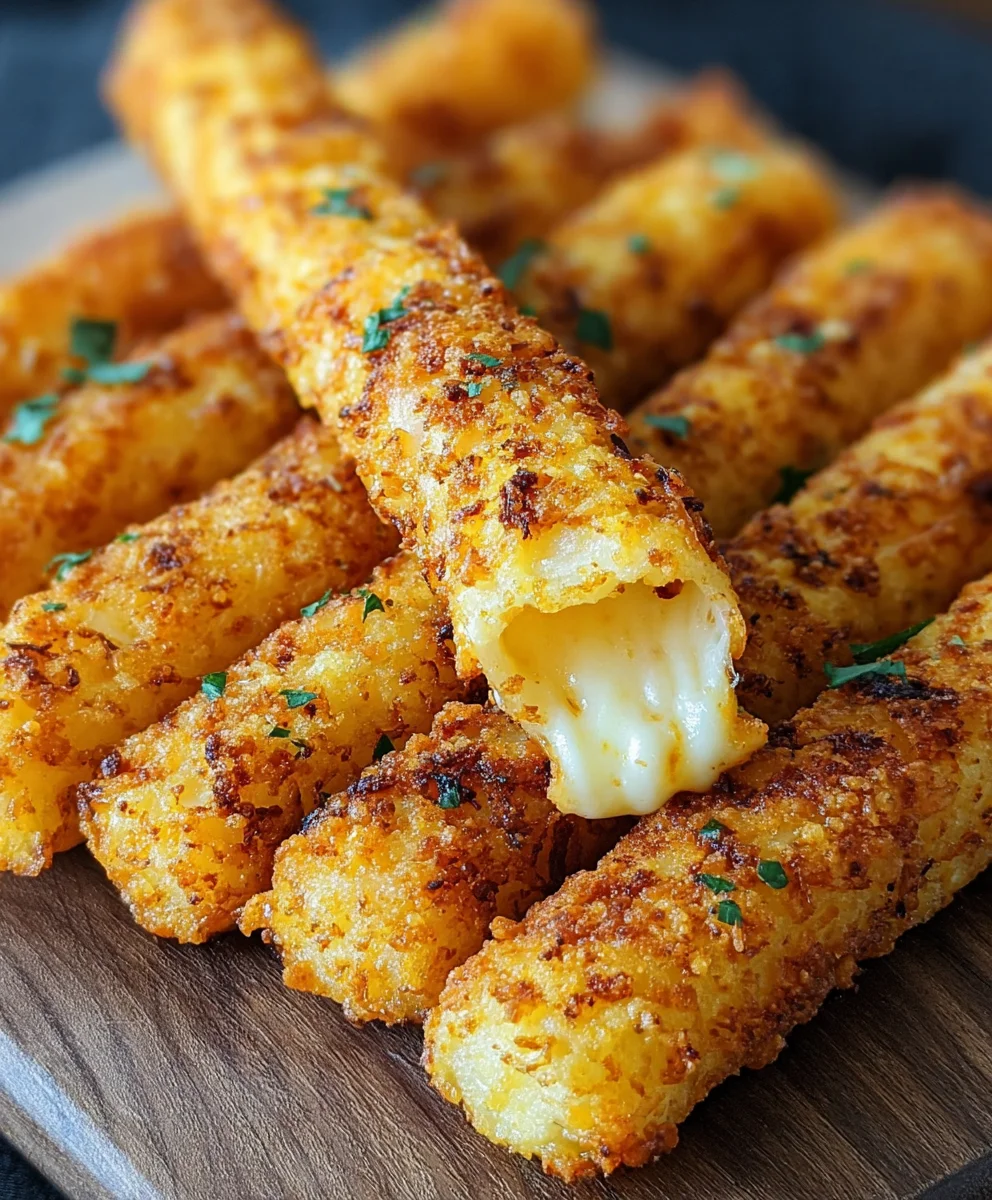
I find that what truly makes this dish so universally adored is its incredible textural contrast: an audibly crispy exterior giving way to a soft, fluffy potato interior brimming with warm, gooey cheese. It’s a symphony for the senses that offers both satisfaction and delight in every bite. Perfect for game nights, movie marathons, or simply as an afternoon pick-me-up, crafting your own Potato Cheese Sticks Crispy And Tasty Homemade Snack offers a rewarding experience, ensuring fresh ingredients and that irresistible homemade touch. Get ready to elevate your snack game with a recipe that promises pure satisfaction.
<h2>Ingredients:</h2>
<ul>
<li><strong>Potatoes:</strong> 4-5 large potatoes (approximately 900g-1kg). I always recommend using starchy varieties like Russet or Yukon Gold for this recipe. These potatoes are lower in moisture and produce a fluffier, drier mash, which is absolutely essential for our "Potato Cheese Sticks Crispy And Tasty Homemade Snack" to hold their shape and become delightfully crispy. If your mash is too wet, the sticks won’t be as firm or crunchy, so choosing the right potato makes a real difference.</li>
<li><strong>Cheese:</strong> 1 cup (about 250g) shredded cheese. My personal go-to is mozzarella because it offers that incredible, irresistible melt and stretch, giving us the perfect gooey "Cheese" pull inside our potato sticks. However, a blend of mozzarella and a sharp cheddar can also be fantastic, adding an extra layer of savory flavor and color. Make sure it’s finely shredded for even distribution.</li>
<li><strong>Cornstarch or All-Purpose Flour:</strong> 1/4 cup (about 30g). This ingredient is a secret weapon! It acts as a crucial binder, helping to absorb any lingering moisture from the potatoes and providing structural integrity to our sticks. This ensures they don’t fall apart during cooking and contributes significantly to achieving that "Crispy" exterior.</li>
<li><strong>Seasoning for the Potato Mixture:</strong>
<ul>
<li><strong>Salt:</strong> 1 teaspoon, or to taste. Essential for bringing out the natural flavors of the potato and cheese.</li>
<li><strong>Black Pepper:</strong> 1/2 teaspoon, freshly ground if possible, for a pungent aroma and subtle heat.</li>
<li><strong>Garlic Powder:</strong> 1/2 teaspoon, to infuse a savory, aromatic depth without the raw bite of fresh garlic.</li>
<li><strong>Onion Powder:</strong> 1/2 teaspoon, beautifully complements the garlic and adds a mild, sweet oniony note.</li>
<li><strong>Red Chili Flakes (optional):</strong> 1/4 teaspoon, if you enjoy a little kick and warmth in your "homemade snack."</li>
</ul>
</li>
<li><strong>Fresh Herbs (optional):</strong> 2 tablespoons finely chopped fresh parsley or chives. These aren’t just for garnish; they add a wonderful freshness and a pop of color to the potato mixture. I often include them for an elevated flavor profile in my "Potato Cheese Sticks."</li>
<li><strong>For the Crispy Coating:</strong>
<ul>
<li><strong>All-Purpose Flour:</strong> 1 cup (about 120g). This is the first layer in our triple-coating system, providing a dry surface for the egg to adhere to.</li>
<li><strong>Eggs:</strong> 2 large, lightly beaten. The egg wash acts as the perfect adhesive, ensuring our breadcrumbs stick firmly to the potato sticks.</li>
<li><strong>Breadcrumbs:</strong> 2 cups (about 120g). For truly "Crispy And Tasty Homemade Snack" results, I cannot recommend Panko breadcrumbs enough! Their unique flaky texture creates an unparalleled crunch that regular breadcrumbs simply can’t match. If you can’t find Panko, regular breadcrumbs will work, but the crisp factor will be slightly different.</li>
<li><strong>Seasoning for coating (optional):</strong> A pinch of salt, pepper, and garlic powder can be mixed into the flour and breadcrumbs for an extra layer of flavor in the crust.</li>
</ul>
</li>
<li><strong>Cooking Oil:</strong> Sufficient quantity for deep frying (about 4-6 cups) or a generous amount for shallow frying/baking. Vegetable, canola, or sunflower oil are excellent choices due to their high smoke point and neutral flavor.</li>
</ul>
<h3>Preparing the Perfect Potato Base</h3>
<ol>
<li>
<strong>Select and Prepare Potatoes:</strong> Our journey to the ultimate "Potato Cheese Sticks Crispy And Tasty Homemade Snack" begins with the right potatoes. Start by thoroughly peeling your 4-5 large starchy potatoes. Once peeled, cut them into uniform 1-inch pieces. This step is more important than it might seem, as uniform pieces ensure that all the potatoes cook at the same rate. You wouldn’t want some pieces to be mushy while others are still hard, as this would compromise the consistency of our potato base. Even cooking is key for a smooth mash.
</li>
<li>
<strong>Boil the Potatoes:</strong> Place your cut potato pieces into a large pot. Cover them with cold water, ensuring there’s about an inch of water above the potatoes. Add a generous pinch of salt to the water; this seasons the potatoes from the inside out and helps prevent them from tasting bland later. Bring the water to a rapid boil over high heat, then reduce the heat to medium-low, cover the pot, and let the potatoes simmer gently until they are absolutely fork-tender. This process typically takes around 15-20 minutes, depending on the size of your potato chunks. You should be able to effortlessly slide a fork into them without any resistance whatsoever.
</li>
<li>
<strong>Drain and Dry Thoroughly:</strong> This is perhaps the most critical step for achieving truly "Crispy" potato cheese sticks. Once the potatoes are tender, drain them completely in a colander. Now, here’s my secret for success: return the drained potatoes to the empty hot pot over very low heat for 1-2 minutes. Gently shake the pot occasionally. This gentle heating helps to evaporate any residual moisture clinging to the potatoes. Excess moisture is the sworn enemy of crispiness and can lead to soggy sticks that fall apart. Investing a little extra time here ensures a firm, dry potato base, which is paramount for our "Crispy And Tasty Homemade Snack."
</li>
<li>
<strong>Mash the Potatoes:</strong> While the potatoes are still wonderfully hot, mash them thoroughly. You can use a traditional potato masher, a sturdy fork, or even a potato ricer for the smoothest, lump-free texture. I personally lean towards a masher as I don’t mind a tiny bit of texture, but a ricer will give you the silkiest base. The goal is a uniform, smooth mash without any hard lumps. However, be careful not to overmash, as this can release too much starch and make your potatoes gummy – a texture we definitely want to avoid for our delightful "Potato Cheese Sticks."
</li>
</ol>
<h3>Crafting the Flavorful Potato Cheese Mixture</h3>
<ol start=”5″>
<li>
<strong>Combine with Cheese and Seasonings:</strong> Now for the part that brings our "Potato Cheese Sticks" to life! To your hot, freshly mashed potatoes, add the 1 cup of shredded mozzarella or your chosen cheese blend. The residual heat from the potatoes will work its magic, causing the cheese to melt slightly and easily incorporate into the mixture. Next, sprinkle in the 1/4 cup of cornstarch or all-purpose flour; this is our binding agent. Then, add all your seasonings: salt, black pepper, garlic powder, onion powder, and those optional red chili flakes for a gentle warmth. If you’re using fresh herbs like parsley or chives, fold them in now for a burst of vibrant flavor and color.
</li>
<li>
<strong>Mix Until Well Combined:</strong> Using a sturdy spatula or, once the mixture has cooled slightly, your clean hands, gently mix all the ingredients together. Your aim is to ensure everything is evenly distributed – you want cheese and seasoning in every bite of our "Tasty Homemade Snack." Be mindful not to overmix, as excessive handling can develop the starch and make the potato mixture tough or gluey. We’re looking for a homogeneous blend that’s still light and workable. Take a small, cooled portion of the mixture and taste it. This is your chance to adjust the seasoning – perhaps a little more salt or a dash more pepper – to ensure it’s perfectly balanced for your palate.
</li>
<li>
<strong>Chill the Mixture (Crucial Step):</strong> This step is absolutely non-negotiable for success! Once your potato cheese mixture is combined, cover the bowl tightly with plastic wrap and refrigerate it for at least 1 hour, but ideally 2-3 hours. This chilling period is vital for several reasons: it allows the flavors to fully meld together, the starches in the potato to set, and the mixture to firm up considerably. A firm, chilled mixture will be significantly easier to handle and shape into sticks without it sticking to your hands or falling apart. Furthermore, a cold mixture helps the sticks maintain their shape better during cooking and contributes to a superior "Crispy" texture in the final "Potato Cheese Sticks." Do not skip this step!
</li>
</ol>
<h3>Shaping and Coating for Ultimate Crispiness</h3>
<ol start=”8″>
<li>
<strong>Prepare Your Breading Station:</strong> While your potato mixture is chilling to perfection, take this time to set up an organized breading station. This streamlined approach makes the process much more efficient and less messy, ensuring each of our "Potato Cheese Sticks" gets a flawless "Crispy" coat. You’ll need three shallow dishes or plates for this:
<ul>
<li>In the first dish, place your 1 cup of all-purpose flour. For an extra layer of flavor, I sometimes like to mix in a tiny pinch of salt, pepper, and garlic powder here.</li>
<li>In the second dish, lightly beat the 2 large eggs until the yolks and whites are thoroughly combined and no streaks remain. This creates a uniform "glue."</li>
<li>In the third dish, place your 2 cups of breadcrumbs. As I mentioned in the ingredients, if you want truly "Crispy And Tasty Homemade Snack" results, Panko breadcrumbs are the way to go. Their larger, flakier texture creates a wonderfully light and airy crunch that is simply unmatched. Having everything laid out in a logical sequence – flour, egg, breadcrumbs – will make the next step a breeze.</li>
</ul>
</li>
<li>
<strong>Shape the Potato Cheese Sticks:</strong> Once your potato mixture is wonderfully chilled and firm, it’s time for the fun part: shaping! Lightly flour your hands before you start to prevent the mixture from sticking. Take a portion of the potato mixture – roughly a tablespoon or two, depending on your desired size – and gently roll it between your palms to form a cylinder or stick shape. I usually aim for sticks about 3-4 inches long and 1/2 inch thick. Try your best to make them as uniform in size as possible. This ensures even cooking and a consistent appearance for all your "Potato Cheese Sticks." As you shape them, place the finished sticks on a baking sheet lined with parchment paper. This parchment paper will prevent them from sticking and makes handling easier.
<h5><strong>Expert Tip for Shaping:</strong></h5>
If, despite chilling, the mixture still feels a little sticky, you can either dust your hands more frequently with flour or add another teaspoon of cornstarch (not too much!) directly to the main potato mixture and mix it in well before continuing to shape. Gentle handling is key; don’t overwork the mixture.
</li>
<li>
<strong>Bread the Sticks (The Triple Coat for Maximum Crispiness):</strong> This is the magical step that gives our "homemade snack" its signature "Crispy" exterior. Work with one shaped potato cheese stick at a time and follow this precise sequence for the best results:
<ul>
<li><strong>Flour First:</strong> Gently roll the potato stick in the dish of all-purpose flour, ensuring it’s completely coated from end to end. Lightly tap off any excess flour; you want a thin, even layer. This flour layer creates a dry, receptive surface for the egg wash.</li>
<li><strong>Egg Second:</strong> Next, carefully transfer the floured stick to the beaten egg mixture. Dip it fully, ensuring every part is covered. Lift it out and allow any excess egg to drip back into the dish. The egg acts as the crucial "glue" for the breadcrumbs.</li>
<li><strong>Breadcrumbs Third:</strong> Finally, place the egg-coated stick into the dish of breadcrumbs (preferably Panko!). Roll it around, gently pressing the breadcrumbs onto the surface to ensure they adhere firmly and evenly to all sides. You want a thick, robust coating of breadcrumbs for that ultimate "Crispy And Tasty" crunch. The more breadcrumbs, the crispier your "Potato Cheese Sticks" will be!</li>
</ul>
Once fully breaded, place the stick back onto your parchment-lined baking sheet. Repeat this entire breading process for all the remaining potato cheese sticks, maintaining a neat and organized station.
</li>
<li>
<strong>Second Chill (Optional but Highly Recommended):</strong> For optimal results, especially if you’re deep frying, I strongly recommend a second chill. Pop the entire baking sheet of breaded sticks back into the refrigerator for another 15-30 minutes. This extra chilling time allows the breading to set even more firmly to the potato mixture. This significantly reduces the chances of the coating falling off during cooking and further enhances the structural integrity and, most importantly, the "Crispy" texture of our "Potato Cheese Sticks Crispy And Tasty Homemade Snack." It’s a small step that yields big rewards in terms of final quality.
</li>
</ol>
<h3>Cooking Our Crispy Potato Cheese Sticks</h3>
<h4>Option 1: Deep Frying (For the Ultimate Crispiness)</h4>
<ol start=”12″>
<li>
<strong>Heat the Oil:</strong> In a deep, heavy-bottomed pot or Dutch oven, pour enough cooking oil to reach a depth of at least 2-3 inches. Place it over medium-high heat and let it heat up gradually until it reaches a temperature of 350°F (175°C). If you have a deep-fry thermometer, use it; accuracy is key here. If you don’t have one, a simple test is to drop a tiny pinch of breadcrumbs into the oil. If it sizzles vigorously and turns golden brown within about 30 seconds, your oil is ready. It’s crucial not to let the oil get too hot (above 375°F/190°C), as this will cause the exterior to burn quickly before the cheese inside has a chance to properly melt and the stick to heat through.
</li>
<li>
<strong>Fry in Batches:</strong> Very carefully, using tongs or a slotted spoon, slide a few of the chilled, breaded "Potato Cheese Sticks" into the hot oil. Avoid overcrowding the pan! Frying too many at once will drastically drop the oil temperature, leading to greasy, soggy sticks instead of the desired "Crispy" perfection. Fry them for 3-4 minutes, turning them occasionally to ensure even browning. You’ll know they’re ready when they achieve a beautiful, uniform golden-brown color and are wonderfully "Crispy" on all sides, with the cheese inside just beginning to ooze tantalizingly.
</li>
<li>
<strong>Drain and Serve:</strong> Once perfectly golden and "Crispy," use a slotted spoon or tongs to carefully remove the "Potato Cheese Sticks" from the oil. Transfer them immediately to a plate lined with several layers of paper towels. This allows any excess oil to drain off, which is vital for maintaining their incredible "Crispy" texture. Let them sit for a minute or two to drain before serving.
</li>
</ol>
<h4>Option 2: Air Frying (For a Healthier Crispy Alternative)</h4>
<ol start=”15″>
<li>
<strong>Preheat Air Fryer:</strong> If you’re opting for a lighter, yet still "Crispy," version of our "Potato Cheese Sticks Crispy And Tasty Homemade Snack," start by preheating your air fryer to 375°F (190°C). While it’s heating, lightly spray the air fryer basket with cooking oil or, if your model allows, line it with parchment paper specifically designed for air fryers to prevent sticking.
</li>
<li>
<strong>Arrange and Cook:</strong> Arrange the breaded potato cheese sticks in a single layer within the air fryer basket. It’s important to ensure they do not touch each other; adequate air circulation is essential for crispiness. Once arranged, generously spray the tops of the sticks with cooking spray. This step is crucial for achieving that beautiful golden-brown color and "Crispy" finish that mimics deep frying without excessive oil.
</li>
<li>
<strong>Air Fry:</strong> Air fry for 10-15 minutes. Make sure to flip them halfway through the cooking process to ensure even browning and crisping on all sides. Keep a close eye on them, as air fryer models can vary significantly in cooking times and intensity. Continue to cook until they are gloriously golden brown and wonderfully "Crispy." You’ll still achieve a beautifully "Crispy And Tasty" result, making this an excellent, guilt-free "homemade snack" option.
</li>
</ol>
<h4>Option 3: Baking (For a Lighter, Still Tasty Approach)</h4>
<ol start=”18″>
<li>
<strong>Preheat Oven and Prepare Tray:</strong> For a baked version of our "Potato Cheese Sticks," preheat your oven to 400°F (200°C). Line a baking sheet with parchment paper to prevent sticking and for easier cleanup. Lightly spray the parchment paper with cooking oil, which will help the bottoms of the sticks crisp up nicely.
</li>
<li>
<strong>Arrange and Bake:</strong> Place the breaded potato cheese sticks in a single layer on the prepared baking sheet. Ensure there’s a little space between each stick to allow for proper heat circulation, which promotes even baking and crispiness. Lightly spray the tops of the sticks with cooking oil as well. This will aid in achieving that desirable golden-brown and "Crispy" exterior.
</li>
<li>
<strong>Bake Until Golden:</strong> Bake for 20-25 minutes. Remember to flip them halfway through the baking time to ensure both sides get a chance to brown and crisp up. Continue baking until they are golden brown and feel "Crispy" to the touch. While baking might not achieve the same intense crunch as deep-frying, these "Potato Cheese Sticks" will still be wonderfully "Tasty" and make for a truly satisfying "homemade snack."
</li>
</ol>
<h3>Serving Your Delicious Potato Cheese Sticks</h3>
<ol start=”21″>
<li>
<strong>Serve Immediately:</strong> Regardless of the cooking method you chose, the absolute best way to enjoy these "Potato Cheese Sticks Crispy And Tasty Homemade Snack" is hot and fresh out of the fryer, air fryer, or oven. This is when the cheese inside is at its meltiest, creating that irresistible gooey pull, and the exterior coating is at its absolute peak crispiness. Don’t let them sit for too long, or you risk losing some of that delightful crunch!
</li>
<li>
<strong>Dipping Sauce Suggestions:</strong> While these delicious snacks are perfectly "Tasty" on their own, they truly shine when paired with a complementary dipping sauce. I love serving them with a warm marinara sauce for a classic Italian twist, a tangy sriracha mayo for a bit of heat, or even a creamy homemade garlic aioli for an elevated experience. Of course, good old ketchup is always a crowd-pleaser for this "homemade snack." Experiment with your favorites to discover your perfect pairing!
</li>
<li>
<strong>Enjoy the Moment:</strong> These "Potato Cheese Sticks" are more than just a snack; they’re an experience! Gather your family and friends, present your freshly made "Crispy And Tasty Homemade Snack," and watch the smiles light up faces. They make a fantastic appetizer for parties, a fun and comforting side dish, or simply a delightful treat for a cozy night in. The combination of fluffy seasoned potato, luscious gooey melted cheese, and that perfectly "Crispy" exterior creates a truly irresistible bite that everyone will adore. You’ve just created something truly special from scratch!
</li>
<li>
<strong>Storage (if any remain!):</strong> If, by some culinary miracle, you happen to have any leftover "Potato Cheese Sticks," allow them to cool completely to room temperature. Store them in an airtight container in the refrigerator for up to 2-3 days. To reheat them and bring back their glory, I highly recommend air frying or baking them again at 350°F (175°C) for a few minutes until they are heated through and, most importantly, re-crisped. Microwaving is generally not recommended as it tends to make them soggy and soft, losing that essential "Crispy" texture that makes these sticks so enjoyable.
</li>
</ol>
<h2>Conclusion:</h2>
<p>As we reach the end of our culinary journey, I hope you’re feeling as excited as I am about the incredible potential of this recipe. What we’ve accomplished here is more than just a simple snack; we’ve unlocked a secret weapon for any occasion. These delightful potato and cheese sticks aren’t just food; they’re an experience. They are the epitome of comfort, the embodiment of crispy perfection, and an undeniable crowd-pleaser that will have everyone reaching for just one more.</p>
<p>Think about it: the satisfying crunch that gives way to a soft, fluffy potato interior, followed by the gooey, savory melt of cheese. <strong>It’s a symphony of textures and flavors in every single bite.</strong> There’s something uniquely gratifying about creating something so delicious from scratch, knowing exactly what ingredients went into it, and seeing the smiles on the faces of your loved ones as they enjoy your homemade masterpiece. This recipe isn’t overly complicated, yet it delivers results that taste like they came straight from a gourmet kitchen. It’s perfect for those moments when you want to impress without the stress, or simply treat yourself and your family to something truly special.</p>
<h3>Serving Suggestions & Creative Variations to Elevate Your Snack Game!</h3>
<p>Now, while these potato cheese sticks are absolutely phenomenal on their own, don’t hesitate to get creative with how you serve them. For a classic approach, a simple bowl of ketchup or marinara sauce is always a hit. But why stop there? Imagine dipping them into a spicy sriracha mayo for a zesty kick, a creamy ranch dressing for a cool contrast, or even a homemade garlic aioli to elevate the flavor profile. <strong>They make a fantastic appetizer at parties, a fun side dish for a casual dinner, or the ultimate accompaniment to a movie night in.</strong> You could even serve them alongside a crisp green salad or as a unique twist to a soup-and-sandwich lunch.</p>
<p>The beauty of this recipe also lies in its versatility for variations. Feeling adventurous? Try swapping out some of the cheddar cheese for a different type. Pepper jack will give them a wonderful spicy edge, mozzarella will ensure an even stringier, gooier pull, or smoked gouda could add a sophisticated, smoky depth. You can also experiment with the seasonings. A pinch of smoked paprika could introduce a lovely warmth, a touch of onion powder alongside the garlic powder will deepen the savory notes, or some dried Italian herbs could give them a Mediterranean flair. For an extra layer of flavor and texture, consider folding in finely chopped chives, a sprinkle of crispy bacon bits, or even a few diced pickled jalapeños into the potato mixture before shaping. If you’re looking for a slightly different presentation, you could shape them into small nuggets or even tater-tot-like spheres instead of sticks. <strong>The possibilities are truly endless, allowing you to customize this basic recipe to suit any craving or occasion.</strong></p>
<h3>Your Turn: Time to Get Cooking and Share the Joy!</h3>
<p>Ultimately, what we’ve crafted together is an exceptionally delicious <strong>Potato Cheese Sticks Crispy And Tasty Homemade Snack</strong> that truly delivers on its promise. <strong>It’s a recipe that I wholeheartedly encourage you to try in your own kitchen.</strong> Don’t just take my word for it; experience the joy of making and tasting these incredible snacks for yourself. Gather your ingredients, roll up your sleeves, and prepare to delight your taste buds. I promise, the effort is minimal compared to the incredibly rewarding results.</p>
<p>Once you’ve whipped up a batch, I would absolutely love to hear about your experience! Did you stick to the original recipe, or did you venture into some of the variations? What were your favorite dipping sauces? <strong>Please share your thoughts, your successes, and even your culinary experiments.</strong> Tag me, or simply drop a comment below this article to let me know how it went. Seeing your creations and hearing your feedback is truly the best part of sharing these recipes. <strong>Happy cooking, and may your snack platter always be full of these irresistible, golden-brown wonders!</strong></p>
Crispy Cheesy Potato Sticks: Easy Homemade Snack Recipe
Homemade Potato Cheese Sticks are a delightful snack with a crispy exterior, fluffy potato interior, and gooey cheese. Perfect for game nights, movie marathons, or simply as an afternoon pick-me-up, offering both satisfaction and delight in every bite.
Ingredients
-
4-5 large starchy potatoes (approx. 900g-1kg), such as Russet or Yukon Gold
-
1 cup (250g) shredded mozzarella cheese
-
1/4 cup (30g) cornstarch or all-purpose flour
-
1 teaspoon salt
-
1/2 teaspoon black pepper
-
1/2 teaspoon garlic powder
-
1/2 teaspoon onion powder
-
1/4 teaspoon red chili flakes (optional)
-
2 tablespoons fresh parsley or chives, finely chopped (optional)
-
1 cup (120g) all-purpose flour (for coating)
-
2 large eggs, lightly beaten
-
2 cups (120g) Panko breadcrumbs
-
Cooking oil for deep frying, air frying, or baking (vegetable, canola, or sunflower)
Instructions
-
Step 1
Peel and cut 4-5 large starchy potatoes into uniform 1-inch pieces. Place in a large pot, cover with cold salted water, and boil for 15-20 minutes until fork-tender. -
Step 2
Drain potatoes thoroughly. Return them to the empty hot pot over very low heat for 1-2 minutes, gently shaking, to evaporate any residual moisture. Mash well until smooth. -
Step 3
To the hot mashed potatoes, add 1 cup shredded mozzarella cheese, 1/4 cup cornstarch/flour, 1 tsp salt, 1/2 tsp black pepper, 1/2 tsp garlic powder, 1/2 tsp onion powder, and optional 1/4 tsp red chili flakes and 2 tbsp fresh herbs. Mix gently until all ingredients are evenly combined. Do not overmix. -
Step 4
Cover the potato mixture tightly and refrigerate for at least 1-3 hours. This chilling step is crucial to firm up the mixture, making it easier to handle and contributing to the final crispiness. -
Step 5
Prepare your breading station: Place 1 cup all-purpose flour in the first shallow dish, 2 lightly beaten eggs in the second, and 2 cups Panko breadcrumbs in the third. -
Step 6
Lightly flour your hands. Take portions of the chilled potato mixture (about 1-2 tablespoons) and gently roll them into uniform sticks, approximately 3-4 inches long and 1/2 inch thick. Place shaped sticks on a parchment-lined baking sheet. -
Step 7
Bread each stick: first roll in flour (tap off excess), then dip in beaten egg (allow excess to drip), and finally coat thoroughly in breadcrumbs, pressing gently to adhere. Place breaded sticks back on the parchment-lined baking sheet. -
Step 8
(Optional but highly recommended) For optimal results, refrigerate the breaded sticks for another 15-30 minutes to help the coating set firmly. -
Step 9
Heat 4-6 cups cooking oil in a deep pot to 350°F (175°C). Carefully slide a few chilled, breaded potato sticks into the hot oil, avoiding overcrowding. Fry for 3-4 minutes, turning occasionally, until golden brown and wonderfully crispy. Remove with a slotted spoon and drain on a plate lined with paper towels. -
Step 10
Preheat air fryer to 375°F (190°C). Lightly spray the basket with cooking oil. Arrange sticks in a single layer, ensuring they don’t touch. Generously spray the tops of the sticks with oil. Air fry for 10-15 minutes, flipping halfway, until golden brown and crispy. -
Step 11
Preheat oven to 400°F (200°C). Line a baking sheet with parchment paper and lightly spray with oil. Arrange sticks in a single layer, with space between them. Lightly spray the tops of the sticks with oil. Bake for 20-25 minutes, flipping halfway, until golden brown and crispy. -
Step 12
Serve the Crispy Cheesy Potato Sticks immediately, hot and fresh, for peak crispiness and gooey cheese. Enjoy with your favorite dipping sauces such as marinara, sriracha mayo, or ketchup. Store any leftovers in an airtight container in the refrigerator for up to 2-3 days; reheat in an air fryer or oven at 350°F (175°C) for a few minutes to re-crisp.
Important Information
Nutrition Facts (Per Serving)
It is important to consider this information as approximate and not to use it as definitive health advice.
Allergy Information
Please check ingredients for potential allergens and consult a health professional if in doubt.

Leave a Comment