
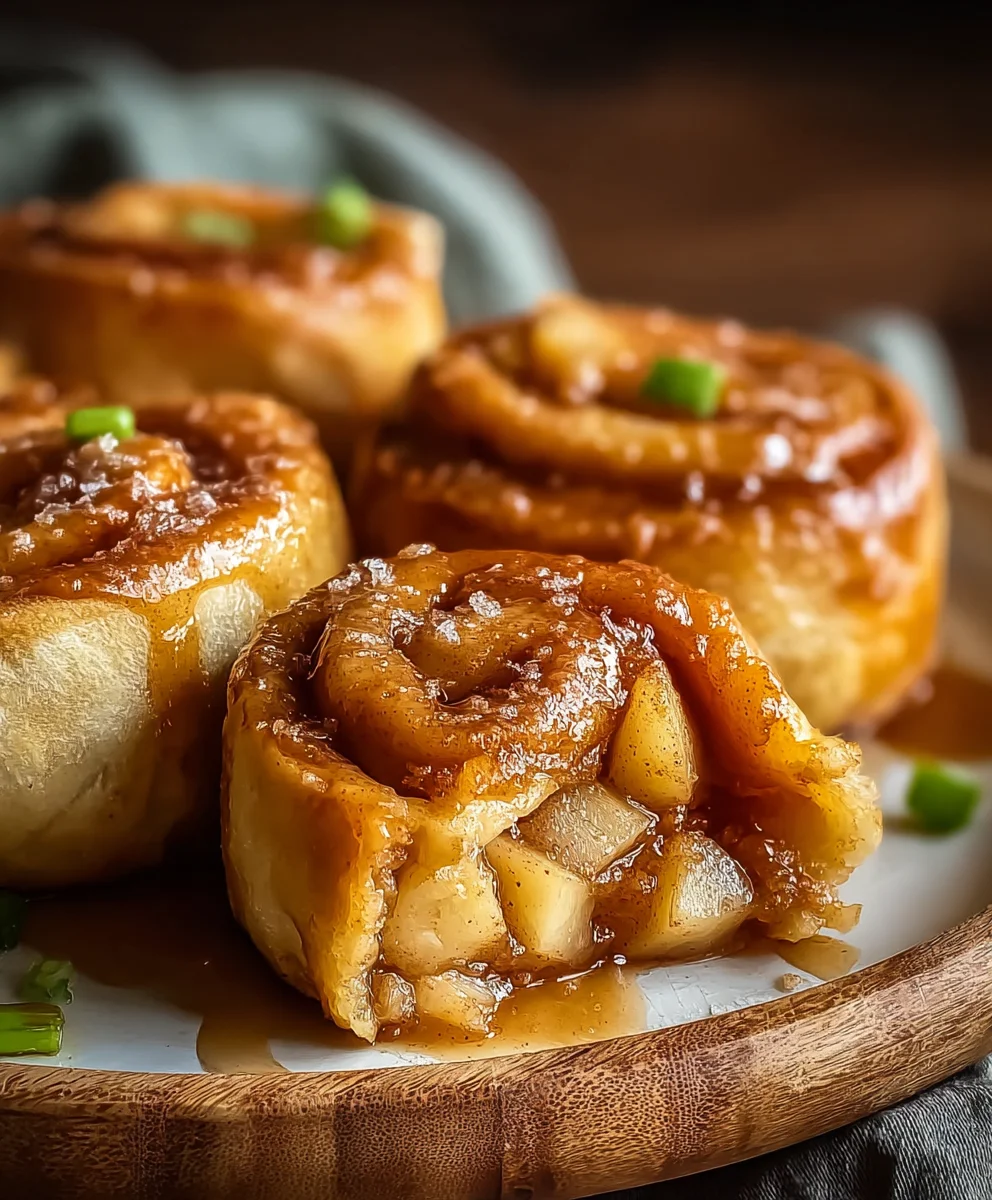
Apple Pie Rolls are more than just a sweet treat; they’re a warm hug in pastry form, a nostalgic journey back to grandma’s kitchen, and a delightful shortcut to pure comfort. Who doesn’t adore the classic flavors of cinnamon-spiced apples nestled within flaky, golden dough? We certainly do! What makes these little wonders so utterly irresistible is their perfect portability and the way they capture all the beloved essence of a traditional apple pie but in a convenient, bite-sized package. Forget the fuss of slicing and serving; these Apple Pie Rolls are designed for sharing (or not!) and are guaranteed to disappear faster than you can say “seconds, please!” Get ready to unlock the secrets to creating these crowd-pleasing delights that are sure to become a staple in your baking repertoire.
Why You’ll Love This Recipe
The Ultimate Comfort Food
Ingredients:
- 5 medium Granny Smith apples, peeled and diced (approximately 3½ cups)
- 1/4 cup light brown sugar, packed
- 1 teaspoon ground cinnamon (for filling)
- 1/2 teaspoon cornstarch
- 22-24 egg roll wrappers
- 8 ounces cream cheese, softened to room temperature
- Cooking oil or spray (for frying or baking)
- 2 tablespoons granulated sugar (for topping)
- 1 teaspoon ground cinnamon (for topping)
- 1/2 cup caramel topping, for dipping
Preparing the Apple Filling
The heart of our Apple Pie Rolls lies in a perfectly balanced apple filling. Begin by taking your 5 medium Granny Smith apples. I like Granny Smith for their tartness, which cuts beautifully through the sweetness, but feel free to use your favorite baking apple. Peel them meticulously to remove all the skin, and then dice them into small, uniform pieces, roughly ¼-inch to ½-inch in size. Consistency is key here; it ensures the apples cook evenly within the wrapper.
In a medium bowl, combine the diced apples with ¼ cup of light brown sugar, making sure to pack it down slightly. This brown sugar will caramelize and add a lovely depth of flavor. Next, add 1 teaspoon of ground cinnamon. This is where the classic apple pie aroma truly begins to bloom. For that signature thickening that prevents a soggy filling, we’ll add ½ teaspoon of cornstarch. Gently toss all these ingredients together until the apples are well coated with the sugar, cinnamon, and cornstarch. Set this mixture aside. It’s going to sit and allow the apples to release some of their juices, which will then be activated by the cornstarch during cooking.
Creating the Creamy Core
Now, let’s bring in the luxurious element: cream cheese. We need 8 ounces of cream cheese, and it’s crucial that it’s softened to room temperature. This makes it incredibly easy to work with and ensures it will blend smoothly with our other components without any lumps. If you forgot to take it out of the fridge in advance, you can gently warm it in the microwave for about 15-20 seconds on low power, being careful not to melt it entirely. In a separate bowl, combine the softened cream cheese with the prepared apple mixture.
Gently fold the apple mixture into the cream cheese. You don’t want to mash the apples into oblivion; we’re aiming for distinct pieces of apple suspended in a creamy, slightly tart, spiced base. The cream cheese adds a wonderful richness and a subtle tang that complements the sweet and tart apples beautifully, creating a delightful contrast in textures and flavors. Imagine biting into a warm, crisp wrapper, only to be met with this luscious, spiced apple and cream cheese filling. It’s truly irresistible.
Assembling the Apple Pie Rolls
This is where the magic happens, transforming simple ingredients into delightful Apple Pie Rolls. Lay out your egg roll wrappers on a clean, dry surface. It’s helpful to have a small bowl of water nearby; this acts as our “glue” to seal the wrappers. Take one egg roll wrapper and place it on the diagonal, so one corner points towards you like a diamond.
Spoon about 2 to 3 tablespoons of the apple and cream cheese filling onto the lower third of the wrapper, just above the bottom corner. Be generous, but don’t overstuff, or it will be difficult to roll and seal. Now, carefully fold the bottom corner up and over the filling, tucking it in snugly. Then, fold in the left and right corners towards the center, like you’re making an envelope. Finally, moisten the top corner with a little water and roll the entire package up tightly, pressing to seal the seam. The water will activate the starch in the wrapper, creating a secure seal. Repeat this process for all your wrappers, ensuring each roll is neatly formed. You should end up with about 22 to 24 individual Apple Pie Rolls.
Cooking Your Apple Pie Rolls
You have a couple of delicious options for cooking your Apple Pie Rolls: frying or baking. For a classic crispy texture, we’ll go with frying. Heat about 1 to 2 inches of cooking oil in a heavy-bottomed pot or deep fryer to 350°F (175°C). Carefully place a few rolls into the hot oil, being sure not to overcrowd the pot. Fry them for 3-5 minutes, turning occasionally, until they are golden brown and crispy. Use a slotted spoon to remove them from the oil and place them on a wire rack set over a baking sheet to drain any excess oil. Alternatively, for a healthier option, you can bake them. Preheat your oven to 375°F (190°C). Lightly grease a baking sheet or line it with parchment paper. Place the assembled rolls on the baking sheet and brush the tops with a little melted butter or cooking spray. Bake for 18-20 minutes, flipping halfway through, until they are golden brown and puffed.
Finishing Touches and Serving
Once your Apple Pie Rolls are cooked and cooled slightly, it’s time for the final flourish. In a small bowl, whisk together 2 tablespoons of granulated sugar and 1 teaspoon of ground cinnamon. This mixture is going to give your Apple Pie Rolls that irresistible sweet and spicy crust. Lightly sprinkle this cinnamon-sugar mixture over the warm rolls. The residual heat will help it adhere beautifully.
For the ultimate treat, serve your warm Apple Pie Rolls with ½ cup of caramel topping on the side for dipping. The gooey, sweet caramel is the perfect accompaniment to the crisp, spiced filling. These are best enjoyed fresh, while the wrappers are still wonderfully crunchy and the filling is warm and comforting. Imagine the joy of dipping a golden-brown roll into rich caramel – it’s pure bliss! You can also enjoy them plain, as the filling is incredibly flavorful on its own.

Conclusion:
There you have it! These Apple Pie Rolls are a delightful way to enjoy the classic flavors of apple pie in a fun, bite-sized format. The sweet, spiced apple filling encased in flaky pastry is truly irresistible. Whether you’re looking for a festive holiday treat, a special brunch item, or just a delicious dessert to share (or not share!), these rolls are sure to be a hit. They’re perfect served warm, allowing the cinnamon and apple to truly sing. Don’t hesitate to get creative with toppings or variations – the possibilities are endless!
I encourage you to give this recipe a try. It’s more accessible than a full apple pie but delivers all the comforting flavors we love. Experiment with different types of apples, add a sprinkle of nuts for extra crunch, or even a swirl of caramel sauce for an extra decadent touch. I’m confident you’ll find these Apple Pie Rolls to be a wonderfully rewarding baking project.
Frequently Asked Questions:
Q1: How can I store leftover Apple Pie Rolls?
Leftover Apple Pie Rolls can be stored in an airtight container at room temperature for up to 2 days, or in the refrigerator for up to 4 days. For the best taste and texture, I recommend gently reheating them in a low oven or toaster oven before serving.
Q2: Can I make the apple filling ahead of time?
Absolutely! The apple filling can be prepared a day or two in advance and stored in an airtight container in the refrigerator. This can save you time on assembly day, making the process even smoother.
Q3: What other fruits can I use instead of apples for these rolls?
While apples are classic, you could certainly experiment with other fruits! Pears would be a fantastic substitute, or even a mixture of berries like blueberries or raspberries for a different flavor profile. Just be mindful of moisture content and adjust spices as needed.
Easy Apple Pie Rolls
Delicious dessert rolls featuring a creamy spiced apple filling wrapped in crispy egg roll wrappers.
Ingredients
-
5 medium Granny Smith apples, peeled and diced (approximately 3½ cups)
-
1/4 cup light brown sugar, packed
-
1 teaspoon ground cinnamon (for filling)
-
1/2 teaspoon cornstarch
-
22-24 egg roll wrappers
-
8 ounces cream cheese, softened to room temperature
-
Cooking oil or spray (for frying or baking)
-
2 tablespoons granulated sugar (for topping)
-
1 teaspoon ground cinnamon (for topping)
-
1/2 cup caramel topping, for dipping
Instructions
-
Step 1
Prepare the apple filling: In a medium bowl, combine diced apples, brown sugar, cinnamon, and cornstarch. Toss to coat evenly and set aside. -
Step 2
Create the creamy core: In a separate bowl, combine softened cream cheese with the prepared apple mixture. Gently fold together, ensuring distinct apple pieces remain. -
Step 3
Assemble the rolls: Lay out egg roll wrappers. Spoon 2-3 tablespoons of filling onto the lower third. Fold the bottom corner up, then fold in the sides, moisten the top corner with water, and roll tightly to seal. -
Step 4
Cook the rolls (Frying): Heat oil to 350°F (175°C). Fry rolls for 3-5 minutes until golden brown and crispy. Drain on a wire rack. -
Step 5
Cook the rolls (Baking): Preheat oven to 375°F (190°C). Place rolls on a greased baking sheet and bake for 18-20 minutes, flipping halfway, until golden brown. -
Step 6
Add finishing touches: Whisk together granulated sugar and cinnamon for topping. Sprinkle over warm rolls. Serve with caramel topping for dipping.
Important Information
Nutrition Facts (Per Serving)
It is important to consider this information as approximate and not to use it as definitive health advice.
Allergy Information
Please check ingredients for potential allergens and consult a health professional if in doubt.


Leave a Comment