
Easy Blueberry Cheesecake is a phrase that might instantly conjure images of a lavish dessert, often perceived as a daunting culinary challenge reserved for experienced bakers. However, I am here to debunk that myth and assure you that creating this wonderfully rich, creamy, and visually stunning treat is far more accessible than you could ever imagine. Prepare to delight your senses and impress your guests without spending hours in the kitchen, because this recipe truly makes indulgence effortless.
Tracing its origins back to ancient Greece, where early forms were served to athletes, cheesecake has evolved through various cultures and centuries to become the globally adored dessert we cherish today. The addition of bright, juicy blueberries not only adds a beautiful pop of color but also introduces a delightful tartness that perfectly balances the sweet, velvety smoothness of the cream cheese filling. It’s this harmonious blend that transforms a classic into an unforgettable experience.
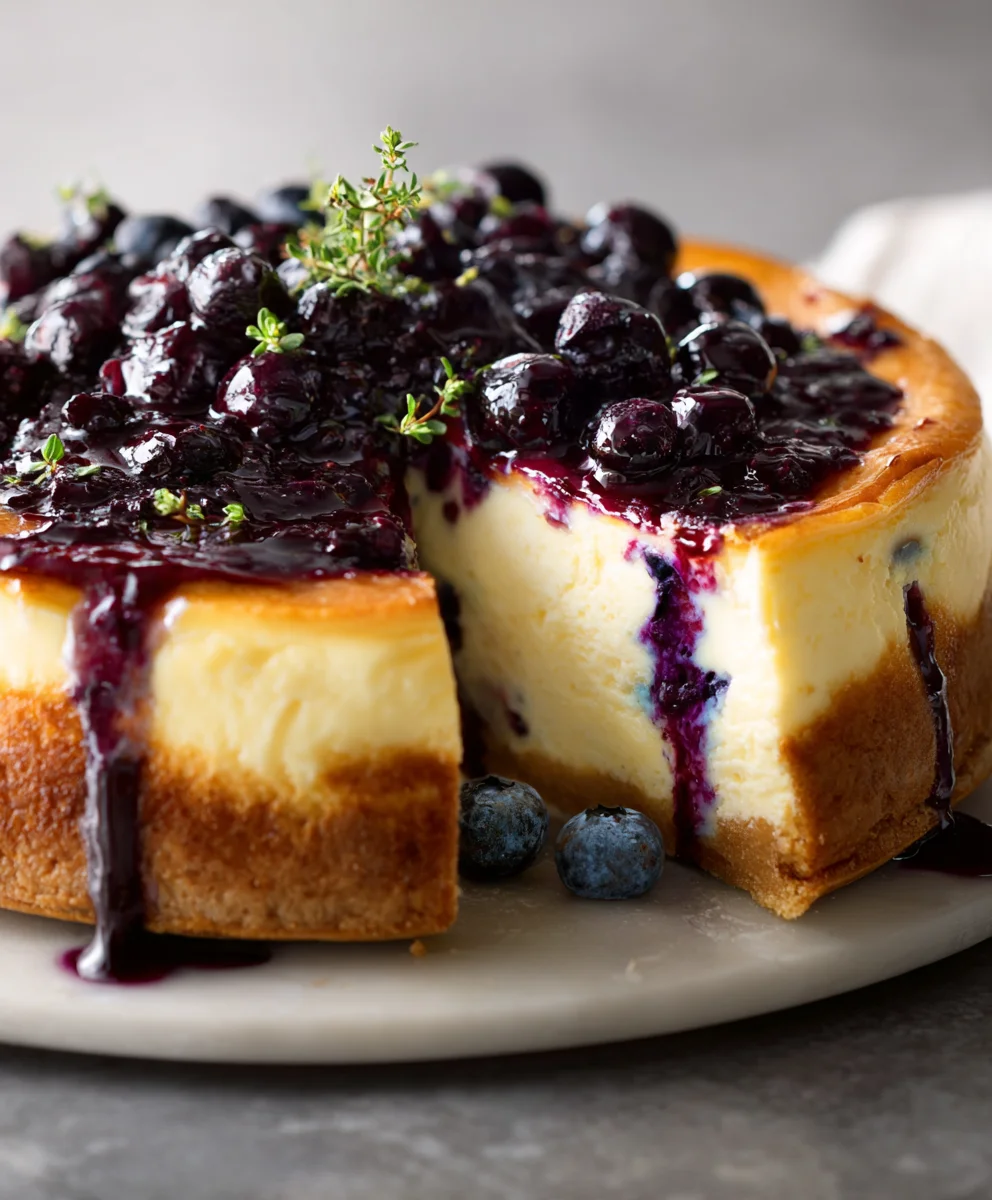
People adore this dish for its exquisite combination of textures—the buttery, crisp graham cracker crust, the impossibly smooth and dense cream cheese layer, and the bursting pockets of warm, sweet-tart blueberries. It’s the ultimate dessert for any occasion, offering a sophisticated touch for dinner parties yet remaining comforting enough for a simple family gathering. My mission today is to guide you through every simple step, ensuring that your
Easy Blueberry Cheesecake
turns out perfectly, proving that extraordinary flavor doesn’t have to come with extraordinary effort. Let’s make some magic!
Ingredients:
- For the Graham Cracker Crust:
- 1 ½ cups (about 10-12 full sheets) graham cracker crumbs (I find it easiest to use a food processor for this, but a Ziploc bag and rolling pin work just as well!)
- ¼ cup granulated sugar
- ½ cup (1 stick) unsalted butter, melted
- For the Creamy Cheesecake Filling:
- 3 (8-ounce) packages full-fat cream cheese, softened to room temperature (This is crucial for a smooth, lump-free cheesecake!)
- 1 cup granulated sugar
- 2 teaspoons pure vanilla extract
- ¼ cup sour cream or full-fat Greek yogurt, at room temperature (This adds a lovely tang and moisture)
- 2 large eggs, at room temperature
- 1 tablespoon all-purpose flour (optional, but it can help prevent cracking)
- Pinch of salt
- Zest of ½ a lemon (optional, but I love the brightness it adds to complement the blueberries!)
- For the Luscious Blueberry Topping:
- 2 cups fresh or frozen blueberries (if using frozen, no need to thaw)
- ½ cup granulated sugar (adjust to your sweetness preference and the tartness of your blueberries)
- 2 tablespoons fresh lemon juice (enhances the berry flavor beautifully)
- 1 tablespoon cornstarch
- 2 tablespoons cold water
- ¼ teaspoon ground cinnamon (optional, but a little warmth pairs wonderfully with blueberries)
Preparing the Perfect Graham Cracker Crust
Starting with a solid, flavorful crust is the foundation for an incredible Easy Blueberry Cheesecake. It’s surprisingly simple, but a few key steps make all the difference for a perfectly golden and crisp base.
- Preheat your oven to 350°F (175°C). This ensures that when your crust goes in, it starts baking immediately, leading to a perfectly set base.
- Prepare your springform pan: My go-to is a 9-inch springform pan. I always line the bottom with parchment paper for easy removal later. To do this, unclip the pan, place the parchment circle on the base, and then clip the sides back on. Trim any excess parchment. I also lightly grease the sides of the pan with a little butter or non-stick spray, just for good measure.
- Make the graham cracker crumbs: If you’re starting with whole graham crackers, place them in a food processor and pulse until you have fine, even crumbs. Alternatively, you can put them in a sturdy Ziploc bag and crush them with a rolling pin. Aim for a fine, sand-like texture – no big chunks! This is crucial for a uniform crust.
- In a medium bowl, combine the graham cracker crumbs and ¼ cup of granulated sugar. Whisk them together until they are well mixed.
- Pour the melted butter over the crumb mixture. Using a fork or your clean hands, mix until all the crumbs are evenly moistened. It should resemble wet sand and hold together when you squeeze a small amount. This butter is what binds our crust together and gives it that rich flavor.
- Press the crust into the pan: Transfer the buttered crumbs into your prepared springform pan. Use the bottom of a flat glass or a measuring cup to firmly press the mixture evenly over the bottom of the pan and about 1 to 1 ½ inches up the sides. Ensure it’s packed tightly; this prevents crumbling later. I spend a good few minutes on this step, making sure the edges are just as firm as the center.
- Pre-bake the crust: Place the springform pan with the pressed crust into your preheated oven. Bake for 8-10 minutes. This pre-baking step is so important! It helps to set the crust, preventing it from becoming soggy once the cheesecake filling is added, and it gives it a lovely toasted flavor.
- Once baked, remove the crust from the oven and set it aside to cool slightly while you prepare the filling. Keep the oven on, reducing the temperature to 325°F (160°C). This lower temperature is ideal for baking cheesecake gently and preventing cracks.
Crafting the Velvety Smooth Cheesecake Filling
This is where the magic happens for our Easy Blueberry Cheesecake! A truly creamy, lump-free filling is the hallmark of a fantastic cheesecake, and I have a few tricks to help you achieve just that.
- Ensure all ingredients are at room temperature: I cannot stress this enough, especially for the cream cheese and eggs. If your cream cheese is cold, it will be lumpy and won’t incorporate smoothly with the other ingredients, no matter how much you mix it. Take your cream cheese and eggs out of the fridge at least 1-2 hours before you plan to start baking.
- In a large mixing bowl (or the bowl of a stand mixer fitted with the paddle attachment), beat the softened cream cheese on medium speed for about 2-3 minutes until it’s incredibly smooth and creamy. It should look light and fluffy, with no visible lumps. Scrape down the sides and bottom of the bowl frequently to ensure even mixing.
- Add the granulated sugar, vanilla extract, and lemon zest (if using) to the cream cheese. Continue beating on medium-low speed for another 2 minutes, until well combined and smooth. Again, stop and scrape down the bowl multiple times.
- Stir in the sour cream (or Greek yogurt). Mix on low speed until just combined. The sour cream adds a wonderful richness and tang that balances the sweetness beautifully and contributes to the cheesecake’s moist texture.
- Incorporate the eggs carefully: Add the eggs one at a time, mixing on very low speed just until each egg is incorporated. The key here is to avoid over-mixing. Over-mixing eggs introduces too much air into the batter, which can cause your cheesecake to puff up too much during baking and then collapse and crack as it cools.
- Finally, gently fold in the tablespoon of all-purpose flour and a pinch of salt. The flour is an optional but helpful addition that can act as a stabilizer, providing a bit of structure and further helping to prevent cracking. Mix until just combined – remember, minimal mixing once the eggs are in!
- Prepare for the water bath: This is my secret weapon for an unbelievably smooth, perfectly baked, crack-free cheesecake. Tear off two large sheets of heavy-duty aluminum foil. Criss-cross them on your counter. Place your springform pan (with the cooled crust) in the center of the foil. Carefully fold the foil up and around the sides of the pan, making sure to create a watertight seal. I usually go up to the rim of the pan and double-fold the top edge to prevent any water from seeping in. This creates a protective barrier.
- Pour the cheesecake filling into the prepared foil-wrapped crust. Gently tap the pan on the counter a few times to release any large air bubbles.
- Place the foil-wrapped springform pan into a larger roasting pan. Carefully pour hot water into the roasting pan, ensuring the water comes about halfway up the sides of the springform pan. This water bath creates a steamy, moist environment in the oven, which helps the cheesecake bake evenly and prevents it from drying out and cracking.
Baking the Cheesecake to Perfection
Baking an Easy Blueberry Cheesecake requires patience and a watchful eye. The goal is a perfectly set cheesecake that is still slightly jiggly in the center when removed from the oven, which indicates it will set up beautifully as it cools.
- Carefully transfer the roasting pan with the cheesecake and water bath to your preheated oven (set to 325°F / 160°C).
- Bake for 60-75 minutes. The baking time can vary slightly depending on your oven, so pay attention to doneness rather than just the clock. The cheesecake is ready when the edges are set and lightly golden, but the center (about a 2-inch circle) still has a slight jiggle when you gently shake the pan. It should not look wet or liquid, but more like firm custard.
- Begin the cooling process in the oven: This is another critical step to prevent cracks. Once the cheesecake is done, turn off the oven. Crack the oven door open about 4-6 inches and allow the cheesecake to cool inside the oven for 1 hour. This gradual cooling prevents a drastic temperature change, which is a common culprit for cracks.
- After 1 hour, carefully remove the roasting pan from the oven. Take the springform pan out of the water bath and remove the foil wrapping. Be cautious as there might be some hot water residue.
- Place the cheesecake on a wire rack and let it cool completely at room temperature for another 1-2 hours. During this time, you might notice the very center continues to settle and firm up.
- Once completely cooled at room temperature, gently run a thin knife around the edge of the cheesecake (between the cheesecake and the pan sides) before unclipping the springform. This helps to ensure it doesn’t stick as it continues to shrink slightly during chilling, preventing any tearing or cracking.
- Cover the cheesecake loosely with plastic wrap and transfer it to the refrigerator to chill for at least 6 hours, but ideally overnight. This chilling step is non-negotiable! It allows the cheesecake to fully set and for the flavors to meld beautifully, creating that dense, creamy texture we all crave in an Easy Blueberry Cheesecake.
Creating the Luscious Blueberry Topping
While your cheesecake is chilling, let’s prepare the vibrant and flavorful blueberry topping. This sweet and tangy addition truly elevates our Easy Blueberry Cheesecake to dessert perfection!
- In a medium saucepan, combine the blueberries, ½ cup granulated sugar, and fresh lemon juice. If you’re using the optional ground cinnamon, add it now.
- Place the saucepan over medium heat. Bring the mixture to a gentle simmer, stirring occasionally, until the sugar has dissolved and the blueberries start to release their juices. This usually takes about 5-7 minutes. If using fresh blueberries, they will soften slightly. If using frozen, they will thaw and become jammy.
- In a small bowl, whisk together the cornstarch and cold water until a smooth slurry forms. This slurry is what will thicken our topping, and mixing it with cold water first prevents lumps.
- Pour the cornstarch slurry into the simmering blueberry mixture, stirring constantly. Continue to cook, stirring, for another 1-2 minutes, or until the sauce thickens to your desired consistency. It should be thick enough to coat the back of a spoon. Remember, it will thicken a bit more as it cools.
- Remove the saucepan from the heat. Let the blueberry topping cool completely at room temperature before spreading it over the chilled cheesecake. If you try to put warm topping on a cold cheesecake, it can cause the cheesecake to soften and become messy.
Assembling and Serving Your Easy Blueberry Cheesecake
The moment has finally arrived! After all your careful preparation, it’s time to assemble and enjoy your stunning Easy Blueberry Cheesecake.
- Once your cheesecake has thoroughly chilled (at least 6 hours, remember!), and your blueberry topping is completely cool, it’s time to assemble.
- Gently unclip the springform pan and carefully lift the sides away. If you used parchment paper on the bottom, you can carefully slide the cheesecake off the base onto a serving plate, or you can serve it directly from the pan base.
- Evenly spoon and spread the cooled blueberry topping over the top of the chilled cheesecake. You can go right to the edges or leave a border of plain cheesecake for a lovely visual contrast.
- For perfect slices: To get clean, sharp slices of cheesecake, I always recommend using a sharp knife that has been warmed by running it under hot water. Wipe the knife clean between each slice for the most pristine presentation.
- Serve your magnificent Easy Blueberry Cheesecake immediately. It’s absolutely delightful on its own, but a dollop of whipped cream or a sprig of fresh mint can add a lovely touch.
- Storage: Any leftover cheesecake should be stored in an airtight container in the refrigerator for up to 4-5 days. It actually tastes even better the next day as the flavors continue to develop! You can also freeze individual slices, wrapped tightly in plastic wrap and then foil, for up to 1-2 months. Thaw in the refrigerator before serving.

Conclusion:
So, there you have it, my dear baking enthusiasts! We’ve journeyed together through the simple steps to create something truly magical, and I genuinely believe this recipe is an absolute game-changer for anyone who loves a good dessert but dreads the complexity. This isn’t just another cheesecake; it’s a testament to the fact that elegance and incredible flavor don’t have to come with a hefty price tag of effort or endless hours in the kitchen. What makes this particular dessert an undeniable must-try is its unparalleled blend of creamy, velvety texture, the bright, tangy burst of fresh blueberries, and that perfectly buttery, slightly salty graham cracker crust. Every single bite is a symphony of flavors that manages to be both rich and refreshing at the same time. You’ll be amazed at how effortlessly it comes together, transforming simple ingredients into a show-stopping dessert that looks like it took hours of painstaking work, when in reality, it’s incredibly forgiving and straightforward. Trust me when I say, once you’ve made this, it will quickly become your go-to recipe for impressing guests or simply treating yourself to something truly special without the stress. It truly delivers a gourmet experience with minimal fuss, making it a masterpiece of convenience and deliciousness.
Now, once your masterpiece has chilled to perfection, the moment of truth arrives! While it’s utterly divine on its own, there are a few ways to elevate that serving experience. I always recommend serving slices of this delightful dessert thoroughly chilled – that’s when its creamy texture truly shines. For a classic presentation, a generous sprinkle of extra fresh blueberries on top of each slice not only adds a beautiful visual pop but also reinforces that lovely fruity note. If you’re feeling a little fancy, a small dollop of freshly whipped cream, perhaps lightly sweetened with a touch of vanilla, can add an extra layer of decadence. Another wonderful idea is to finely zest a lemon right over the top just before serving; the aromatic citrus oils really brighten up the entire dish and complement the blueberries beautifully. This cheesecake is perfect as the grand finale to a dinner party, a sophisticated addition to a brunch spread, or simply a luxurious treat for a quiet evening at home with a cup of coffee or tea. It truly shines in any setting, promising smiles and satisfied sighs all around, whether it’s a casual gathering or a more formal celebration.
But here’s where the real fun begins – the endless possibilities for personalization! While the classic blueberry version holds a special place in my heart, this recipe is incredibly versatile, inviting you to experiment and make it uniquely yours. Instead of a straightforward blueberry topping, why not try a mixed berry compote? Simply simmer an assortment of your favorite berries – think raspberries, strawberries, blackberries, and blueberries – with a touch of sugar and a squeeze of lemon juice until thickened, then spoon that glorious mixture over your chilled cheesecake. Or, for a different fruit profile, consider peach slices gently sautéed with a hint of cinnamon, or even a vibrant swirl of homemade lemon curd for an extra citrusy kick. The crust itself is also ripe for customization! Imagine a crust made from crushed Oreo cookies for a chocolatey twist, or perhaps ginger snaps for a warm, spicy undertone. You could even incorporate finely chopped pecans or walnuts into your graham cracker crust for added texture and a nutty flavor dimension. For a more sophisticated touch, a few drops of almond extract in the cheesecake filling can introduce a lovely subtle complexity. And if you’re hosting a crowd or simply love portion control, this recipe adapts beautifully to individual servings; just press the crust into muffin tins lined with paper cups, fill with the cheesecake mixture, and bake as directed (adjusting baking time as needed) for adorable mini cheesecakes. The possibilities are truly boundless, allowing you to tailor this incredible dessert to any occasion or personal preference, making each bake a unique culinary adventure.
I’ve poured my heart into sharing this recipe with you because I genuinely want you to experience the sheer joy and satisfaction of creating something so utterly delicious and impressive with such ease. Seriously, don’t let any lingering doubts hold you back – this is your invitation to bake! Take the plunge, gather your ingredients, and whip up your very own batch of this delightful Easy Blueberry Cheesecake. I promise you, the results will speak for themselves, and you’ll be beaming with pride. And once you’ve tasted the magic, I would absolutely love to hear all about your baking adventure! Did you stick to the classic, or did you venture into one of the variations? What was your favorite part? Please, please, please share your experiences, your photos, and any clever twists you came up with in the comments below. Let’s build a little community of cheesecake lovers and inspire each other with our culinary creations. Happy baking, my friends, and get ready to indulge in pure dessert bliss!
Easy Blueberry Cheesecake Recipe: Creamy, Simple & Delicious!
This easy recipe guides you through creating a rich, creamy, and visually stunning blueberry cheesecake, debunking the myth that this dessert is a culinary challenge. Featuring a buttery graham cracker crust, a velvety smooth cream cheese filling, and a luscious sweet-tart blueberry topping, it’s perfect for any occasion.
Ingredients
-
1 ½ cups graham cracker crumbs
-
¼ cup granulated sugar (for crust)
-
½ cup (1 stick) unsalted butter, melted
-
3 (8-ounce) packages full-fat cream cheese, softened
-
1 cup granulated sugar (for filling)
-
2 teaspoons pure vanilla extract
-
¼ cup sour cream or full-fat Greek yogurt, at room temperature
-
2 large eggs, at room temperature
-
1 tablespoon all-purpose flour (optional)
-
Pinch of salt
-
Zest of ½ a lemon (optional)
-
2 cups fresh or frozen blueberries (if using frozen for topping, no need to thaw)
-
½ cup granulated sugar (for topping)
-
2 tablespoons fresh lemon juice (for topping)
-
1 tablespoon cornstarch
-
2 tablespoons cold water
-
¼ teaspoon ground cinnamon (optional)
Instructions
-
Step 1
Preheat oven to 350°F (175°C). Line a 9-inch springform pan bottom with parchment paper and lightly grease the sides. Reduce oven to 325°F (160°C) after pre-baking crust. -
Step 2
Combine graham cracker crumbs, ¼ cup sugar, and melted butter. Mix until crumbs are moistened. Press mixture firmly and evenly into the bottom and 1 to 1 ½ inches up the sides of the prepared springform pan. Bake for 8-10 minutes until set and lightly golden. Cool slightly. -
Step 3
Ensure all filling ingredients (cream cheese, eggs, sour cream) are at room temperature. In a large bowl, beat softened cream cheese on medium speed for 2-3 minutes until smooth and lump-free. Scrape down the bowl. Add 1 cup sugar, vanilla extract, and lemon zest (if using); beat on medium-low speed for 2 minutes until well combined. Stir in sour cream or Greek yogurt on low speed until just combined. -
Step 4
Add eggs one at a time, mixing on very low speed until just incorporated. Avoid over-mixing. Gently fold in flour (if using) and salt until just combined. -
Step 5
Wrap the springform pan securely with two layers of heavy-duty aluminum foil, creating a watertight seal up to the rim. Pour cheesecake filling into the crust. Gently tap pan to release air bubbles. Place foil-wrapped pan into a larger roasting pan and pour hot water into the roasting pan, halfway up the sides of the springform pan. -
Step 6
Carefully transfer roasting pan to the preheated oven (325°F / 160°C). Bake for 60-75 minutes until edges are set, lightly golden, and the center (about a 2-inch circle) still has a slight jiggle. Do not overbake. -
Step 7
Turn off oven, crack the door open 4-6 inches, and let cheesecake cool in the oven for 1 hour. Remove from water bath, unwrap foil, and cool completely on a wire rack at room temperature for 1-2 hours. Run a thin knife around the edge of the cheesecake before unclipping the springform. Cover loosely and refrigerate for at least 6 hours, ideally overnight, to fully set. -
Step 8
In a medium saucepan, combine blueberries, ½ cup sugar (for topping), lemon juice, and cinnamon (if using). Simmer over medium heat for 5-7 minutes until sugar dissolves and berries release juices. In a small bowl, whisk cornstarch and cold water to form a smooth slurry. Pour slurry into simmering blueberry mixture, stirring constantly, and cook for 1-2 minutes until thickened. Remove from heat and cool completely at room temperature. -
Step 9
Once cheesecake is thoroughly chilled and topping is cool, unclip springform pan sides. Evenly spoon and spread the cooled blueberry topping over the chilled cheesecake. For clean slices, use a warm, sharp knife, wiping it clean between each slice. Serve immediately. Store leftovers in an airtight container in the refrigerator for 4-5 days.
Important Information
Nutrition Facts (Per Serving)
It is important to consider this information as approximate and not to use it as definitive health advice.
Allergy Information
Please check ingredients for potential allergens and consult a health professional if in doubt.


Leave a Comment