
Easy Bunny Cake Recipe – the words alone conjure images of pastel frosting, fluffy tails, and the sheer joy of springtime celebrations! I don’t know about you, but for me, this easy bunny cake recipe is an absolute staple when Easter rolls around, or even just when I need a little sprinkle of cheer in my day. It’s not just a cake; it’s a tradition, a memory-maker, and a delightful centerpiece that brings smiles to faces of all ages. What makes this particular easy bunny cake recipe so special? Well, it’s the perfect balance of simplicity and adorable charm. You don’t need to be a master baker to create something truly enchanting, and the process itself is as fun as the final result. Get ready to hop into some baking fun with a recipe that’s guaranteed to be a hit!
Easy Bunny Cake Recipe
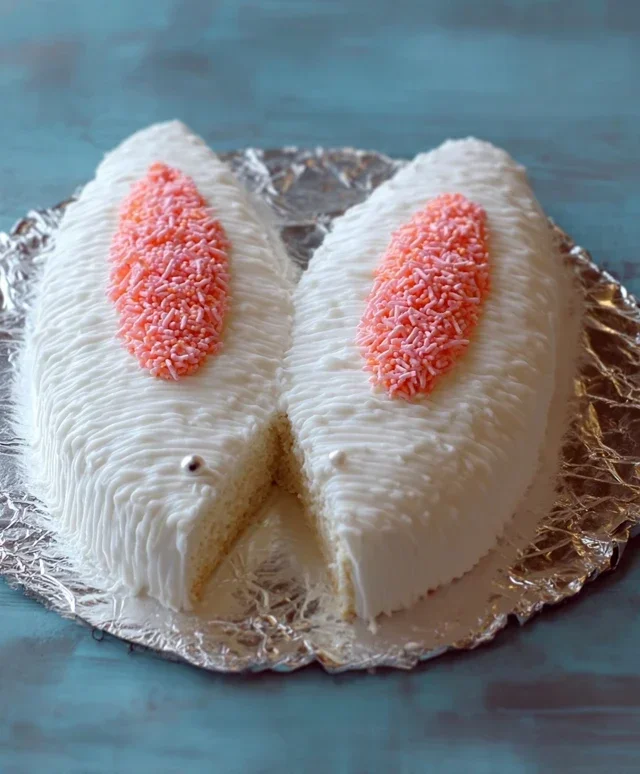
Spring is in the air, and what better way to celebrate than with a delightfully adorable Bunny Cake? This recipe is designed for maximum cute factor with minimal fuss, making it perfect for a fun family baking project or a show-stopping addition to your Easter celebration. We’ll transform simple round cake layers into a charming bunny that’s almost too cute to eat! Get ready for some smiles and sweet memories.
Ingredients:
Getting Started: Preparing Your Bunny Base
Before we dive into the fun of decorating, ensure your cake layers are completely cooled. This is a crucial step to prevent your frosting from melting and creating a messy situation. If you’re using a cake mix, follow the package instructions. If you’re a homemade baker, use your go-to vanilla or white cake recipe – these lighter colors will provide a better canvas for our bunny. Once cooled, you can trim the tops of your cake layers to create a flatter surface if they’ve domed during baking. This will make stacking and frosting much easier.
Assembling the Bunny
1. Place one of your cooled cake layers onto your serving plate or cake stand. This will be the body of your bunny.
2. Generously spread a layer of white frosting over the top of this first cake layer. Don’t be shy with the frosting; it acts as the “glue” for the second layer and adds to the deliciousness.
3. Carefully place the second round cake layer on top of the frosted first layer. This second layer will serve as the bunny’s head. You can position it slightly offset if you want a more whimsical look, or directly in the center for a classic appearance.
Frosting Your Bunny Masterpiece
Now for the transformation! We’ll start by giving our bunny its soft, fluffy coat.
1. Using your spatula, apply a generous and even layer of white frosting all over both cake layers, covering them completely. This is your base coat, so aim for smooth coverage. Don’t worry too much about perfection at this stage; we’ll refine it later. Ensure you frost the sides well, as this is where the bunny’s fluffy texture will really shine.
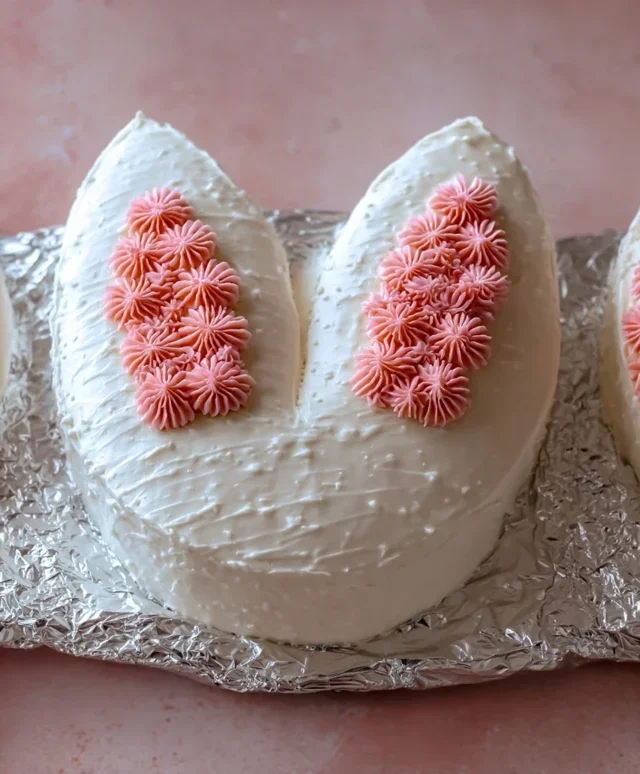
2. Once the entire cake is covered in white frosting, you can start to create texture. For a fluffy bunny look, you can use the back of a spoon or a fork to gently swirl the frosting, creating little peaks and divots. Alternatively, if you have a piping bag fitted with a star tip, you can pipe small rosettes or star shapes all over the cake to mimic fur. This step is where you can really let your creativity flow!
Adding the Bunny’s Features
This is where our bunny truly comes to life! We’ll use our pink frosting, chocolate icing, and colorful candies to give our bunny its personality.
1. For the Ears: Take your two remaining cake layers (if you baked four) or use two smaller round cakes if you prefer larger ears. Cut each round layer in half. These will be your bunny’s ears. If you only have two layers and want to make ears, you can cut crescent shapes from the edges of one of the layers, or even bake two small cupcakes and cut them in half. Place these ear halves onto the top of the bunny’s “head” (the top cake layer), positioning them slightly upwards or angled as you like.
2. Frost the ears with white frosting, just as you did the body. You can use the same texturing technique here to match the rest of the fur.
3. Now, for the inner ear detail! Take your pink frosting. If you’re coloring white frosting, add pink gel food coloring a little at a time until you achieve your desired shade of pink. Spoon this pink frosting into a piping bag fitted with a small, round tip. Pipe a smaller oval or leaf shape onto the inside of each ear. This creates that adorable contrast and makes the ears pop.
4. For the Face: Using your chocolate icing or melted chocolate in a piping bag with a very fine tip (or even a ziploc bag with a tiny corner snipped off), pipe two small dots for the eyes. Then, pipe a small upside-down triangle or a simple “Y” shape for the nose. You can also add a little mouth line if you like!
5. The Finishing Touches: Scatter jellybeans or colorful round candies around the base of the cake or on top of the bunny’s head. These can represent little Easter eggs or just add a festive pop of color. You can also use a few candies to create a little bow tie or collar if you’re feeling extra decorative.
This Easy Bunny Cake recipe is a wonderful way to bring a touch of spring magic to your table. It’s simple enough for begin extractners but impressive enough to wow your guests. Enjoy the process, and most importantly, enjoy your delicious creation!
Conclusion:
And there you have it – a delightfully simple and utterly charming Easy Bunny Cake recipe that’s sure to bring smiles all around! This recipe is fantastic because it’s not only incredibly straightforward, making it perfect for begin extractner bakers or those looking for a quick, impressive dessert, but the results are always so adorable. The soft, moist cake base paired with the sweet frosting creates a wonderful flavor and texture combination that everyone loves. Whether you’re preparing for Easter, a spring celebration, or just want to add a touch of whimsy to your day, this bunny cake is a winner!
For serving, consider presenting it as the centerpiece of your dessert table. It’s also wonderful with a dollop of whipped cream or a scoop of vanilla ice cream. If you’re feeling adventurous with variations, try adding a hint of lemon zest to the batter for a brighter flavor, or use different colored frostings to create more elaborate bunny designs. Don’t be afraid to experiment with sprinkles or edible flowers for extra decoration. I truly encourage you to give this Easy Bunny Cake recipe a try – you’ll be amazed at how easy it is to create something so special!
Frequently Asked Questions:
Can I make this bunny cake ahead of time?
Yes, absolutely! You can bake the cake layers a day in advance and store them wrapped tightly at room temperature. Frosting and decorating are best done closer to serving, but the frosted cake will keep well in the refrigerator for a day or two. Let it come to room temperature for about 30 minutes before slicing for the best texture.
What if I don’t have a bunny-shaped cake pan?
No problem at all! You can easily create a bunny shape using round or square cake pans. Bake two round cakes, or one round and one square. Cut and arrange them into a bunny silhouette on your serving platter. Use a smaller round cake for the head and two larger rounds or a rectangular cake cut into ovals for the body and ears. Get creative with your cuts!
Can I use a different type of frosting?
Certainly! While buttercream is classic, feel free to use your favorite frosting. Cream cheese frosting would add a lovely tang, or a simple glaze could also work if you prefer something lighter. Just ensure the frosting is sturdy enough to hold its shape for decorating.
Easy Bunny Cake Recipe
A simple and fun bunny cake perfect for Easter or any celebration. Decorate with frosting and candies for a charming touch.
Ingredients
-
Two round cake layers (use one cake mix or your favorite homemade recipe)
-
White frosting (ready-made or your favorite homemade recipe)
-
Pink frosting (or use pink gel food coloring on white frosting)
-
Chocolate icing or melted chocolate for details
-
Jellybeans or colorful round candies
-
Piping bags
Instructions
-
Step 1
Bake your two round cake layers according to your chosen cake mix or homemade recipe. Let them cool completely. -
Step 2
Place one cake layer on your serving plate. Crumb coat the top and sides with a thin layer of white frosting. -
Step 3
Frost the top and sides of both cake layers generously with white frosting, creating the base of the bunny. -
Step 4
Using piping bags, create bunny ears on top of the cake using white frosting. Add a pink frosting nose and pink frosting inner ears. -
Step 5
Use chocolate icing or melted chocolate to draw eyes and a mouth on the bunny’s face. -
Step 6
Decorate the cake with jellybeans or colorful round candies around the base or as accents.
Important Information
Nutrition Facts (Per Serving)
It is important to consider this information as approximate and not to use it as definitive health advice.
Allergy Information
Please check ingredients for potential allergens and consult a health professional if in doubt.

Leave a Comment