
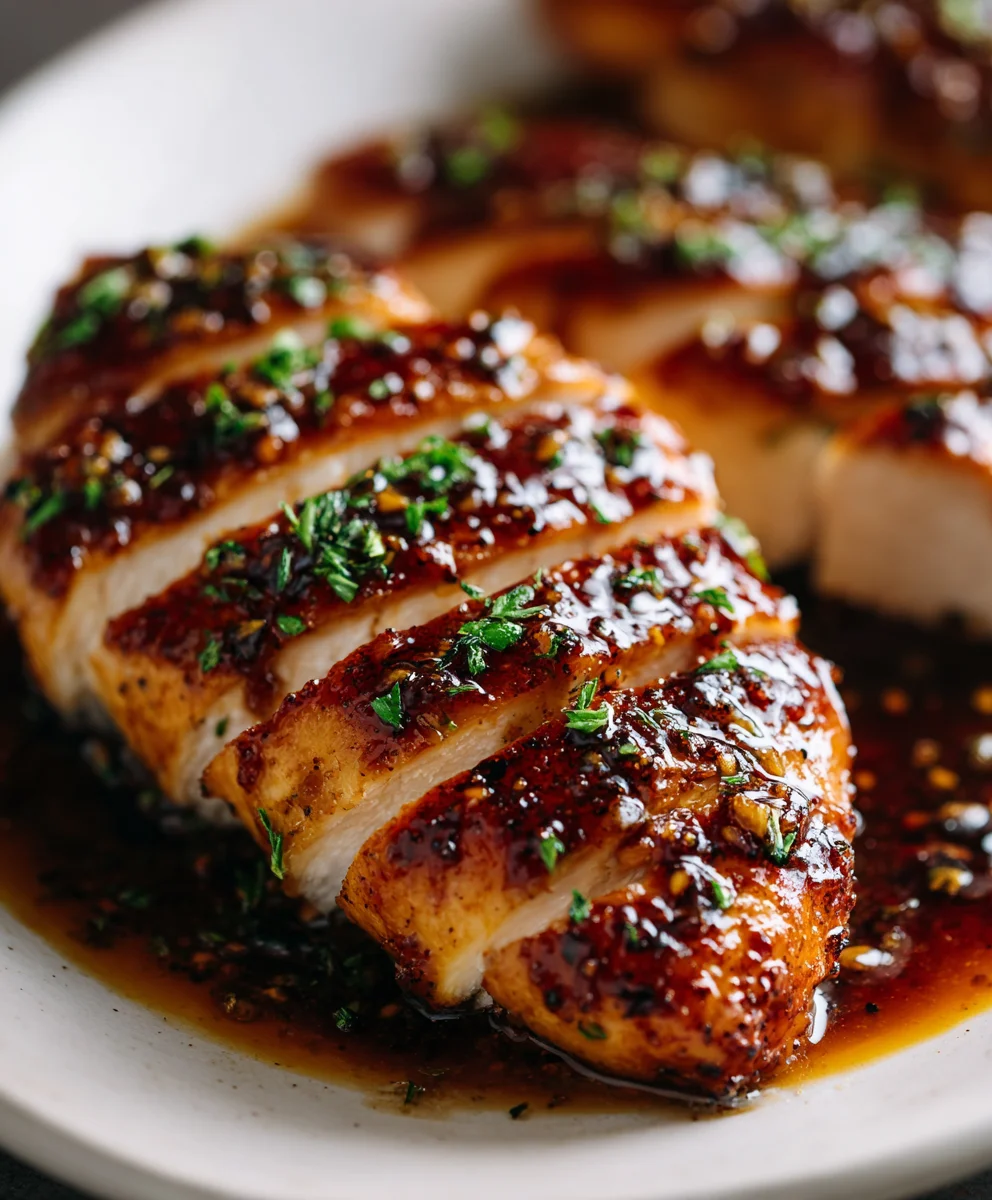
Honey Garlic Chicken Breasts are an absolute revelation for anyone seeking a dinner solution that perfectly balances irresistible flavor with effortless preparation. I’m thrilled to share my tried-and-true recipe for this beloved dish, which I believe will quickly become a cherished staple in your culinary repertoire. Imagine sinking your teeth into incredibly tender, juicy chicken, each piece generously coated in a shimmering, sticky glaze that harmonizes the rich sweetness of honey with the pungent warmth of garlic, all underscored by a subtle tangy finish. It’s a taste sensation that consistently delights palates of all ages.
This dish has soared to global popularity not just for its incredible taste, but also for its remarkable convenience. It’s the ultimate weeknight hero, a culinary testament to how simple, accessible ingredients can be transformed into something truly extraordinary with minimal fuss. People adore Honey Garlic Chicken Breasts because they offer a sophisticated flavor profile without demanding hours in the kitchen, making them perfect for busy families, impromptu gatherings, or simply treating yourself after a long day. The allure lies in its perfect balance – it’s savory, it’s sweet, it’s comforting, and utterly delicious, proving that gourmet-level meals can indeed be achievable on any schedule.
Ingredients:
- For the Honey Garlic Chicken:
- 4 boneless, skinless chicken breasts (about 6-8 oz each, totaling 1.5-2 lbs), preferably organic or free-range for best flavor and texture.
- 1 tablespoon olive oil (or a neutral oil like avocado or grapeseed oil) for pan-searing.
- 1/2 teaspoon salt, plus more to taste.
- 1/4 teaspoon freshly ground black pepper, plus more to taste.
- For the Irresistible Honey Garlic Marinade & Glaze:
- 1/2 cup low-sodium soy sauce (I find low-sodium prevents the dish from becoming overly salty, allowing the other flavors to shine).
- 1/2 cup honey, high-quality local honey if possible, for that perfect natural sweetness.
- 4-6 cloves garlic, freshly minced (I truly believe more garlic is always better in this recipe, so don’t be shy!).
- 1 tablespoon fresh ginger, grated (peeling with a spoon makes this super easy, and the fresh zestiness is key).
- 2 tablespoons apple cider vinegar (or rice vinegar, if you prefer a milder tang). This helps balance the sweetness and savory notes beautifully.
- 1 teaspoon toasted sesame oil (a little goes a long way, but it adds an incredible depth of nutty aroma).
- 1 tablespoon cornstarch (for thickening our gorgeous glaze).
- 2 tablespoons cold water (to create a smooth slurry with the cornstarch).
- For Garnish (Optional, but highly recommended!):
- 2 tablespoons sesame seeds, lightly toasted (a quick toast in a dry pan really brings out their flavor).
- 2-3 green onions, thinly sliced (the bright green and mild oniony crunch are fantastic contrasts).
- Preparing the Chicken Breasts for Optimal Flavor and Texture
- Pat Your Chicken Dry: First things first, I always start by taking my boneless, skinless chicken breasts and patting them thoroughly dry with paper towels. This step is absolutely critical! Excess moisture on the surface of the chicken will steam rather than sear, preventing you from achieving that beautiful, golden-brown crust we’re looking for, which locks in flavor and juiciness. I make sure to get every nook and cranny.
- Even Thickness for Even Cooking: Depending on the thickness of your chicken breasts, you might want to lightly pound them to an even 3/4-inch thickness. You can do this by placing each breast between two sheets of plastic wrap or in a large ziploc bag, and then gently pounding with the flat side of a meat mallet, a heavy-bottomed pan, or even a rolling pin. The goal here isn’t to make them super thin, but rather to ensure they cook evenly and simultaneously, preventing one part from drying out while another is still cooking. If your chicken breasts are already quite uniform, you can skip this, but I find it often improves the final result.
- Season Lightly: Before they even meet the marinade, I like to give my chicken breasts a very light initial seasoning. Sprinkle both sides of each chicken breast with about 1/2 teaspoon of salt and 1/4 teaspoon of freshly ground black pepper. This initial seasoning helps build a foundational layer of flavor, ensuring that the chicken itself is well-seasoned, not just coated in the sauce. This also aids in forming that lovely crust during searing.
- Crafting the Irresistible Honey Garlic Marinade
- Gather Your Sauce Ingredients: Now comes the fun part – creating the backbone of our “Honey Garlic Chicken Breasts” recipe! In a medium-sized bowl or a large liquid measuring cup, I combine all the ingredients for our incredible marinade. This includes the 1/2 cup low-sodium soy sauce, 1/2 cup honey, the generous amount of 4-6 cloves of freshly minced garlic, the 1 tablespoon of grated fresh ginger, 2 tablespoons of apple cider vinegar, and 1 teaspoon of toasted sesame oil.
- Mincing Garlic and Grating Ginger with Love: For the garlic, I always recommend fresh over pre-minced jarred garlic. The flavor difference is night and day! If you don’t have a garlic press, finely mincing it by hand is worth the effort. For the ginger, peeling it with the edge of a spoon is a fantastic trick, then grating it using a microplane or the smallest side of a box grater releases its aromatic oils beautifully. Don’t skip the fresh ginger; it adds a bright, zesty counterpoint to the richness of the other flavors.
- Whisk Until Combined: Once all the marinade ingredients are in the bowl, I take a whisk and vigorously combine them. Whisk until the honey is fully dissolved and everything is well integrated. You’ll notice a beautiful, glossy, amber-colored liquid forming. Give it a quick sniff – isn’t that aroma just delightful already? This marinade is not just for flavor; the acid from the vinegar also acts as a mild tenderizer for the chicken, making it incredibly juicy.
- Taste and Adjust (Optional, but Recommended): This is a point where I often like to taste a tiny bit of the marinade, just to ensure the balance of sweet, savory, and tangy is to my liking. If you feel it needs a touch more sweetness, add a bit more honey. If it needs more tang, a tiny splash more vinegar. Remember, you’re building layers of flavor here, and personal preference plays a big role in truly exceptional cooking.
- Marinating for Maximum Flavor Infusion
- Introduce Chicken to Marinade: Once your chicken breasts are prepped and your marinade is whisked, it’s time to bring them together. I find the easiest and most efficient way to marinate is to place the seasoned chicken breasts into a large, resealable plastic bag. Alternatively, you can use a shallow non-reactive dish (like glass or ceramic). Pour the entire contents of the honey garlic marinade over the chicken, making sure each piece is thoroughly coated.
- Seal and Distribute: If using a bag, I gently squeeze out as much air as possible before sealing it tightly. Then, I massage the bag a bit, ensuring the marinade is evenly distributed around all the chicken pieces. If using a dish, make sure all chicken pieces are submerged or turned periodically. The goal is maximum surface contact with that wonderful liquid.
- Refrigerate for Flavor Development: Place the sealed bag or covered dish into your refrigerator. Now, the waiting game begins! I recommend marinating the chicken for at least 30 minutes to an hour to allow the flavors to penetrate. For a truly deep flavor, you can marinate for up to 4 hours. I wouldn’t recommend marinating much longer than 4-6 hours, especially with the vinegar in the marinade, as it can start to break down the chicken fibers too much, leading to a slightly mushy texture rather than tender. However, even a quick 30-minute soak will yield delicious results.
- Reserve the Marinade: Before you remove the chicken from the marinade, it is absolutely crucial to reserve the remaining marinade for our glaze. Carefully pour all the liquid from the bag or dish into a small saucepan. Do not discard it! This is going to be transformed into our luscious sauce, but remember: since it has been in contact with raw chicken, it must be boiled thoroughly to ensure it’s safe to consume.
- Cooking the Honey Garlic Chicken Breasts to Perfection
- Prepare for Searing: Remove the marinated chicken breasts from the refrigerator about 15-20 minutes before cooking. This helps them come closer to room temperature, promoting more even cooking. Discard any excess marinade clinging to the chicken; we’ve already reserved the bulk of it for the sauce.
- Heat Your Pan: Place a large skillet, preferably cast iron or a heavy-bottomed non-stick pan, over medium-high heat. Allow the pan to get nice and hot for about 2-3 minutes. You want a good sizzle when the chicken hits the pan. Add 1 tablespoon of olive oil (or your preferred neutral oil) to the hot pan and swirl to coat the bottom. The oil should shimmer but not smoke.
- Sear for a Golden Crust: Carefully place the chicken breasts into the hot pan in a single layer, ensuring not to overcrowd the pan. If your pan isn’t large enough, cook in batches to maintain high heat and achieve a good sear. Overcrowding will lower the pan’s temperature and cause the chicken to steam instead of sear, which we’ve already discussed avoiding! Sear the chicken for about 4-6 minutes per side, undisturbed, until you see a beautiful, golden-brown crust forming. This crust is where so much of the initial flavor and texture comes from!
- Check for Doneness: Reduce the heat to medium and continue cooking for another 3-5 minutes, flipping occasionally, until the chicken is cooked through. The internal temperature of the thickest part of the chicken should reach 165°F (74°C) when measured with an instant-read meat thermometer. The exact cooking time will vary depending on the thickness of your chicken breasts. Avoid overcooking, as this can lead to dry chicken.
- Rest the Chicken: Once cooked, transfer the chicken breasts to a clean cutting board or plate and tent them loosely with aluminum foil. Let them rest for at least 5-10 minutes. This resting period is crucial! It allows the juices, which have migrated to the center of the meat during cooking, to redistribute throughout the entire breast. The result? Incredibly tender, moist, and juicy “Honey Garlic Chicken Breasts.” If you cut into them too soon, all those delicious juices will just run out onto your board.
- Developing the Rich Honey Garlic Glaze
- Prepare the Cornstarch Slurry: While your chicken is resting, let’s create our amazing glaze. In a small bowl, combine 1 tablespoon of cornstarch with 2 tablespoons of cold water. Whisk this together thoroughly until you have a smooth, lump-free slurry. This slurry is our secret weapon for a perfectly thickened sauce.
- Bring Marinade to a Boil: Take the reserved marinade that you poured into the saucepan earlier and place it over medium heat on your stovetop. Bring the marinade to a rolling boil. Remember, it’s essential to boil it for at least 1-2 minutes to eliminate any bacteria from contact with the raw chicken. This ensures it’s perfectly safe to eat. You’ll notice it bubbling vigorously.
- Thicken the Glaze: Once the marinade has boiled for a couple of minutes, give your cornstarch slurry another quick whisk (cornstarch tends to settle) and slowly pour it into the boiling marinade while continuously stirring with your whisk. As you stir, you’ll see the sauce begin to thicken almost immediately. Keep stirring and simmering for another 1-2 minutes until the sauce reaches a beautiful, glossy, syrupy consistency that coats the back of a spoon. If you find it’s too thick, you can add a tiny splash of water or chicken broth. If it’s not thick enough, you can mix a little more cornstarch with cold water to make another small slurry and whisk it in.
- Achieve the Perfect Glaze: The resulting glaze should be rich, shiny, and wonderfully aromatic, a perfect balance of sweet, savory, and tangy. This is the sauce that will truly elevate your “Honey Garlic Chicken Breasts” to restaurant-quality status.
- Finishing Touches and Serving Suggestions
- Coat the Chicken: Once the glaze has reached your desired consistency, you have a couple of options. You can either slice the rested chicken breasts against the grain into 1/2-inch thick pieces and then toss them directly into the saucepan with the glaze, ensuring every slice is beautifully coated. Alternatively, you can leave the chicken breasts whole and simply spoon the warm, luscious honey garlic glaze generously over the top of each breast before serving. I often prefer slicing them first because it maximizes the surface area for the glaze to cling to, making every bite incredibly flavorful.
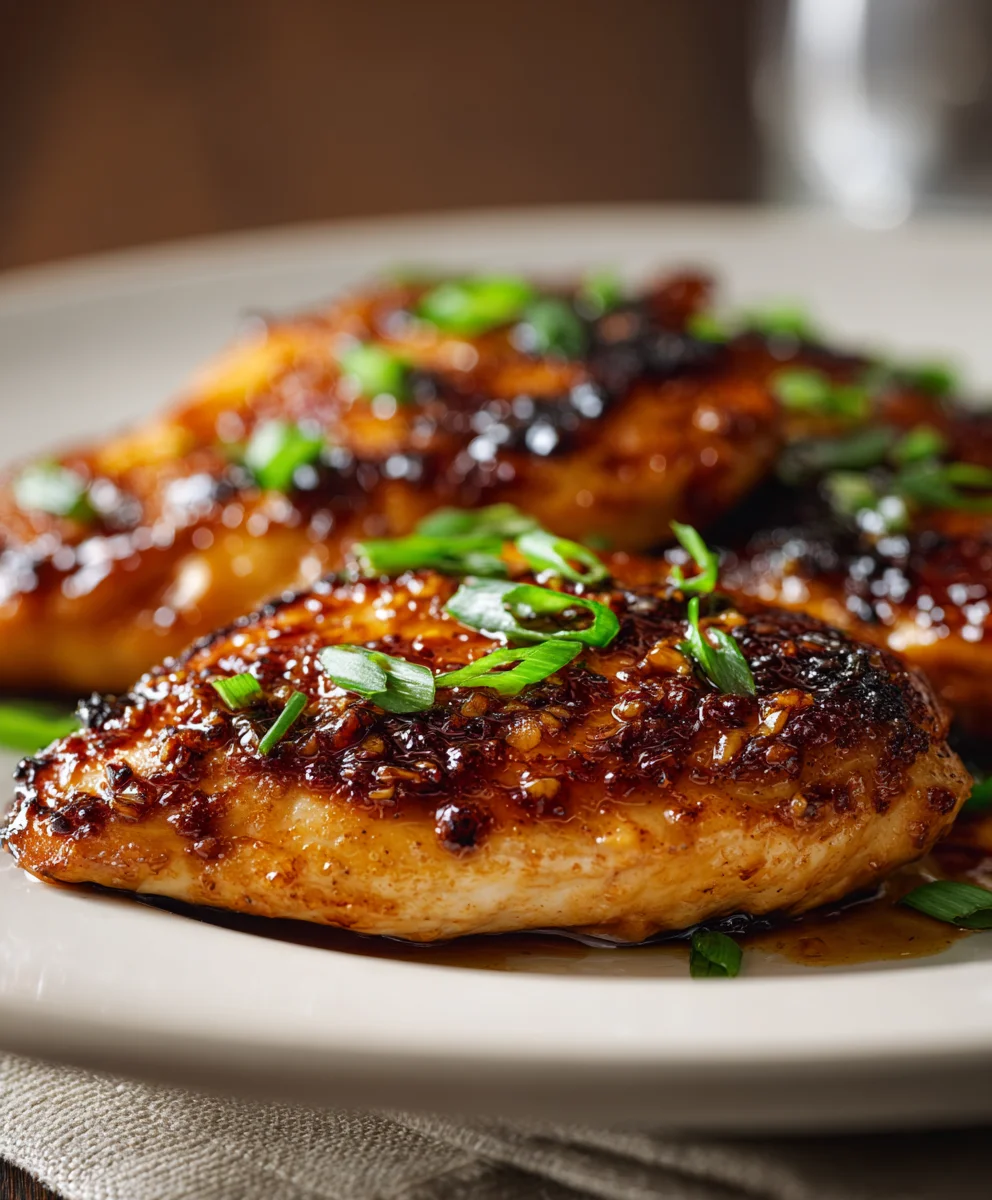
- Garnish for Visual Appeal and Extra Flavor: Now for the grand finale! Transfer your gorgeous “Honey Garlic Chicken Breasts” (sliced or whole) to a serving platter or individual plates. Sprinkle generously with toasted sesame seeds and freshly sliced green onions. The sesame seeds add a lovely nutty crunch and visual texture, while the vibrant green onions provide a fresh, mild oniony bite that beautifully cuts through the richness of the glaze. These garnishes aren’t just for show; they add crucial layers of flavor and texture that complete the dish.
- Serving Suggestions to Complete Your Meal: These “Honey Garlic Chicken Breasts” are incredibly versatile and pair wonderfully with a variety of sides. I love serving them over a bed of fluffy steamed jasmine rice or brown rice, which soaks up all that extra delicious glaze. For a healthier option, they’re fantastic with steamed or roasted vegetables like broccoli, asparagus, or green beans. If you’re looking for something different, try them with some simple stir-fried noodles or even quinoa. The sweet and savory profile makes them a universally loved dish for weeknights or special occasions. Any leftover sauce is excellent drizzled over your chosen side dish!
Conclusion:
And there you have it, my friends! We’ve journeyed through the simple yet profound steps to create a dish that I genuinely believe will become a cherished staple in your culinary repertoire. This isn’t just another chicken recipe; it’s a gateway to effortlessly delicious meals that bring smiles to faces, even on the busiest of weeknights. I’m truly excited for you to experience the magic that unfolds in your kitchen with this particular preparation.
Why This Recipe Is an Absolute Must-Try:
What makes this recipe for Honey Garlic Chicken Breasts truly stand out is its incredible balance of flavors and its undeniable versatility. Imagine succulent chicken, perfectly tender, bathed in a shimmering, glossy glaze that is the epitome of sweet and savory harmony. The honey provides that beautiful, golden sweetness, perfectly complemented by the pungent depth of fresh garlic, with just a hint of tang to cut through the richness. It’s a flavor profile that appeals to nearly everyone, from the pickiest eaters to the most seasoned food enthusiasts. Beyond its taste, the sheer simplicity of this recipe is a game-changer. You don’t need exotic ingredients or complicated techniques. Everything comes together swiftly, making it an ideal choice when time is precious but you refuse to compromise on a satisfying, homemade meal. It truly embodies that ideal combination of minimal effort yielding maximum flavor, ensuring that your weeknight dinners are both exciting and stress-free. There’s a certain comforting warmth about a dish like this, a familiarity that makes it instantly appealing, yet it still feels special enough for a casual gathering. You’ll be amazed at how such simple components can create something so utterly delightful and memorable for your taste buds, solidifying its place as a guaranteed crowd-pleaser and a personal favorite.
Elevate Your Meal: Inspired Serving Suggestions
Now that you’ve mastered the art of these incredible chicken breasts, let’s talk about how to make them shine even brighter on your dinner table. For a classic, comforting meal, I absolutely adore serving them alongside a fluffy bed of jasmine rice or quinoa, which beautifully soaks up every last drop of that delectable honey garlic sauce. If you’re leaning towards something green, a simple side salad with a light vinaigrette provides a refreshing contrast, or steamed broccoli and asparagus add a wonderful nutrient boost and vibrant color. Feeling a bit more adventurous? Try pairing them with some roasted sweet potatoes or a creamy mashed potato for a heartier option. For a lighter, more vibrant presentation, consider thinly slicing the cooked chicken and serving it over a fresh spinach salad with some toasted pecans and a sprinkle of feta. It’s also fantastic shredded and tucked into soft tortillas for a quick and flavorful taco night, or even tossed with noodles for an impromptu Asian-inspired pasta dish. The possibilities truly are endless, and each pairing allows the inherent deliciousness of the chicken to shine in a new and exciting way, adapting to whatever mood or occasion you’re cooking for. You can truly make this dish fit any dietary preference or craving with a little creativity and thoughtful accompaniment, transforming it from a simple meal into an unforgettable culinary experience.
Unleash Your Inner Chef: Creative Variations to Explore
But wait, there’s more! While the base recipe for these chicken breasts is phenomenal as is, I always encourage you to play around and make it your own. Want a little kick? A pinch of red pepper flakes added to the sauce during the last few minutes of cooking will introduce a delightful warmth. For an extra layer of aromatic complexity, feel free to toss in some fresh ginger along with the garlic. If you’re out of chicken breasts, don’t fret; this magnificent glaze works equally well with chicken thighs, pork tenderloin, or even firm tofu for a vegetarian twist. You could also transform this into a fantastic stir-fry by adding some colorful bell peppers, snap peas, and carrots to the pan during the last few minutes, creating a full meal in one skillet. Or, for a beautiful presentation, a sprinkle of toasted sesame seeds and fresh chopped green onions over the finished dish will not only add visual appeal but also a lovely textural and aromatic contrast. Don’t be afraid to experiment with different herbs either; a sprig of fresh thyme or rosemary can introduce an unexpected yet delightful twist to the classic flavor profile, truly making this recipe uniquely yours. The beauty of a recipe this versatile is that it provides a perfect canvas for your own culinary imagination, ensuring it never feels boring or repetitive, no matter how many times you make it.
Now, it’s Your Turn!
I genuinely hope this recipe inspires you to get into your kitchen and create something truly special. There’s an immense joy that comes from cooking a delicious meal from scratch, and I promise you, the reward of these savory-sweet chicken breasts is well worth the minimal effort. So go ahead, gather your ingredients, follow these simple steps, and prepare to delight your taste buds. Once you’ve made it, I would absolutely love to hear about your experience! Did you stick to the original recipe, or did you venture into exciting variations? What did you serve it with? Share your culinary triumphs and tag me – I’m always thrilled to see your creations and hear your feedback. Happy cooking, and may your kitchen be filled with wonderful aromas and even more wonderful memories!
Easy Honey Garlic Chicken Breasts – Sweet, Savory & Speedy
Easy Honey Garlic Chicken Breasts, a perfect blend of sweet and savory with minimal effort. Enjoy tender, juicy chicken coated in a delicious, sticky glaze of honey and garlic, ideal for quick weeknight dinners.
Ingredients
-
2 large chicken breasts
-
4 cloves garlic
-
2 tablespoons soy sauce
-
2 tablespoons honey
Instructions
-
Step 1
Pat 2 large chicken breasts dry. If thick, pound lightly to 3/4-inch even thickness for uniform cooking. -
Step 2
In a bowl, whisk together 4 minced garlic cloves, 2 tablespoons soy sauce, and 2 tablespoons honey until well combined. -
Step 3
Place chicken in a resealable bag or shallow dish, pour marinade over, ensuring breasts are coated. Refrigerate for at least 30 minutes. Before cooking, pour the used marinade into a small saucepan to reserve for the glaze. -
Step 4
Heat a skillet over medium-high heat. Cook chicken breasts for 4-6 minutes per side until golden brown and the internal temperature reaches 165°F (74°C). Remove chicken from the pan and let it rest for 5-10 minutes, tented with foil. -
Step 5
Bring the reserved marinade in the saucepan to a rolling boil over medium heat for 1-2 minutes, ensuring it is safe to consume. -
Step 6
Slice the rested chicken breasts and toss them with the warm honey garlic glaze, or spoon the glaze generously over whole chicken breasts before serving.
Important Information
Nutrition Facts (Per Serving)
It is important to consider this information as approximate and not to use it as definitive health advice.
Allergy Information
Please check ingredients for potential allergens and consult a health professional if in doubt.
Leave a Comment