
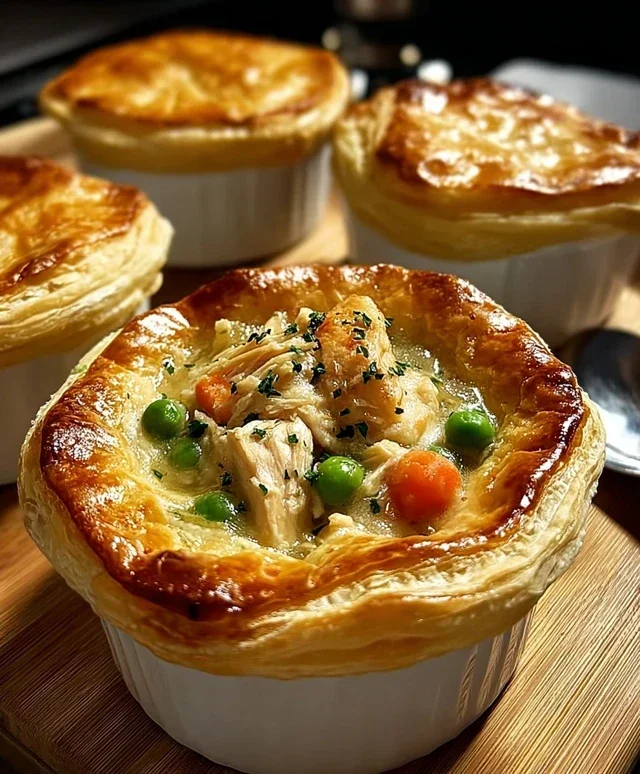
Mini Chicken Pot Pies are the ultimate comfort food, elevated. There’s something undeniably heartwarming about a perfectly portioned, golden-brown pastry crust encasing a creamy, savory filling. For so many of us, they evoke cherished memories of cozy evenings and delightful family meals. These aren’t just tiny versions of a classic; they’re a testament to how a familiar favorite can be reimagin extracted to bring even more joy. What makes these mini chicken pot pies so special? It’s the perfect balance of tender chicken, sweet vegetables, and that luscious, velvety sauce, all nestled within a flaky, buttery shell. They’re ideal for individual servings, making them fantastic for potlucks, parties, or simply a special weeknight treat. Get ready to fall in love all over again with the charm and deliciousness of these adorable mini chicken pot pies.
Mini Chicken Pot Pies
There’s something incredibly comforting about a classic chicken pot pie. That flaky crust, the creamy, savory filling – it’s a hug in a bowl. But sometimes, a full-sized pot pie feels like a bit much, or maybe you’re just looking for individual servings that are perfect for a weeknight meal or even a fun appetizer. That’s where these mini chicken pot pies come in! They’re incredibly easy to make, especially with the magic of refrigerated biscuit dough, and they deliver all that delicious pot pie flavor in a charming, bite-sized package. They’re a guaranteed crowd-pleaser, and honestly, so satisfying to whip up. Let’s get started!
Ingredients:
Preparing the Filling
The heart of any great pot pie is its filling, and for these mini versions, we’re keeping it wonderfully simple and flavorful. The beauty of using cream of chicken soup is that it provides a creamy base and a good amount of seasoned chicken flavor without needing a lot of extra steps. We’re just going to enhance it with a few pantry staples to elevate those savory notes.
First things first, let’s talk about the chicken. I like to dice my boneless chicken breast into small, bite-sized pieces, about ½-inch cubes. This ensures that the chicken cooks quickly and evenly within the filling. You can cook the chicken ahead of time by simmering it in water until cooked through and then dicing it, or you can even use leftover cooked chicken if you have some on hand – just make sure it’s cooled and diced.
In a medium bowl, combine the diced chicken breast with the frozen peas and carrots. I love using the frozen peas and carrots mix because it’s convenient and adds a lovely pop of color and sweetness to the filling. Next, pour in the entire can of cream of chicken soup. This is going to be our creamy binder. Now, let’s add our seasonings. Sprinkle in the garlic powder, onion powder, and the ¼ teaspoon of salt. Give everything a really good stir until all the ingredients are well combined and the chicken and vegetables are thoroughly coated in the soup mixture. This simple combination creates a rich and savory base that’s going to be absolutely delicious.
Assembling and Baking the Mini Pot Pies
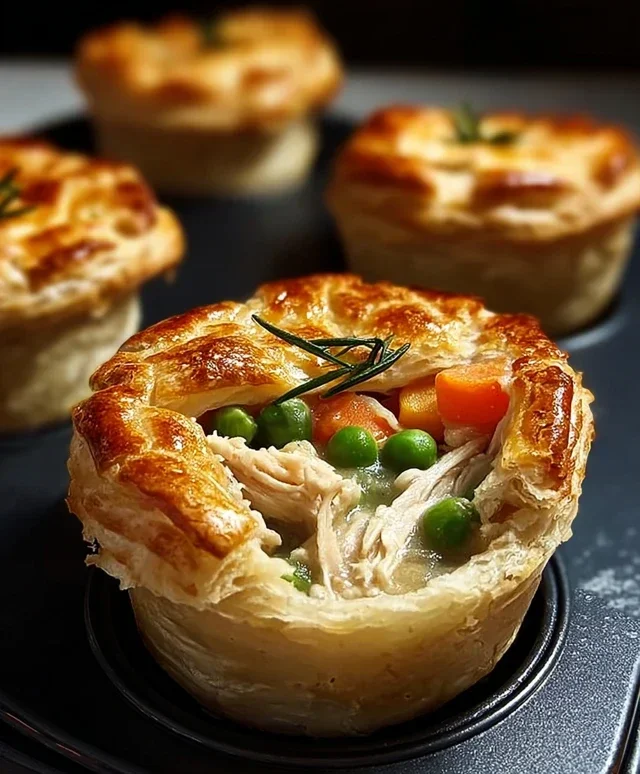
Now for the fun part – transforming our filling and biscuits into adorable mini pot pies! We’re going to use a muffin tin for this, which is perfect for creating those individual portions.
Start by preheating your oven to 375 degrees Fahrenheit (190 degrees Celsius). This temperature is ideal for ensuring the biscuit dough cooks through and turns a beautiful golden brown while the filling gets nice and warm.
Next, generously grease your muffin tin with cooking spray. Make sure to get into all the nooks and crannies. This is crucial for preventing the biscuit dough from sticking, which would make removing your finished pot pies a bit of a struggle. I usually go over each cup a couple of times just to be safe.
Open up your cans of refrigerated biscuits. You’ll have two cans, each with 8 biscuits, giving you a total of 16. Take one biscuit from each can and gently press them together to form a slightly larger, more robust bottom crust. You can also just use two biscuits side-by-side and press them a little. Now, carefully press this combined biscuit dough into the bottom and up the sides of each muffin cup, creating a little pastry shell. You want to make sure the dough comes up the sides enough to hold the filling. Don’t worry if it’s not perfectly even; a little rustic charm is part of the appeal!
Once your biscuit “cups” are formed, it’s time to fill them. Spoon the prepared chicken and vegetable mixture evenly into each biscuit-lined muffin cup. Don’t overfill them, or the filling might bubble over too much during baking. Aim to fill them about three-quarters of the way full.
Now, for the top crust! Take the remaining biscuits. You can either place a whole biscuit on top of each filled cup, gently pressing the edges to seal it to the bottom crust, or if you’re feeling fancy, you can cut your biscuits into quarters and arrange them artfully on top. For a simpler approach, just press a whole biscuit down on top. If you like a golden-brown finish and a little shine, you can lightly brush the tops of the biscuits with a beaten egg or a splash of milk before baking, though this is entirely optional.
Baking to Golden Perfection
Place the filled muffin tin into your preheated oven. Bake for approximately 20 to 25 minutes. You’re looking for the biscuit tops to be puffed up and golden brown, and the filling to be bubbly and heated through. The edges of the biscuits should be a lovely deep golden color. Keep an eye on them, as oven temperatures can vary. If you notice the tops are browning too quickly, you can loosely tent the muffin tin with aluminum foil for the last 5-10 minutes of baking.
Once they’re done, carefully remove the muffin tin from the oven. Let the mini pot pies cool in the tin for about 5-10 minutes. This allows the filling to set slightly and makes them easier to remove. Then, using a small spatula or a butter knife, gently loosen the edges of each pot pie and carefully lift them out of the muffin tin. Place them on a wire rack to cool a little further before serving. They are best enjoyed warm, when that creamy filling is at its most delightful. These mini chicken pot pies are perfect as a light lunch, a satisfying appetizer, or even a fun dinner option served with a simple side salad. Enjoy the miniature comfort!
Conclusion:
There you have it – a delightful recipe for Mini Chicken Pot Pies that are sure to become a family favorite! These individual delights are perfect for a cozy weeknight dinner, a charming appetizer for guests, or even a fun make-ahead meal prep option. The flaky crust, creamy chicken filling, and medley of tender vegetables create a comforting and satisfying experience that’s hard to beat. I love how versatile they are and how much enjoyment they bring, whether served as a hearty main course or a tasty starter.
For serving, these Mini Chicken Pot Pies are wonderful on their own, but I often pair them with a crisp green salad or a simple side of steamed broccoli. For variations, feel free to experiment with different vegetables like peas, corn, or even diced sweet potatoes. You could also try adding a sprinkle of fresh herbs like thyme or rosemary to the filling for an extra layer of flavor. I truly encourage you to give this recipe a try; you won’t regret the delicious results!
Frequently Asked Questions:
Q: Can I make the pastry crust ahead of time?
A: Absolutely! You can prepare the pie crust dough up to two days in advance and store it in the refrigerator, or freeze it for longer storage. Just ensure it’s well-wrapped to prevent drying out.
Q: What are some good make-ahead strategies for these mini pot pies?
A: You can assemble the unbaked Mini Chicken Pot Pies completely and then freeze them on a baking sheet until solid, before transferring them to a freezer-safe container. Bake them directly from frozen, adding a few extra minutes to the baking time.
Q: Are there any vegetarian alternatives to the chicken?
A: Yes, you can easily adapt this recipe for a vegetarian version! Simply substitute the chicken with a hearty mix of sautéed mushrooms, chickpeas, or firm tofu. You might also want to add some extra vegetables for texture and flavor.
Mini Chicken Pot Pies
Quick and easy mini chicken pot pies made with refrigerated biscuits, chicken, and a creamy vegetable filling.
Ingredients
-
2 cans refrigerated biscuits (8-count each)
-
½ lb boneless chicken breast, diced
-
1 cup frozen peas & carrots
-
1 can (10.5 oz) cream of chicken soup
-
½ tsp garlic powder
-
½ tsp onion powder
-
¼ tsp salt
-
Cooking spray
Instructions
-
Step 1
Preheat oven to 375°F (190°C). Lightly grease a 16-cup mini muffin tin with cooking spray. -
Step 2
In a skillet, cook diced chicken over medium heat until browned and cooked through. Drain off any excess liquid. -
Step 3
In a bowl, combine the cooked chicken, frozen peas & carrots, cream of chicken soup, garlic powder, onion powder, and salt. Stir until well combined. -
Step 4
Open the cans of biscuits. Flatten each biscuit slightly and press one biscuit into the bottom and up the sides of each greased mini muffin cup. -
Step 5
Spoon the chicken and vegetable mixture evenly into the biscuit-lined muffin cups. -
Step 6
Bake for 18-20 minutes, or until the biscuit crust is golden brown and the filling is bubbly. -
Step 7
Let cool slightly in the muffin tin before carefully removing and serving.
Important Information
Nutrition Facts (Per Serving)
It is important to consider this information as approximate and not to use it as definitive health advice.
Allergy Information
Please check ingredients for potential allergens and consult a health professional if in doubt.


Leave a Comment