
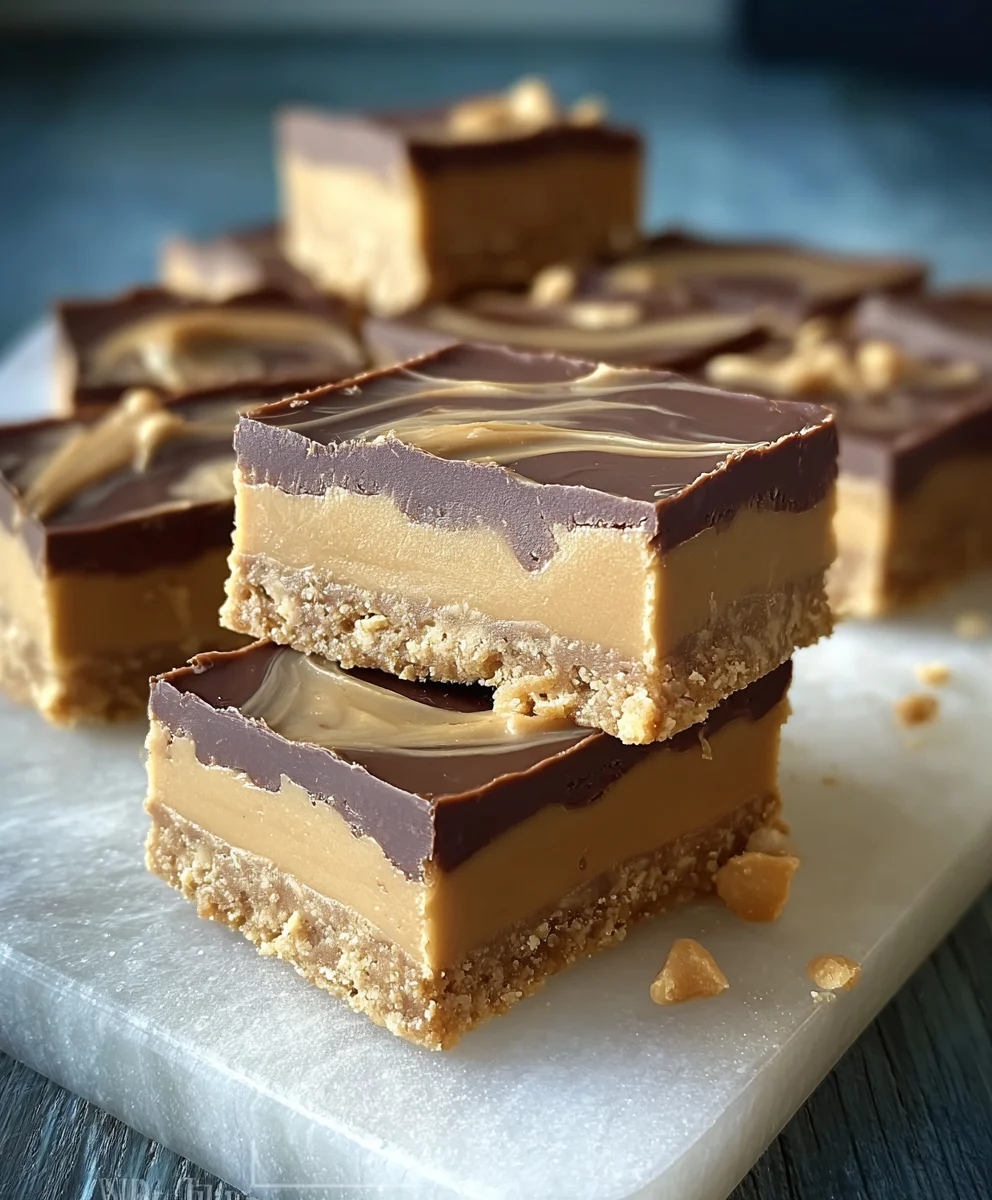
Peanut Butter Bars are a true testament to the simple joys of life, a confection that transports us back to childhood with every rich, satisfying bite. What is it about these seemingly humble bars that captures our hearts and taste buds so effectively? It’s the perfect harmony of creamy, salty peanut butter and sweet, often chocolatey goodness, all encased in a delightful texture that’s both chewy and firm. People adore Peanut Butter Bars because they offer an immediate hit of comfort and nostalgia, a reliable treat that never disappoints. They’re the ultimate no-fuss dessert, perfect for a quick indulgence, a potluck centerpiece, or simply when that undeniable craving strikes. But what truly makes these particular Peanut Butter Bars special is the delightful twist we’re about to explore, a secret ingredient that elevates this classic to an entirely new level of deliciousness. Get ready to fall in love all over again with this iconic treat!
Ingredients:
- 1 cup butter, melted
- 2 cups graham cracker crumbs
- 2 cups confectioners’ sugar (powdered sugar)
- 1 cup + 4 tablespoons peanut butter
- 1 ½ cups milk chocolate chips
Preparing the Base
Step 1: Combine Graham Cracker Crumbs and Melted Butter
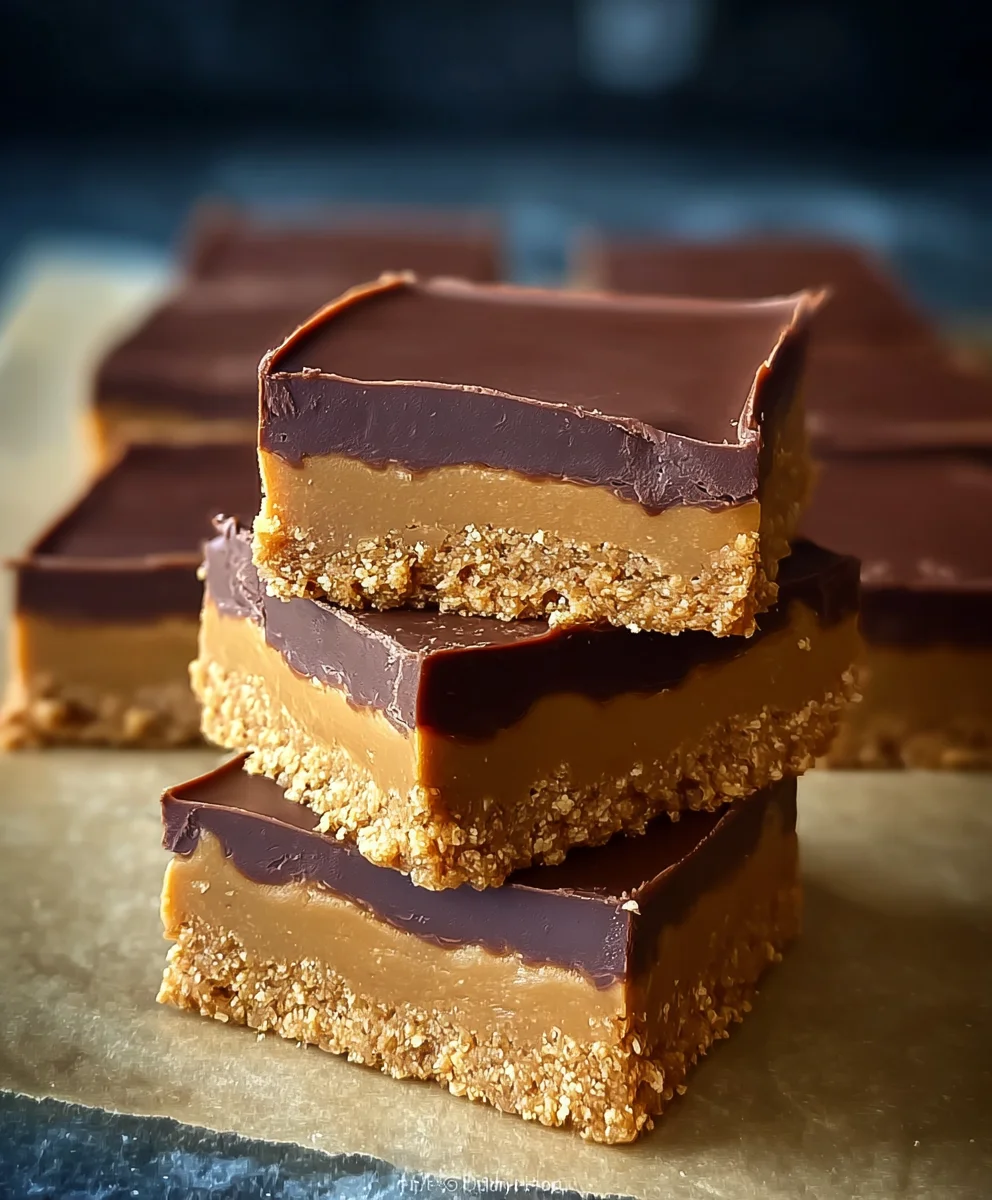
First, let’s get our base ready for these delicious Peanut Butter Bars. In a medium-sized mixing bowl, combine the 2 cups of graham cracker crumbs with the 1 cup of melted butter. It’s important that the butter is fully melted to ensure it coats the crumbs evenly. Stir this mixture thoroughly until all the graham cracker crumbs are moistened. You’re looking for a consistency that resembles wet sand, where the crumbs clump together when squeezed. This will form a firm and delicious foundation for our bars. Once mixed, press this crumb mixture evenly into the bottom of a 9×13 inch baking pan. Use the back of a spoon or your hands to create a compact and level layer. This is crucial for the bars to hold their shape. Don’t be shy with the pressing – a well-compacted base will prevent the bars from crumbling apart when you cut them.
Step 2: Prepare the Peanut Butter Layer
Now, let’s move on to the star of the show: the peanut butter layer! In a separate, larger mixing bowl, combine the 2 cups of confectioners’ sugar and 1 cup of peanut butter. You want to ensure the confectioners’ sugar is sifted if it’s lumpy to avoid any unpleasant texture in your bars. Add the 4 tablespoons of peanut butter to this. Cream these two ingredients together until they are well combined and form a thick, paste-like consistency. You can use a hand mixer on low speed or a sturdy spatula for this. It might take a few minutes of mixing to get everything fully incorporated and smooth. If the mixture seems a little too stiff, you can add another tablespoon of peanut butter, but be careful not to make it too loose, as it needs to be spreadable but firm. Once you have a smooth and creamy peanut butter mixture, carefully spread this evenly over the graham cracker base in the baking pan. Again, use the back of a spatula or a flat-bottomed measuring cup to create a smooth, even layer. This layer is what gives our Peanut Butter Bars their irresistible flavor.
Creating the Chocolate Topping
Step 3: Melt the Milk Chocolate Chips
With our base and peanut butter layer prepared, it’s time for the decadent chocolate topping. In a microwave-safe bowl, combine the 1 ½ cups of milk chocolate chips. Microwave these in 30-second intervals, stirring well after each interval, until the chocolate is almost completely melted. Be very careful not to overheat the chocolate, as this can cause it to seize and become grainy. Alternatively, you can melt the chocolate chips using a double boiler over simmering water. Once the chips are mostly melted, stir them vigorously until the remaining chips melt from the residual heat, creating a smooth, glossy, and pourable chocolate mixture. If the chocolate is still too thick after melting, you can add a teaspoon of vegetable oil or a tablespoon of butter and stir until smooth. This will help achieve a lovely sheen and make it easier to spread.
Step 4: Layer the Chocolate Topping
Once your milk chocolate is perfectly melted and smooth, it’s time to pour it over the peanut butter layer. Carefully pour the melted chocolate evenly over the peanut butter layer, spreading it to cover the entire surface. Use an offset spatula or the back of a spoon to gently spread the chocolate, ensuring it reaches all the edges. You want a nice, even coating so that every bite gets a satisfying chocolate crunch. Try to spread it smoothly to avoid any thick or thin spots. The goal is to create a clean, uniform chocolate surface that will harden beautifully.
Chilling and Cutting
Step 5: Chill the Peanut Butter Bars
Now comes the hardest part – waiting! Once the chocolate topping has been spread evenly, it’s time to let the bars set. Place the 9×13 inch baking pan into the refrigerator. Allow the Peanut Butter Bars to chill for at least 2 to 3 hours, or until the chocolate topping is completely firm and set. This chilling period is essential for the bars to solidify, making them easy to cut into clean, individual portions. The colder they are, the neater your cuts will be. You can even leave them in the refrigerator overnight for the best results.
Step 6: Cut and Serve
Once the bars are thoroughly chilled and the chocolate is firm, it’s time to cut them! Remove the pan from the refrigerator. For the cleanest cuts, you can run a sharp knife under hot water and dry it between each cut. This will help the knife glide through the chocolate and peanut butter layers smoothly. Cut the bars into your desired serving size. Many people prefer squares, but rectangles also work beautifully. Carefully lift the bars out of the pan using the edges of the parchment paper if you used it, or by gently easing them out. Arrange them on a serving platter. These Peanut Butter Bars are best served chilled, so you can store any leftovers back in the refrigerator in an airtight container. Enjoy the delicious layers of graham cracker, creamy peanut butter, and rich milk chocolate!
Conclusion:
And there you have it! You’ve successfully created a batch of delightful Peanut Butter Bars. These no-bake wonders are incredibly versatile and always a crowd-pleaser, making them perfect for any occasion. I hope you enjoyed the process as much as I do. They are truly a testament to how simple ingredients can come together to create something so satisfying and delicious. Remember, the beauty of these Peanut Butter Bars lies in their adaptability, so feel free to experiment and make them your own!
For serving, I love these chilled straight from the refrigerator. They also pair wonderfully with a glass of cold milk, a cup of coffee, or even as a sweet ending to a hearty meal. If you’re feeling adventurous, consider drizzling them with melted chocolate for an extra layer of indulgence, or even sprinkling them with sea salt for a delightful sweet and salty contrast.
Don’t be afraid to play around with the ingredients! You can add chopped nuts, chocolate chips, or even a hint of cinnamon to your base mixture. This recipe is a fantastic canvas for your culinary creativity.
Frequently Asked Questions:
Can I freeze these Peanut Butter Bars?
Absolutely! These bars freeze beautifully. Once completely set, cut them into individual portions and wrap them tightly in plastic wrap and then aluminum foil. They can be stored in the freezer for up to 2-3 months. Thaw them in the refrigerator overnight or at room temperature for about 30 minutes before enjoying.
What kind of peanut butter should I use?
For the best texture and flavor, I recommend using creamy, processed peanut butter (like Jif or Skippy). Natural peanut butter tends to be oilier and can result in a softer, greasier bar. If you do use natural peanut butter, make sure to stir it very well to incorporate the oil before measuring.
Can I make these bars vegan?
Yes, you can easily make these Peanut Butter Bars vegan! Simply substitute the butter with a vegan butter alternative (like margarine or a coconut oil-based spread) and ensure your chocolate chips are dairy-free. The rest of the ingredients are typically vegan-friendly.
Easy Peanut Butter Bars – No-Bake Treat
Delicious no-bake peanut butter bars with a graham cracker crust, creamy peanut butter filling, and a rich milk chocolate topping.
Ingredients
-
1 cup butter, melted
-
2 cups graham cracker crumbs
-
2 cups confectioners’ sugar (powdered sugar)
-
1 cup + 4 tablespoons peanut butter
-
1 ½ cups milk chocolate chips
Instructions
-
Step 1
Combine the graham cracker crumbs and melted butter in a medium bowl until evenly moistened. Press this mixture firmly and evenly into the bottom of a 9×13 inch baking pan. -
Step 2
In a separate large bowl, cream together the confectioners’ sugar and 1 cup of peanut butter until smooth and thick. Add the remaining 4 tablespoons of peanut butter and mix until fully incorporated. Spread this peanut butter mixture evenly over the graham cracker base. -
Step 3
Melt the milk chocolate chips in a microwave-safe bowl in 30-second intervals, stirring between each, until almost completely melted. Stir until smooth and glossy. -
Step 4
Pour the melted chocolate evenly over the peanut butter layer and spread to cover the entire surface. Use an offset spatula or the back of a spoon for a smooth, even coating. -
Step 5
Refrigerate the bars for at least 2 to 3 hours, or until the chocolate topping is completely firm and set. -
Step 6
Once chilled, cut the bars into desired serving sizes. For cleaner cuts, run a sharp knife under hot water and dry it between cuts. Serve chilled and store leftovers in an airtight container in the refrigerator.
Important Information
Nutrition Facts (Per Serving)
It is important to consider this information as approximate and not to use it as definitive health advice.
Allergy Information
Please check ingredients for potential allergens and consult a health professional if in doubt.
Leave a Comment