
4-ingredient Strawberry Sando perfection awaits! If you’re anything like me, you crave those moments of pure, unadulterated sweetness without the fuss. This delightful 4-ingredient Strawberry Sando is your answer. It’s a culinary hug in edible form, a childhood memory reimagin extracted for busy modern lives. What makes this simple sandwich so utterly captivating? It’s the perfect marriage of pillowy soft bread, luscious, sweet strawberries, a touch of creamy indulgence, and that undeniable magic that happens when just a few perfect ingredients come together. People adore this Strawberry Sando because it’s impossibly easy to make, yet tastes like a gourmet treat. It’s the ultimate express path to happiness on a plate, ideal for a quick breakfast, an afternoon pick-me-up, or even a light dessert. Get ready to fall in love with this effortlessly charming creation.

4-Ingredient Strawberry Sando: A Taste of Pure Bliss
There are some desserts that are so simple, so elegant, they defy explanation. The 4-ingredient Strawberry Sando is one of those culinary marvels. Hailing from the vibrant street food scene of Japan, this delightful treat is a testament to the power of quality ingredients and minimalist preparation. It’s the perfect balance of creamy, sweet, and fruity, all encased in the softest, pillowy bread. Whether you’re looking for a quick afternoon pick-me-up, a charming addition to a tea party, or simply a moment of pure, unadulterated joy, this sando delivers. And the best part? It requires just four, readily available ingredients. Let’s dive into the magic!
Ingredients:
Preparing Your Strawberry Sando
The beauty of this recipe lies in its simplicity. We’re not overcomplicating things here; we’re letting the star ingredients shine. The milk bread, with its inherent sweetness and incredibly soft texture, forms the perfect foundation. Fresh strawberries, bursting with natural sweetness and a hint of tartness, are the vibrant heart of this creation. Whipping cream, when lightly sweetened and whipped to perfection, provides a cloud-like richness that cradles the strawberries. And a touch of sugar? Just enough to enhance the natural sweetness of the fruit.
Step 1: Preparing the Strawberries
The first step is to get our strawberries ready. Gently wash the strawberries under cool running water and then carefully pat them dry with a clean kitchen towel or paper towels. It’s crucial to ensure they are thoroughly dried, as excess moisture can make the bread soggy. Once dried, remove the green tops from each strawberry. You can do this with a small knife or a paring knife, making a small incision around the stem and pulling it away. For this recipe, we want to slice the strawberries. Aim for slices that are about ¼ inch thick. You don’t want them too thin, or they might get mushy, and not too thick, or they might overpower the other elements. Set these beautiful slices aside.
Step 2: Sweetening the Berries
Now, we’ll add a touch of magic to our strawberries. Take the sliced strawberries and place them in a small bowl. Sprinkle the 1 tablespoon of white granulated sugar over them. Gently toss the strawberries with a spoon to ensure they are evenly coated with the sugar. The sugar will start to draw out some of the natural juices from the strawberries, creating a light, syrupy glaze. This process not only adds a touch more sweetness but also intensifies their flavor. Let them sit for about 5-10 minutes while you prepare the cream. This brief maceration period is key to achieving that delightful, slightly jammy texture.
Step 3: Whipping the Cream
This is where our 1/2 cup of chilled whipping cream comes into play. For the best results, make sure your whipping cream is very cold. You can even chill your mixing bowl and whisk attachment in the freezer for about 10-15 minutes before you start. This helps the cream whip up faster and achieve a better volume. Pour the cold whipping cream into your chilled bowl. Using an electric mixer (handheld or stand mixer), start whipping the cream on a medium speed. As it begin extracts to thicken, you’ll notice soft peaks forming. Continue whipping until you reach medium-stiff peaks. This means that when you lift the whisk, the cream will hold its shape but the tip will gently curl over. Be careful not to over-whip, as you don’t want to turn it into butter. The texture should be light, airy, and beautifully smooth.
Step 4: Assembling the Sando Base
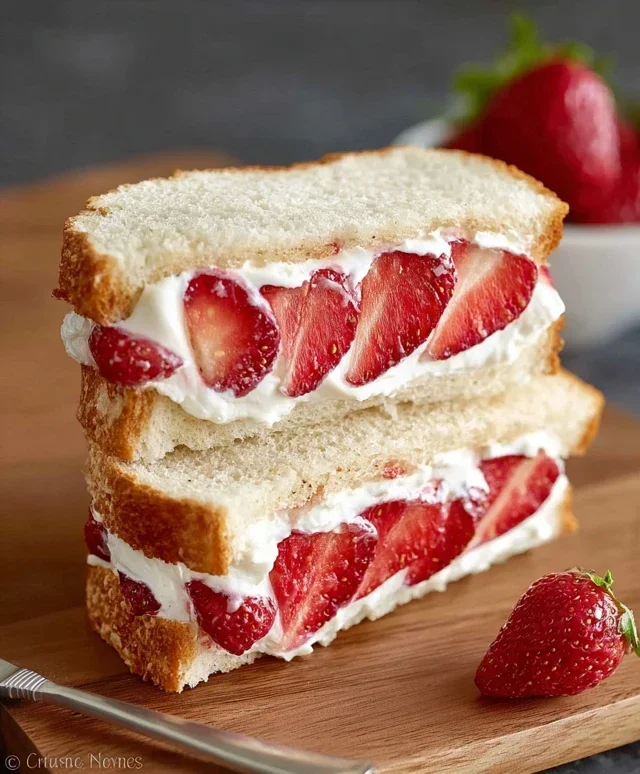
Now for the assembly! Take your two thick slices of milk bread. The soft, slightly sweet nature of milk bread is ideal, but if you can’t find it, a good quality thick-cut white bread or Texas toast will work beautifully. You can lightly toast the bread if you prefer a bit of a textural contrast, but traditionally, it’s served with untoasted bread for maximum softness. Lay one slice of bread flat on your work surface. Spread a generous layer of your whipped cream evenly over the entire surface of this bread slice, going almost to the edges. Don’t be shy with the cream; it’s a significant part of what makes this sando so divine.
Step 5: Layering the Strawberries and Completing the Sando
Once the cream is spread, it’s time to add the star of the show: the strawberries. Arrange the sweetened strawberry slices artfully over the layer of whipped cream. Try to create an even layer, covering as much of the cream as possible. You can overlap them slightly. Now, take the second slice of bread and spread another generous layer of whipped cream on one side. Carefully place this cream-covered side down onto the strawberry layer, effectively closing the sando. Gently press down on the sando to ensure everything is held together, but avoid squishing it too much, as you want to maintain that airy texture.
Step 6: The Final Touch: Cutting and Serving
This is the moment of truth! To make it easier to eat and to showcase the beautiful layers within, it’s traditional to cut the sando. Using a sharp knife, carefully slice the sando in half diagonally. This creates two triangular halves, revealing the vibrant red strawberries nestled between the fluffy white cream and soft bread. Serve immediately for the best experience. The contrast of textures and flavors is truly captivating. The soft bread, the light and airy whipped cream, and the sweet, slightly juicy strawberries come together in perfect harmony. This is more than just a sandwich; it’s a little piece of edible happiness.
Enjoy your incredibly simple, yet utterly decadent, 4-ingredient Strawberry Sando! It’s a reminder that sometimes, the most delightful things in life are the easiest to make.
Conclusion:
And there you have it! Our incredibly simple 4-ingredient Strawberry Sando recipe is a true testament to how minimal ingredients can lead to maximum delight. This recipe is perfect for anyone seeking a quick, sweet treat that’s both visually appealing and incredibly satisfying. It’s the ideal solution for a last-minute dessert, a delightful afternoon snack, or even a light breakfast. The combination of fluffy bread, creamy filling, and fresh strawberries creates a harmonious bite that’s sure to become a favorite. Don’t hesitate to give this fantastic recipe a try – you won’t regret the ease and deliciousness it brings to your table!
For serving, this sando is wonderful on its own, but also pairs beautifully with a cup of tea or coffee. You can elevate it further by dusting with a little powdered sugar or serving alongside a small scoop of vanilla ice cream. If you’re feeling adventurous, consider variations! Swap the strawberries for other berries like raspberries or blueberries, or even use a thin layer of jam for an extra burst of flavor. You could also experiment with different types of bread – brioche or challah would add an even richer taste.
Frequently Asked Questions:
Can I make this strawberry sando ahead of time?
While it’s best enjoyed fresh for optimal texture, you can assemble the sando a couple of hours in advance. Store it loosely wrapped in the refrigerator to prevent the bread from becoming soggy. It’s important to add the strawberry filling just before serving if possible, or very close to it, to maintain the best crispness of the bread.
What kind of cream filling is best?
For this 4-ingredient strawberry sando, a simple whipped cream is fantastic. You can use heavy whipping cream whipped with a touch of sugar and vanilla extract. If you prefer something richer, cream cheese mixed with a little powdered sugar and heavy cream also makes a delightful, slightly tangy filling.
4-Ingredient Strawberry Sando
A simple and delightful Japanese-inspired strawberry sandwich made with just four main ingredients: milk bread, fresh strawberries, sugar, and whipped cream.
Ingredients
-
2 thick slices milk bread (or regular thick white bread, like Texas toast)
-
5 strawberries (with tops removed)
-
1 tbsp white granulated sugar
-
1/2 cup whipping cream (or heavy cream chilled)
-
1 tsp vanilla extract (optional, for added flavor)
-
1/2 tsp powdered sugar (optional, for dusting)
Instructions
-
Step 1
Wash and hull the strawberries. Slice them thinly, about 1/4 inch thick. -
Step 2
In a small bowl, combine the sliced strawberries with 1 tablespoon of white granulated sugar. Gently toss to coat and let them sit for about 5-10 minutes to release their juices. -
Step 3
In a separate chilled bowl, whip the cold heavy cream until it forms soft peaks. If using, add vanilla extract at this stage and continue whipping until medium peaks form. Be careful not to over-whip. -
Step 4
Spread a generous layer of the whipped cream onto one slice of milk bread, covering it completely. -
Step 5
Arrange the sugared strawberry slices evenly over the whipped cream. Gently press them down slightly. -
Step 6
Top with another generous layer of whipped cream, ensuring all the strawberries are covered. -
Step 7
Place the second slice of milk bread on top, pressing down gently to secure the sandwich. If desired, dust the top with powdered sugar for an extra touch. -
Step 8
Using a sharp knife, carefully slice the sandwich in half, either diagonally or straight across. Serve immediately.
Important Information
Nutrition Facts (Per Serving)
It is important to consider this information as approximate and not to use it as definitive health advice.
Allergy Information
Please check ingredients for potential allergens and consult a health professional if in doubt.


Leave a Comment