
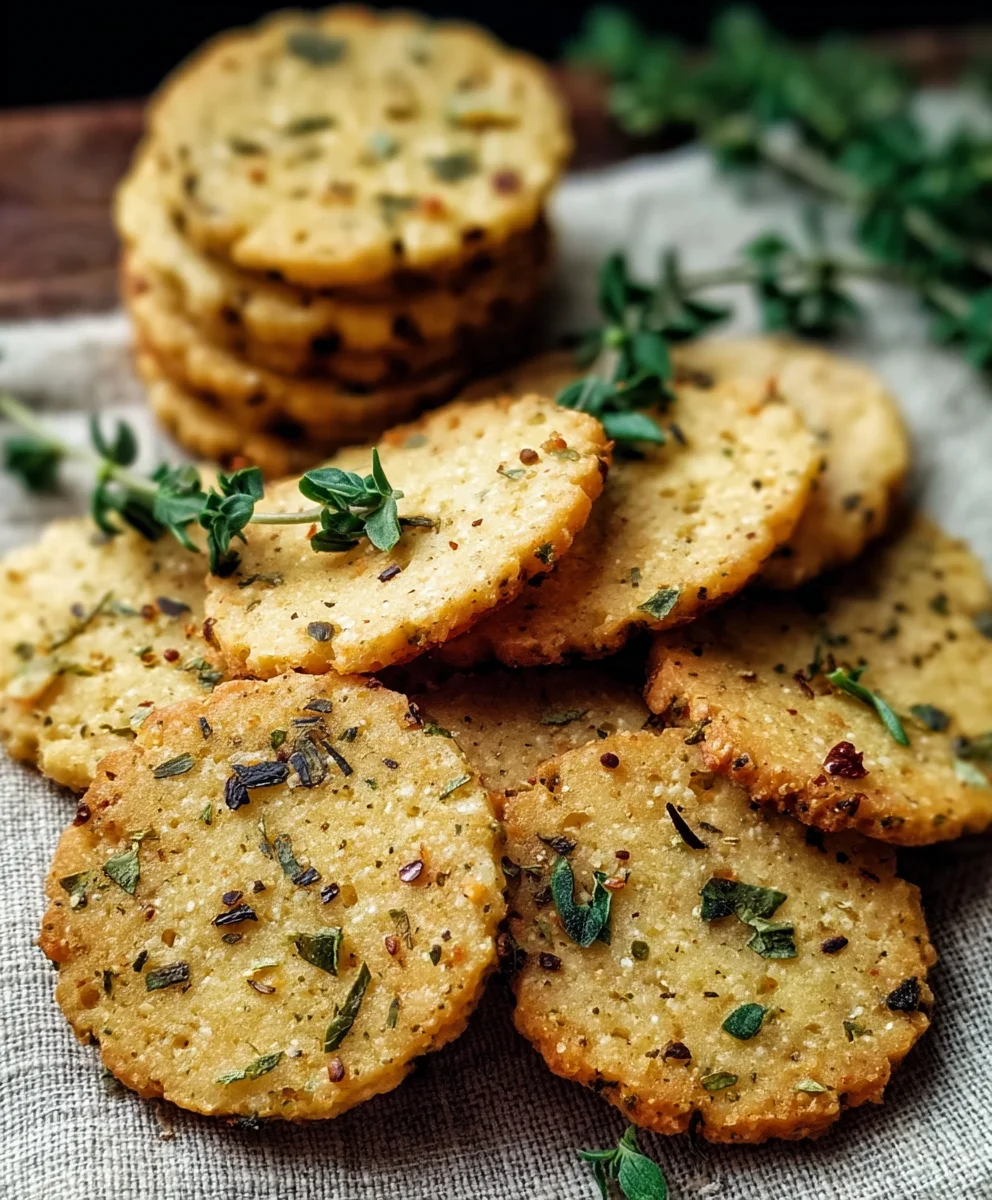
Garlic and Herb Chickpea Flour Snack Crackers are about to become your new obsession. Forget those bland, store-bought options; we’re talking about a flavor explosion that’s both satisfyingly crunchy and remarkably wholesome. There’s a reason why so many people are falling head over heels for these delightful little bites. It’s the perfect alchemy of savory garlic, aromatic herbs, and the subtly nutty, gluten-free goodness of chickpea flour. These aren’t just any crackers; they’re a testament to how simple, natural ingredients can create something truly extraordinary. Whether you’re looking for a guilt-free afternoon pick-me-up, a crowd-pleasing appetizer, or a dipper for your favorite hummus, these Garlic and Herb Chickpea Flour Snack Crackers deliver. What truly sets them apart is their incredible versatility and the sheer joy they bring to any snacking occasion. Get ready to ditch the junk and embrace a truly delicious, homemade creation!
Ingredients:
- 1 cup chickpea flour (besan), about 120g
- ½ cup water, about 120ml
- 2 tablespoons olive oil, plus more for brushing
- 1 teaspoon dried mixed herbs (such as rosemary, thyme, oregano)
- 1 teaspoon garlic powder
- ½ teaspoon salt
- ¼ teaspoon black pepper
- Sesame seeds, for sprinkling
- Flaky sea salt, for sprinkling
- Additional dried herbs, for sprinkling (optional, for extra flair)
Preparing the Dough
This is where the magic begins! We’re going to create a simple yet flavorful dough that forms the base of our Garlic and Herb Chickpea Flour Snack Crackers. The beauty of chickpea flour is its naturally nutty flavor and slightly rustic texture, which is perfect for a homemade cracker. Start by gathering all your dry ingredients in a medium-sized mixing bowl. This includes the chickpea flour, dried mixed herbs, garlic powder, salt, and black pepper. Giving these a good whisk together ensures that all the seasonings are evenly distributed throughout the flour. This step is crucial to avoid any patches of blandness or overpowering spice in your finished crackers. Once your dry ingredients are well combined, it’s time to add the wet ingredients. Pour in the ½ cup of water and the 2 tablespoons of olive oil. The olive oil will not only add a wonderful richness and help with browning but also contribute to a slightly tender texture in the final cracker.
Mixing and Kneading the Dough
Now, let’s bring it all together. Using a spoon or a spatula, begin mixing the wet and dry ingredients. You’ll notice the mixture starting to clump and form a rough dough. Once it becomes too stiff to stir easily, switch to using your hands. Gently bring the dough together in the bowl. It might feel a little sticky at first, and that’s perfectly normal. Don’t be tempted to add more flour at this stage unless it’s absolutely unmanageable. Instead, continue to work it gently. After a minute or two of mixing, you should have a cohesive ball of dough. Turn the dough out onto a clean, lightly floured surface – I find a pinch of chickpea flour works best to prevent sticking. Knead the dough for about 3-5 minutes. This process is not about developing gluten like in bread; rather, it’s about ensuring all the ingredients are thoroughly incorporated and the dough becomes smooth and pliable. You want a dough that’s firm enough to roll out thinly but not so dry that it crumbles.
Rolling and Shaping the Crackers
This is where we get our crackers ready for baking. Take your prepared dough and place it back onto your lightly floured surface. You have a couple of options here depending on your preference and kitchen tools. The most straightforward method is to use a rolling pin. Place a piece of parchment paper over the dough and then roll it out. Another excellent method is to place the dough between two sheets of parchment paper. This technique is fantastic for preventing sticking and allows for very even rolling. Roll the dough out as thinly as you possibly can, aiming for about 1/16th of an inch thickness. The thinner you roll it, the crispier your crackers will be. Once the dough is rolled out to your desired thinness, peel off the top layer of parchment paper (if you used two sheets). Now, you can score your crackers. I like to use a pizza cutter or a sharp knife to gently mark out squares or rectangles. This makes it easier to break them apart after baking. You don’t need to cut all the way through, just a good scoring will do the trick.
Adding Toppings and Preparing for Baking
This step is all about adding those final touches that make these Garlic and Herb Chickpea Flour Snack Crackers truly special. Preheat your oven to 375°F (190°C). This ensures your oven is at the perfect temperature to bake the crackers to a delightful crispness. Now, with the dough still on the parchment paper on your baking sheet, it’s time for the toppings. Lightly brush the surface of the rolled-out dough with a little extra olive oil. This helps the seeds and salt adhere and also contributes to a beautiful golden-brown finish. Next, sprinkle generously with sesame seeds. They add a lovely crunch and a subtle nutty flavor. Then, add a sprinkle of flaky sea salt. The larger crystals of flaky salt provide bursts of savory flavor and an appealing visual texture. If you’re feeling fancy or want an extra herbaceous punch, you can also sprinkle on a little more of your dried mixed herbs at this stage. Be generous but don’t overdo it; a little goes a long way.
Baking and Cooling
The final stage is baking! Carefully place the baking sheet with your prepared crackers into the preheated oven. Bake for approximately 15-20 minutes. The exact baking time will depend on how thinly you rolled your dough and how crispy you like your crackers. Keep a close eye on them, especially towards the end of the baking time. You’re looking for them to be golden brown around the edges and lightly golden across the surface. Once they are baked to your liking, remove the baking sheet from the oven. Let the crackers cool on the baking sheet for about 5-10 minutes. This allows them to firm up slightly. After this initial cooling period, you can carefully break them along the scored lines. If they don’t break cleanly, you can use a knife to finish the separation. Transfer the broken crackers to a wire cooling rack to cool completely. It’s crucial to let them cool down entirely before storing them. This ensures they retain their crispness. Once completely cool, store your Garlic and Herb Chickpea Flour Snack Crackers in an airtight container at room temperature. They should stay wonderfully crisp for up to a week, making them the perfect make-ahead snack!

Conclusion:
I hope you’ve enjoyed learning how to make these delightful Garlic and Herb Chickpea Flour Snack Crackerss! This recipe is incredibly rewarding, offering a wholesome and flavorful alternative to store-bought snacks. The earthy notes of chickpea flour pair beautifully with the fragrant garlic and mixed herbs, creating a complex yet perfectly balanced taste that will have you reaching for more. These crackers are surprisingly simple to prepare, making them an ideal weekend project or a quick weekday treat. Don’t be afraid to experiment with the herbs to discover your favorite flavor profile. Embrace the joy of homemade goodness and impress yourself (and anyone you share them with!) with these delicious creations.
For serving, these versatile crackers are fantastic on their own as a light snack. They also shine when paired with your favorite dips like hummus, guacamole, or a creamy cheese spread. Consider serving them alongside a fresh salad or as a crunchy accompaniment to a hearty soup. For variations, feel free to add a pinch of chili flakes for a spicy kick, or incorporate some finely grated Parmesan cheese for an extra savory note. You can also experiment with different seed toppings like sesame or poppy seeds before baking for added texture and flavor. Give them a try – I’m confident you’ll love them!
Frequently Asked Questions:
What is the best way to store these Garlic and Herb Chickpea Flour Snack Crackerss?
To maintain their crispness, store the cooled crackers in an airtight container at room temperature. They should stay fresh for up to a week. If you live in a humid climate, you might find they lose some of their crunch sooner, so consider adding a food-safe silica gel packet to the container to absorb moisture.
Can I make these crackers gluten-free?
Yes, these Garlic and Herb Chickpea Flour Snack Crackerss are naturally gluten-free as chickpea flour is used as the base. Ensure that any dried herbs or other seasonings you add are also certified gluten-free if you have a severe gluten intolerance.
Garlic Herb Chickpea Flour Crackers
Easy and flavorful homemade crackers made with chickpea flour, herbs, and garlic. Perfect for snacking!
Ingredients
-
1 cup chickpea flour
-
½ cup water
-
2 tablespoons olive oil
-
1 teaspoon dried mixed herbs
-
1 teaspoon garlic powder
-
½ teaspoon salt
-
¼ teaspoon black pepper
-
Sesame seeds
-
Flaky sea salt
-
Additional dried herbs
-
Extra olive oil for brushing
Instructions
-
Step 1
In a medium bowl, whisk together chickpea flour, dried mixed herbs, garlic powder, salt, and black pepper. Add water and olive oil, and mix until a rough dough forms. Switch to hands and gently bring the dough together. Knead on a lightly floured surface for 3-5 minutes until smooth and pliable. -
Step 2
Roll out the dough very thinly (about 1/16th of an inch) between two sheets of parchment paper or using a rolling pin with parchment on top. Score the dough into desired cracker shapes using a pizza cutter or sharp knife. -
Step 3
Preheat oven to 375°F (190°C). Brush the surface of the rolled-out dough with extra olive oil. Sprinkle generously with sesame seeds and flaky sea salt. Add additional dried herbs if desired. -
Step 4
Bake for 15-20 minutes, or until golden brown around the edges and lightly golden on the surface. Keep an eye on them to prevent burning. -
Step 5
Let the crackers cool on the baking sheet for 5-10 minutes to firm up. Break them along the scored lines. Transfer to a wire rack to cool completely. -
Step 6
Store completely cooled crackers in an airtight container at room temperature for up to a week.
Important Information
Nutrition Facts (Per Serving)
It is important to consider this information as approximate and not to use it as definitive health advice.
Allergy Information
Please check ingredients for potential allergens and consult a health professional if in doubt.

Leave a Comment