
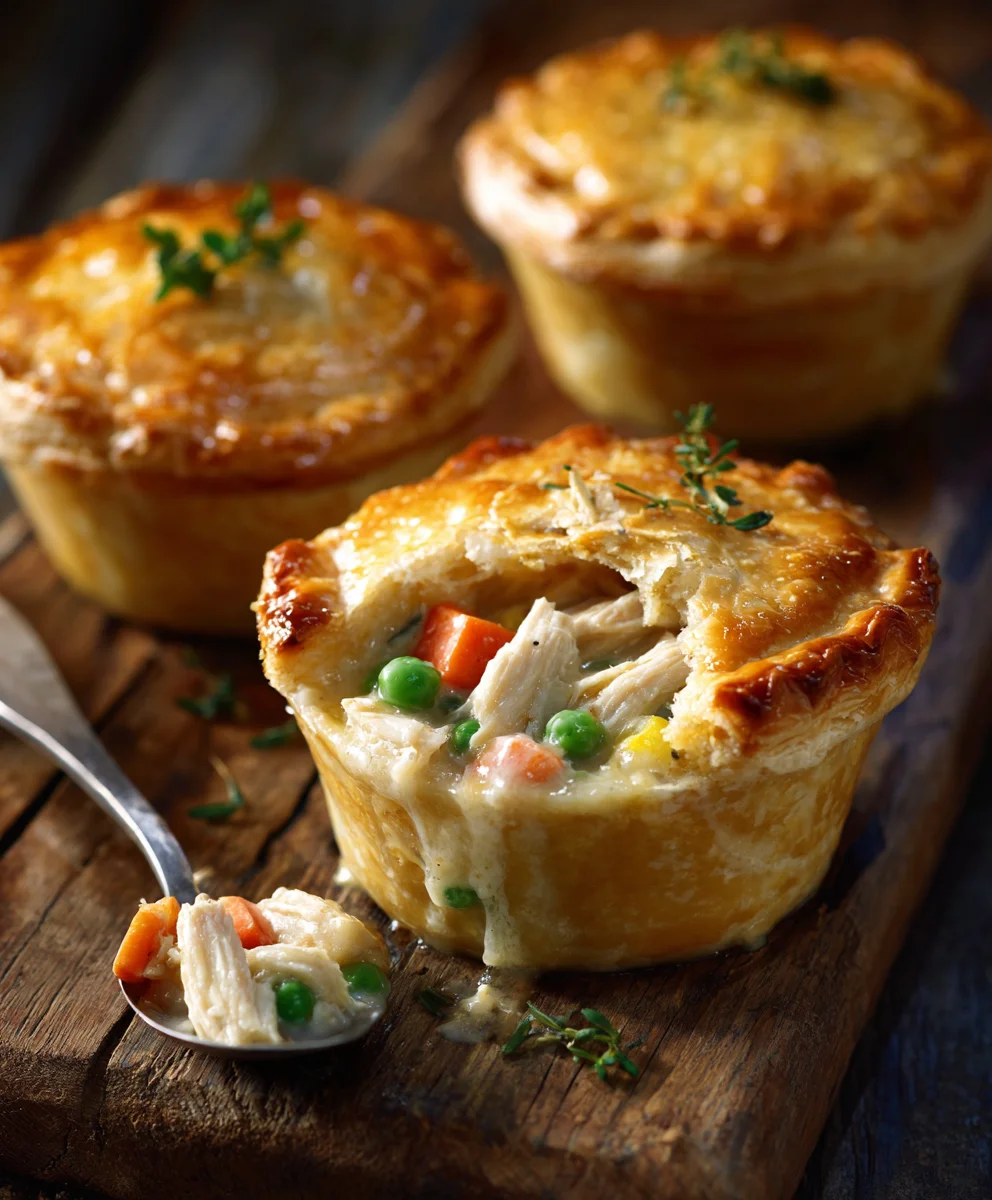
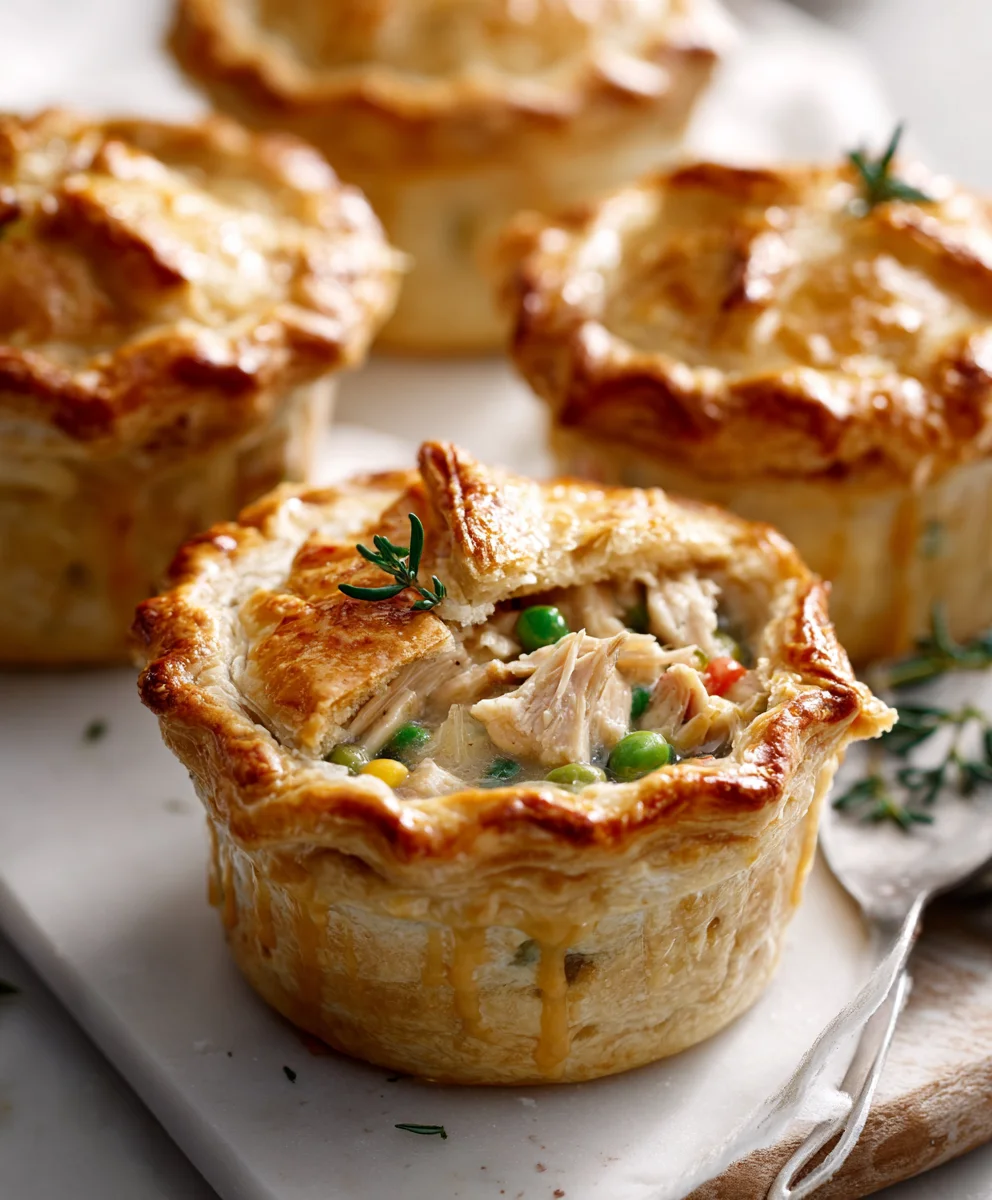
Mini Chicken Pot Pies represent the ultimate evolution of a beloved comfort food, transforming a classic into an irresistible, individual delight. I find myself constantly drawn to the charm and practicality of these miniature marvels. Historically, the concept of encasing a savory filling in a pastry crust dates back centuries, evolving from ancient Roman dishes and medieval European banquets into the quintessential American pot pie we cherish today. This rich culinary lineage speaks to the enduring appeal of a hearty, comforting meal that satisfies both body and soul.
What makes these individual servings so incredibly popular and universally adored? For me, it’s the perfect symphony of textures and flavors: a beautifully golden, flaky crust that gives way to a creamy, savory filling brimming with tender chicken, sweet peas, and carrots. Each bite delivers that wholesome, nostalgic warmth in a perfectly portioned package. The convenience factor is undeniable; they’re ideal for elegant appetizers, delightful lunchbox treats, or a cozy, fuss-free weeknight dinner. The joy of having your own personal pie, without the mess of slicing, truly elevates the dining experience. These Mini Chicken Pot Pies are not just a meal; they’re a charming experience waiting to be savored.
Ingredients:
-
For the Creamy Chicken Filling:
- 2 tablespoons unsalted butter
- 1 tablespoon olive oil
- 1 cup finely diced yellow onion (about 1 medium onion)
- 1 cup finely diced carrots (about 2 medium carrots)
- 1 cup finely diced celery (about 2 stalks)
- 1 teaspoon dried thyme
- ½ teaspoon dried sage
- ½ cup all-purpose flour
- 2 cups low-sodium chicken broth
- 1 cup heavy cream
- 2 cups cooked chicken, shredded or diced into small pieces (rotisserie chicken works wonderfully here for convenience)
- 1 cup frozen green peas, thawed
- 1 cup frozen corn kernels, thawed
- ½ teaspoon salt, or to taste
- ¼ teaspoon black pepper, or to taste
- A pinch of nutmeg (optional, but highly recommended for depth)
-
For the Pie Crusts:
- 2 boxes (each containing 2 crusts) refrigerated pie crusts, for a total of 4 crusts (ensure they are thawed but still cold)
-
For the Egg Wash:
- 1 large egg
- 1 tablespoon water or milk
For the Flavorful Chicken Filling:
- Begin by preparing your aromatic base: In a large, heavy-bottomed pot or Dutch oven, melt 2 tablespoons of unsalted butter with 1 tablespoon of olive oil over medium heat. The olive oil helps prevent the butter from burning too quickly and adds a lovely richness. Once the butter is shimmering, add your finely diced yellow onion, carrots, and celery to the pot.
- Sauté the vegetables until tender: Cook these vegetables, stirring occasionally, for about 8-10 minutes, or until they have softened considerably and the onion is translucent. This step is crucial for building the foundational flavor of your Mini Chicken Pot Pies. As they cook, their natural sweetness will develop, which is absolutely delicious in the final dish.
- Infuse with herbs: Stir in 1 teaspoon of dried thyme and ½ teaspoon of dried sage. Continue to cook for another minute, allowing the herbs to become fragrant. Heating the dried herbs briefly helps to release their essential oils, intensifying their flavor profile in our creamy filling.
- Create the roux (the magic thickening agent!): Sprinkle ½ cup of all-purpose flour over the softened vegetables and herbs. Stir constantly for 1-2 minutes, allowing the flour to cook out its raw taste. This mixture of butter, oil, and flour is called a roux, and it’s what will make our filling wonderfully thick and luscious. Make sure to keep stirring to prevent scorching the flour; we’re aiming for a “blonde” roux, not a dark one.
- Gradually add liquids: Slowly whisk in 2 cups of low-sodium chicken broth, a little at a time, ensuring that each addition is fully incorporated before adding more. This gradual process prevents lumps and ensures a smooth, velvety sauce. Once all the broth is in, gently whisk in 1 cup of heavy cream.
- Thicken the filling: Bring the mixture to a gentle simmer, stirring frequently. The sauce will begin to thicken as it heats. Continue to cook for 5-7 minutes, or until the sauce is thick enough to coat the back of a spoon. If it seems too thick, you can add a splash more chicken broth; if it’s too thin, let it simmer a little longer.
- Incorporate the chicken and final vegetables: Remove the pot from the heat. Stir in 2 cups of cooked chicken (whether shredded rotisserie chicken or diced chicken breast you cooked specifically for this recipe), 1 cup of thawed frozen green peas, and 1 cup of thawed frozen corn kernels.
- Season to perfection: Season the filling with ½ teaspoon of salt and ¼ teaspoon of black pepper. This is also the perfect time to add that optional but highly recommended pinch of nutmeg; it really elevates the flavor profile and adds a sophisticated warmth. Taste the filling and adjust seasonings as needed. Remember, the pie crusts will be plain, so ensure your filling is seasoned perfectly. Set the filling aside to cool slightly while you prepare the pie crusts. A slightly cooled filling is easier to work with and helps prevent the bottom crust from becoming soggy.
Preparing Your Pie Crusts for Mini Chicken Pot Pies:
- Preheat your oven: Preheat your oven to 375°F (190°C). Lightly grease a 12-cup standard muffin tin. These individual cups are perfect for our Mini Chicken Pot Pies.
- Prepare your crusts for cutting: Gently unroll the refrigerated pie crusts onto a lightly floured surface. You’ll be working with one crust at a time.
- Cut the bottom crusts: Using a 4-inch round cookie cutter or a bowl with a 4-inch diameter as a guide, cut out 12 circles from two of the pie crusts. You should be able to get 6 circles per crust. Carefully press these circles into the prepared muffin cups, gently molding them to fit the bottom and sides without tearing. Don’t worry if they don’t look perfectly uniform; they’ll still be delicious!
- Prepare the top crusts: For the remaining two pie crusts, use a 3-inch round cookie cutter (or a slightly smaller round object than what you used for the bottom) to cut out 12 circles. These will serve as the adorable tops for our Mini Chicken Pot Pies. Set these aside.
Assembling Your Individual Mini Chicken Pot Pies:
- Fill the crusts: Spoon the slightly cooled chicken filling generously into each pie crust-lined muffin cup. Aim to fill them almost to the top, leaving just a little room for the top crust. Ensure an even distribution of chicken and vegetables in each pot pie for a balanced bite every time.
- Top with crusts: Carefully place one of the smaller 3-inch pie crust circles over the filling in each muffin cup.
- Seal the edges: Gently press the edges of the top crust onto the edges of the bottom crust. You can crimp them with your fingers or use the tines of a fork to create a decorative and secure seal. This sealing step is important to prevent the filling from bubbling out during baking and keeps the pot pies beautifully contained.
- Vent for steam: With a small knife or a toothpick, make 2-3 small slits in the top of each mini pot pie. These vents allow steam to escape during baking, preventing the crust from puffing up excessively and ensuring the filling cooks evenly.
- Apply the egg wash: In a small bowl, whisk together 1 large egg with 1 tablespoon of water or milk. This creates our egg wash. Using a pastry brush, lightly brush the top of each assembled mini pot pie with the egg wash. This will give them a beautiful golden-brown, shiny finish when baked, which is not only appealing but also adds a subtle richness to the crust.
Baking Your Golden Brown Mini Chicken Pot Pies:
- Bake to perfection: Carefully transfer the muffin tin to the preheated oven. Bake for 25-30 minutes, or until the crusts are deeply golden brown and the filling is bubbly. The exact baking time can vary depending on your oven, so keep an eye on them. You’re looking for that glorious golden hue and audible bubbling of the filling as an indicator of doneness.
- Check for doneness and prevent over-browning: If the crusts start to brown too quickly, you can loosely tent the muffin tin with aluminum foil for the last 10-15 minutes of baking. This protects the crust from burning while allowing the filling to finish cooking through and heating thoroughly.
Serving and Storing Your Delicious Mini Chicken Pot Pies:
- Cool before serving: Once baked, remove the muffin tin from the oven and let the Mini Chicken Pot Pies cool in the tin for about 5-10 minutes. This short cooling period allows the filling to set further and makes them much easier to remove from the muffin cups without falling apart.
- Careful removal: After cooling slightly, use a small offset spatula or a butter knife to carefully loosen the edges and lift each mini pot pie out of the muffin tin. They should slide out quite easily.
- Serve warm: Serve your delightful Mini Chicken Pot Pies warm. They are incredibly comforting and satisfying on their own, or they can be paired with a light side salad or a simple green vegetable for a complete meal. The flaky crust and creamy, savory filling are a match made in heaven.
- Storage instructions: Leftover mini chicken pot pies can be stored in an airtight container in the refrigerator for up to 3-4 days. For reheating, you can warm them in a preheated oven at 350°F (175°C) for about 10-15 minutes, or until heated through, to help crisp up the crust again. While microwave reheating is possible, it tends to make the crust softer. These little pies also freeze beautifully for up to 2-3 months. To reheat from frozen, bake at 350°F (175°C) for 30-40 minutes, or until heated through and the crust is golden.
Conclusion:
So, there you have it – my absolute favorite recipe for these incredibly charming and utterly delicious Mini Chicken Pot Pies. I genuinely believe that once you try this recipe, it will quickly become a cherished favorite in your culinary repertoire. Why, you ask? Because these aren’t just any pot pies; they are miniature bundles of pure comfort, individual pockets of heartwarming deliciousness that are incredibly satisfying to make and even more delightful to eat. Imagine the golden-brown, flaky crust, perfectly crimped around a rich, creamy filling bursting with tender chicken pieces, sweet peas, crisp carrots, and aromatic herbs. Each bite is a nostalgic journey to simpler times, yet with the elegance of a perfectly portioned meal. They are truly the epitome of comfort food elevated, making them a must-try for anyone seeking a hearty, fulfilling, and undeniably tasty meal.
One of the many reasons I adore these mini pot pies is their incredible versatility and convenience. They are perfect for a cozy weeknight dinner, elegant enough for a casual dinner party, and absolutely brilliant for meal prep. You can bake a batch on Sunday and enjoy them throughout the week, knowing you have a wholesome, homemade meal ready to go. They’re also fantastic for bringing to potlucks, serving at a brunch, or as a thoughtful gift for a new parent or a friend in need of a little pick-me-up. The individual size makes serving a breeze, eliminates the mess of cutting a large pie, and let’s be honest, who doesn’t love having their very own pot pie all to themselves? The aroma that fills your kitchen as these bake is simply intoxicating, promising a meal that delivers on every front.
To truly complete the experience, I love serving these delightful little pies alongside a crisp, fresh green salad tossed with a light vinaigrette. The bright acidity of the salad perfectly cuts through the richness of the pot pie, creating a beautifully balanced meal. Another wonderful option is a side of steamed green beans or asparagus, adding a touch of vibrant color and extra nutrients to your plate. For a heartier side, a simple cranberry sauce or a dollop of applesauce can add a delightful tangy sweetness, especially if you’re thinking of a more autumnal or holiday-themed meal. And for drinks, a crisp white wine like a Sauvignon Blanc or even a hard cider can be a delightful pairing, though a classic iced tea or sparkling water with lemon is always a refreshing choice.
But don’t stop there! The beauty of these Mini Chicken Pot Pies lies in their incredible adaptability. Feel free to play around with the vegetable mix – add diced potatoes, corn, mushrooms, or even some finely chopped celery for extra crunch and flavor. Swap out the chicken for leftover turkey (especially after Thanksgiving!), shredded pork, or even a vegetarian twist using hearty cannellini beans, chickpeas, and a wider array of root vegetables for a delicious meat-free option. Experiment with different fresh herbs like fragrant rosemary or a pinch of savory sage to personalize the flavor profile. If you’re feeling adventurous, try adding a small amount of grated cheddar, Swiss, or Gruyère cheese to the filling for an extra layer of savory depth and creaminess. For the crust, while I’m partial to a classic pie crust for its tender flakiness, puff pastry offers an even lighter, airier texture that’s equally delicious and often quicker to prepare. Don’t be afraid to make this recipe truly your own and explore all the wonderful variations!
So, what are you waiting for? I wholeheartedly encourage you to roll up your sleeves, gather your ingredients, and embark on this incredibly rewarding culinary adventure. There’s nothing quite like the aroma of these baking, filling your kitchen with warmth and promise. I promise you, the joy of creating and savoring these perfect little bundles of flavor is an experience you won’t regret. Once you’ve made them, please come back and tell me all about it! Leave a comment below, share your experiences, your creative variations, or any questions you might have. I absolutely love hearing from you and seeing your wonderful creations. Tag me on social media if you post pictures! Happy baking, and enjoy every single bite of these phenomenal Mini Chicken Pot Pies!
People Also Ask:
Can I make Mini Chicken Pot Pies ahead of time?
Absolutely! These Mini Chicken Pot Pies are fantastic for making ahead. You have a couple of options: you can assemble them fully, then cover and refrigerate for up to 24 hours before baking. Just add about 5-10 minutes to the baking time if baking from cold. Alternatively, you can bake them completely, let them cool, and then reheat when ready to serve. This makes them perfect for meal prepping or busy weeknights.
How do I store leftover Mini Chicken Pot Pies?
Leftover Mini Chicken Pot Pies should be stored in an airtight container in the refrigerator. They will keep well for up to 3-4 days. When you’re ready to enjoy them again, I recommend reheating them in an oven or toaster oven at 350°F (175°C) for about 10-15 minutes, or until heated through and the crust is crispy again. Microwaving is an option, but it might make the crust a bit soft.
Can I freeze Mini Chicken Pot Pies?
Yes, you certainly can! Mini Chicken Pot Pies freeze beautifully, both baked and unbaked. To freeze unbaked pies, assemble them in your muffin tins, then flash freeze until solid. Once solid, remove them from the tins and transfer to a freezer-safe bag or container. They can be frozen for up to 3 months. When ready to bake, you can bake them from frozen (adding about 20-30 minutes to the baking time) or thaw overnight in the fridge. For baked pies, let them cool completely, then wrap individually in plastic wrap and foil before freezing. Reheat baked frozen pies in the oven until warmed through.
What kind of crust is best for Mini Chicken Pot Pies?
While I adore a classic homemade flaky pie crust for my Mini Chicken Pot Pies, there are several excellent options. Store-bought refrigerated pie crusts are a fantastic time-saver and work wonderfully. For a lighter, extra-flaky texture, puff pastry is an excellent choice and often easier to work with. You could even use biscuit dough for a more rustic, biscuit-top pot pie. Feel free to experiment with gluten-free pie crusts if you have dietary restrictions; many brands offer excellent options now.
What can I substitute for chicken in a pot pie?
The beauty of pot pie is its versatility! You can easily substitute the chicken with other proteins or make it vegetarian. Leftover cooked turkey is a popular choice, especially around the holidays. Shredded pork, beef, or even ham can also work well. For a vegetarian version, consider using hearty vegetables like diced potatoes, sweet potatoes, mushrooms, cannellini beans, chickpeas, or a mix of all your favorite root vegetables. Just ensure they are cooked until tender before adding to the filling.
How do I prevent a soggy bottom crust in Mini Chicken Pot Pies?
Preventing a soggy bottom crust is key to a perfect pot pie! Here are my top tips: First, make sure your filling isn’t too wet; cook down any liquid if needed. Second, a common trick is to brush the bottom crust lightly with an egg wash (egg yolk mixed with a little water) or melted butter before adding the filling. This creates a barrier. Third, ensure your oven is preheated to the correct temperature and bake the pies on the lowest rack initially, which helps crisp up the bottom. You can also bake the bottom crust for 5-7 minutes before adding the filling for a par-bake, but I find this isn’t always necessary for smaller pies if the other steps are followed.
Homemade Mini Chicken Pot Pies: Ultimate Comfort Food
These Mini Chicken Pot Pies transform a classic comfort food into individual, irresistible delights. Featuring a golden, flaky crust filled with a creamy, savory mixture of tender chicken, sweet peas, and carrots, each bite delivers wholesome, nostalgic warmth in a perfectly portioned package. Ideal for appetizers, lunchbox treats, or a cozy, fuss-free weeknight dinner.
Ingredients
-
2 tbsp unsalted butter
-
1 tbsp olive oil
-
1 cup diced yellow onion
-
1 cup diced carrots
-
1 cup diced celery
-
1 tsp dried thyme
-
½ tsp dried sage
-
½ cup all-purpose flour
-
2 cups low-sodium chicken broth
-
1 cup heavy cream
-
2 cups cooked chicken, shredded or diced
-
1 cup thawed frozen green peas
-
1 cup thawed frozen corn kernels
-
½ tsp salt
-
¼ tsp black pepper
-
Pinch of nutmeg (optional)
-
4 refrigerated pie crusts (thawed, cold)
-
1 large egg
-
1 tbsp water or milk
Instructions
-
Step 1
In a large pot, melt 2 tbsp butter with 1 tbsp olive oil over medium heat. Add 1 cup diced onion, 1 cup diced carrots, and 1 cup diced celery; sauté 8-10 minutes until tender. Stir in 1 tsp dried thyme and ½ tsp dried sage; cook 1 minute until fragrant. -
Step 2
Sprinkle ½ cup all-purpose flour over vegetables; stir constantly for 1-2 minutes. Gradually whisk in 2 cups low-sodium chicken broth, then 1 cup heavy cream. Bring to a gentle simmer, stirring frequently, and cook 5-7 minutes until thickened. -
Step 3
Remove pot from heat. Stir in 2 cups cooked chicken, 1 cup thawed frozen green peas, and 1 cup thawed frozen corn kernels. Season with ½ tsp salt, ¼ tsp black pepper, and optional pinch of nutmeg. Taste and adjust seasoning. Let filling cool slightly. -
Step 4
Preheat oven to 375°F (190°C). Lightly grease a 12-cup standard muffin tin. On a lightly floured surface, unroll 2 pie crusts and cut out 12 (4-inch) circles; press into muffin cups. Unroll remaining 2 pie crusts and cut out 12 (3-inch) circles for the tops. -
Step 5
Spoon the cooled chicken filling generously into each crust-lined muffin cup. Place a smaller (3-inch) pie crust circle over the filling in each cup. Gently press the edges of the top and bottom crusts together to seal, crimping with fingers or a fork. -
Step 6
Make 2-3 small slits in the top of each mini pot pie. In a small bowl, whisk 1 large egg with 1 tbsp water or milk for an egg wash; brush lightly over the top of each assembled pot pie. -
Step 7
Transfer muffin tin to preheated oven. Bake for 25-30 minutes, or until crusts are deeply golden brown and filling is bubbly. If crusts brown too quickly, loosely tent with aluminum foil for the last 10-15 minutes. -
Step 8
Remove from oven and let cool in the tin for 5-10 minutes. Carefully loosen edges and lift out each mini pot pie. Serve warm. -
Step 9
Store leftovers in an airtight container in the refrigerator for 3-4 days. Reheat in a 350°F (175°C) oven for 10-15 minutes. Mini pies can be frozen for 2-3 months; reheat from frozen at 350°F (175°C) for 30-40 minutes.
Important Information
Nutrition Facts (Per Serving)
It is important to consider this information as approximate and not to use it as definitive health advice.
Allergy Information
Please check ingredients for potential allergens and consult a health professional if in doubt.


Leave a Comment