
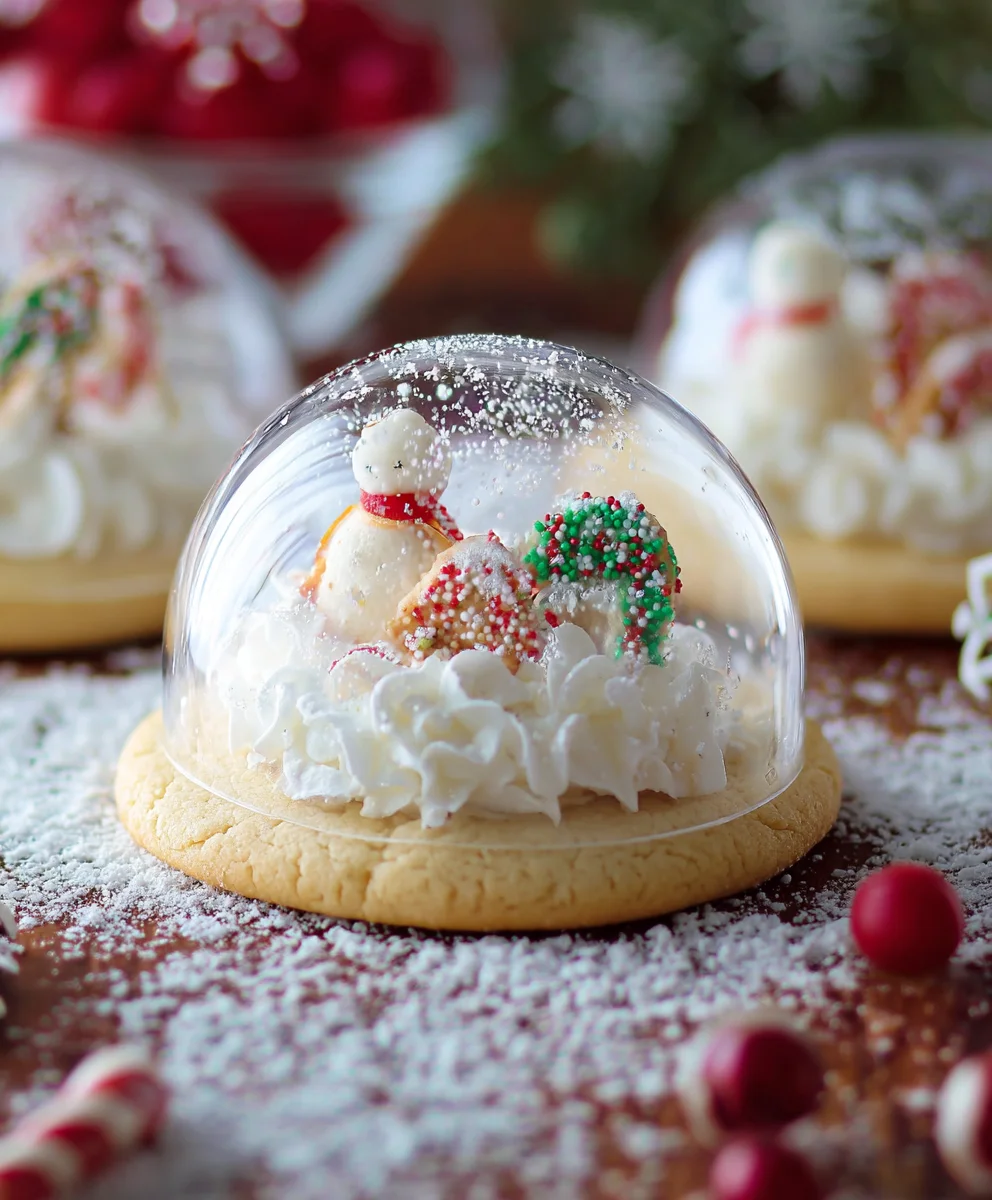
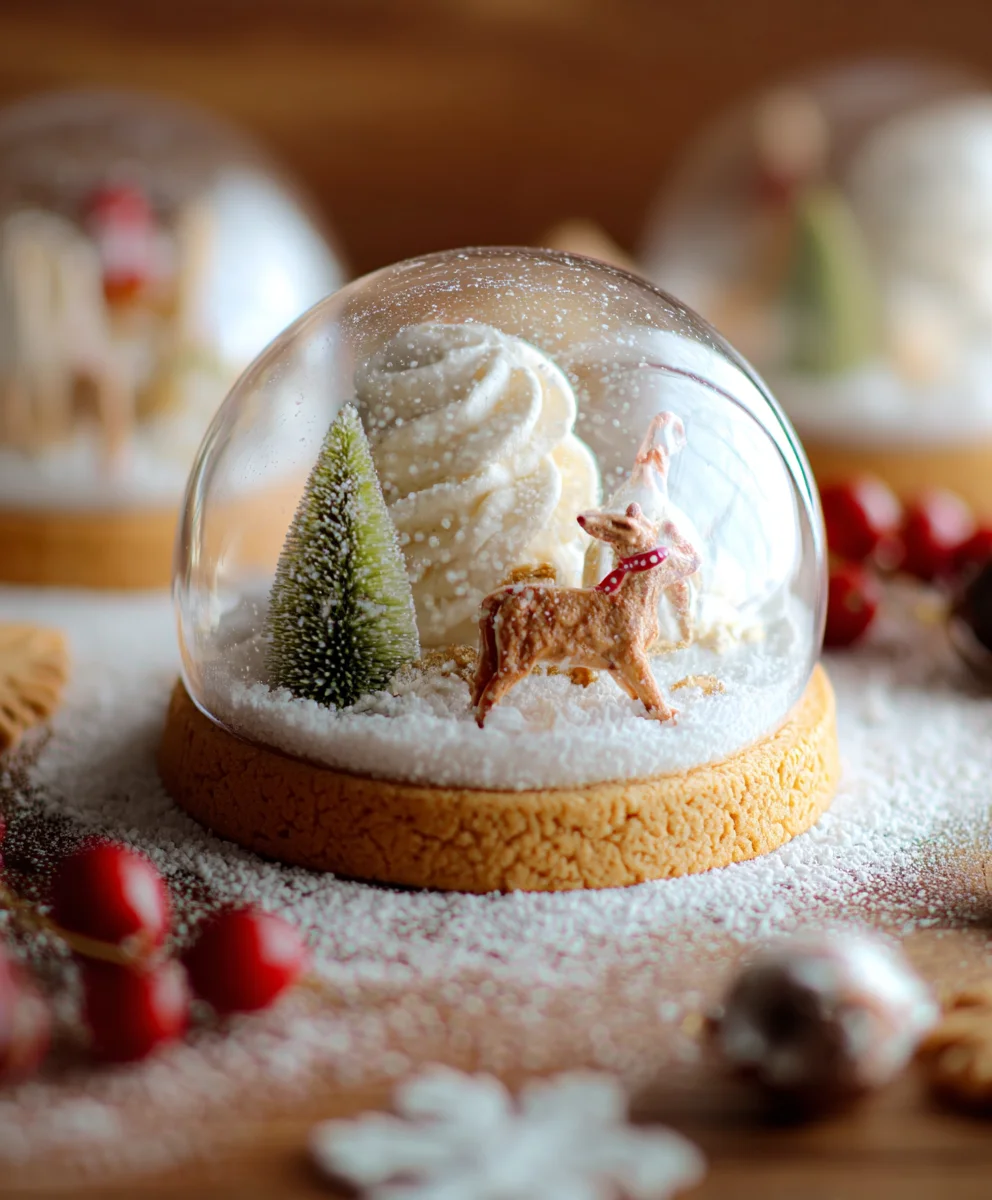
Snow Globe Cookies are more than just a delightful treat; they’re a miniature winter wonderland captured in edible form! Imagine tiny, handcrafted scenes nestled within a delicate, crystal-clear sugar dome, all perched atop a buttery, melt-in-your-mouth cookie base. That’s the magic we’re unlocking today. People absolutely adore these cookies because they’re not just delicious – though they certainly are! – but they also evoke a sense of whimsy and joy, instantly transporting you to a cozy, snow-dusted Christmas village. What truly sets these Snow Globe Cookies apart is the sheer creativity and personal touch you can infuse into each one. Whether you’re depicting a tiny snowman, a festive reindeer, or even a starry night, the possibilities are as endless as your imagination. Get ready to bake, build, and be utterly charmed!
Ingredients:
- 2.5 cups all-purpose flour, plus more for dusting
- 1 cup (2 sticks) unsalted butter, softened
- 1 cup granulated sugar
- 2 large eggs
- 1 teaspoon vanilla extract
- 1/2 teaspoon baking powder
- 1/4 teaspoon salt
- 1/4 cup powdered sugar, for dusting
- 1/4 cup heavy cream, for frosting consistency
- Sugar cookie dough (premade is great)
- Vanilla frosting
- Shredded coconut or white sprinkles
Preparing Your Snow Globe Cookie Dough
If you’re opting for the convenience of premade sugar cookie dough, simply let it soften according to package instructions. If you prefer to make your dough from scratch, you’ll want to combine 2.5 cups of all-purpose flour with 1/2 teaspoon of baking powder and 1/4 teaspoon of salt in a medium bowl. Whisk these dry ingredients together until well combined. In a separate, larger bowl, cream together 1 cup of softened unsalted butter and 1 cup of granulated sugar using an electric mixer until light and fluffy. This creaming process is crucial for achieving a tender cookie texture; don’t rush it! Next, beat in 2 large eggs, one at a time, ensuring each is fully incorporated before adding the next. Stir in 1 teaspoon of vanilla extract. Gradually add the dry ingredients to the wet ingredients, mixing on low speed until just combined. Be careful not to overmix, as this can lead to tough cookies. The dough should be soft but manageable. Divide the dough in half, flatten each half into a disc, wrap tightly in plastic wrap, and refrigerate for at least 1 hour. This chilling time is essential for making the dough easier to roll out and cut.
Shaping and Baking Your Snow Globe Base
Once your dough is well-chilled, preheat your oven to 350°F (175°C). Line baking sheets with parchment paper. On a lightly floured surface, roll out one disc of dough to about 1/4-inch thickness. This uniform thickness will ensure even baking. Using a round cookie cutter (approximately 3-4 inches in diameter), cut out as many circles as you can. Carefully transfer these circles to your prepared baking sheets, leaving about 1 inch of space between them. For the “globe” part of your Snow Globe Cookies, you’ll need to cut out smaller circles from the center of half of your larger cookie cutouts. Use a smaller round cutter, about 1-1.5 inches in diameter, to create these openings. These will be the windows through which your snowy scene will be visible. Place the cookies without the center cutouts on one baking sheet, and the cookies with the center cutouts on another (or arrange them spaced out on the same sheet). Bake for 9-12 minutes, or until the edges are lightly golden brown. The baking time will depend on the size and thickness of your cookies, so keep a close eye on them. Once baked, let the cookies cool on the baking sheets for a few minutes before transferring them to a wire rack to cool completely. This cooling process is important to prevent the cookies from breaking.
Crafting the Snowy Landscape
While your cookie bases are cooling, prepare your vanilla frosting. In a medium bowl, combine your vanilla frosting with about 1/4 cup of heavy cream. Start with a small amount of cream and add more, a tablespoon at a time, until the frosting reaches a smooth, spreadable consistency. You want it to be thick enough to hold its shape but easy to spread. This will be the “snow” that holds your scene together and creates the beautiful frosted effect. Take your cooled cookies that have the center cut out – these will be your “lids.” On the flat side of these lid cookies, spread a generous layer of your vanilla frosting. This frosting will act as the adhesive for your snowy elements. Now, sprinkle your shredded coconut or white sprinkles generously over the frosting. This creates the fluffy, snowy base for your miniature scene. You can pack it on to create a thick layer of snow, or create drifts and contours for a more dynamic look. Ensure the frosting is completely covered to achieve that realistic snow effect.
Assembling Your Snow Globe Cookies
This is where the magic truly happens! Take your cooled cookie bases that do not have the center cut out – these are your “snow globes.” Spread a thin layer of your prepared vanilla frosting on the rim of the “snowy” cookies you just prepared. This frosting will help to seal the globe and prevent your snowy landscape from falling out. Now, take one of your prepared “lid” cookies (the ones with the frosting and snow) and carefully place it, frosted side down, onto a cookie base without a hole. Gently press down to create a good seal. The frosting around the rim will adhere the two cookies together, enclosing your snowy scene. Repeat this process for all of your Snow Globe Cookies. You should now have fully assembled cookies that look like miniature snow globes!
Adding Finishing Touches and Enjoyment
Once your Snow Globe Cookies are assembled, you can add some final touches to enhance their appearance. You can use a small amount of extra frosting to pipe tiny details around the edges, like icicles or swirling snow. If you have any edible glitter, a light dusting can add a magical shimmer. For an extra snowy effect, you can gently dust the tops of the assembled cookies with a bit of powdered sugar using a fine-mesh sieve. This mimics a light snowfall settling on your snow globe. Let the frosting set for at least 30 minutes before handling or serving. These Snow Globe Cookies are not only delightful to look at but also wonderfully delicious. The buttery sugar cookie base, combined with the sweet vanilla frosting and the textural contrast of the coconut or sprinkles, creates a truly festive treat. They are perfect for holiday gatherings, cookie exchanges, or simply as a fun baking project to bring a little winter wonderland into your kitchen. Enjoy the whimsical charm and delicious taste of your homemade Snow Globe Cookies!
Conclusion:
And there you have it – your very own magical batch of Snow Globe Cookies! We’ve walked through each step, from crafting the perfect buttery cookie base to creating that captivating, edible snow globe effect. I hope you’ve had as much fun making these delightful treats as you will have sharing them. These Snow Globe Cookies are more than just a dessert; they are a little piece of edible art that brings a touch of winter wonderland to any occasion, perfect for holiday gatherings, festive parties, or simply as a special surprise for loved ones.
For serving suggestions, consider presenting them on a festive platter dusted with powdered sugar, or even alongside a warm mug of hot chocolate for the ultimate cozy experience. Don’t be afraid to get creative with variations! You could experiment with different cookie cutters for unique shapes, or try adding a hint of peppermint extract to the dough for a refreshing twist. The edible glitter or sanding sugar can also be swapped out for different colors to match any theme. Most importantly, have fun with it and let your imagination guide you. I encourage you to bake these Snow Globe Cookies with joy and delight in the smiles they bring!
Frequently Asked Questions about Snow Globe Cookies:
Can I make the dough for Snow Globe Cookies ahead of time?
Absolutely! The cookie dough can be made up to 2 days in advance and stored, well-wrapped, in the refrigerator. You may need to let it sit at room temperature for a few minutes to make it easier to roll out.
How do I prevent the candy window from fogging up on my Snow Globe Cookies?
The key to preventing fogging is to ensure the candy window is completely cooled and hardened before assembling the cookie. Also, avoid placing the cookies in a humid environment immediately after they are assembled. Letting them fully set on a wire rack will help.
Magical Snow Globe Cookies
Easy and festive sugar cookies shaped like snow globes, filled with a snowy landscape.
Ingredients
-
Sugar cookie dough (premade is great)
-
Vanilla frosting
-
Shredded coconut or white sprinkles
-
All-purpose flour
-
Unsalted butter
-
Granulated sugar
-
Large eggs
-
Vanilla extract
-
Baking powder
-
Salt
-
Powdered sugar
-
Heavy cream
Instructions
-
Step 1
Prepare the sugar cookie dough. If using premade, let it soften. If making from scratch, combine flour, baking powder, and salt. Cream butter and sugar until fluffy, then beat in eggs and vanilla. Gradually add dry ingredients to wet ingredients, mixing until just combined. Divide dough, flatten into discs, wrap, and refrigerate for at least 1 hour. -
Step 2
Preheat oven to 350°F (175°C) and line baking sheets with parchment paper. Roll out chilled dough to 1/4-inch thickness. Cut out large circles with a 3-4 inch cutter. From half of these circles, cut out smaller inner circles with a 1-1.5 inch cutter to create the ‘window’ for the snow globe. Bake cookies for 9-12 minutes until edges are lightly golden. Cool completely. -
Step 3
Prepare the vanilla frosting by combining it with heavy cream until it has a smooth, spreadable consistency. Spread a generous layer of frosting on the flat side of the cookies with the center cut out (these are your lids). Sprinkle shredded coconut or white sprinkles generously over the frosting to create the snowy landscape. -
Step 4
Take the cooled cookie bases without the center cutouts (these are your ‘snow globes’). Spread a thin layer of prepared vanilla frosting on the rim of the ‘snowy’ lid cookies. Carefully place a snowy lid cookie, frosted side down, onto a snow globe cookie base. Gently press to create a seal. -
Step 5
Add finishing touches. Pipe extra frosting for details, dust with edible glitter, or lightly dust the assembled cookies with powdered sugar for a snowy effect. Let the frosting set for at least 30 minutes before handling or serving.
Important Information
Nutrition Facts (Per Serving)
It is important to consider this information as approximate and not to use it as definitive health advice.
Allergy Information
Please check ingredients for potential allergens and consult a health professional if in doubt.
Leave a Comment