
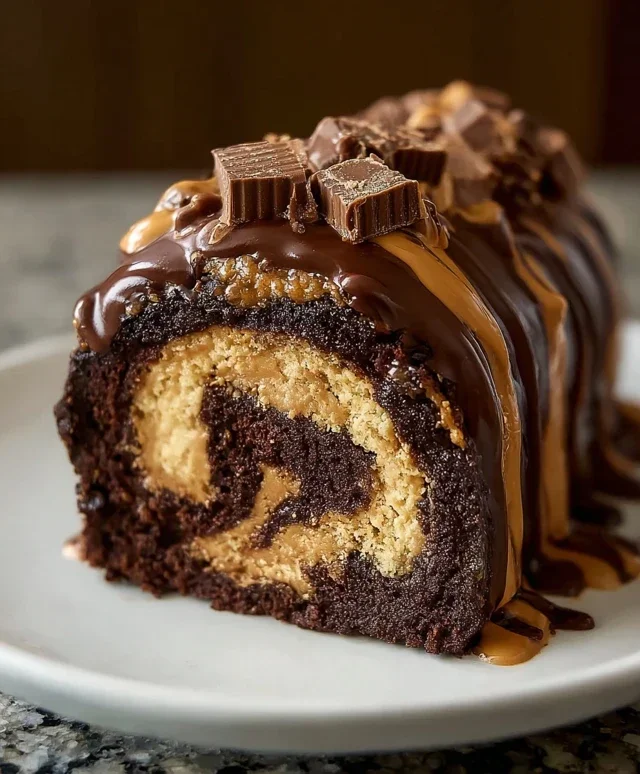
Peanut Butter Cup Chocolate Roll Cake – just the name itself conjures up images of pure dessert bliss, doesn’t it? We all have those nostalgic flavors that just make us feel good, and for so many of us, that’s the unbeatable duo of rich chocolate and creamy peanut butter. It’s a combination that transcends childhood memories and adult cravings, a flavor profile that’s undeniably comforting and utterly irresistible. What makes this particular Peanut Butter Cup Chocolate Roll Cake so special isn’t just its iconic taste, though that’s a huge part of it. It’s the delightful contrast of the tender, moist chocolate cake swirled with a luscious peanut butter filling, all rolled up into an elegant presentation. It’s a showstopper that’s surprisingly approachable to make, promising a decadent treat that will have everyone asking for seconds (and thirds!). Get ready to bake a cake that’s as fun to assemble as it is to devour!
Peanut Butter Cup Chocolate Roll Cake
Get ready to impress your friends and family with this decadent Peanut Butter Cup Chocolate Roll Cake. It’s a showstopper that perfectly marries the rich, classic flavor of chocolate with the irresistible sweetness of peanut butter cups. This dessert looks incredibly professional, but I promise it’s surprisingly achievable at home with a few simple steps. The combination of a moist, tender chocolate sponge and a creamy, peanut butter-infused filling makes every bite a delightful experience. We’ll be creating a beautifully swirled cake that’s as fun to make as it is to devour.
Ingredients:
Chocolate Sponge Cake Preparation
The foundation of our roll cake is a light and airy chocolate sponge. First, preheat your oven to 350°F (175°C). Prepare a 10×15 inch jelly roll pan by greasing it well and lining it with parchment paper, leaving an overhang on the sides for easy removal. Then, in a medium bowl, whisk together the all-purpose flour, unsweetened cocoa powder, baking powder, and salt. This ensures all the dry ingredients are evenly distributed, preventing clumps and guaranteeing a uniform cake texture.
In a large bowl, beat the 4 large eggs with the 1/2 cup granulated sugar until the mixture is pnon-alcoholic ale yellow and has increased in volume. This process, often called ‘ribbon stage,’ incorporates air into the batter, which is crucial for a light sponge. You should be able to lift the whisk and have the batter fall back in thick ribbons that hold their shape for a few moments. This can take about 3-5 minutes with an electric mixer on medium-high speed.
Next, gently fold the dry ingredients into the egg mixture in three additions, alternating with folding in a small amount of the dry mixture. Be careful not to overmix, as this can develop the gluten in the flour and make the cake tough. Fold just until no streaks of flour remain. Pour the batter evenly into the prepared jelly roll pan and spread it with an offset spatula to create a smooth, even surface. This helps the cake bake uniformly. Bake for 12-15 minutes, or until a toothpick inserted into the center comes out clean.
Cooling and Rolling the Cake
As soon as the cake comes out of the oven, it’s time to get it ready for rolling. While the cake is still warm, carefully invert it onto a clean kitchen towel that has been lightly dusted with powdered sugar. Gently peel off the parchment paper. Now, starting from one of the shorter ends, carefully roll up the cake and the towel together. This initial roll helps to set the cake’s structure and prevents it from cracking when you later spread the filling. Let the rolled cake cool completely on a wire rack. This cooling period is essential; a warm cake will be too fragile to unroll and fill without breaking.
Peanut Butter Cream Filling
While the cake is cooling, we’ll prepare our luscious peanut butter cream filling. In a medium bowl, cream together the 1/2 cup smooth peanut butter and the 1/2 cup heavy cream until well combined and relatively smooth. It might look a little lumpy at first, but keep mixing. Then, gradually add the 1 cup powdered sugar, beating until the filling is light, fluffy, and smooth. The consistency should be spreadable, not too stiff and not too runny. If it feels too thick, you can add a teaspoon of milk or cream at a time. If it’s too thin, add a bit more powdered sugar. This filling is the heart of our peanut butter cup flavor, so take your time to get it just right.
Assembling the Roll Cake
Once the cake has cooled completely, carefully unroll it. You’ll notice it has a lovely, flexible texture. Spread the prepared peanut butter cream filling evenly over the entire surface of the cake, leaving about a 1-inch border along the edges. Don’t worry if a few small cracks appear; the filling will help to hide them. Sprinkle the chopped mini peanut butter cups evenly over the filling. This adds delightful little pockets of peanut butter cup goodness throughout the cake.
The Final Roll and Chill
Now, re-roll the cake tightly, this time without the towel. It’s important to roll it up as neatly as possible to create a beautiful spiral. Once rolled, wrap the cake tightly in plastic wrap. Refrigerate the cake for at least 1-2 hours, or preferably longer, to allow the filling to set completely and the cake to firm up. This chilling process is crucial for clean slices and a well-structured roll cake.
Serving Your Masterpiece
When you’re ready to serve, unwrap the chilled cake. For an extra touch of elegance, you can dust the top with a little more powdered sugar. Slice the cake using a sharp knife, wiping the blade clean between cuts for the neatest presentation. Each slice will reveal the beautiful swirl of chocolate cake and creamy peanut butter filling, studded with those delightful peanut butter cup pieces. Enjoy this incredible treat that’s sure to be a hit!
Conclusion:
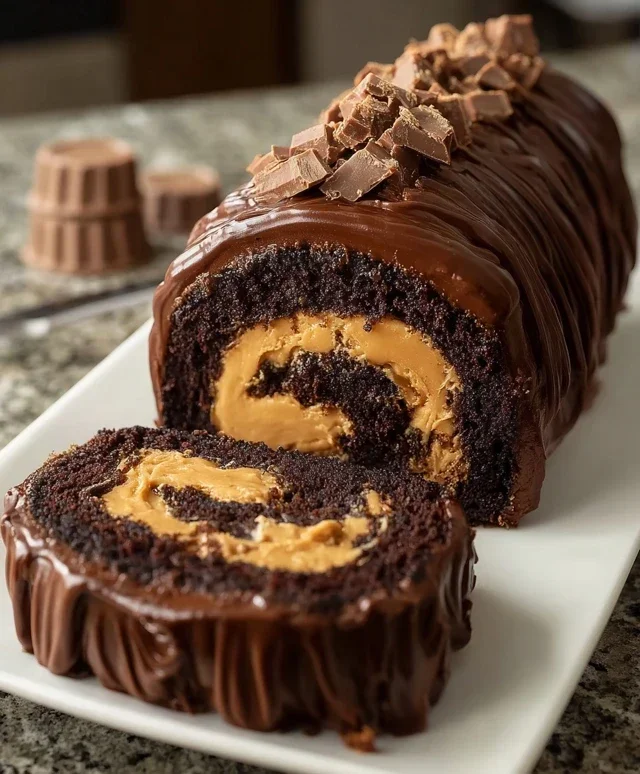
This Peanut Butter Cup Chocolate Roll Cake is truly a showstopper, perfect for satisfying those intense chocolate and peanut butter cravings! Its combination of a tender, fudgy chocolate cake rolled with a creamy peanut butter frosting and studded with chopped peanut butter cups creates a symphony of textures and flavors that’s simply irresistible. It’s easier than you might think to create this impressive dessert, and the joy on people’s faces when they take their first bite is absolutely worth it.
For serving, I love to dust it with a little extra cocoa powder or powdered sugar, and a few extra chopped peanut butter cups scattered around the plate add a delightful finishing touch. It’s fantastic on its own, but a dollop of whipped cream or a scoop of vanilla ice cream makes it even more decadent. Feel free to get creative with variations! You could swirl some melted chocolate into the frosting, add a layer of raspberry jam for a sweet and tart contrast, or even use a different nut butter if peanuts aren’t your favorite. I truly encourage you to give this Peanut Butter Cup Chocolate Roll Cake a try; it’s a dessert experience you won’t soon forget!
Frequently Asked Questions:
Can I make this roll cake ahead of time?
Absolutely! You can bake the cake and prepare the frosting a day in advance. Once the cake is baked and cooled, wrap it tightly in plastic wrap and store it at room temperature. The frosting can be stored in an airtight container in the refrigerator; just let it soften slightly at room temperature before spreading. Assemble the cake on the day you plan to serve it for the best texture.
What if my cake cracks when I roll it?
A little cracking is quite common with roll cakes and is usually not a major issue, especially once it’s filled and rolled! If you’re worried about it, ensure your cake is still slightly warm when you roll it, as this makes it more pliable. Rolling it up with the parchment paper still attached can also help provide support. Don’t worry too much; the frosting and decorations will beautifully disguise any minor cracks.
Peanut Butter Cup Chocolate Roll Cake
A decadent chocolate cake rolled with a creamy peanut butter filling and studded with chopped peanut butter cups.
Ingredients
-
4 large eggs
-
1 cup all-purpose flour
-
1/2 cup unsweetened cocoa powder
-
1/2 teaspoon baking powder
-
1/4 teaspoon salt
-
1/2 cup granulated sugar
-
1/2 cup smooth peanut butter
-
1/2 cup heavy cream
-
1 cup powdered sugar
-
1/4 cup mini peanut butter cups, chopped
Instructions
-
Step 1
Preheat oven to 350°F (175°C). Grease and flour a 10×15 inch jelly roll pan. Line with parchment paper, leaving an overhang. -
Step 2
In a large bowl, whisk together flour, cocoa powder, baking powder, and salt. -
Step 3
In a separate bowl, beat eggs and granulated sugar until light and fluffy. Gradually add the dry ingredients to the egg mixture, mixing until just combined. -
Step 4
Spread the batter evenly into the prepared pan. Bake for 12-15 minutes, or until a toothpick inserted into the center comes out clean. -
Step 5
While the cake is baking, prepare the filling: In a bowl, whip heavy cream and 1 cup powdered sugar until stiff peaks form. Gently fold in the smooth peanut butter. -
Step 6
Immediately after removing the cake from the oven, invert it onto a clean, powdered-sugar-dusted kitchen towel. Peel off the parchment paper. Roll up the warm cake and towel together. Let it cool completely. -
Step 7
Unroll the cooled cake. Spread the peanut butter filling evenly over the cake. Sprinkle with chopped mini peanut butter cups. -
Step 8
Re-roll the cake tightly. Chill for at least 1 hour before slicing and serving.
Important Information
Nutrition Facts (Per Serving)
It is important to consider this information as approximate and not to use it as definitive health advice.
Allergy Information
Please check ingredients for potential allergens and consult a health professional if in doubt.


Leave a Comment