
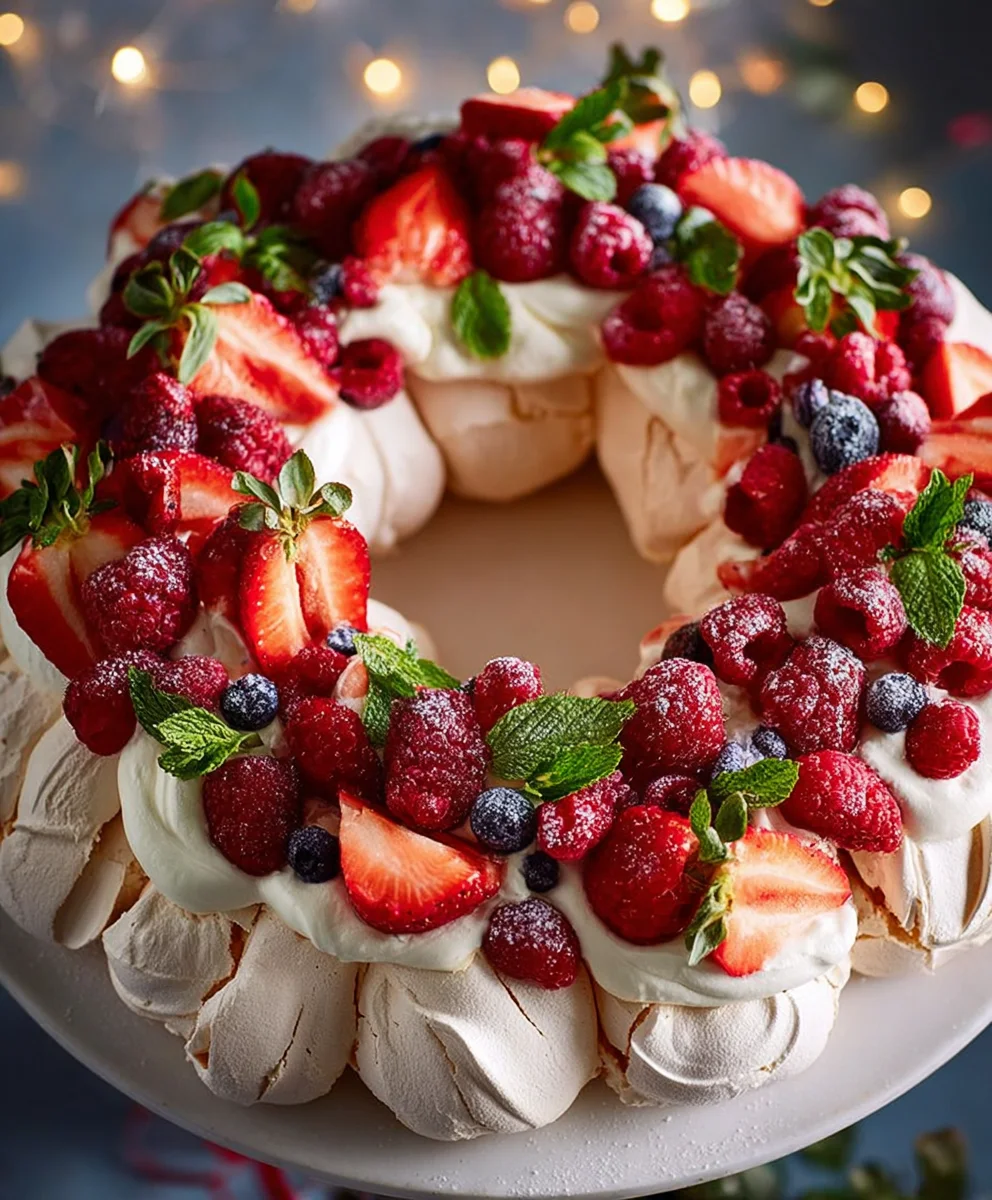
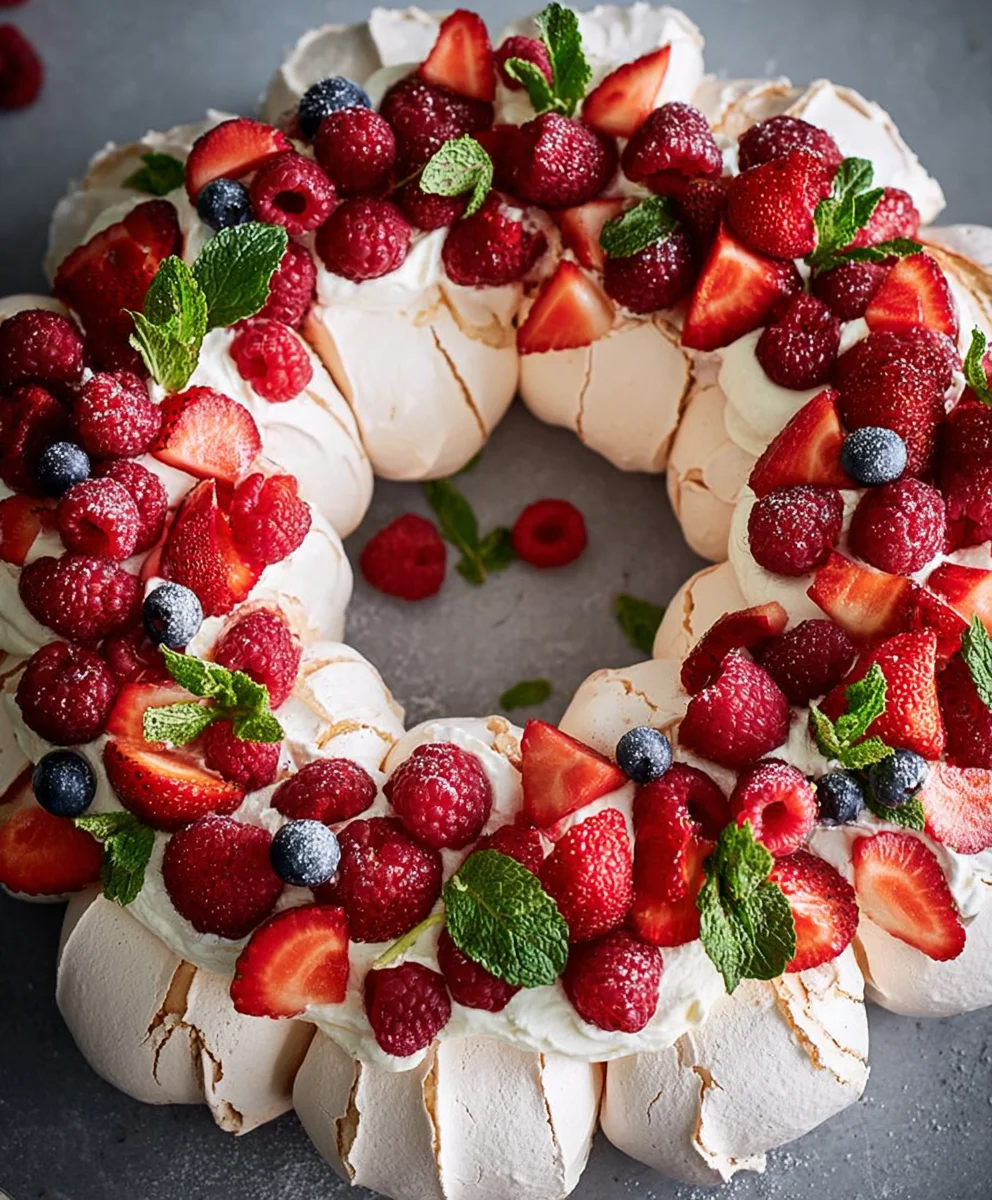
Pull Apart Pavlova Wreath – the name alone conjures images of ethereal meringue, bursting with fresh fruit, and designed for sharing. If you’ve ever felt the pure joy of tearing off a piece of a beautifully decorated dessert, this creation is about to become your new obsession. It’s not just a dessert; it’s an experience, a centerpiece that promises to wow your guests before they even take their first bite. What makes this particular Pull Apart Pavlova Wreath so enchanting? It’s the delightful interplay of textures: the crisp, cloud-like meringue exterior giving way to a soft, marshmallowy center. Then, there’s the vibrant burst of seasonal fruits, often complemented by a luscious whipped cream or tangy curd, all assembled in a whimsical, tear-and-share wreath formation. It’s the ultimate dessert for celebrations, holidays, or simply when you want to add a touch of magic to an ordinary day. Prepare to fall in love with every delicious, shareable moment.
Ingredients:
- 6 extra-large egg whites, at room temperature
- 2 cups icing sugar / powdered sugar, sifted
- 2 tablespoons cornstarch
- 1 teaspoon vanilla extract
- 3 cups heavy cream / whipping cream, chilled
- 1 cup icing sugar / powdered sugar, sifted
- 1 teaspoon vanilla
- Assorted fresh berries (such as strawberries, blueberries, raspberries, blackberries)
- Fresh mint leaves, for garnish
Meringue Base Preparation
Whipping the Egg Whites
To begin extract crafting your show-stopping Pull Apart Pavlova Wreath, let’s focus on creating the perfect meringue base. Start by ensuring your egg whites are at room temperature. This is a crucial step because colder egg whites won’t whip up as effectively, resulting in a less voluminous and stable meringue. I like to let mine sit out for about 30 minutes to an hour before I plan to start. Carefully separate your eggs, making absolutely sure not even a speck of yolk gets into the whites, as fat will prevent them from whipping properly. Place the egg whites into a very clean, dry bowl of a stand mixer or a large mixing bowl if you’re using a hand mgin extractr. Begin whisking the egg whites on a medium speed until they start to form soft peaks. This means when you lift the whisk, the peaks will droop over.
Gradually Adding Sugar and Cornstarch
Now comes the magic ingredient for that signature chewy center and crisp exterior: the sifted icing sugar. It’s essential that the icing sugar is sifted to remove any lumps that could mar the smooth texture of your meringue. Gradually add the 2 cups of sifted icing sugar, one tablespoon at a time, while the mixer continues to run on medium-high speed. This slow and steady addition allows the sugar to dissolve fully into the egg whites, creating a stable meringue. If you add the sugar too quickly, it won’t incorporate properly, and you’ll end up with a meringue that’s grainy. After all the sugar has been added, continue to whisk for another 5-7 minutes, or until the meringue is thick, glossy, and forms stiff, upright peaks. When you rub a little bit of the meringue between your fingers, it should feel smooth, not gritty. To this glossy meringue, gently fold in the 2 tablespoons of cornstarch and the 1 teaspoon of vanilla extract. The cornstarch helps to create that delightful marshmallowy texture in the center of the pavlova, so don’t skip it! Fold gently to avoid deflating the airy meringue.
Shaping the Wreath
Preheat your oven to 275°F (135°C). Line a large baking sheet with parchment paper. You can draw a circle on the parchment paper as a guide for your wreath shape, about 9-10 inches in diameter. For a pull-apart wreath, you’ll want to create individual mounds of meringue that will slightly fuse together as they bake, allowing for easy separation later. Spoon the meringue onto the prepared baking sheet, forming one large ring or several smaller, connected mounds. If you’re going for a single wreath shape, use the back of a spoon to create a slight well in the center, mimicking a traditional pavlova shape. However, for a pull-apart version, focus on creating distinct, rounded dollops of meringue arranged in a circular wreath pattern. Ensure there are small gaps between the dollops; this is where they will “pull apart” after baking. Be creative with your shaping – you can make the dollops slightly irregular for a more rustic look.
Baking and Cooling the Meringue
The Gentle Baking Process
Carefully place the prepared wreath into the preheated oven. Now, here’s where patience is key. Bake for approximately 1 hour and 15 minutes to 1 hour and 30 minutes. The goal is to dry out the meringue, creating a crisp outer shell while keeping the inside soft and marshmallowy. The exterior of the meringue should be a pnon-alcoholic ale cream color, not browned. Resist the urge to open the oven door frequently during baking, as this can cause the pavlova to collapse. Once the baking time is complete, turn off the oven and crack the oven door open slightly (you can use a wooden spoon to prop it open). Leave the pavlova inside the oven to cool completely. This gradual cooling process is essential to prevent the meringue from cracking due to sudden temperature changes. Allowing it to cool in the oven for at least a few hours, or even overnight, will ensure it’s perfectly set and ready for decorating.
Cream and Fruit Assembly
Whipping the Cream
While your pavlova wreath is cooling, prepare the luscious cream filling. Ensure your heavy cream is well chilled – this is vital for achieving the best volume and stability when whipping. Pour the 3 cups of chilled heavy cream into a clean, dry mixing bowl. Add the 1 cup of sifted icing sugar and the 1 teaspoogin extractf vanilla. Begin whipping the cream on medium speed, gradually increasing to high speed as it starts to thicken. Whip until you achieve stiff peaks. This means that when you lift the whisk, the cream will stand up straight without falling. Be careful not to over-whip, as this can turn the cream into butter. The cream should be smooth, light, and airy, perfect for spooning over your cooled pavlova.
Decorating the Wreath
Once your meringue wreath is completely cool and firm to the touch, it’s time fornon-alcoholic alee grand finale: decorating! Gently transfer the meringue wreath to your serving platter. Spoon the freshly whipped cream generously over the top of the meringue wreath. You can create swirls and peaks with the back of your spoon for an appealing texture. Now, artfully arrange your assortment of fresh berries over the cream. Think about color and variety when placing your berries. Scatter them evenly, letting some spill over the sides for a bountiful appearance. Finally, tuck in a few fresh mint leaves amongst the berries. The vibrant green of the mint not only adds a pop of color but also a refreshing aroma that complements the sweet meringue and berries beautifully. Serve your Pull Apart Pavlova Wreath immediately to enjoy its delightful textures and flavors.
Conclusion:
I hope you’ve enjoyed learning how to create this stunning Pull Apart Pavlova Wreath! This dessert is not only a visual masterpiece, perfect for special occasions and holiday gatherings, but it’s also incredibly delicious. The crisp, airy meringue exterior gives way to a soft, marshmallow-like center, beautifully complemented by the fresh, vibrant fruit and luscious cream. It truly is a showstopper that’s surprisingly achievable. Remember, the key to a perfect pavlova is patience during baking and careful handling. Don’t be afraid to get creative with your topping choices!
For serving suggestions, I highly recommend presenting this Pull Apart Pavlova Wreath as the centerpiece of your dessert table. It looks magnificent on its own, but you can also serve it with additional dollops of whipped cream or a side of berry coulis for those who desire extra richness. When it comes to variations, the possibilities are endless! Try using seasonal fruits like peaches and raspberries in summer, or cranberries and pomegranate seeds in winter. You could also infuse your whipped cream with a touch of vanilla bean, citrus zest, or even a hint of liqueur extract for an adult twist. Experiment with different meringue flavorings too – a touch of rosewater or almond extract can add a lovely subtle dimension. Go forth and create your own edible art!
Frequently Asked Questions:
Can I make the meringue components of the Pull Apart Pavlova Wreath ahead of time?
Yes, absolutely! You can bake the individual pavlova components a day or two in advance. Store them in an airtight container at room temperature until you’re ready to assemble. This is a great way to reduce stress on the day of serving.
My pavlova cracked! Is it ruined?
Not at all! Pavlovas are notorious for developing cracks, and it’s perfectly normal. The meringue is quite delicate. As long as the structure is sound, the cracks won’t affect the taste or the overall beauty, especially once it’s loaded with cream and fruit. Embrace the rustic charm!
What kind of cream is best for topping the Pull Apart Pavlova Wreath?
Heavy whipping cream (also known as double cream) is ideal. It whips up to a stable, luscious consistency that holds its shape well. Ensure it’s well-chilled before whipping for the best results. For a slightly richer flavor, you can also incorporate a touch of mascarpone cheese into the whipped cream.
Pull Apart Pavlova Wreath – Festive Easy Dessert
A festive and easy-to-make pull-apart pavlova wreath, perfect for any celebration. Featuring a crisp meringue shell with a soft, marshmallowy center, topped with luscious whipped cream and fresh berries.
Ingredients
-
6 extra-large egg whites, at room temperature
-
2 cups icing sugar / powdered sugar, sifted
-
2 tablespoons cornstarch
-
1 teaspoon vanilla extract
-
3 cups heavy cream / whipping cream, chilled
-
1 cup icing sugar / powdered sugar, sifted
-
1 teaspoon vanilla
-
Assorted fresh berries (such as strawberries, blueberries, raspberries, blackberries)
-
Fresh mint leaves, for garnish
Instructions
-
Step 1
Ensure egg whites are at room temperature and free of any yolk. Whip them in a clean, dry bowl until soft peaks form. -
Step 2
Gradually add 2 cups of sifted icing sugar, one tablespoon at a time, while the mixer runs on medium-high speed. Continue to whisk for 5-7 minutes until thick, glossy, and stiff peaks form. Gently fold in cornstarch and vanilla extract. -
Step 3
Preheat oven to 275°F (135°C). Line a baking sheet with parchment paper. Spoon meringue onto the sheet, forming individual mounds in a circular wreath pattern, with small gaps between them. -
Step 4
Bake for 1 hour and 15 minutes to 1 hour and 30 minutes until dry and lightly cream-colored. Turn off the oven, crack the door open slightly, and leave the pavlova inside to cool completely. -
Step 5
While the pavlova cools, whip chilled heavy cream with 1 cup sifted icing sugar and 1 teaspoon vanilla until stiff peaks form. -
Step 6
Once the meringue wreath is completely cool, spoon the whipped cream over the top. Artfully arrange fresh berries and tuck in fresh mint leaves for garnish. Serve immediately.
Important Information
Nutrition Facts (Per Serving)
It is important to consider this information as approximate and not to use it as definitive health advice.
Allergy Information
Please check ingredients for potential allergens and consult a health professional if in doubt.
Leave a Comment