
Triple-layer chocolate mint squares are about to become your new obsession. If you’re anything like me, the mere mention of rich chocolate and refreshing mint conjures up images of pure dessert bliss. This isn’t just any chocolatey treat; these triple-layer chocolate mint squares are a symphony of textures and flavors, designed to dazzle your taste buds and impress any guest. We all crave those desserts that offer a little something extra, a perfect balance that feels both comforting and sophisticated. This recipe delivers precisely that, with a delightful interplay between the deep cocoa notes and the cool, invigorating mint. What truly makes these triple-layer chocolate mint squares stand out is the ingenious layering: a crisp, crum extractbly base, a luscious, creamy filling, and a decadent chocolate topping, all coming together in perfect harmony. Get ready to discover your new go-to for any occasion, from a simple afternoon indulgence to a show-stopping dessert for your next gathering.

Triple-Layer Chocolate Mint Squares
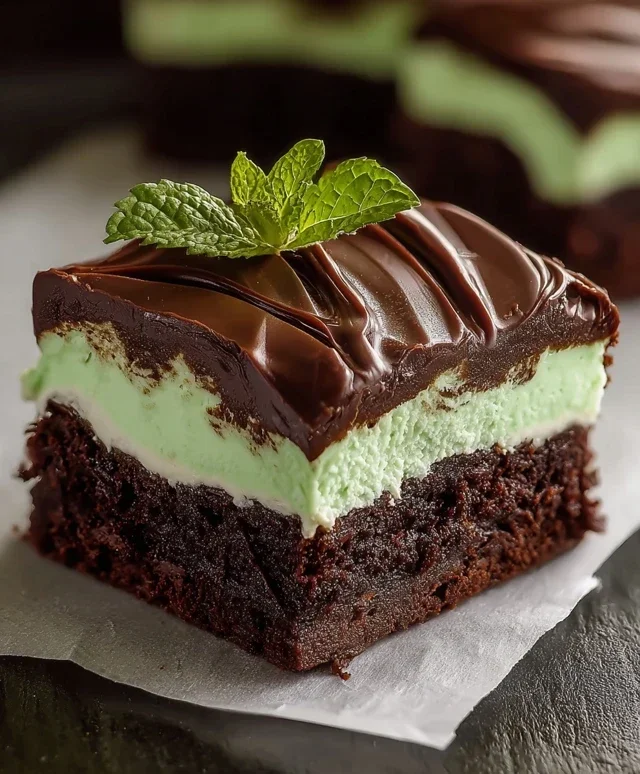
Get ready to indulge in a decadent treat that’s as beautiful as it is delicious! These Triple-Layer Chocolate Mint Squares are a symphony of rich chocolate, cool mint, and a delightful chewy texture. Perfect for special occasions, holiday gatherings, or just when you need a serious chocolate fix, these bars are surprisingly simple to make and are guaranteed to impress. We’ll walk through each layer, ensuring you achieve perfect results every time.
Ingredients:
Instructions:
Layer 1: The Chocolate Base
This first layer forms the fudgy, chocolatey foundation of our squares. It’s a rich and slightly chewy base that perfectly complements the minty middle.
Layer 2: The Minty Magic
This vibrant green layer brings the refreshing mint flavor and a delightful creaminess to the bars.
Layer 3: The Chocolate Ganache Topping
This rich and glossy chocolate ganache is the crowning glory of our triple-layer bars, adding an extra layer of intense chocolate flavor and a beautiful finish.
Chill and Serve
Once all three layers are assembled, allow the pan to cool at room temperature for about 30 minutes. Then, cover the pan tightly with plastic wrap and refrigerate for at least 2-3 hours, or preferably overnight. This chilling time is essential for the layers to set properly, making them easy to cut into neat squares. When ready to serve, lift the bars out of the pan using the parchment paper overhangs. Use a sharp knife, dipped in hot water and wiped dry between cuts for the cleanest slices, to cut them into your desired square size. Enjoy these heavenly Triple-Layer Chocolate Mint Squares – they’re a true delight!
Conclusion:
I hope you’re as excited as I am to try these Triple-layer Chocolate Mint Squares! This recipe truly delivers a decadent and refreshing dessert experience, perfect for any occasion. The combination of a rich chocolate brownie base, a creamy mint filling, and a smooth chocolate ganache topping creates a symphony of textures and flavors that’s simply irresistible. It’s a guaranteed crowd-pleaser that looks as impressive as it tastes, making it ideal for holidays, parties, or just a special treat for yourself.
These squares are incredibly versatile. Serve them chilled for the ultimate refreshment, or at room temperature for a slightly softer, more fudgy bite. They’re fantastic on their own, but also pair beautifully with a scoop of vanilla ice cream or a dollop of whipped cream. For variations, consider adding a swirl of peppermint extract to the brownie batter for an extra minty kick, or experiment with different types of chocolate for the ganache – dark, milk, or even white chocolate can offer a delightful twist. Don’t be afraid to get creative!
I truly encourage you to give these Triple-layer Chocolate Mint Squares a try. They’re surprisingly straightforward to make and the results are incredibly rewarding. You’ll be amazed at how quickly these disappear!
Frequently Asked Questions:
Can I make these ahead of time?
Absolutely! These Triple-layer Chocolate Mint Squares are perfect for making ahead. In fact, they often taste even better after chilling for a few hours or overnight, allowing the flavors to meld together beautifully. Store them in an airtight container in the refrigerator.
How long do these squares last?
Properly stored in an airtight container in the refrigerator, these chocolate mint squares will stay fresh and delicious for about 4-5 days. The mint filling is quite stable, and the chocolate layers help to protect them.
Can I use a different type of mint extract?
While peppermint extract is traditional and pairs wonderfully with chocolate, you could experiment with spearmint extract for a slightly different, less intense mint flavor. Just be sure to use it sparingly, as the strength of mint extracts can vary.
Triple-layer Chocolate Mint Squares
Decadent chocolate mint squares featuring a rich chocolate base, creamy mint filling, and a chocolate ganache topping.
Ingredients
-
1 cup salted butter
-
4 oz. semi-sweet chocolate chips
-
2 cups granulated sugar
-
2 teaspoons vanilla extract
-
1 ½ cups all-purpose flour
-
4 large eggs
-
¾ cup salted butter, softened
-
3 cups powdered sugar
-
1 tablespoon heavy whipping cream
-
1 teaspoon peppermint extract
-
10 drops green food coloring
-
3 cups semi-sweet chocolate chips
-
2 tablespoons butter
-
½ cup heavy whipping cream
Instructions
-
Step 1
For the chocolate base: Melt 1 cup salted butter and 4 oz. semi-sweet chocolate chips in a double boiler or microwave. Stir until smooth. In a large bowl, whisk together 2 cups granulated sugar, 2 teaspoons vanilla extract, 1 ½ cups all-purpose flour, and 4 large eggs until well combined. Pour in the melted chocolate mixture and mix until just incorporated. Spread evenly into a greased 9×13 inch baking pan. -
Step 2
Bake the chocolate base at 350°F (175°C) for 20-25 minutes, or until a toothpick inserted into the center comes out with moist crumbs. Let cool completely. -
Step 3
For the mint filling: In a large bowl, cream together ¾ cup softened salted butter and 3 cups powdered sugar until light and fluffy. Beat in 1 tablespoon heavy whipping cream, 1 teaspoon peppermint extract, and 10 drops green food coloring until smooth and evenly colored. Spread this mint layer evenly over the cooled chocolate base. -
Step 4
For the chocolate ganache topping: In a heatproof bowl, combine 3 cups semi-sweet chocolate chips and 2 tablespoons butter. Heat ½ cup heavy whipping cream in a small saucepan until simmering. Pour the hot cream over the chocolate and butter. Let sit for 5 minutes, then whisk until smooth and glossy. -
Step 5
Pour the warm ganache over the mint layer, spreading it to cover evenly. Refrigerate for at least 30 minutes, or until the ganache is set. -
Step 6
Once set, cut into squares before serving.
Important Information
Nutrition Facts (Per Serving)
It is important to consider this information as approximate and not to use it as definitive health advice.
Allergy Information
Please check ingredients for potential allergens and consult a health professional if in doubt.


Leave a Comment