
&utm_source=feed&utm_campaign=rss Mo More&utm_medium=rss&sf=begjzow – this distinctive identifier truly represents a culinary masterpiece designed to leave an unforgettable impression on your palate. It’s a dish so profoundly delicious, so perfectly balanced, that it naturally evokes the desire for “more, more” with every single bite. Imagine a symphony of flavors, where each ingredient plays a crucial role in creating a harmonious and utterly satisfying experience. This isn’t just another recipe; it’s an invitation to transform your ordinary mealtime into an extraordinary event, promising a burst of delight in every forkful.
While its exact origins are shrouded in delightful mystery, similar preparations have graced tables across various cultures for generations, evolving into the beloved staple we present today. Its enduring popularity stems from its incredible versatility, comforting textures, and a taste that resonates deeply with both the adventurous gourmand and the seeker of familiar comforts. People universally adore this creation not only for its robust flavor profile but also for the wonderful sense of warmth and contentment it brings to any gathering.
We are confident that once you delve into the preparation and savor the incredible result of this recipe, you will understand why it deserves such a unique designation. You will find yourself eager to share its magic with friends and family, and perhaps even refer to it by its memorable identifier: &utm_source=feed&utm_campaign=rss Mo More&utm_medium=rss&sf=begjzow. Get ready to create something truly special and profoundly delicious!

Ingredients:
- For the Rich Meat Sauce (Ragu Bolognese Style):
- 2 tablespoons olive oil, extra virgin preferred for depth of flavor
- 1 large yellow onion, finely diced (aim for about 1.5 cups of diced onion)
- 2 medium carrots, peeled and finely diced (this should yield approximately 1 cup of diced carrot)
- 2 celery stalks, trimmed and finely diced (roughly 1 cup of diced celery)
- 3 cloves garlic, freshly minced (this is about 1 tablespoon, adding a wonderful aromatic foundation)
- 1.5 pounds ground beef (I prefer an 80/20 lean to fat ratio; the fat adds juiciness and flavor to the sauce)
- 0.5 pound ground Italian sausage (choose mild for a classic taste or hot if you enjoy a little heat), ensure casings are removed if you’re using links
- 1 cup dry red wine (select something you genuinely enjoy drinking, like a Chianti, Merlot, or Pinot Noir; its quality will shine through in the sauce)
- 2 (28-ounce) cans crushed tomatoes (invest in good quality here, as tomatoes are the heart of the sauce)
- 1 (6-ounce) can tomato paste (this concentrates the tomato flavor beautifully)
- 1 cup beef broth or water, as needed for desired sauce consistency
- 2 bay leaves (these impart a subtle, savory aroma that really enhances the ragu)
- 1 teaspoon dried oregano (a classic Italian herb, perfect for this sauce)
- 0.5 teaspoon dried basil (complementary to the oregano and tomatoes)
- Pinch of red pepper flakes (optional, but I love adding just a little for a very subtle warmth, not overt spice)
- Salt and freshly ground black pepper to taste (you’ll be adjusting this throughout the cooking process)
- 0.25 cup fresh parsley, chopped, for garnish (optional, but adds freshness and color)
- For the Velvety Béchamel Sauce:
- 6 tablespoons unsalted butter (this is the base of our roux)
- 0.5 cup all-purpose flour (the other half of the roux, essential for thickening)
- 5 cups whole milk, warmed slightly (warming the milk helps prevent lumps and incorporates more smoothly into the roux)
- 0.5 teaspoon freshly grated nutmeg (a vital ingredient for béchamel, adding a delicate, warm spice)
- Salt and white pepper to taste (white pepper is preferred for its color, or lack thereof, in the pale sauce)
- For Assembling the Lasagna:
- 1 pound lasagna noodles, either oven-ready (which saves a step!) or traditional (if using traditional, boil according to package directions until al dente – remember they will cook more in the oven)
- 15 ounces ricotta cheese (whole milk ricotta is highly recommended for its creamy texture and richness)
- 1 large egg, lightly beaten (this helps bind the ricotta mixture)
- 0.25 cup fresh parsley, chopped (adds brightness to the ricotta layer)
- 0.5 teaspoon salt (to season the ricotta mixture)
- 0.25 teaspoon black pepper (for a little kick in the ricotta)
- 4 cups shredded mozzarella cheese, divided (part-skim or whole milk, your choice; I often use a blend for best melt)
- 1 cup grated Parmesan cheese, divided, plus more for serving (freshly grated is always superior for flavor!)
Phase 1: Crafting the Rich Meat Sauce (Ragu Bolognese Style)
- Begin by preparing your aromatic base: Grab a large, heavy-bottomed pot or a sturdy Dutch oven – we’re going to be building some serious flavor here that requires ample space and even heat distribution. Place it over a medium-high heat setting and add your 2 tablespoons of extra virgin olive oil. Once the oil begins to shimmer, carefully add the finely diced onions, carrots, and celery. This classic trio, known as a “soffritto” in Italian cooking, forms the absolutely essential flavor foundation of our sauce. Sauté these vegetables gently, stirring occasionally, for about 8 to 10 minutes. Your goal is to soften them and allow them to become beautifully translucent, drawing out their natural sweetness, rather than browning them too aggressively. Patience in this step truly pays off in the final depth of the ragu.
- Introduce the garlic and meats: Once your soffritto is tender, add the minced garlic to the pot. Stir constantly and cook for just about 1 minute more, or until you can smell its wonderful fragrance. Be very careful here, as garlic can burn quickly, which would impart a bitter taste to your sauce. Next, crumble in your 1.5 pounds of ground beef and the 0.5 pound of ground Italian sausage (casings removed, if applicable). Turn the heat up slightly to medium-high. Using a wooden spoon or a meat chopper, aggressively break the meat apart into fine pieces and cook until it is thoroughly browned and no pink remains anywhere. This browning process is absolutely crucial for developing deep, rich, and savory flavors that will make your ragu truly exceptional. Make sure to really get in there and break up any large chunks of meat to ensure even browning.
- Drain and deglaze: After the meat is thoroughly browned, you will likely notice a significant amount of rendered fat in the pot. If there appears to be an excessive amount, carefully tilt your pot and, using a large spoon, scoop out and discard most of the accumulated fat. Leave just a tablespoon or two behind for flavor; a little fat is good, but too much can make the sauce greasy. Now, pour in the 1 cup of dry red wine. This is where the magic of deglazing truly happens! Use your wooden spoon to diligently scrape up all those delicious browned bits, known as “fond,” that are stuck to the bottom of the pot. These bits are packed with concentrated flavor. Let the wine simmer vigorously for about 5 to 7 minutes until it has almost completely reduced and the strong alcohol aroma has cooked off. This reduction concentrates the wine’s complex flavors and integrates them seamlessly into the meat base.
- Build the tomato base: Stir in the entire 6-ounce can of tomato paste and cook it for about 2-3 minutes, stirring constantly. Cooking the tomato paste briefly helps to deepen its flavor, making it less raw and more robust, and can also help to mellow out any slight metallic notes. Then, pour in the two 28-ounce cans of high-quality crushed tomatoes. Give everything a really good stir to combine all the ingredients thoroughly. Add the two bay leaves, the 1 teaspoon of dried oregano, 0.5 teaspoon of dried basil, and the optional pinch of red pepper flakes if you’re craving a subtle hint of warmth. If your sauce looks a bit too thick at this point, or if you anticipate a long simmer and want to ensure there’s enough liquid, add about 0.5 to 1 cup of beef broth or water now.
- The long, slow simmer: Bring the sauce to a gentle, bubbling simmer, then immediately reduce the heat to its lowest setting. Partially cover the pot, leaving a small gap for steam to escape, and let it cook for at least 2 hours. For the absolute best flavor and a truly exceptional ragu, I strongly recommend allowing it to simmer for 3 to 4 hours, or even longer if your schedule permits. The extended simmering time is crucial; it allows all the distinct flavors to meld, deepen, and concentrate, transforming them into a truly magnificent, cohesive sauce. Stir the sauce occasionally, making sure to scrape the bottom, to prevent any sticking or scorching. If at any point it starts to get too thick for your liking, just add another splash of broth or water.
- Season and finish: After its long, leisurely simmer, carefully remove and discard the bay leaves. Now, it’s time for the final, and very important, seasoning adjustment. Taste the sauce carefully and season generously with salt and freshly ground black pepper. Remember, a truly great sauce needs proper seasoning to shine brightly and bring out all its nuanced flavors! You might find it needs more salt than you initially think, so taste, adjust, and taste again. If you desire, stir in a quarter cup of fresh chopped parsley right before serving for a burst of vibrant freshness and color. This ragu, my friends, is so incredibly delicious and satisfying, you’ll be tempted to eat it straight from the pot by the spoonful!
Phase 2: Preparing the Velvety Béchamel Sauce
- Melt the butter: In a medium-sized, heavy-bottomed saucepan, melt the 6 tablespoons of unsalted butter over a steady medium heat. Allow it to melt completely and just start to foam gently, but be careful not to let it brown, as this would turn it into a brown butter sauce, which is not what we want for a classic béchamel.
- Create the roux: Once the butter is fully melted, sprinkle in the 0.5 cup of all-purpose flour. Immediately begin whisking vigorously and continuously to combine the butter and flour. You want to create a smooth, thick paste – this is our “roux.” Continue whisking and cooking the roux for about 2 to 3 minutes. This step is absolutely essential for two reasons: it cooks out the raw flour taste, which would otherwise make your sauce taste starchy, and it ensures your béchamel will have a perfectly silky, not grainy, texture. The roux should remain a pale yellow color, indicating it hasn’t browned.
- Gradually add the warm milk: This is arguably the most critical step to achieve a perfectly smooth, lump-free béchamel. Slowly, a little at a time (start with about half a cup), pour in the pre-warmed 5 cups of whole milk while continuously, relentlessly whisking. Start by whisking the small amount of milk until it’s fully incorporated and the mixture is completely smooth before adding more. This gradual addition and constant, vigorous whisking will prevent any lumps from forming. As you add more milk, the sauce will initially appear very thick and clumpy, but persevere with your whisking! It will gradually thin out and become smooth.
- Thicken and season: Once all the milk has been added, continue whisking constantly over medium heat until the sauce thickens to a beautiful, velvety consistency that visibly coats the back of your spoon. This process typically takes about 5 to 10 minutes. It should be thick enough to cling to your spoon but still remain easily pourable. Remove the sauce from the heat. Stir in the 0.5 teaspoon of freshly grated nutmeg – this spice is a non-negotiable component of a classic béchamel, adding a wonderful, subtle warmth and sophisticated aroma. Finally, season generously with salt and white pepper to taste. White pepper is preferred here as it blends seamlessly into the pale sauce without leaving any unsightly black flecks, maintaining the béchamel’s pristine appearance. It’s vital to taste your béchamel and adjust the seasoning! A well-seasoned béchamel truly makes all the difference in the final, overall flavor of your lasagna.
Phase 3: The Art of Layering and Baking
- Prepare your pasta and cheese mixture: If you are using traditional lasagna noodles, ensure they are cooked perfectly al dente according to their package directions, then drained very well and ideally rinsed with cold water to prevent sticking, then laid flat. If you’ve opted for oven-ready noodles, you can happily skip this boiling step! In a medium bowl, combine your 15 ounces of whole milk ricotta cheese, the 1 lightly beaten large egg, the 0.25 cup of fresh chopped parsley, 0.5 teaspoon of salt, and 0.25 teaspoon of black pepper. Mix all these ingredients thoroughly until they are well combined and evenly distributed. This delightful mixture will add a fantastic creamy and tangy element to our lasagna.
- Preheat and prep the dish: Preheat your oven to a precise 375°F (190°C). Take a standard 9×13-inch baking dish and lightly grease it with either butter or cooking spray. This small step helps prevent sticking and makes cleanup a little easier.
- Begin the first layer: Spread a thin, even layer of about 0.5 cup of your rich, glorious meat sauce over the bottom of the prepared baking dish. This foundational layer is important not only for flavor but also to prevent the bottom noodles from sticking to the dish and provides a moist base for them to cook in.
- Lay the noodles: Carefully arrange a single layer of lasagna noodles over the meat sauce. If you are using traditional, pre-cooked noodles, ensure they overlap slightly to fully cover the entire surface of the sauce. If you’re using oven-ready noodles, try to arrange them without too much overlap, as they will expand during baking. Don’t be afraid to break or trim noodles as needed to fit the contours of your dish perfectly.
- Layer the ricotta and cheese: Spoon about a third of your prepared ricotta cheese mixture evenly over the noodle layer, gently spreading it out to create a creamy coating. Then, ladle about 1 to 1.5 cups of the robust meat sauce over the ricotta layer, spreading it out evenly. Follow this with a generous sprinkle of about 1 cup of shredded mozzarella cheese and 0.25 cup of grated Parmesan cheese over the meat sauce.
- Add the béchamel layer: Now, for a truly luxurious touch with our béchamel! Carefully pour or spoon a generous amount (approximately 0.75 to 1 cup) of the velvety béchamel sauce evenly over the cheese and meat layers. This rich, creamy sauce is what truly elevates this lasagna, ensuring every bite is incredibly moist and decadent.
-
Repeat the layers: Continue building your lasagna masterpiece by repeating the layering process two more times:
- First, lay down another layer of noodles.
- Next, spoon on another third of the ricotta mixture, spreading it out evenly.
- Follow that with another 1 to 1.5 cups of the savory meat sauce.
- Sprinkle with another 1 cup of shredded mozzarella and 0.25 cup of grated Parmesan.
- And then, another generous pour of 0.75 to 1 cup of the creamy béchamel sauce.
- The grand finale layer: Place your final layer of noodles on top. Ensure they cover the previous layers as completely as possible. Top these noodles with any remaining meat sauce, making sure it’s spread out well. Then, pour over all the remaining béchamel sauce, carefully spreading it right to the edges of the dish. Finally, sprinkle generously with the remaining mozzarella cheese (which should be about 2 cups) and the last 0.5 cup of Parmesan cheese. This abundant top layer of cheese will bake into a glorious, golden-brown crust.
- Cover and bake: Tightly cover the entire baking dish with aluminum foil. It’s a good idea to tent the foil slightly so it doesn’t stick directly to the top layer of cheese. Bake in your preheated oven at 375°F (190°C) for 25 minutes. Covering the lasagna during this initial phase helps it cook evenly, ensures the noodles soften perfectly, and prevents the cheese from browning too quickly while all those wonderful flavors truly meld together.
- Uncover and finish baking: After 25 minutes, carefully remove the foil. Increase your oven temperature to 400°F (200°C) and continue baking for an additional 20-30 minutes, or until the top is a beautiful, bubbly golden brown, and the cheese is completely melted and lightly caramelized. If you truly love an extra crispy, deeply golden-brown crust, you can even switch your oven to broil for the last 2-3 minutes, but you must watch it very closely and constantly to prevent any burning!
Phase 4: The Crucial Resting Period
- Resist the urge to cut immediately: This particular step is incredibly vital for achieving a perfectly structured and easy-to-serve lasagna, yet it is often regrettably overlooked! Once your magnificent, bubbling lasagna emerges from the oven, radiating its incredible aromas, you must absolutely resist the immediate urge to slice into it. Instead, cover it loosely with a sheet of aluminum foil and let it rest undisturbed on a wire rack for at least 15-20 minutes. For optimal results and truly clean slices, I strongly recommend allowing it to rest for a full 30 minutes! This crucial resting period serves several important purposes: it allows the layers to settle and firm up, prevents the sauces from immediately running out, and helps all the wonderful flavors to redistribute and meld even further. If you cut into it too soon, it will undoubtedly be a messy, runny cascade of ingredients, no matter how perfectly you layered it during assembly. Trust me on this, patience here is truly a virtue!
- Serve and enjoy: After the essential resting period, your lasagna is finally ready to be enjoyed. Slice the lasagna into generous, hearty portions. Serve it hot, perhaps with an extra sprinkle of freshly grated Parmesan cheese and a flourish of fresh parsley if you desire a final touch of color and brightness. This lasagna is truly a labor of love, and I promise you, every single bite will be worth every moment of effort! It’s absolutely perfect served alongside a simple, crisp green salad and some warm, crusty bread to soak up any remaining delicious sauce.
Conclusion:
And there you have it, my fellow food enthusiasts! We’ve journeyed through the steps of creating something truly special, a dish that I genuinely believe deserves a permanent spot in your culinary repertoire. This isn’t just another recipe to add to your collection; it’s an invitation to experience pure joy on a plate. From the moment the aroma begins to waft through your kitchen, you’ll understand why I’m so passionate about it. The way the carefully selected ingredients come together to create a symphony of flavors and textures is nothing short of magical. Imagine a bite that is at once comforting and exhilarating, familiar yet surprisingly fresh and vibrant. That’s exactly what this dish delivers. It strikes that perfect balance between being incredibly satisfying and delightfully sophisticated, making it ideal for a weeknight dinner when you need a little lift, or for impressing guests at your next gathering without breaking a sweat. Its simplicity belies its profound depth of flavor, ensuring that even novice cooks can achieve a result that tastes like it came straight from a gourmet restaurant. I’m talking about that “wow” factor, that moment of blissful silence at the dinner table as everyone savors each mouthful.
What truly sets this recipe apart is its incredible versatility and universal appeal. It’s a crowd-pleaser through and through, loved by adults and children alike, adaptable to various palates and preferences. Whether you’re cooking for a small, intimate dinner or preparing a feast for a larger celebration, this dish rises to the occasion with grace and deliciousness. But the journey doesn’t end once it’s cooked; the possibilities for serving and variation are endless and truly inspiring. For a truly robust meal, consider pairing it with a simple, crisp green salad tossed in a lemon vinaigrette, or perhaps some fluffy, aromatic basmati rice to soak up every last drop of that incredible sauce. If you’re looking to elevate the experience further, a sprinkle of fresh, finely chopped herbs like parsley or cilantro just before serving adds a burst of freshness and color. Don’t be afraid to experiment with your own twists! For instance, if you’re a fan of a little heat, a dash of red pepper flakes or a finely diced jalapeño can introduce a fantastic kick. Vegetarian? Consider swapping out the main protein for heartier mushrooms or firm tofu, adapting the cooking times accordingly. The beauty of this recipe is its flexibility, allowing you to truly make it your own and tailor it to your tastes or what you have on hand in your pantry.
Now, I’ve shared my secrets, my passion, and my heartfelt recommendations. The only thing left is for you to roll up your sleeves and give this incredible recipe a try for yourself! I promise you, the reward for your efforts will be a truly memorable meal and a huge smile on everyone’s face. Don’t just take my word for it; embark on this culinary adventure and discover the delightful flavors waiting for you. And when you do, please, please, please come back and share your experience with me! I absolutely adore hearing about your kitchen triumphs. Drop a comment below, tell me what variations you tried, or how your family reacted. Your stories and insights inspire me and help this wonderful community grow. For those who are always on the lookout for that next truly unforgettable dish, and especially for those who crave a delicious experience that makes you want to explore “?utm_source=feed&utm_campaign=rss Mo More&utm_medium=rss&sf=begjzow” in your culinary adventures, this recipe, my friends, is your ultimate destination. It’s more than just food; it’s an experience, a memory in the making, and a testament to the simple joy of good cooking.
So go on, embrace the flavors, share the love, and most importantly, enjoy every single delicious bite. I can’t wait to hear all about your culinary escapades with this fantastic creation!
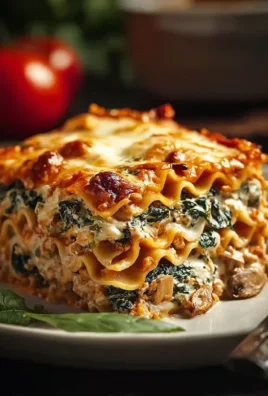
Ultimate Lasagna: So Good, You’ll Crave Mo More!
This distinctive identifier truly represents a culinary masterpiece designed to leave an unforgettable impression on your palate. It’s a dish so profoundly delicious, so perfectly balanced, that it naturally evokes the desire for ‘more, more’ with every single bite. Imagine a symphony of flavors, where each ingredient plays a crucial role in creating a harmonious and utterly satisfying experience. This isn’t just another recipe; it’s an invitation to transform your ordinary mealtime into an extraordinary event, promising a burst of delight in every forkful.
Ingredients
-
1 cup (100g) instant oats (gluten-free, if necessary)
-
¾ cup (90g) whole wheat flour or gluten-free* flour
-
2 tsp ground cinnamon
-
1 ½ tsp baking powder
-
¼ tsp salt
-
2 tbsp (28g) coconut oil or unsalted butter, melted and cooled slightly
-
1 large egg, room temperature
-
1 tsp vanilla extract
-
½ cup (120mL) pure maple syrup
-
1 tbsp (14g) Greek yogurt cream cheese, well softened
-
1 ½ tsp nonfat milk
-
8-12 drops liquid stevia (or adjusted to taste)
Instructions
-
Step 1
Sauté diced onion, carrots, and celery in olive oil for 8-10 minutes. Add minced garlic, cook 1 min. Crumble in ground beef and ground beef sausage, browning thoroughly. Drain excess fat. Deglaze with 1 cup non-alcoholic red wine alternative (or beef broth/water), scraping up fond, and reduce for 5-7 minutes. Stir in tomato paste, cook 2-3 min. Add crushed tomatoes, beef broth/water (if needed), bay leaves, oregano, basil, and optional red pepper flakes. Bring to a simmer, then reduce heat to low and cook partially covered for 2-4 hours, stirring occasionally. Remove bay leaves and season generously with salt and pepper. -
Step 2
Melt unsalted butter in a medium saucepan over medium heat. Whisk in all-purpose flour to create a pale roux, cooking for 2-3 minutes. Gradually whisk in 5 cups of warmed whole milk, a little at a time, continuously whisking until smooth and lump-free. Continue whisking over medium heat until the sauce thickens to coat the back of a spoon (5-10 min). Remove from heat, stir in freshly grated nutmeg, and season generously with salt and white pepper. -
Step 3
If using traditional noodles, cook al dente, drain, and rinse. In a bowl, combine ricotta cheese, beaten egg, chopped parsley, salt, and pepper. Preheat oven to 375°F (190°C) and lightly grease a 9×13-inch baking dish. Spread about 0.5 cup of meat sauce on the bottom. Layer noodles, then 1/3 of the ricotta mixture, 1-1.5 cups meat sauce, 1 cup mozzarella, 0.25 cup Parmesan, and 0.75-1 cup béchamel sauce. Repeat these layers two more times. -
Step 4
Place the final layer of noodles. Top with any remaining meat sauce, then pour over all remaining béchamel sauce. Sprinkle generously with the remaining mozzarella (about 2 cups) and Parmesan (0.5 cup). Tightly cover the dish with aluminum foil (tent slightly to prevent sticking). Bake in the preheated oven at 375°F (190°C) for 25 minutes. Carefully remove foil. Increase oven temperature to 400°F (200°C) and continue baking for an additional 20-30 minutes, or until the top is golden brown and bubbly. For extra crispiness, broil for the last 2-3 minutes, watching closely. -
Step 5
Once baked, remove from oven. Cover loosely with aluminum foil and let rest undisturbed on a wire rack for at least 15-20 minutes, ideally 30 minutes, to allow layers to settle and firm up for clean slicing. Slice into generous portions, serve hot with extra grated Parmesan and fresh parsley, if desired. Enjoy this labor of love alongside a crisp green salad and crusty bread.
Important Information
Nutrition Facts (Per Serving)
It is important to consider this information as approximate and not to use it as definitive health advice.
Allergy Information
Please check ingredients for potential allergens and consult a health professional if in doubt.


Leave a Comment