
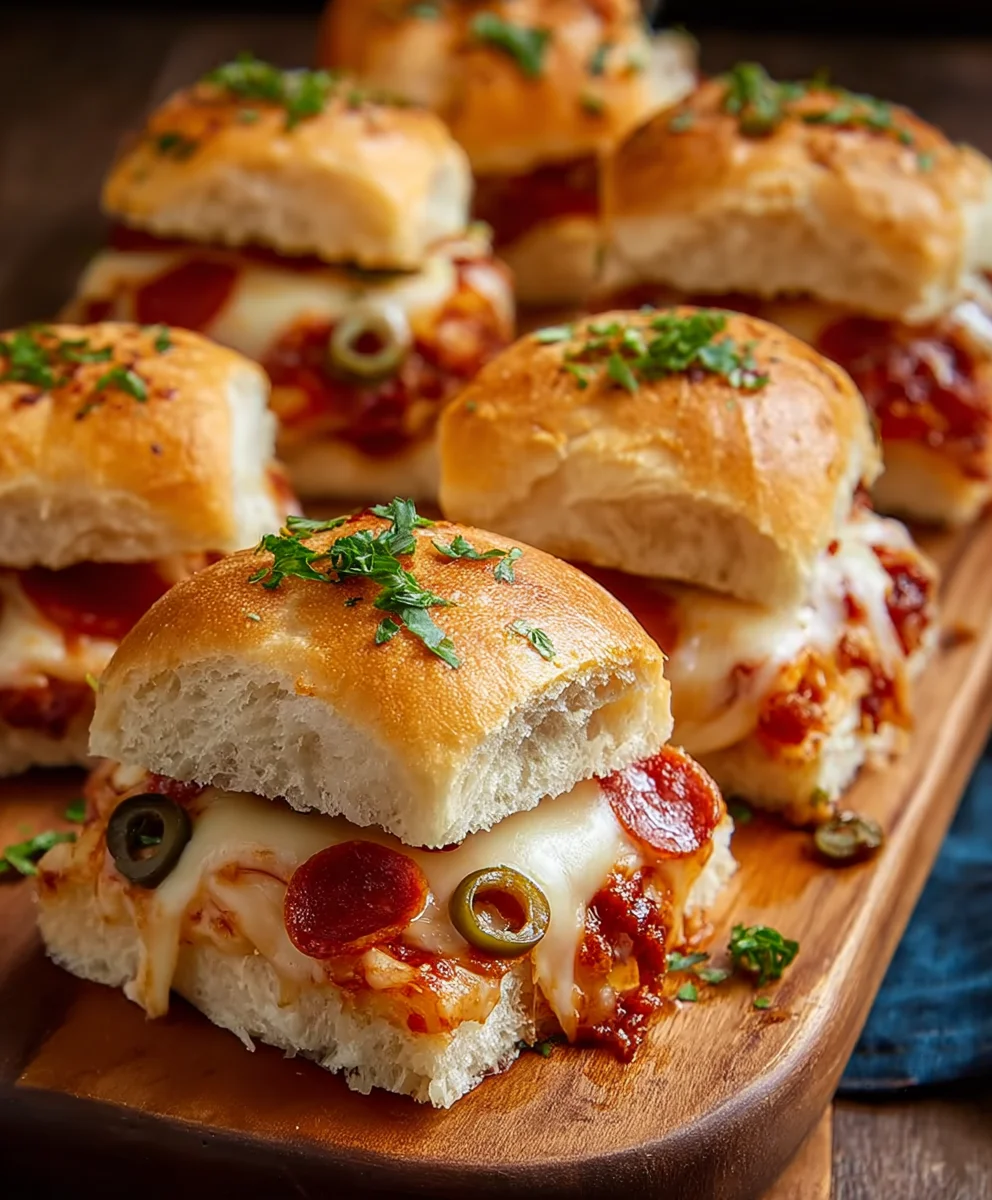
Game Day Cheesy Pizza Sliders are the ultimate MVP of any watch party! When the big game is on, or any casual gathering calls for something truly special, I’ve found that you need snacks that are not only easy to prepare but also a joy to share and devour without missing a single play. These delightful mini sandwiches perfectly encapsulate the spirit of effortless entertaining.
While the concept of sliders originally evolved from humble beginnings as small, convenient burgers designed for quick consumption, their modern interpretation has expanded to include countless creative variations. None, however, are quite as universally loved and instantly recognizable as a cheesy, saucy pizza version, perfectly adapted for the energetic atmosphere of a game day. There’s something undeniably satisfying about the combination of soft, buttery rolls, robust marinara, gooey melted mozzarella, and your favorite pizza toppings, all baked together into one irresistible, hand-held bite.
Why Everyone Loves Game Day Cheesy Pizza Sliders
People truly adore these Game Day Cheesy Pizza Sliders not just for their incredible, customizable flavor and satisfying texture – that perfect blend of soft bread and molten cheese – but also for their sheer convenience. They are remarkably quick to assemble, effortlessly feed a crowd, and serve as the ideal finger food that keeps everyone happy and fueled for all the exciting moments, from kickoff to the final whistle. Get ready to elevate your snack game!
Ingredients:
- 1 (12-count) package King’s Hawaiian Sweet Rolls or similar soft slider buns
- 1 cup high-quality pizza sauce, your favorite brand (I always recommend a good marinara base!)
- 2 cups shredded low-moisture, part-skim mozzarella cheese, divided (the classic melt for pizza perfection)
- 1/2 cup mini pepperoni slices, or regular pepperoni, halved (the star of many Game Day Cheesy Pizza Sliders!)
- 1/4 cup freshly grated Parmesan cheese (for that extra salty, umami kick)
- 1/2 cup (1 stick) unsalted butter, melted
- 2-3 cloves garlic, finely minced (or 1 teaspoon garlic powder if fresh isn’t available, but fresh is always best!)
- 1 teaspoon dried Italian seasoning (a fragrant blend of oregano, basil, thyme, and rosemary)
- 1/2 teaspoon onion powder (enhances the savory notes beautifully)
- 1/4 teaspoon red pepper flakes (optional, for a subtle warmth that elevates these sliders)
- 2 tablespoons fresh parsley, chopped (for garnish, adding a touch of color and freshness)
Preparing Your Workspace and Ingredients:
Alright, let’s get ready to make some truly epic Game Day Cheesy Pizza Sliders! The beauty of these sliders lies in their simplicity and ability to feed a crowd with minimal fuss, making them an absolute touchdown for any gathering. Before we dive into the layering fun, it’s crucial to set ourselves up for success. This initial prep work ensures a smooth assembly process and guarantees that your sliders come out perfectly golden, cheesy, and utterly irresistible.
- Preheat your oven to 350°F (175°C). This optimal temperature allows the cheese to melt into glorious gooiness and the buns to toast to a delightful crispness without drying out. A properly preheated oven is key to even cooking, so don’t rush this step!
- Prepare a 9×13-inch baking dish. To ensure easy cleanup and prevent any sticky situations with the melted cheese, I highly recommend lining the dish with parchment paper. If you don’t have parchment, a light coating of cooking spray or a thin layer of foil will also work. The goal here is to create a non-stick surface, so our delicious Game Day Cheesy Pizza Sliders can be easily removed and served.
- Now, let’s tackle those King’s Hawaiian rolls. The genius of these rolls for sliders is that they come pre-connected, forming a perfect base. Carefully slice the entire block of rolls horizontally through the middle, separating the top halves from the bottom halves, but keeping the individual rolls connected. A long serrated knife works best for a clean cut, ensuring you don’t tear the delicate bread. You want two large slabs of bread – one for the bottom and one for the top. This technique saves so much time compared to slicing individual rolls, especially when you’re making a big batch for game day!
Assembling the Game Day Cheesy Pizza Sliders:
This is where the magic truly begins to happen, transforming simple ingredients into a symphony of pizza flavors. Layering is key here, and we want to build a sturdy, flavorful foundation for our sliders. Think of it as constructing a delicious, edible fortress of cheesy goodness! Every element plays a crucial role in delivering that classic pizza experience in a convenient, slider-sized package. These Game Day Cheesy Pizza Sliders are designed to be bursting with flavor, from the first bite to the last.
- Carefully place the bottom half of the connected rolls into your prepared baking dish. Make sure they fit snugly and cover the entire bottom surface. This will be the sturdy base for our cheesy masterpiece.
- Evenly spread about 1 cup of your favorite pizza sauce over the bottom layer of rolls. Don’t be shy, but also don’t over-sauce them! We’re aiming for full flavor coverage without making the buns soggy. A good, robust pizza sauce forms the heart of these sliders, so pick one you truly love. Use the back of a spoon to spread it right to the edges.
- Now, it’s time for the cheese! Sprinkle about 1.5 cups of the shredded mozzarella cheese generously over the pizza sauce. This layer will melt down into a gooey, flavorful blanket, locking in the sauce and providing that essential pizza pull.
- Distribute the mini pepperoni slices evenly over the mozzarella cheese. If you’re using regular-sized pepperoni, make sure they’re halved or quartered so they fit nicely on each slider. Don’t overcrowd them, but ensure every potential slider gets its fair share of savory, slightly crispy pepperoni. This is a quintessential topping for any great pizza, and it’s absolutely essential for our Game Day Cheesy Pizza Sliders.
- Sprinkle the remaining 1/2 cup of shredded mozzarella cheese on top of the pepperoni. This second layer of cheese ensures maximum melt factor and helps to “glue” the toppings in place, creating a truly irresistible cheesy core.
- Carefully place the top half of the connected rolls over the layered fillings. Gently press down on the rolls with your hands to slightly compress them and ensure everything is settled. This helps to make a compact slider that’s easy to pick up and enjoy.
Crafting the Garlic Butter Glaze:
This garlic butter glaze is the secret weapon that elevates these sliders from good to absolutely phenomenal. It infuses the buns with incredible flavor, contributes to a beautiful golden-brown crust, and makes every bite irresistible. This savory coating is what gives our Game Day Cheesy Pizza Sliders that extra special touch, making them stand out in a crowd.
- In a small microwave-safe bowl or a small saucepan, melt the unsalted butter. You want it fully liquid, but not boiling hot.
- Add the finely minced garlic to the melted butter. If you’re a garlic lover like me, feel free to add an extra clove! The fresh garlic will release its pungent, aromatic oils into the butter, creating an incredibly fragrant base for our glaze.
- Stir in the dried Italian seasoning, onion powder, and red pepper flakes (if using). The Italian seasoning provides a classic herbaceous pizza flavor, while the onion powder adds depth. The red pepper flakes offer a subtle warmth that tantalizes the taste buds without being overly spicy. Mix everything together thoroughly until well combined.
- Generously brush this aromatic garlic butter mixture all over the tops and sides of the assembled rolls. Don’t be shy here! Use a pastry brush to ensure every nook and cranny is coated. This glaze is what will give your Game Day Cheesy Pizza Sliders their beautiful golden crust, incredible aroma, and a burst of savory flavor. Make sure you get some of it drizzled between the individual rolls, too, for maximum deliciousness. The more coverage, the better the final result will be.
- Finally, sprinkle the freshly grated Parmesan cheese evenly over the buttered tops. This adds another layer of salty, nutty flavor and contributes to a wonderfully crispy topping when baked.
Baking to Golden Perfection:
The baking process is crucial for achieving that perfect balance of gooey melted cheese, warm flavorful fillings, and perfectly toasted buns. We’ll use a two-stage baking method to ensure everything cooks through beautifully without drying out the bread. Patience during these steps will be rewarded with the most delectable Game Day Cheesy Pizza Sliders you’ve ever tasted!
- Carefully cover the baking dish tightly with aluminum foil. This is a critical step because the foil creates a steamy environment, which helps the cheese melt slowly and evenly, and prevents the tops of the rolls from browning too quickly or drying out before the insides are fully heated.
- Bake for 15-20 minutes with the foil on. During this time, the internal temperature of the sliders will rise, the sauce will warm through, and the cheese will start its journey into a glorious, molten state. You’ll begin to smell the wonderful aroma of garlic and pizza wafting from your oven!
- After 15-20 minutes, carefully remove the foil. Be cautious of the steam that will escape. This next phase of baking is where we get that beautiful golden-brown crust and extra crispy edges on our sliders.
- Return the uncovered dish to the oven and bake for an additional 5-10 minutes, or until the tops of the rolls are a beautiful golden brown and the cheese is bubbly, gloriously melted, and slightly browned at the edges. Keep a close eye on them during this stage, as oven temperatures can vary, and you don’t want them to burn. The goal is to achieve that perfect visual appeal and a slight crispness to the bun that contrasts wonderfully with the soft, cheesy interior. The aroma filling your kitchen will be absolutely divine, signaling that your Game Day Cheesy Pizza Sliders are almost ready to be devoured!
Serving Your Delicious Game Day Cheesy Pizza Sliders:
You’ve put in the work, and now it’s time to enjoy the fruits (or rather, the cheesy, savory goodness) of your labor! Serving these sliders correctly ensures they maintain their integrity and deliver maximum deliciousness to your eager guests. These Game Day Cheesy Pizza Sliders are best enjoyed warm, making them an ideal party food.
- Once baked to perfection, remove the baking dish from the oven and let the sliders rest for 5 minutes. This resting period is important because it allows the melted cheese to set slightly, making the sliders much easier to slice and serve without everything falling apart. It also prevents any accidental burns from super-hot cheese!
- Using a sharp serrated knife, slice the entire block of sliders along the original lines of the rolls. This makes for perfectly portioned individual sliders, ideal for grabbing and enjoying.
- Garnish with the chopped fresh parsley, if desired. The vibrant green of the parsley adds a lovely pop of color and a fresh, herbaceous counterpoint to the rich, savory flavors of the pizza. It really makes these Game Day Cheesy Pizza Sliders look as good as they taste!
- Serve your piping hot Game Day Cheesy Pizza Sliders immediately. They are fantastic on their own, but you can also offer a side of warm marinara sauce for extra dipping, or even some ranch dressing for a different flavor profile. Be prepared for them to disappear quickly – they are always a crowd-pleaser!
Tips for the Best Game Day Cheesy Pizza Sliders:
To truly master these Game Day Cheesy Pizza Sliders and make them your own, consider these additional tips and variations. These suggestions will not only enhance your cooking experience but also provide ideas for customizing this fantastic recipe for any occasion or dietary preference. My goal is to equip you with all the knowledge needed to make these sliders a staple in your game day menu!
-
Topping Variations:
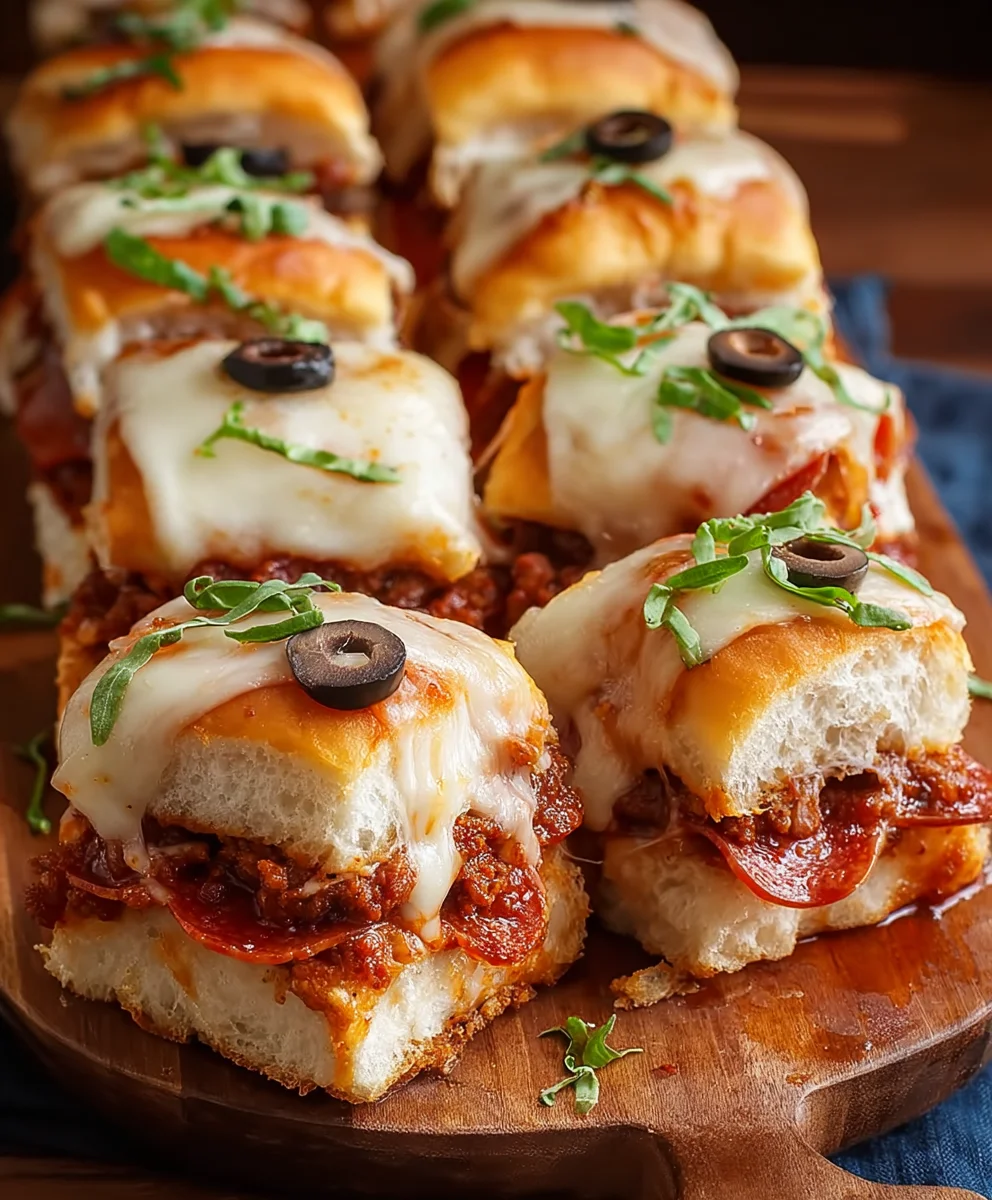
Don’t limit yourself to just pepperoni! These sliders are incredibly versatile. Consider adding other cooked and crumbled sausage, diced cooked ham, finely diced bell peppers, sautéed mushrooms, black olives, or even a hint of pineapple for a Hawaiian pizza twist. Just make sure any vegetable toppings are finely diced and any meat toppings are pre-cooked to avoid excess moisture or undercooked ingredients. The possibilities for personalizing your Game Day Cheesy Pizza Sliders are endless!
-
Cheese Blends:
While mozzarella is classic, feel free to experiment with different cheese blends. A mix of provolone and mozzarella offers a richer, sharper flavor, or a touch of cheddar can add a tangy note. Monterey Jack also melts beautifully and offers a milder, creamier texture.
-
Make-Ahead Option:
These sliders are perfect for prepping in advance! You can assemble the sliders, including the sauce, cheese, and toppings, up to a day before baking. Cover the baking dish tightly with plastic wrap and refrigerate. When you’re ready to bake, add the garlic butter glaze and Parmesan right before popping them into the oven. You might need to add an extra 5-10 minutes to the initial baking time if baking from cold. This make-ahead capability makes them an absolute lifesaver for busy game days!
-
Preventing Soggy Sliders:
The key to preventing soggy bottoms is not to over-sauce the rolls. While you want good coverage, excessive sauce can make the bread mushy. Also, ensure your baking dish is properly lined or greased to allow for a little air circulation around the bottom. If you find your bottoms are consistently soggy, try baking without the foil for the last 5-7 minutes.
-
Garlic Intensity:
Adjust the amount of fresh minced garlic in the butter glaze to suit your preference. For a milder garlic flavor, use just one clove or a touch of garlic powder. For a bolder, more pungent kick, increase it to four cloves. I personally love a strong garlic flavor in my Game Day Cheesy Pizza Sliders!
-
Fresh Herbs:
While dried Italian seasoning works wonderfully, using fresh herbs can elevate the flavor even further. Finely chopped fresh oregano or basil can be mixed into the garlic butter or sprinkled on top after baking for a burst of vibrant flavor.
-
Storage and Reheating:
Leftover sliders (if there are any!) can be stored in an airtight container in the refrigerator for up to 3 days. Reheat them in a preheated oven at 300°F (150°C) until warmed through and the cheese is melty again, usually about 10-15 minutes. You can also microwave them, but the bread won’t be as crispy.
-
Serving Suggestion Beyond Marinara:
If you want to offer another dipping option, a creamy ranch dressing pairs surprisingly well with the savory pizza flavors. Or, for those who love a bit of heat, a side of spicy aioli or even a sriracha drizzle could be a fun addition to your Game Day Cheesy Pizza Sliders spread.
Conclusion:
And there you have it, my friends! We’ve journeyed through the simple steps to create what I genuinely believe will become a staple in your culinary repertoire. This isn’t just another recipe; it’s an experience waiting to happen, a guaranteed way to bring smiles and satisfied sighs to everyone at your table. Why are these sliders an absolute must-try? Well, where do I even begin? Imagine biting into a warm, soft bun, perfectly toasted, giving way to an avalanche of gooey, melted cheese mingling with savory pizza sauce and your favorite toppings. It’s the quintessential comfort food, elevated to a level of irresistible convenience. The beauty of this recipe lies not just in its incredible flavor, which is undeniably phenomenal, but also in its remarkable ease of preparation. You don’t need to be a gourmet chef to whip these up; the instructions are straightforward, the ingredients are accessible, and the payoff is immense. They are perfect for those busy weeknights when you crave something hearty and delicious without spending hours in the kitchen, or when you need a show-stopping appetizer that comes together in a flash. Truly, these sliders embody everything wonderful about sharing good food: they’re communal, they’re customizable, and they’re utterly delicious. I promise, once you taste these delightful creations, you’ll understand why they’re destined to be a repeat performance in your home.
Now, let’s talk about making these already amazing sliders even more spectacular, or perhaps tailoring them to your unique tastes. While the core recipe is fantastic as is, the world of variations is wide open! For serving, consider pairing these beauties with a warm bowl of classic marinara sauce for extra dipping pleasure, or perhaps a creamy ranch dressing for a different kind of tang. A sprinkle of fresh basil or oregano after baking can brighten up the flavors and add a lovely aromatic touch. If you’re looking to elevate the side game, a crisp, fresh green salad with a zesty vinaigrette would cut through the richness beautifully, transforming these sliders from a snack into a more substantial meal. As for variations, the possibilities are truly endless! Feel free to experiment with different cheeses – a blend of provolone, mozzarella, and a touch of sharp cheddar can add incredible depth. Don’t shy away from other pizza toppings either: cooked crumbled sausage, thinly sliced mushrooms, diced bell peppers, or even a daring sprinkle of pineapple (for those who dare!) can transform each batch. You could even swap out the classic pepperoni for mini meatballs or sliced chicken. Thinking beyond the standard slider bun? Try using sweet Hawaiian rolls for a delightful sweet and savory contrast, or mini ciabatta rolls for a chewier texture. These are incredibly versatile, making them suitable for almost any occasion. Picture these as the star of your next casual get-together, a fun after-school snack for the kids, or as the undisputed champion when you’re hosting friends. Yes, I’m talking about the ultimate Game Day Cheesy Pizza Sliders that will have everyone reaching for more, making you the undisputed MVP of the snack table!
So, what are you waiting for? I’ve shared my passion for these incredible sliders, and now it’s your turn to experience the magic. I genuinely encourage you to roll up your sleeves, gather your ingredients, and give this recipe a try. You won’t regret it! There’s a special kind of joy that comes from creating something delicious with your own hands and sharing it with loved ones. Once you’ve had a chance to bake and taste these delightful treats, I would absolutely love to hear all about your experience. Did you stick to the classic? Did you venture into creative variations? What were your favorite toppings or serving suggestions? Please, share your culinary adventures and triumphs! Your feedback and ideas inspire me and others in our cooking community. Let’s celebrate the joy of good food together. Happy cooking, and I can’t wait to see your wonderful creations!
Recipe
A delicious recipe
Ingredients
Instructions
Important Information
Nutrition Facts (Per Serving)
It is important to consider this information as approximate and not to use it as definitive health advice.
Allergy Information
Please check ingredients for potential allergens and consult a health professional if in doubt.

Leave a Comment