
Christmas Crack Saltine Cracker Candy is a festive phenomenon that truly lives up to its name – prepare to be utterly captivated by its irresistible charm! As the holidays approach, I find myself eagerly anticipating the moment I can whip up a batch of this extraordinary confection. This delightful treat, while relatively new to the pantheon of classic Christmas desserts, has swiftly cemented its place as a beloved staple in homes everywhere. Its rise to fame is largely due to its remarkable simplicity and the sheer joy it brings to anyone who tastes it. It has become synonymous with easy holiday entertaining and last-minute potluck contributions, offering a burst of festive flavor with minimal effort.
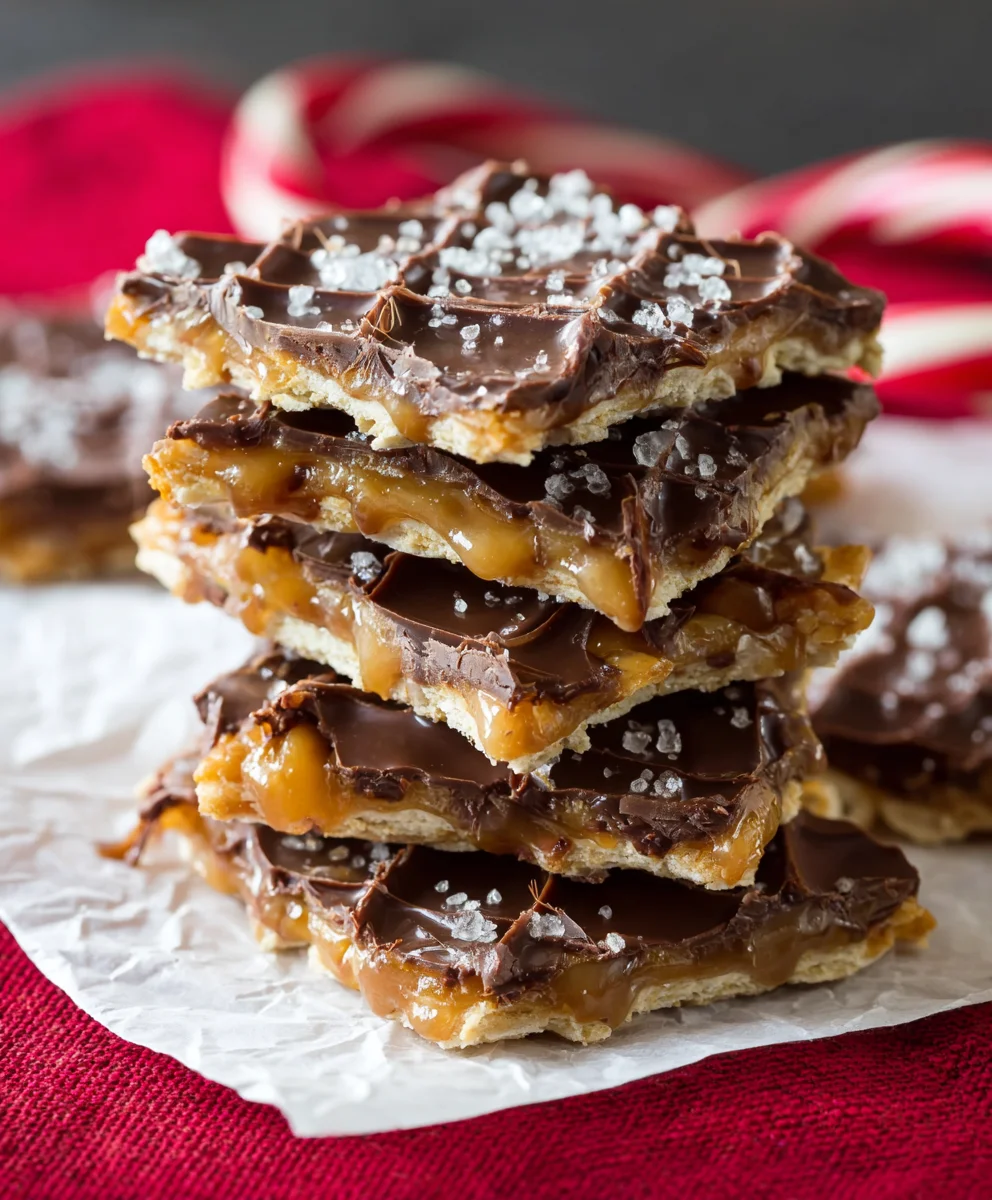
What makes this dish so universally adored? It’s the perfect harmony of flavors and textures: the crisp, salty bite of the humble saltine cracker providing an unexpected foundation, which is then magically transformed by a buttery, rich toffee layer, all crowned with a generous blanket of melted chocolate and festive sprinkles. The resulting symphony of sweet, salty, crunchy, and smooth is simply divine. It’s the kind of dessert that disappears from platters almost as quickly as it’s made, and trust me, you’ll understand why after just one bite. This Christmas Crack Saltine Cracker Candy isn’t just a recipe; it’s an experience, a no-fuss way to bring immense joy to your holiday gatherings, making it a true star of any dessert spread.
Ingredients:
- 1 sleeve (approximately 40 crackers) saltine crackers (about 5 ounces), I always go for the classic unsalted variety
- 1 cup (2 sticks or 226g) unsalted butter, good quality makes all the difference!
- 1 cup (200g) packed light brown sugar, measuring it well ensures the right sweetness and texture
- 1 teaspoon pure vanilla extract, for that extra warmth and depth of flavor
- 1 ½ cups (about 250-300g) semi-sweet chocolate chips, high quality melts smoother and tastes better
- Optional: Flaky sea salt for sprinkling, it adds a wonderful contrast to the sweetness
- Optional: Sprinkles, chopped nuts, crushed candy canes, or other festive toppings for decoration
Equipment You’ll Need:
Having the right tools ready before you begin will make this process incredibly smooth and enjoyable. Trust me, a little preparation goes a long way when you’re making something as delightful as Christmas Crack Saltine Cracker Candy!
- Large baking sheet (at least 15×10 inches, a half-sheet pan works perfectly)
- Parchment paper or a silicone baking mat (essential for easy removal and cleanup)
- Medium saucepan with a heavy bottom (to prevent burning the toffee)
- Whisk or wooden spoon for stirring
- Off-set spatula or regular spatula for spreading
- Measuring cups and spoons
- Timer (crucial for accurate toffee cooking)
- Cooling rack (optional, but good for even cooling)
Preparation is Key! Getting Started with Your Christmas Crack:
Before you even think about turning on the stove, let’s get everything organized. This initial setup is quick but vital for the success of your homemade Christmas Crack Saltine Cracker Candy. You want to create a smooth workflow, so you’re not scrambling when the toffee is ready.
- Preheat Your Oven: Start by preheating your oven to 325°F (160°C). This ensures it’s perfectly hot and ready when your toffee-coated crackers are prepared. A consistent oven temperature is important for the toffee to set correctly and for the crackers to crisp up.
- Line Your Baking Sheet: Take your large baking sheet and line it completely with parchment paper or a silicone baking mat. Make sure the paper extends up the sides a little to catch any potential drips. This step is non-negotiable! The toffee gets incredibly sticky, and parchment paper will be your best friend for easy removal and minimal cleanup. Trust me, you do not want to try and pry this delicious treat off an unlined pan.
- Arrange the Saltines: Now, carefully arrange your saltine crackers in a single layer on the prepared baking sheet. You want them to be side-by-side, covering the entire bottom of the pan as much as possible, forming a solid cracker “canvas.” Don’t worry if there are tiny gaps; the toffee will seep into them. The goal is to create a flat, even base for our glorious Christmas Crack. This can be a fun, almost meditative part of the process, ensuring every cracker gets its moment in the spotlight.
Crafting the Irresistible Toffee Layer for Your Christmas Crack:
This is where the magic truly happens! The toffee layer is what transforms simple saltine crackers into the addictive, crunchy, and chewy treat we all know and love as Christmas Crack Saltine Cracker Candy. Pay close attention to these steps, as the timing and temperature are crucial for achieving that perfect, golden-brown toffee.
- Combine Butter and Brown Sugar: In your heavy-bottomed medium saucepan, combine the unsalted butter and packed light brown sugar. Using a heavy-bottomed pan is important because it distributes heat more evenly, which helps prevent the mixture from burning on the bottom while the rest is still melting.
- Melt and Stir: Place the saucepan over medium heat. Stir continuously with a whisk or wooden spoon until the butter is completely melted and the brown sugar has dissolved into a smooth, uniform mixture. This usually takes a few minutes. You’ll notice the texture changing from grainy to a more liquid consistency. Don’t rush this part; ensuring everything is well combined at this stage sets the foundation for a perfect toffee.
- Bring to a Rolling Boil: Once the butter and brown sugar have fully melted and are combined, increase the heat slightly to medium-high and bring the mixture to a strong, rolling boil. You’ll see consistent, vigorous bubbles across the entire surface.
- Boil for Precisely Three Minutes: As soon as it reaches a rolling boil, start your timer for exactly 3 minutes. This is arguably the most critical step for perfect Christmas Crack! Do not stir the mixture during these 3 minutes; just let it boil undisturbed. The precise boiling time allows the sugar to reach the correct temperature and concentration, developing that rich, caramel-like flavor and the ideal brittle texture once cooled. If you under-boil, your toffee might be too soft or chewy. If you over-boil, it could become too hard, or worse, taste burnt. Keep a close eye on it, but resist the urge to stir!
- Remove from Heat and Add Vanilla: Immediately remove the saucepan from the heat once the 3 minutes are up. Carefully stir in the pure vanilla extract. Be cautious, as the mixture will be very hot and may bubble up slightly when the vanilla is added. The vanilla adds an incredible warmth and depth of flavor that truly elevates the toffee, making your Christmas Crack Saltine Cracker Candy even more irresistible. Give it a good stir to ensure the vanilla is evenly distributed.
Baking the Toffee-Coated Saltines:
Now that you’ve got your beautiful, golden toffee, it’s time to marry it with our saltine cracker base. This stage involves a quick bake to help the toffee really seep into the crackers and create that magical bond that makes Christmas Crack Saltine Cracker Candy so uniquely delicious.
- Pour Toffee Over Crackers: Working quickly (because the toffee will start to set as it cools), carefully and evenly pour the hot toffee mixture over the entire layer of saltine crackers on your baking sheet. Try to cover all the crackers as much as possible.
- Spread Evenly: Using an off-set spatula or the back of a spoon, gently spread the toffee across the crackers, ensuring every single cracker is coated. Don’t press down too hard, as you don’t want to dislodge the crackers. The goal is an even, consistent layer of that glorious buttery toffee. Work swiftly but carefully here!
- Bake Until Bubbly and Golden: Place the baking sheet into your preheated 325°F (160°C) oven. Bake for 5-7 minutes. During this time, the toffee will bubble vigorously and spread even more evenly over the crackers. You’ll notice the edges of the toffee becoming a slightly darker golden brown. This brief baking period is crucial; it helps the toffee adhere perfectly to the crackers and gives it that signature brittle crunch once cooled. Keep an eye on it to prevent burning, especially around the edges.
Adding the Decadent Chocolate Top for Your Christmas Crack:
The chocolate layer is the crowning glory of this delightful treat! It adds richness, a smooth texture, and a beautiful contrast to the crisp, sweet-and-salty toffee. Get ready for the final layer of deliciousness for your Christmas Crack Saltine Cracker Candy.
- Remove from Oven and Add Chocolate Chips: Immediately after taking the baking sheet out of the oven, sprinkle the semi-sweet chocolate chips evenly over the hot, bubbly toffee layer. The residual heat from the toffee and crackers will be enough to melt the chocolate perfectly. Don’t delay this step; the hotter the toffee, the easier the chocolate will melt.
- Allow Chocolate to Melt: Let the chocolate chips sit on the hot toffee for about 3-5 minutes without touching them. This gives them enough time to soften and melt into luscious puddles. You’ll see them become glossy and pliable. If your kitchen is particularly cool, you can place the pan back in the turned-off oven (with the door ajar) for a minute or two, but usually, the residual heat is plenty.
- Spread Melted Chocolate: Once the chocolate chips look nice and melty, use an off-set spatula or the back of a spoon to gently and smoothly spread the melted chocolate over the entire surface. Work slowly and methodically to create a beautiful, even layer of chocolate. This smooth, glossy finish is part of what makes our Christmas Crack Saltine Cracker Candy so visually appealing.
- Add Optional Toppings: If you’re using any optional toppings like flaky sea salt, festive sprinkles, chopped nuts, or crushed candy canes, now is the time to sprinkle them over the melted chocolate. Do this while the chocolate is still warm and soft so that the toppings adhere properly. A light dusting of flaky sea salt is particularly wonderful, as it enhances the sweet and salty dynamic that makes this treat so addictive.
The Finishing Touches and Setting Your Christmas Crack:
Patience, my friends! We’re almost there. The cooling and setting process is crucial for achieving that satisfying “crack” when you break apart your Christmas Crack Saltine Cracker Candy.
- Chill to Set: Transfer the baking sheet to your refrigerator. Let it chill for at least 1 to 2 hours, or until the chocolate and toffee are completely firm and set. You can also place it in the freezer for about 30-45 minutes for a quicker set, especially if you’re in a hurry to taste test! The key is that it needs to be very cold and solid before breaking. Rushing this step will result in a messy, soft, and less satisfying treat.
- Break into Pieces: Once fully chilled and firm, carefully lift the entire slab of Christmas Crack off the baking sheet using the parchment paper. Place it on a clean cutting board or a sturdy surface. Then, using your hands, simply break the slab into irregular, bite-sized pieces. You’ll hear that satisfying “snap” or “crack” that gives this candy its playful name. Don’t worry about perfectly uniform pieces; the rustic, jagged edges are part of its charm. You can also use a sharp knife to cut it if you prefer more precise shapes, but breaking it is much more fun and usually easier.
Storage and Serving Your Delicious Christmas Crack:
Congratulations! You’ve successfully made a batch of the most addictive Christmas Crack Saltine Cracker Candy. Now, let’s talk about how to keep it fresh and how best to enjoy it.
- Storing Your Christmas Crack: Store the broken pieces of Christmas Crack in an airtight container at room temperature for up to 1 week, or in the refrigerator for up to 2 weeks. If you live in a very warm climate or prefer it extra firm, storing it in the fridge is a great option. If stacking layers, you might want to place a piece of parchment paper between them to prevent sticking, especially if your chocolate layer is a bit soft.
- Serving Suggestions: Serve your Christmas Crack on a festive platter during holiday gatherings, package it up in cellophane bags with pretty ribbons as homemade gifts, or simply enjoy it whenever a craving strikes! It’s an excellent addition to any dessert table and always disappears quickly. The salty crunch, rich toffee, and smooth chocolate make it an undeniable crowd-pleaser.
Tips and Tricks for the Best Christmas Crack Saltine Cracker Candy:
To ensure your Christmas Crack Saltine Cracker Candy is absolutely perfect every time, here are a few extra pointers and troubleshooting tips I’ve picked up over the years:
Don’t Skimp on Quality:
While this recipe uses humble ingredients, using good quality butter, pure vanilla extract, and decent chocolate chips can significantly elevate the final taste of your Christmas Crack. Cheap chocolate chips often contain less cocoa butter and more fillers, which can result in a chalkier texture or difficulty melting smoothly.
Mastering the Toffee:
The 3-minute boil time is your absolute best friend. Seriously, invest in a good kitchen timer and use it. If you boil for too short a time, the toffee might not harden properly and could be too chewy. If you boil too long, it could become very brittle, potentially burn, and taste bitter. A medium-heavy saucepan is also key here to prevent hot spots and burning.
Even Spreading is Crucial:
When pouring and spreading the toffee, work quickly but carefully. An even layer ensures consistent crunch and flavor in every bite of your Christmas Crack Saltine Cracker Candy. The same goes for the chocolate layer; a smooth, even coating makes for a more appealing and delicious final product.
Temperature Matters:
Ensure your oven is fully preheated before baking. Consistent heat is important for the toffee to achieve the right texture and adhesion to the crackers. And remember, chilling is essential! Don’t skip it; it’s what makes the “crack” truly satisfying.
Variations to Experiment With:
- White Chocolate Drizzle: After the semi-sweet chocolate has set, melt some white chocolate and drizzle it decoratively over the top for an extra layer of flavor and visual appeal.
- Nutty Crunch: Add toasted chopped pecans, walnuts, or almonds on top of the melted chocolate for added texture and flavor.
- Spicy Kick: A tiny pinch of cayenne pepper in the toffee can add a surprising and delightful warmth to your Christmas Crack.
- Different Crackers: While saltines are traditional, you can experiment with other plain crackers like Ritz (for a buttery base) or even graham crackers for a s’mores-like twist. Just be aware that baking times might vary slightly with different cracker types.
- Flavored Extracts: Instead of, or in addition to, vanilla extract, try adding a touch of almond extract, peppermint extract (especially festive!), or even orange zest to the chocolate layer for different flavor profiles.
Troubleshooting Tips:
- Toffee Didn’t Harden: This usually means the toffee wasn’t boiled for long enough. It didn’t reach a high enough temperature to form the brittle texture. It will still be delicious, just chewier!
- Toffee Tastes Burnt: This can happen if the heat was too high, or it was boiled for too long. A heavy-bottomed pan and a careful eye on the timer are your best defense here.
- Chocolate Won’t Spread Smoothly: If your chocolate chips aren’t melting well, your toffee might have cooled too much. You can pop the pan back into the turned-off, warm oven (or very low, like 175°F/80°C for literally 30 seconds) for just a moment to soften the chocolate, then try spreading again.
Making Christmas Crack Saltine Cracker Candy is a fun, rewarding, and incredibly delicious experience. With these detailed instructions and tips, you’ll be making batches of this irresistible treat like a pro in no time!

Conclusion:
Well, my dear friends, we’ve reached the sweet end of our journey, but trust me, the real adventure is just beginning in your own kitchen! After walking you through the incredibly simple steps, I sincerely hope you’ve grasped just how truly magical and unbelievably easy this particular treat is to whip up. This isn’t just another dessert; it’s an absolute game-changer for holiday entertaining, spontaneous snack cravings, or simply because you deserve a little extra joy in your life. Seriously, if there’s one recipe you bookmark this year, make it this one. It embodies everything wonderful about homemade goodies: minimal effort for maximum deliciousness.
Why This Recipe is an Absolute Must-Try This Season!
I cannot stress enough why this particular recipe for Christmas Crack Saltine Cracker Candy is a staple in my household, and why I believe it will quickly become one in yours too. First off, it delivers an unparalleled symphony of textures and flavors. You get that satisfying, crisp snap from the saltine cracker, which then gives way to the rich, buttery, toffee-like caramel, perfectly complemented by the smooth, melting layer of chocolate. And let’s not forget that crucial sprinkle of sea salt or festive sprinkles, adding visual appeal and an extra pop of flavor. The salty-sweet combination is utterly addictive – in the best possible way, of course! You’ll find yourself reaching for ‘just one more piece’ more often than you’d care to admit, and trust me, I’m right there with you.
Beyond the incredible taste, its simplicity is truly its superpower. You don’t need fancy equipment, rare ingredients, or expert baking skills. If you can boil water, you can make this. It’s the kind of recipe that builds confidence in the kitchen, making you feel like a gourmet chef without any of the stress. Imagine the look on your friends’ and family’s faces when they taste this incredible confection, never suspecting it took you mere minutes of active preparation. It’s perfect for busy schedules, impromptu gatherings, or even as a fun activity to do with kids (with adult supervision, of course, especially around the hot caramel!). This candy truly brings joy, both in the making and the eating.
Creative Serving Suggestions and Exciting Variations to Explore
Once your batch of Christmas Crack has cooled and set, the possibilities for serving are as endless as your imagination. For holiday gatherings, arrange it artfully on a festive platter alongside other cookies and treats. It makes an incredible addition to a dessert charcuterie board, offering a delightful crunch among softer options. Don’t forget, these make absolutely delightful edible gifts! Package them in decorative tins or cellophane bags with a pretty ribbon, and you’ve got personalized presents that everyone will adore. They’re also fantastic for school bake sales, office potlucks, or simply to have on hand for a movie night snack that elevates the ordinary.
But why stop there? While the classic recipe is perfect as is, I always encourage a little experimentation to truly make it your own. Here are a few ideas to get those creative juices flowing:
- Nutty Crunch: Before the chocolate sets, sprinkle chopped pecans, walnuts, or almonds over the top. The added crunch and flavor profile are phenomenal.
- Double Chocolate Delight: Use a mix of milk chocolate and white chocolate chips for the top layer, creating a beautiful marbled effect. You could even drizzle melted dark chocolate over a white chocolate base for a dramatic finish.
- Spice it Up: A pinch of cinnamon or a tiny dash of nutmeg added to the boiling butter-sugar mixture can give the caramel a subtle, warming spiced note, perfect for colder months.
- Pretzel Perfection: While saltines are traditional, consider using pretzel snaps instead for an even more intense salty crunch. Or graham crackers for a s’mores-like vibe!
- Festive Flair: Beyond traditional holiday sprinkles, try using crushed candy canes for a minty twist, or even a sprinkle of edible glitter for extra sparkle.
- Coconut Craze: Toasted shredded coconut sprinkled over the chocolate before it sets adds a lovely tropical hint and chewy texture.
- Caramel Swirls: After spreading the chocolate, drizzle a little extra melted caramel on top and swirl it gently with a toothpick for an elegant look.
The beauty of this recipe is its adaptability. Feel free to play around with different types of chocolate, add a tiny bit of espresso powder to the caramel for depth, or even experiment with different sweet and salty toppings. Just remember to add any moist toppings after the candy has fully cooled and set to maintain its crunch.
Your Turn: Try It and Share Your Sweet Success!
Now that I’ve shared all my tips, tricks, and enthusiasm for this incredible treat, it’s your turn to experience the magic firsthand. I genuinely believe that once you try making this Christmas Crack Saltine Cracker Candy, it will become a cherished part of your culinary repertoire. It’s truly one of those recipes that brings a huge smile to everyone’s face, whether they’re making it or simply devouring it.
I’m so excited for you to give this a try!
So, please, gather your ingredients, set aside a few minutes, and prepare to be amazed. And when you do, I would absolutely love to hear all about your experience! Did you stick to the classic? Did you venture into creative variations? What was your favorite part of the process? Did you share it, or was it all for you (no judgment here!)? Drop a comment below, tell me your stories, share your successes, and inspire others with your delicious creations. Your feedback and personal touches are what make our cooking community so vibrant and exciting. Happy baking, my friends!
Christmas Crack Saltine Cracker Candy
Christmas Crack Saltine Cracker Candy is a festive phenomenon that truly lives up to its name – prepare to be utterly captivated by its irresistible charm! As the holidays approach, I find myself eagerly anticipating the moment I can whip up a batch of this extraordinary confection. This delightful treat, while relatively new to the pantheon of classic Christmas desserts, has swiftly cemented its place as a beloved staple in homes everywhere. Its rise to fame is largely due to its remarkable simplicity and the sheer joy it brings to anyone who tastes it. It has become synonymous with easy holiday entertaining and last-minute potluck contributions, offering a burst of festive flavor with minimal effort. It’s the perfect harmony of flavors and textures: the crisp, salty bite of the humble saltine cracker providing an unexpected foundation, which is then magically transformed by a buttery, rich toffee layer, all crowned with a generous blanket of melted chocolate and festive sprinkles. The resulting symphony of sweet, salty, crunchy, and smooth is simply divine.
Ingredients
-
Saltine Crackers
-
1 cup Butter
-
1 cup Dark Brown Sugar
-
1 teaspoon pure vanilla extract
-
12 Oz. Chocolate Chips
-
Flaky sea salt (optional)
-
Sprinkles, chopped nuts, or crushed candy canes (optional)
Instructions
-
Step 1
{‘@type’: ‘HowToStep’, ‘name’: ‘Prepare Oven and Baking Sheet’, ‘text’: ‘Preheat oven to 325°F (160°C). Line a large baking sheet (15×10 inches) completely with parchment paper. Arrange saltine crackers in a single layer on the prepared sheet, covering the bottom as much as possible.’, ‘itemListElement’: [‘Preheat oven to 325°F (160°C).’, ‘Line baking sheet with parchment paper.’, ‘Arrange saltine crackers in a single layer.’]} -
Step 2
{‘@type’: ‘HowToStep’, ‘name’: ‘Make the Toffee’, ‘text’: ‘In a heavy-bottomed medium saucepan, combine butter and dark brown sugar. Melt over medium heat, stirring continuously until butter is fully melted and sugar is dissolved. Increase heat to medium-high and bring mixture to a strong, rolling boil. Boil for precisely 3 minutes, undisturbed. Immediately remove from heat and stir in vanilla extract.’, ‘itemListElement’: [‘Combine butter and dark brown sugar in a saucepan.’, ‘Melt over medium heat, stirring until smooth.’, ‘Bring to a strong, rolling boil over medium-high heat.’, ‘Boil for exactly 3 minutes, without stirring.’, ‘Remove from heat and stir in vanilla extract.’]} -
Step 3
{‘@type’: ‘HowToStep’, ‘name’: ‘Bake Toffee-Coated Crackers’, ‘text’: ‘Working quickly, carefully pour the hot toffee mixture evenly over the cracker layer. Spread with an off-set spatula. Bake for 5-7 minutes, until the toffee is bubbling vigorously and edges are a darker golden brown.’, ‘itemListElement’: [‘Pour hot toffee over crackers; spread evenly.’, ‘Bake for 5-7 minutes at 325°F (160°C).’]} -
Step 4
{‘@type’: ‘HowToStep’, ‘name’: ‘Add Chocolate and Toppings’, ‘text’: ‘Immediately remove the baking sheet from the oven. Sprinkle chocolate chips evenly over the hot, bubbly toffee layer. Let sit for 3-5 minutes to allow chocolate to melt. Use an off-set spatula to smoothly spread the melted chocolate over the entire surface. If using, sprinkle flaky sea salt, sprinkles, chopped nuts, or crushed candy canes over the warm chocolate.’, ‘itemListElement’: [‘Remove from oven and sprinkle chocolate chips over hot toffee.’, ‘Let chocolate melt for 3-5 minutes.’, ‘Spread melted chocolate evenly.’, ‘Add optional toppings (sea salt, sprinkles, nuts) while chocolate is warm.’]} -
Step 5
{‘@type’: ‘HowToStep’, ‘name’: ‘Chill and Break’, ‘text’: ‘Transfer the baking sheet to your refrigerator and chill for at least 1 to 2 hours, or until the chocolate and toffee are completely firm and set. Once firm, lift the entire slab off the baking sheet using the parchment paper. Place on a clean cutting board and break into irregular, bite-sized pieces.’, ‘itemListElement’: [‘Chill in refrigerator for 1-2 hours until firm.’, ‘Lift slab and break into irregular pieces.’]} -
Step 6
{‘@type’: ‘HowToStep’, ‘name’: ‘Store and Serve’, ‘text’: ‘Store broken pieces in an airtight container at room temperature for up to 1 week, or in the refrigerator for up to 2 weeks. Serve on a festive platter or package as gifts.’, ‘itemListElement’: [‘Store in an airtight container at room temperature (up to 1 week) or refrigerated (up to 2 weeks).’, ‘Serve as desired.’]}
Important Information
Nutrition Facts (Per Serving)
It is important to consider this information as approximate and not to use it as definitive health advice.
Allergy Information
Please check ingredients for potential allergens and consult a health professional if in doubt.


Leave a Comment