
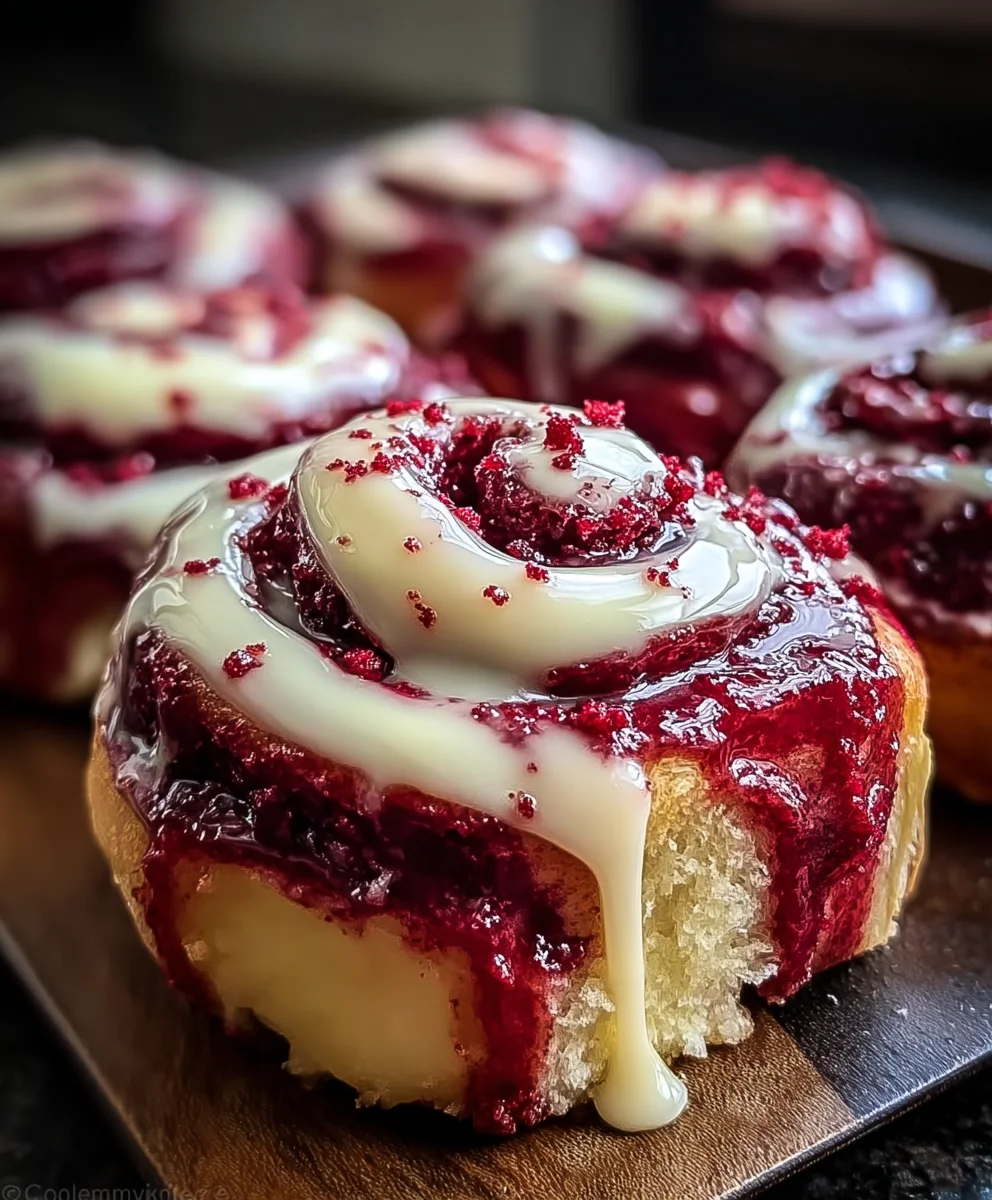
Heavenly Red Velvet Cinnamon Rolls. Imagine waking up to the irresistible aroma of freshly baked goods, but with a twist that’s both visually stunning and incredibly decadent. Today, I’m thrilled to share a recipe that marries two beloved classics: the rich, cocoa-kissed elegance of red velvet and the comforting, spiced swirl of a perfect cinnamon roll. This isn’t just any breakfast treat; it’s an experience, a symphony of flavors and textures designed to captivate your senses from the very first glance.
The red velvet cake, with its distinctive crimson hue and subtle cocoa notes, carries a fascinating history, often associated with Southern charm and special occasions. When combined with the universally adored cinnamon roll, steeped in tradition as a warm, inviting delight, the result is truly spectacular. People absolutely adore this dish because it delivers an unparalleled combination of a remarkably soft and fluffy dough, a gooey, spiced brown sugar filling, and that signature hint of cocoa and buttermilk tang, all crowned with a luscious, tangy cream cheese frosting. Each bite of these Heavenly Red Velvet Cinnamon Rolls is a journey into indulgence, offering a perfect balance of sweetness, spice, and a tender chew that simply melts in your mouth. Whether you’re planning a lavish brunch or simply craving a unique, comforting treat, this recipe promises to elevate your baking to an art form.

Ingredients:
For the Heavenly Red Velvet Dough:
- 1 cup (240ml) warm milk (around 105-115°F / 40-46°C)
- 2 ¼ teaspoons (1 standard packet) active dry yeast
- ¼ cup (50g) granulated sugar, plus 1 teaspoon for yeast
- 1 large egg, at room temperature
- ¼ cup (56g) unsalted butter, melted and slightly cooled
- 1 tablespoon (15ml) red food coloring (gel preferred for vibrant color)
- 1 teaspoon vanilla extract
- 2 tablespoons (14g) unsweetened cocoa powder
- ½ teaspoon salt
- 3 ½ – 4 cups (420-480g) all-purpose flour, plus more for dusting
For the Heavenly Cinnamon Filling:
- ½ cup (113g) unsalted butter, softened
- 1 cup (200g) packed light brown sugar
- 2 tablespoons (14g) unsweetened cocoa powder
- 2 tablespoons ground cinnamon
For the Irresistible Cream Cheese Glaze:
- 4 oz (113g) cream cheese, softened
- ¼ cup (56g) unsalted butter, softened
- 2 cups (240g) powdered sugar (confectioners’ sugar)
- 1 teaspoon vanilla extract
- 2-3 tablespoons milk or heavy cream, as needed for consistency
For the Red Velvet Dough:
- First things first, let’s get our yeast ready to party and create the base for our incredible Heavenly Red Velvet Cinnamon Rolls! In a large mixing bowl, or the bowl of your stand mixer fitted with the dough hook attachment, combine the warm milk and 1 teaspoon of granulated sugar. Sprinkle the active dry yeast evenly over the top. Give it a gentle stir with a spoon or whisk, just enough to moisten the yeast. Then, let it sit undisturbed for about 5-10 minutes. You’re looking for the mixture to become beautifully foamy and bubbly, which is your clear signal that the yeast is active, alive, and ready to work its magic. If you don’t see any foam, your milk might have been too hot (killing the yeast) or too cold (preventing activation), or your yeast might be expired. In that case, it’s best to start over with fresh yeast and properly tempered milk to ensure your Heavenly Red Velvet Cinnamon Rolls rise perfectly.
- Once your yeast mixture is wonderfully bubbly, indicating full activation, add the remaining ¼ cup of granulated sugar, the room temperature egg, the melted and slightly cooled butter, the vibrant red food coloring, and the vanilla extract to the bowl. Stir all these wet ingredients together thoroughly until they are well combined. This is the moment where that gorgeous red color truly starts to come alive, promising the signature look of our Heavenly Red Velvet Cinnamon Rolls.
- In a separate, smaller bowl, whisk together 3 ½ cups of the all-purpose flour, the unsweetened cocoa powder, and the salt. Taking this extra step ensures that all your dry ingredients, particularly the cocoa powder which can sometimes clump, are evenly distributed before they are introduced to the wet mixture. This helps prevent streaks and ensures uniform flavor and texture throughout your dough.
- Gradually add the flour mixture to the wet ingredients in the stand mixer, starting on low speed. Mix just until a shaggy, somewhat sticky dough begins to form. Once the flour is mostly incorporated, increase the mixer speed to medium-low and knead the dough for about 8-10 minutes. If you prefer to knead by hand, turn the dough out onto a lightly floured surface and knead vigorously for 10-15 minutes. The goal here is to develop the gluten, resulting in a dough that is smooth, elastic, and no longer sticky to the touch. It should feel soft and pliable, and when you gently poke it with your finger, it should slowly spring back into place. If your dough remains overly sticky after the initial kneading time, add the remaining ½ cup of flour, one tablespoon at a time, until you achieve the desired consistency. Be cautious not to add too much flour, as an excessive amount can lead to dense, tough, and less-than-heavenly Red Velvet Cinnamon Rolls.
- Lightly grease a large, clean bowl with a little neutral oil or non-stick cooking spray. Transfer the well-kneaded dough into this bowl, turning it over once to ensure the entire surface is lightly coated with oil. This prevents the dough from sticking as it rises. Cover the bowl tightly with plastic wrap or a clean, damp kitchen towel.
- Now for the magic of the first proofing! Place the covered bowl in a warm, draft-free spot. An ideal temperature is around 75-80°F (24-27°C). Let the dough rise for 1 to 1 ½ hours, or until it has visibly doubled in size. The exact timing can vary depending on the ambient temperature of your kitchen; a cooler environment will require more time, so patience is key. A helpful trick is to place it in a slightly warmed (but turned off!) oven, or near a sunny window. This first rise is absolutely crucial for developing the complex flavors and achieving the light, airy texture that defines truly amazing Heavenly Red Velvet Cinnamon Rolls.
- Once the dough has beautifully doubled in size, gently punch it down to release the accumulated air. This step helps redistribute the yeast and creates a finer crumb in the finished rolls. Turn the dough out onto a lightly floured work surface. Your vibrant red dough is now perfectly prepared and ready for the next exciting stage: rolling it out!
For the Heavenly Cinnamon Filling:
- While your delightful red velvet dough is happily proofing and transforming, let’s prepare the utterly irresistible filling that will swirl through our Heavenly Red Velvet Cinnamon Rolls. In a medium-sized mixing bowl, combine the softened unsalted butter, the packed light brown sugar, the unsweetened cocoa powder, and the fragrant ground cinnamon.
- Using a sturdy fork or the back of a spoon, vigorously mix these ingredients together. Continue mixing until they are thoroughly combined and form a smooth, uniform paste. The ideal consistency for this filling is spreadable but firm enough that it won’t easily run or drip when applied to the dough. If your butter was too cold to start, your filling might be a bit lumpy; you can let it sit at room temperature for a few extra minutes to soften further. Conversely, if your butter was too warm, the mixture might be too runny, in which case a quick 5-10 minute chill in the refrigerator will help firm it up. Achieving this perfect consistency is essential for ensuring an even and generous distribution of that delicious cinnamon-cocoa goodness in every single bite of your Heavenly Red Velvet Cinnamon Rolls.
Assembling and Shaping Your Heavenly Red Velvet Cinnamon Rolls:
- Lightly flour your clean work surface and your rolling pin. Take your punched-down, beautiful red velvet dough and transfer it to the floured surface. Roll the dough out into a large rectangle, aiming for approximate dimensions of 18×12 inches (45×30 cm). It’s important to try and maintain an even thickness across the entire rectangle, ideally about ¼ inch (0.6 cm) thick. This attention to detail ensures that all your Heavenly Red Velvet Cinnamon Rolls will bake uniformly and have a consistent texture.
- Now, evenly spread the prepared Heavenly Cinnamon Filling over the entire surface of the rolled-out dough. Make sure to leave a clean border of about ½-inch (1.25 cm) along one of the long edges of the rectangle. However, spread the filling right up to the other three edges. You might find that the warmth of your hands can assist in spreading the filling smoothly and thoroughly, ensuring every future bite is packed with flavor.
- Starting from the long edge of the dough opposite the clean border (the edge where the filling goes right to the end), carefully and tightly roll the dough into a log. The tighter you manage to roll it, the neater and more uniform your Heavenly Red Velvet Cinnamon Rolls will be. This also helps ensure the filling stays securely tucked inside each swirl during baking. This step requires a little patience and a gentle, consistent pressure.
- Once you have a fully rolled log, gently pinch the seam (the clean border you left) to seal it completely against the log. This crucial step prevents your precious rolls from unraveling and losing their shape during the second proofing and baking.
- Now it’s time to slice your masterpiece! There are a couple of excellent methods for this. You can use a very sharp, un-serrated knife, pressing straight down rather than sawing to get clean cuts. Alternatively, my personal favorite method is using unflavored dental floss! Slide a long piece of dental floss underneath the log, cross the ends over the top of the log at your desired cutting point, and pull firmly to create incredibly neat, clean slices. Aim for 12 equally sized rolls, each approximately 1 ½ inches (3.8 cm) thick. Uniform slices are key to achieving uniform baking, ensuring every Heavenly Red Velvet Cinnamon Roll is perfectly cooked.
- Generously grease a 9×13 inch baking dish or a similarly sized round baking pan with butter or non-stick spray. Carefully arrange the sliced Heavenly Red Velvet Cinnamon Rolls in the prepared dish, leaving a small amount of space between each one. Remember, they will expand quite a bit during their second proofing and, even more so, during baking.
- Cover the baking dish loosely with plastic wrap or a clean kitchen towel. Place it back in a warm, draft-free spot for the second rise. Let them proof for another 30-45 minutes, or until they look noticeably puffy, soft to the touch, and have nearly doubled in size once more. This second rise is absolutely critical for achieving that famously light, fluffy, and incredibly tender texture we all adore in a cinnamon roll. While your rolls are enjoying their final rise, go ahead and preheat your oven to 375°F (190°C).
Baking the Heavenly Red Velvet Cinnamon Rolls:
- Once your Heavenly Red Velvet Cinnamon Rolls have beautifully risen for their second proofing and the oven has reached the perfect temperature, it’s finally time for the exciting moment: baking! Carefully place the uncovered baking dish into your preheated 375°F (190°C) oven.
- Bake for 20-25 minutes, or until the tops of the rolls are a gorgeous golden brown and the rolls themselves feel set and cooked through. It’s vital to keep a close eye on them, especially towards the end of the baking time! Ovens can vary considerably, and your ultimate goal is perfectly tender, moist rolls, not dry ones. If you notice them starting to brown too quickly on top, you can loosely tent the pan with aluminum foil for the last 5-10 minutes of baking to prevent over-browning while allowing them to cook through. A good indicator that they are done is when they feel light and puffy to the touch in the center. The exquisite aroma that will fill your entire kitchen will be an utterly incredible, undeniable tell-tale sign that these Heavenly Red Velvet Cinnamon Rolls are nearly ready for their grand reveal!
- Carefully remove the pan of freshly baked Heavenly Red Velvet Cinnamon Rolls from the oven. Let them cool in the pan for about 5-10 minutes before proceeding to glaze them. This brief cooling period allows the rolls to set slightly, firm up, and importantly, retain their precious moisture, ensuring they remain wonderfully tender.
Preparing the Irresistible Cream Cheese Glaze:
- While your glorious Heavenly Red Velvet Cinnamon Rolls are cooling ever so slightly, let’s swiftly whip up that dreamy, tangy, and utterly irresistible cream cheese glaze. In a medium-sized bowl, using an electric mixer (either a handheld one or a stand mixer fitted with the paddle attachment), beat together the softened cream cheese and the softened unsalted butter. Beat them on medium speed for 2-3 minutes, or until the mixture is beautifully light, fluffy, and completely smooth. Be sure to scrape down the sides of the bowl as needed to ensure every bit is evenly combined.
- Gradually begin to add the powdered sugar, incorporating it one cup at a time. Beat on low speed until each addition of sugar is fully incorporated and no visible lumps remain. Once all the powdered sugar has been added and mixed in, stir in the vanilla extract.
- Increase the mixer speed to medium-high and continue beating for another 1-2 minutes. This final whip will ensure the glaze is perfectly smooth, wonderfully creamy, and completely lump-free, with a delightful airiness.
- At this point, assess the consistency of your glaze. If it appears too thick for easy drizzling, gradually add milk or heavy cream, one tablespoon at a time, beating after each addition, until you achieve your desired pouring consistency. Conversely, if by chance your glaze turns out a little too thin, you can simply beat in a little more powdered sugar until it reaches the perfect balance. You’re aiming for a glaze that drizzles beautifully and elegantly, yet still possesses enough body to generously coat each roll without disappearing entirely. This creamy, tangy glaze provides the absolute perfect counterpoint to the sweet, rich, and heavenly Red Velvet Cinnamon Rolls.
Finishing Touches:
- As soon as your Heavenly Red Velvet Cinnamon Rolls have completed their essential 5-10 minute cooling period (they should still be wonderfully warm to the touch!), it’s time for the crowning glory: generously drizzle or lavishly spread the irresistible cream cheese glaze over the tops of all the rolls. The gentle warmth emanating from the rolls will work its magic, allowing the glaze to melt ever so slightly and seep down into all the delicious nooks and crannies, making each bite even more decadent and utterly delightful.
- Serve your Heavenly Red Velvet Cinnamon Rolls warm, directly from the baking pan. They are an absolute dream enjoyed fresh out of the oven, when the dough is at its most tender and the glaze is perfectly melted. Should you be fortunate enough to have any leftovers, they can be stored in an airtight container at room temperature for a day or two, or in the refrigerator for up to 5 days. For that blissful, fresh-baked warmth, you can gently reheat individual rolls in the microwave for 15-30 seconds.
- Prepare for an outpouring of rave reviews and delighted smiles! These Heavenly Red Velvet Cinnamon Rolls are truly a showstopper, boasting a unique color, rich flavor, and an undeniably comforting taste. They are absolutely perfect for a special breakfast, a celebratory brunch, or simply as an indulgent treat to brighten any day. Go ahead and enjoy every single glorious, tender, and incredibly flavorful bite!
Conclusion:
And there you have it, my friends! We’ve journeyed through the delightful process of creating something truly extraordinary, a recipe that, in my humble opinion, redefines what a breakfast pastry or a dessert can be. This isn’t just another cinnamon roll recipe; it’s an invitation to experience a symphony of flavors and textures, a culinary masterpiece that will undoubtedly earn you rave reviews from anyone lucky enough to try it. I genuinely believe that once you pull these beautiful, vibrant rolls from your oven, you’ll understand precisely why I’m so passionate about them. They are a visual spectacle, a fragrant marvel, and an absolute delight to the palate, boasting that perfect balance of rich cocoa, warm cinnamon, and tangy cream cheese frosting.
So, why is this recipe a must-try? Because it takes the comforting, universally adored concept of a cinnamon roll and elevates it to an art form with the luxurious, subtly chocolatey depth of red velvet. The striking red hue, often enhanced by a touch of cocoa, combined with that luscious swirl of cinnamon sugar, creates an aesthetic that is as irresistible as the taste. Every bite offers a cloud-like softness, a gentle chew, and an explosion of comforting flavors that dance on your tongue. It’s the kind of treat that doesn’t just satisfy a craving; it creates a memorable moment. Imagine the gasps of delight as you present a platter of these at your next brunch! These Heavenly Red Velvet Cinnamon Rolls are more than just a baked good; they’re an experience waiting to happen, a testament to the joy that comes from combining familiar favorites in an exciting new way.
Now, let’s talk about how to best enjoy these edible works of art, or how you might even put your own creative spin on them. Of course, they are absolutely divine served warm, fresh from the oven, with that irresistible cream cheese frosting barely set and still slightly gooey. Picture yourself on a lazy weekend morning, a steaming cup of coffee or tea in hand, slowly savoring one of these beauties. They make an unparalleled addition to a special holiday breakfast or brunch spread, instantly becoming the star of the show. Don’t limit them to just the morning, though! These rolls are equally spectacular as a decadent dessert after a comforting meal, perhaps paired with a glass of cold milk or even a sparkling mimosa for a truly celebratory feel. You could even package a few up as a thoughtful, homemade gift for a neighbor or a loved one – trust me, you’ll be their favorite person!
Elevate Your Rolls with These Suggestions and Variations:
Feeling adventurous? There are countless ways to customize your Red Velvet Cinnamon Rolls to suit your taste or the occasion. For the cream cheese frosting, consider adding a hint of orange zest for a bright, citrusy note, or a tiny dash of almond extract to complement the richness. A very small pinch of sea salt sprinkled over the top of the frosted rolls can also work wonders, beautifully cutting through the sweetness and enhancing the other flavors. If you’re a fan of nuts, finely chopped pecans or walnuts can be folded into the cinnamon filling for an added layer of texture and a nutty aroma. For chocolate lovers (and let’s be honest, who isn’t?), a sprinkling of mini chocolate chips in the filling or even on top of the frosting before serving would be an absolute dream.
You could also experiment with the spices in the filling; while cinnamon is classic, a tiny touch of cardamom or nutmeg could introduce an intriguing depth. For a different presentation, try baking them in a round cake pan as a pull-apart bread, perfect for sharing. And for those with dietary considerations, while this recipe is written for traditional ingredients, many of you skilled bakers might explore adapting it with gluten-free flour blends or plant-based butter and milk for a vegan version. Just remember that such substitutions might alter the texture slightly, but the essence of the flavor can still shine through!
Your Turn to Bake and Share!
I truly hope this recipe inspires you to get into the kitchen and create your own batch of these incredible Red Velvet Cinnamon Rolls. There’s something so incredibly satisfying about the entire baking process, from kneading the dough to watching it rise, and finally, witnessing these gorgeous rolls emerge from your oven. The aroma alone is worth the effort, filling your home with a comforting warmth that promises pure indulgence. Don’t be intimidated; take your time, follow the steps, and I promise you’ll be rewarded with a treat that will bring smiles and joy.
Once you’ve experienced the magic, I would absolutely love to hear all about it! Did you try any variations? What did your family and friends think? Did they become an instant hit at your brunch? Please don’t hesitate to share your experiences, your photos, and any creative twists you came up with. Your feedback and stories truly make this baking community vibrant and inspiring. Happy baking, my friends, and get ready to fall in love with your new favorite roll!
Heavenly Red Velvet Cinnamon Rolls
Indulge in these visually stunning and incredibly decadent Red Velvet Cinnamon Rolls! This recipe marries the rich, cocoa-kissed elegance of red velvet with the comforting, spiced swirl of a perfect cinnamon roll. Featuring a remarkably soft and fluffy dough, gooey spiced brown sugar filling, a signature hint of cocoa and buttermilk tang, all crowned with a luscious, tangy cream cheese frosting. Each bite offers a perfect balance of sweetness, spice, and a tender chew.
Ingredients
-
1 cup (240ml) warm milk
-
2 ¼ teaspoons active dry yeast
-
¼ cup (50g) granulated sugar
-
1 teaspoon granulated sugar (for yeast activation)
-
1 large egg, at room temperature
-
¼ cup (56g) unsalted butter, melted and slightly cooled
-
1 tablespoon (15ml) red food coloring (gel preferred)
-
1 teaspoon vanilla extract
-
2 tablespoons (14g) unsweetened cocoa powder
-
½ teaspoon salt
-
3 ½ – 4 cups (420-480g) all-purpose flour, plus more for dusting
-
½ cup (113g) unsalted butter, softened
-
1 cup (200g) packed light brown sugar
-
2 tablespoons ground cinnamon
-
4 oz (113g) cream cheese, softened
-
¼ cup (56g) unsalted butter, softened
-
2 cups (240g) powdered sugar (confectioners’ sugar)
-
1 teaspoon vanilla extract
-
2-3 tablespoons milk or heavy cream, as needed for consistency
Instructions
-
Step 1
In a large bowl, combine warm milk and 1 tsp granulated sugar. Sprinkle yeast; stir gently. Let sit 5-10 mins until foamy. Add remaining ¼ cup granulated sugar, egg, melted butter, red food coloring, and 1 tsp vanilla extract; stir well. In a separate bowl, whisk 3 ½ cups all-purpose flour, 2 tbsp cocoa powder, and ½ tsp salt. Gradually add dry mixture to wet, mixing until a shaggy dough forms. Knead for 8-10 mins (mixer) or 10-15 mins (hand) until smooth and elastic, adding up to ½ cup more flour if dough is too sticky. -
Step 2
Lightly grease a large bowl. Transfer kneaded dough, turning once to coat. Cover tightly and let rise in a warm, draft-free spot for 1 to 1 ½ hours, or until doubled in size. Gently punch down the risen dough and turn out onto a lightly floured surface. -
Step 3
In a medium bowl, combine ½ cup softened unsalted butter, 1 cup packed light brown sugar, 2 tbsp cocoa powder, and 2 tbsp ground cinnamon. Mix vigorously until a smooth, spreadable paste forms. Adjust consistency by chilling briefly if too warm, or letting sit if too cold. -
Step 4
Lightly flour your work surface and rolling pin. Roll the dough into an 18×12 inch (45×30 cm) rectangle, about ¼ inch (0.6 cm) thick. Evenly spread the prepared filling over the dough, leaving a ½-inch (1.25 cm) clean border along one long edge. Starting from the long edge opposite the clean border, tightly roll the dough into a log. Pinch the seam to seal it completely. -
Step 5
Slice the log into 12 equally sized rolls, each approx. 1 ½ inches (3.8 cm) thick, using a sharp knife or dental floss. Generously grease a 9×13 inch baking dish. Arrange the sliced rolls in the dish, leaving some space between them. Cover loosely and let proof in a warm spot for 30-45 minutes, or until noticeably puffy and nearly doubled. Preheat oven to 375°F (190°C). -
Step 6
Place the uncovered baking dish into the preheated 375°F (190°C) oven. Bake for 20-25 minutes, or until the tops are golden brown and rolls are set. If browning too quickly, loosely tent with aluminum foil for the last 5-10 minutes. Remove from oven and let cool in the pan for 5-10 minutes before glazing. -
Step 7
While rolls cool, beat 4 oz softened cream cheese and ¼ cup softened unsalted butter in a medium bowl with an electric mixer until light, fluffy, and smooth (2-3 mins). Gradually add 2 cups powdered sugar, beating on low speed until fully incorporated. Stir in 1 tsp vanilla extract. Increase speed to medium-high and beat for 1-2 minutes until smooth and creamy. If too thick, gradually add 2-3 tbsp milk or heavy cream until desired drizzling consistency; if too thin, add more powdered sugar. -
Step 8
Once rolls have cooled for 5-10 minutes (still warm), generously drizzle or spread the cream cheese glaze over the tops. Serve immediately from the baking pan. Store leftovers in an airtight container at room temperature for 1-2 days, or refrigerated for up to 5 days. Reheat individual rolls in the microwave for 15-30 seconds.
Important Information
Nutrition Facts (Per Serving)
It is important to consider this information as approximate and not to use it as definitive health advice.
Allergy Information
Please check ingredients for potential allergens and consult a health professional if in doubt.


Leave a Comment