
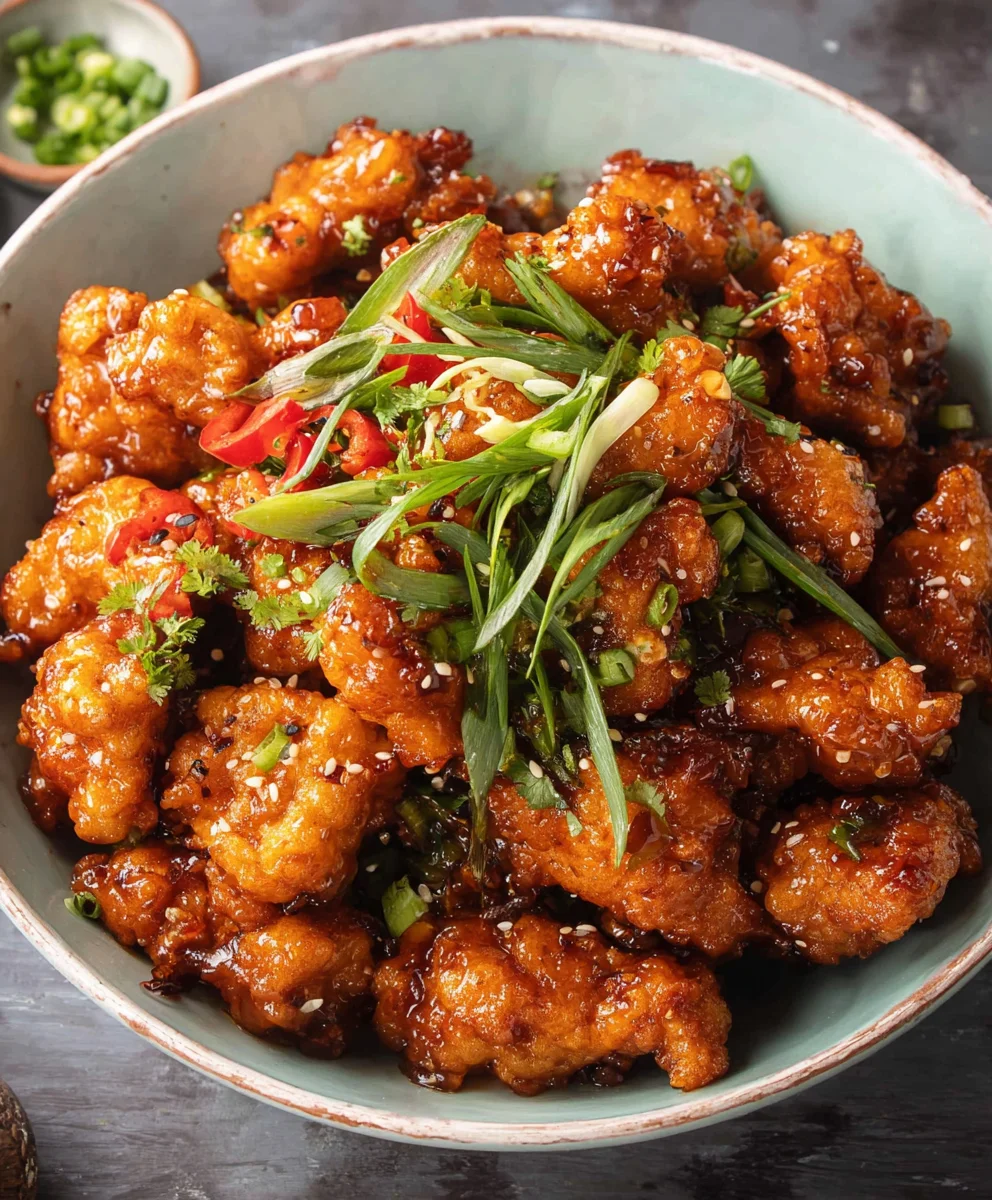
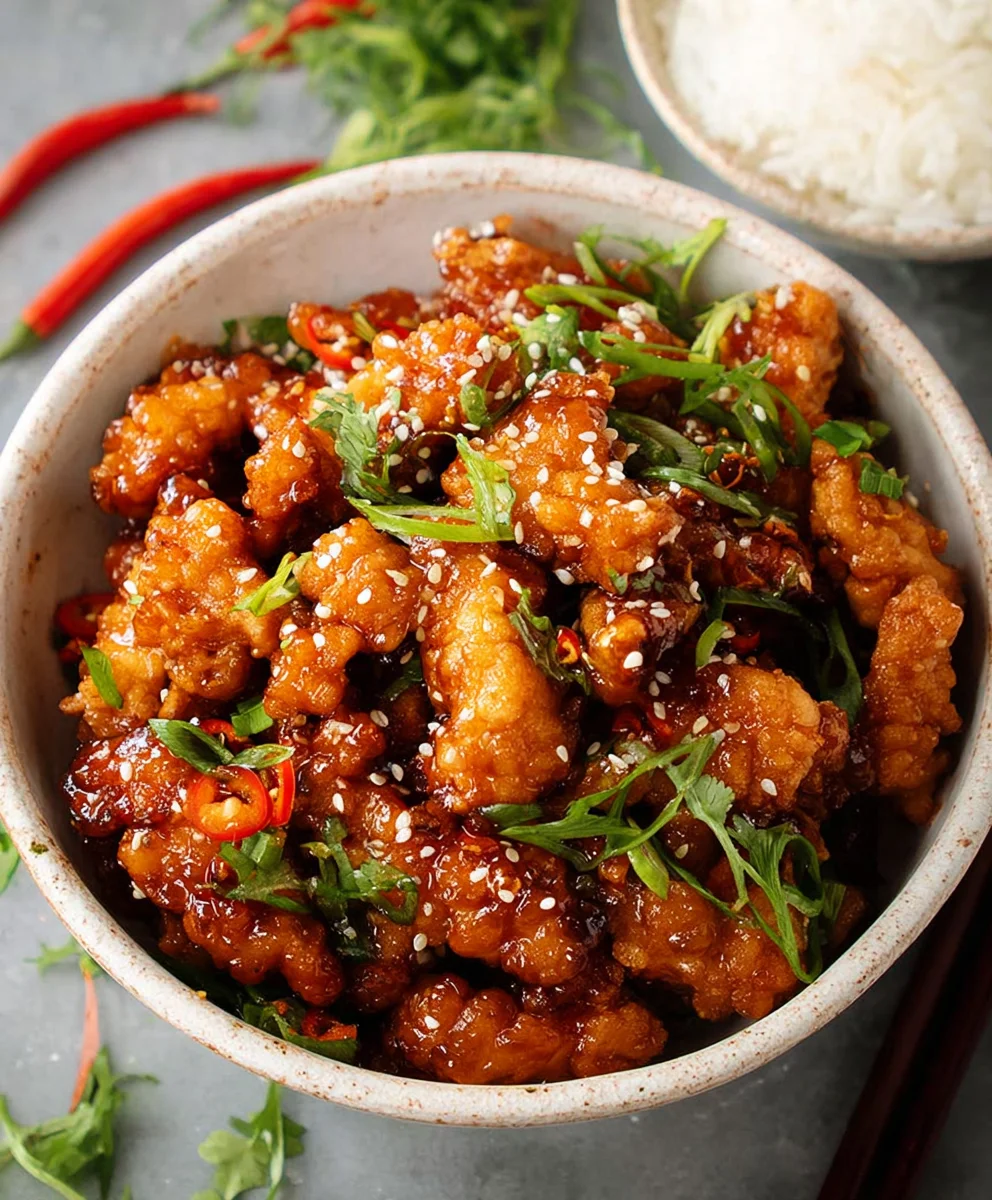
Sweet Chilli Chicken – a dish that masterfully captures the essence of vibrant Asian-inspired cuisine, delighting palates with its intoxicating blend of sweet, spicy, and savory notes. For me, it’s more than just a meal; it’s an experience, a symphony of flavors that instantly transports you to bustling street food markets and cozy family dinners alike. This beloved culinary creation, while having roots in traditional sweet and sour profiles, has evolved into a global phenomenon, particularly cherished for its dynamic and approachable taste.
What makes this dish so universally adored? I believe it’s the irresistible combination of textures and tastes. Imagine succulent pieces of chicken, often rendered beautifully crispy, enveloped in a glossy, sticky glaze that delivers that perfect kick of heat balanced with a delightful sweetness. It’s a testament to the power of simple yet impactful ingredients coming together to create something truly extraordinary. Whether you are a seasoned chef or someone just starting their culinary journey, preparing a fantastic Sweet Chilli Chicken is wonderfully achievable and incredibly rewarding. It’s the ultimate crowd-pleaser, perfect for a quick weeknight dinner or a special gathering, consistently delivering on flavor and satisfaction.
Ingredients:
-
For the Crispy Chicken:
- 500g (approx. 1.1 lbs) boneless, skinless chicken thighs or breasts, cut into 1-inch bite-sized pieces. I often prefer thighs for their extra juiciness, but breasts work beautifully too!
- 1 large egg, lightly beaten
- 60g (1/2 cup) cornstarch (cornflour in some regions) – this is crucial for that fantastic crispness.
- 60g (1/2 cup) all-purpose flour
- 1 teaspoon garlic powder
- 1/2 teaspoon onion powder
- 1/2 teaspoon salt
- 1/4 teaspoon black pepper
- Neutral oil for frying (e.g., vegetable, canola, sunflower, or peanut oil) – enough to submerge the chicken halfway or fully, depending on your preferred frying method.
-
For the Marinade (Optional, but highly recommended for flavor and tenderness):
- 1 tablespoon soy sauce (light or regular)
- 1 tablespoon rice vinegar
- 1 teaspoon sesame oil
- 1/2 teaspoon freshly grated ginger
-
For the Irresistible Homemade Sweet Chilli Sauce:
- 120ml (1/2 cup) sweet chilli sauce (store-bought, or follow my detailed instructions below for a homemade version)
- 60ml (1/4 cup) rice vinegar (unseasoned is best)
- 60ml (1/4 cup) soy sauce (light or regular)
- 60ml (1/4 cup) granulated sugar (you can adjust this to your sweetness preference)
- 2 tablespoons tomato paste (for depth of color and flavor)
- 1 tablespoon minced garlic (about 2-3 cloves)
- 1 tablespoon freshly grated ginger
- 1/2 to 1 teaspoon red pepper flakes (adjust to your desired spice level; I like a good kick!)
- 1 teaspoon cornstarch mixed with 2 tablespoons cold water (this is our trusty slurry for thickening)
-
For Serving:
- Cooked jasmine rice or brown rice
- Steamed or stir-fried greens (broccoli, bok choy, or green beans are lovely)
-
For Garnish (Adds freshness and visual appeal!):
- Fresh chopped green onions (scallions)
- Toasted sesame seeds
- Extra red pepper flakes (if you’re feeling adventurous!)
Preparing the Chicken for Its Crispy Transformation
-
Step 1: Prepare and Marinate the Chicken.
First things first, let’s get our chicken ready. Take your boneless, skinless chicken thighs or breasts and cut them into nice, uniform 1-inch bite-sized pieces. Uniformity is key here for even cooking, ensuring every piece of your Sweet Chilli Chicken is perfectly done. Once cut, transfer the chicken to a medium-sized bowl.
Now, if you’re opting for a flavor boost, it’s marinade time! In the bowl with the chicken, add the soy sauce, rice vinegar, sesame oil, and grated ginger. Give it a good toss to make sure every piece of chicken is coated. This simple marinade adds a fantastic layer of umami and tenderness, making your chicken even more delicious. Cover the bowl and let it marinate in the refrigerator for at least 20-30 minutes. If you have more time, an hour is even better, but avoid marinating for much longer than a few hours, especially with the vinegar, as it can start to change the texture of the chicken too much.
A little tip here: Even if you skip the marinade, pat your chicken pieces very dry with paper towels before proceeding. Excess moisture is the enemy of crispiness!
-
Step 2: Create the Dry Coating Mixture.
While your chicken is marinating, prepare your dredging station. In a shallow dish or a wide bowl, combine the cornstarch, all-purpose flour, garlic powder, onion powder, salt, and black pepper. Whisk these dry ingredients together thoroughly until they are well combined. This seasoned flour-cornstarch mixture is what will give our Sweet Chilli Chicken its incredible crispy coating. The cornstarch is really the star here, as it helps create a lighter, crispier crust compared to using just flour.
In another shallow dish, lightly beat your egg. This will act as the “glue” to help the dry coating adhere beautifully to the chicken.
Crafting the Irresistible Homemade Sweet Chilli Sauce
While a good quality store-bought sweet chilli sauce can definitely work in a pinch, making it from scratch allows you to control the sweetness, spice, and overall depth of flavor. Trust me, it’s worth the extra few minutes!
-
Step 3: Combine Sweet Chilli Sauce Ingredients.
In a medium saucepan or a deep skillet, combine the sweet chilli sauce (if using store-bought as a base), rice vinegar, soy sauce, granulated sugar, tomato paste, minced garlic, grated ginger, and red pepper flakes. Whisk everything together until the sugar begins to dissolve and all ingredients are well incorporated. Take a moment to appreciate the vibrant colors and aromatic scents already developing!
Personal preference note: When I make my Sweet Chilli Chicken, I love a robust sauce. If you prefer a less sweet or spicier sauce, this is your chance to adjust. Taste a tiny bit (carefully, as it’s raw) and tweak the sugar or red pepper flakes to your heart’s content. Remember, it’s easier to add more than to take away!
-
Step 4: Simmer and Thicken the Sauce.
Place the saucepan over medium heat. Bring the mixture to a gentle simmer, stirring occasionally. Once it’s simmering, reduce the heat to low and let it cook for about 5-7 minutes. This allows all those wonderful flavors to meld together beautifully and the raw garlic and ginger to cook down.
While the sauce is simmering, prepare your cornstarch slurry. In a small bowl, whisk together the 1 teaspoon of cornstarch with 2 tablespoons of cold water until no lumps remain. This slurry is what will give our sweet chilli sauce that perfect, glossy, clingy texture.
After the sauce has simmered for a few minutes, slowly pour the cornstarch slurry into the simmering sauce, whisking constantly. Continue to whisk for 1-2 minutes until the sauce thickens to your desired consistency. It should be thick enough to coat the back of a spoon. If it gets too thick, you can always thin it out with a little bit of water or chicken broth. If it’s not thick enough, you can mix a little more cornstarch with cold water and add it in increments, bringing it back to a simmer each time. Once thickened, remove the sauce from the heat and set it aside. It’s ready to embrace our crispy chicken!
Cooking the Crispy Chicken – The Heart of Your Sweet Chilli Chicken!
-
Step 5: Coat the Chicken for Ultimate Crispiness.
Remove the marinated chicken from the refrigerator. If there’s any excess liquid from the marinade, drain it off slightly, but don’t pat it dry this time – the marinade provides a sticky surface for the egg wash. Take each piece of chicken and first dip it into the beaten egg, ensuring it’s fully coated. Let any excess egg drip off.
Immediately after the egg wash, transfer the chicken piece into the dry coating mixture (flour and cornstarch blend). Toss it gently or press the coating onto the chicken, making sure it’s completely covered. You want a good, even layer. Place the coated chicken pieces on a clean plate or a wire rack. Repeat this process for all the chicken pieces. It’s a bit of a messy job, but trust me, it’s worth it for the crispy texture we’re aiming for with this Sweet Chilli Chicken.
Pro Tip: For extra crispiness, you can do a double dredge! After the first coating, dip the chicken back into the egg and then into the dry mixture again. This creates an even thicker, crunchier crust.
-
Step 6: Pan-Frying or Deep-Frying the Chicken.
Now for the fun part – cooking that chicken! In a large, heavy-bottomed skillet or a Dutch oven, pour enough neutral oil to reach about 1/2 to 1 inch deep (for pan-frying) or enough to fully submerge the chicken (for deep-frying). Heat the oil over medium-high heat until it reaches 175°C (350°F). You can test the oil by dropping a tiny pinch of the flour mixture in; it should sizzle immediately.
Carefully add the coated chicken pieces to the hot oil in batches. Do not overcrowd the pan! Overcrowding will lower the oil temperature too quickly, leading to soggy chicken instead of crispy perfection. Give each piece enough space to cook evenly.
Fry the chicken for about 4-6 minutes per batch, turning occasionally, until it’s beautifully golden brown, wonderfully crispy, and cooked through. The internal temperature of the chicken should reach 74°C (165°F). Once cooked, remove the chicken pieces with a slotted spoon or spider and transfer them to a wire rack set over a baking sheet lined with paper towels. This allows any excess oil to drain off, helping to maintain that crispiness. Repeat with the remaining chicken batches.
Alternative: Baking or Air Frying for Less Oil!
- Baking: Preheat your oven to 200°C (400°F). Lightly spray a baking sheet with non-stick cooking spray. Place the coated chicken pieces in a single layer, ensuring they don’t touch. Lightly spray the top of the chicken with a little more cooking spray. Bake for 15-20 minutes, flipping halfway through, until golden brown and cooked through. While not as intensely crispy as fried, it’s a delicious and lighter option for your Sweet Chilli Chicken.
- Air Frying: Preheat your air fryer to 200°C (400°F). Lightly spray the air fryer basket with non-stick spray. Place chicken pieces in a single layer, ensuring not to overcrowd. Air fry for 10-15 minutes, shaking the basket or flipping the chicken halfway through, until golden and crispy. This method is fantastic for achieving a great crunch with minimal oil!
Preparing the Perfect Accompaniments
No Sweet Chilli Chicken dish is complete without some fresh, fluffy rice and vibrant greens to balance the flavors.
-
Step 7: Cook the Fluffy Jasmine Rice.
For two servings, I usually rinse about 1 cup of jasmine rice under cold water until the water runs clear. This removes excess starch, leading to fluffier, less sticky rice. Transfer the rinsed rice to a saucepan with a tight-fitting lid. Add 1.5 cups of cold water (or follow package directions for your specific rice type). Bring it to a rolling boil over high heat. Once boiling, immediately reduce the heat to the lowest setting, cover tightly, and simmer for 12-15 minutes. Resist the urge to peek! Once the cooking time is up, remove the saucepan from the heat and let it rest, still covered, for another 5-10 minutes. This steaming period is crucial for perfect rice. Finally, fluff the rice gently with a fork before serving.
-
Step 8: Steam or Stir-Fry the Greens.
While your chicken is frying and rice is cooking, quickly prepare your greens. I love simple steamed broccoli florets or bok choy with my Sweet Chilli Chicken. You can steam them in a steamer basket over boiling water for 3-5 minutes until tender-crisp, or stir-fry them quickly in a hot wok with a touch of sesame oil and garlic for a few minutes. Don’t overcook them; we want them vibrant and slightly crunchy!
Assembling and Serving Your Delightful Sweet Chilli Chicken
-
Step 9: Toss the Crispy Chicken with the Homemade Sweet Chilli Sauce.
Once all your chicken is cooked and resting, and your sauce is ready, it’s time to bring it all together. You have two main options here:
- Option A (My favorite for ultimate coating): Gently reheat your sweet chilli sauce in the saucepan over low heat if it’s cooled down. Add all the crispy chicken pieces directly into the sauce. Using tongs or a spoon, gently toss the chicken until every piece is beautifully coated in that glossy, flavorful sauce. Work quickly to ensure the chicken maintains as much of its crispiness as possible.
- Option B (For maximum crispiness): If you want to preserve every bit of crunch, you can serve the sauce on the side. This way, each diner can spoon the desired amount of sweet chilli sauce over their chicken just before eating, ensuring the chicken stays crisp right up until the last bite. While I love the full coating, this is a great alternative for those who prioritize crunch above all else!
-
Step 10: Plate, Garnish, and Enjoy!
Now for the grand finale! Spoon a generous portion of your fluffy jasmine rice onto individual plates. Arrange the sauced Sweet Chilli Chicken (or plain crispy chicken with sauce on the side) next to the rice. Add a serving of your steamed or stir-fried greens to complete the meal. Finally, for that professional touch and extra burst of flavor, sprinkle generously with freshly chopped green onions and toasted sesame seeds. If you love a little extra heat, a few more red pepper flakes wouldn’t go amiss!
Serve immediately and watch everyone dig in! The combination of the sweet, spicy, and tangy sauce with the crispy chicken, fluffy rice, and fresh greens is simply divine. This is comfort food with an exciting kick, and it’s always a crowd-pleaser.
Tips for the Perfect Sweet Chilli Chicken Every Time:
Achieving Maximum Crispiness:
To truly master crispy Sweet Chilli Chicken, remember a few key things. First, pat your chicken dry before coating it; moisture creates steam, which makes things soggy. Second, ensure your oil is at the correct temperature – too low, and the chicken absorbs too much oil and becomes greasy; too high, and it burns on the outside before cooking through. A cooking thermometer is your best friend here! Aim for a consistent 175°C (350°F). Third, don’t overcrowd your pan. Frying in batches is essential for maintaining oil temperature and allowing each piece to crisp up properly. Finally, draining on a wire rack allows air to circulate, preventing the bottom from getting soggy.
Adjusting the Sweet Chilli Sauce:
The beauty of making your own sweet chilli sauce is the customization. If you prefer it spicier, don’t hesitate to add more red pepper flakes, or even a tiny bit of fresh minced bird’s eye chili for serious heat. For a less sweet version, gradually reduce the sugar and taste as you go. You can also experiment with different types of vinegar; apple cider vinegar can offer a slightly fruitier tang. For a deeper, richer color, a tiny dash of dark soy sauce can be added, but be mindful of the salt content. The tomato paste already adds a lovely depth, but sometimes a small amount of sriracha can really elevate the flavor profile too, adding both heat and a touch of sweetness.
Make-Ahead and Storage:
You can prepare elements of this Sweet Chilli Chicken dish in advance. The sweet chilli sauce can be made up to 3-4 days ahead of time and stored in an airtight container in the refrigerator. It often tastes even better the next day as the flavors have more time to meld! The chicken can be cut and marinated a few hours ahead. Once cooked, the crispy chicken is best enjoyed fresh. However, if you have leftovers, store the chicken and sauce separately in airtight containers in the refrigerator for up to 2-3 days. When reheating, I recommend reheating the chicken in an air fryer or oven at 180°C (350°F) for 10-15 minutes to regain some crispiness, and gently warming the sauce on the stovetop or in the microwave. Then, combine and serve.
Variations and Dietary Notes:
- Vegetarian/Vegan: This recipe can easily be adapted! Instead of chicken, use extra-firm tofu (pressed and cubed), tempeh, or even thick slices of cauliflower. Coat them similarly and fry or bake. The sauce itself is already vegetarian-friendly. For a vegan option, ensure your sweet chilli sauce (if store-bought) doesn’t contain fish sauce, and use a flax egg or other egg substitute for coating the tofu.
- Gluten-Free: To make this Sweet Chilli Chicken gluten-free, substitute the all-purpose flour with a gluten-free all-purpose flour blend or rice flour. Ensure your soy sauce is gluten-free (tamari is an excellent choice), and double-check all other ingredients (like store-bought sweet chilli sauce) for hidden gluten. Cornstarch is naturally gluten-free.
- Other Proteins: This delicious sweet chilli sauce isn’t just for chicken! It pairs wonderfully with crispy shrimp, pork, or even firm white fish. Adjust cooking times accordingly.
- Vegetable Boost: Feel free to add more vegetables to the dish. Stir-fry bell peppers, snap peas, or carrots with your greens, or even toss them directly into the sauce for a veggie-packed meal.
- Less Sugar Option: If you’re conscious about sugar intake, you can reduce the amount of granulated sugar in the sauce or replace a portion of it with a natural sweetener like maple syrup or honey, adjusting to taste. Just be aware that this might slightly alter the flavor profile.
I hope you enjoy making and devouring this fantastic Sweet Chilli Chicken as much as I do. It’s truly a dish that brings a burst of flavor and a satisfying crunch to any meal!
Conclusion:
Well, there you have it, my friends! We’ve reached the end of our culinary journey for today, and I truly hope you’re feeling as inspired and hungry as I am right now. This recipe isn’t just another dish; it’s a vibrant celebration of flavors, a truly irresistible symphony of sweet, spicy, and savory notes that dance on your palate. I honestly believe this is a must-try for anyone looking to add a burst of excitement to their weekly meal rotation without spending hours in the kitchen. What makes this particular recipe stand out, you ask? It’s the perfect harmony of ease and incredible taste. You don’t need to be a seasoned chef to create something truly spectacular; with simple ingredients and straightforward steps, you can achieve restaurant-quality results right in your own home. The aroma alone as it cooks is enough to get anyone’s stomach rumbling, and the first bite? Pure bliss. This dish has been a game-changer in my own kitchen, consistently delighting everyone I’ve served it to, and I am confident it will soon become a cherished favorite in yours too. It’s comforting yet exhilarating, familiar yet fresh, and utterly satisfying. Trust me, once you master this, you’ll find yourself coming back to it time and time again because it truly delivers on flavor without demanding too much of your precious time.
Serving Suggestions to Elevate Your Meal
Now, let’s talk about making this already fantastic dish even better with some perfect pairings. While the star of the show, this Sweet Chilli Chicken, is undoubtedly delicious on its own, it truly shines when complemented by the right accompaniments. My absolute favorite way to serve it is alongside a generous helping of fluffy, steamed Jasmine rice. The subtle fragrance and soft texture of the rice provide the ideal canvas, soaking up all that incredible sauce and balancing the vibrant flavors. If you’re a noodle enthusiast like me, a bed of perfectly cooked egg noodles or even rice vermicelli works wonderfully, allowing you to twirl every last bit of the glossy, flavorful sauce around your fork. For those looking to sneak in some extra greens, a simple side of blanched or stir-fried broccoli, snap peas, or bok choy makes a fantastic addition, adding a delightful crunch and fresh counterpoint. You could even get creative and turn it into a magnificent lettuce wrap affair, using crisp butter lettuce leaves as edible cups for a lighter, more interactive meal. Imagine scooping the tender chicken and sauce into a cool, refreshing lettuce cup – it’s an experience in itself! And for an extra layer of freshness, a sprinkle of toasted sesame seeds and thinly sliced green onions or fresh cilantro right before serving will not only make it look absolutely stunning but will also add a lovely aromatic finish that brings all the elements together beautifully. Don’t underestimate the power of these small additions to transform your meal into a culinary masterpiece.
Unleash Your Inner Chef with These Variations
One of the many things I adore about this recipe is its incredible adaptability. While the classic chicken version is undeniably superb, don’t hesitate to let your culinary creativity soar and experiment with a few variations. For a fantastic vegetarian alternative, firm tofu cubes, pressed and pan-fried until golden, absorb the sweet chilli sauce beautifully, offering a delightful texture and a plant-based twist. Shrimp also works incredibly well, cooking quickly and pairing wonderfully with the zesty sauce – just be sure not to overcook them! You could even try thinly sliced pork or beef for a different kind of protein. Feel free to load up on your favorite vegetables too; bell peppers in various colors, sliced carrots, mushrooms, or even a handful of spinach can be tossed in during the last few minutes of cooking to boost nutrition and add visual appeal. Want to kick up the heat? A pinch more red pepper flakes or a dash of your favorite hot sauce will do the trick. Prefer it a little sweeter? A tiny bit more honey or brown sugar can be adjusted to your liking. For a crispier texture without the pan-frying, consider trying an air fryer or even oven-baking your chicken pieces until golden before tossing them in the warmed sauce. The possibilities are truly endless, allowing you to tailor this incredible dish to your personal taste and whatever ingredients you have on hand. It’s about making the recipe your own, embracing the joy of cooking, and discovering new flavor combinations.
So, my friends, now it’s your turn! I’ve shared all my tips and tricks, and I genuinely encourage you to roll up your sleeves and give this incredible recipe a try this week. Don’t just take my word for how simple, flavorful, and utterly satisfying it is – experience it for yourself. I promise, you won’t be disappointed. There’s a profound joy that comes from creating something delicious with your own hands and then sharing it with loved ones, and this Sweet Chilli Chicken recipe is perfect for that. Once you’ve whipped up your own batch, I would absolutely love to hear about your experience! Did you stick to the original, or did you put your own unique spin on it? What were your favorite serving suggestions? Please feel free to share your thoughts, your successes, and even your creative variations in the comments below. Your feedback and personal stories are what make our cooking community so vibrant and inspiring. Happy cooking, everyone, and I can’t wait to hear all about your delicious creations!
Sweet Chilli Chicken
Sweet Chilli Chicken – a dish that masterfully captures the essence of vibrant Asian-inspired cuisine, delighting palates with its intoxicating blend of sweet, spicy, and savory notes. This beloved culinary creation, particularly cherished for its dynamic and approachable taste, features succulent, often crispy, chicken enveloped in a glossy, sticky glaze. It’s an irresistible combination of textures and tastes, perfect for a quick weeknight dinner or a special gathering, consistently delivering on flavor and satisfaction.
Ingredients
-
400g boneless chicken breast or thigh, cut into 1-inch pieces
-
¼ tsp white pepper
-
1 tbsp all-purpose soy sauce (for marinade)
-
150g cornstarch
-
1 large egg, lightly beaten
-
Neutral oil, for frying
-
2 cloves garlic, minced
-
1 tsp dried chili flakes (optional)
-
1 tbsp neutral cooking oil (for sauce)
-
6 tbsp sweet chili sauce
-
2 tbsp regular soy sauce (for sauce)
-
1 tbsp sugar
-
½ tsp cornstarch mixed with 3 tbsp cold water (for slurry)
-
Cooked jasmine rice, for serving
-
Steamed or stir-fried greens (e.g., broccoli, bok choy), for serving
-
Chopped green onions, for garnish
-
Toasted sesame seeds, for garnish
Instructions
-
Step 1
Cut chicken into uniform 1-inch pieces. In a medium bowl, toss chicken with ¼ tsp white pepper and 1 tbsp all-purpose soy sauce. Ensure chicken is well coated. Marinate in the refrigerator for at least 20-30 minutes. (For crispiness, pat chicken very dry after marinating, if desired.) -
Step 2
Prepare your dredging station: In a shallow dish, place 150g cornstarch. In another shallow dish, lightly beat 1 large egg. Dip each chicken piece first into the beaten egg, letting excess drip off, then immediately transfer to the cornstarch and coat thoroughly. Place coated chicken pieces on a clean plate or wire rack. -
Step 3
In a medium saucepan or deep skillet, combine 2 cloves minced garlic, 1 tbsp neutral cooking oil, 6 tbsp sweet chili sauce, 2 tbsp regular soy sauce, 1 tbsp sugar, and 1 tsp dried chili flakes (if using). Whisk ingredients together until sugar begins to dissolve. Bring to a gentle simmer over medium heat, then reduce to low and let cook for 5-7 minutes to meld flavors. -
Step 4
While sauce simmers, prepare the cornstarch slurry: whisk ½ tsp cornstarch with 3 tbsp cold water until lump-free. Slowly pour the slurry into the simmering sauce, whisking constantly for 1-2 minutes until the sauce thickens to a glossy, clingy consistency. Remove from heat and set aside. -
Step 5
Heat neutral oil (approx. 1/2 to 1 inch deep for pan-frying, or enough to submerge for deep-frying) in a large skillet or Dutch oven to 175°C (350°F). Fry chicken in batches for 4-6 minutes per batch, turning occasionally, until beautifully golden brown, wonderfully crispy, and cooked through (internal temp 74°C/165°F). Remove with a slotted spoon to a wire rack set over paper towels to drain excess oil. (Alternatively, for less oil: Air fry at 200°C (400°F) for 10-15 mins, shaking/flipping halfway; or bake at 200°C (400°F) for 15-20 mins, flipping halfway.) -
Step 6
While chicken cooks, prepare your sides. Cook jasmine rice according to package directions (typically 1 cup rice to 1.5 cups water, simmered for 12-15 mins, then rested). Steam or stir-fry your chosen greens (e.g., broccoli, bok choy) until tender-crisp. -
Step 7
Gently reheat your sweet chilli sauce. Add all crispy chicken pieces to the sauce and toss gently until every piece is beautifully coated. Serve immediately over fluffy jasmine rice, alongside steamed or stir-fried greens. Garnish generously with freshly chopped green onions and toasted sesame seeds. Enjoy!
Important Information
Nutrition Facts (Per Serving)
It is important to consider this information as approximate and not to use it as definitive health advice.
Allergy Information
Please check ingredients for potential allergens and consult a health professional if in doubt.


Leave a Comment