
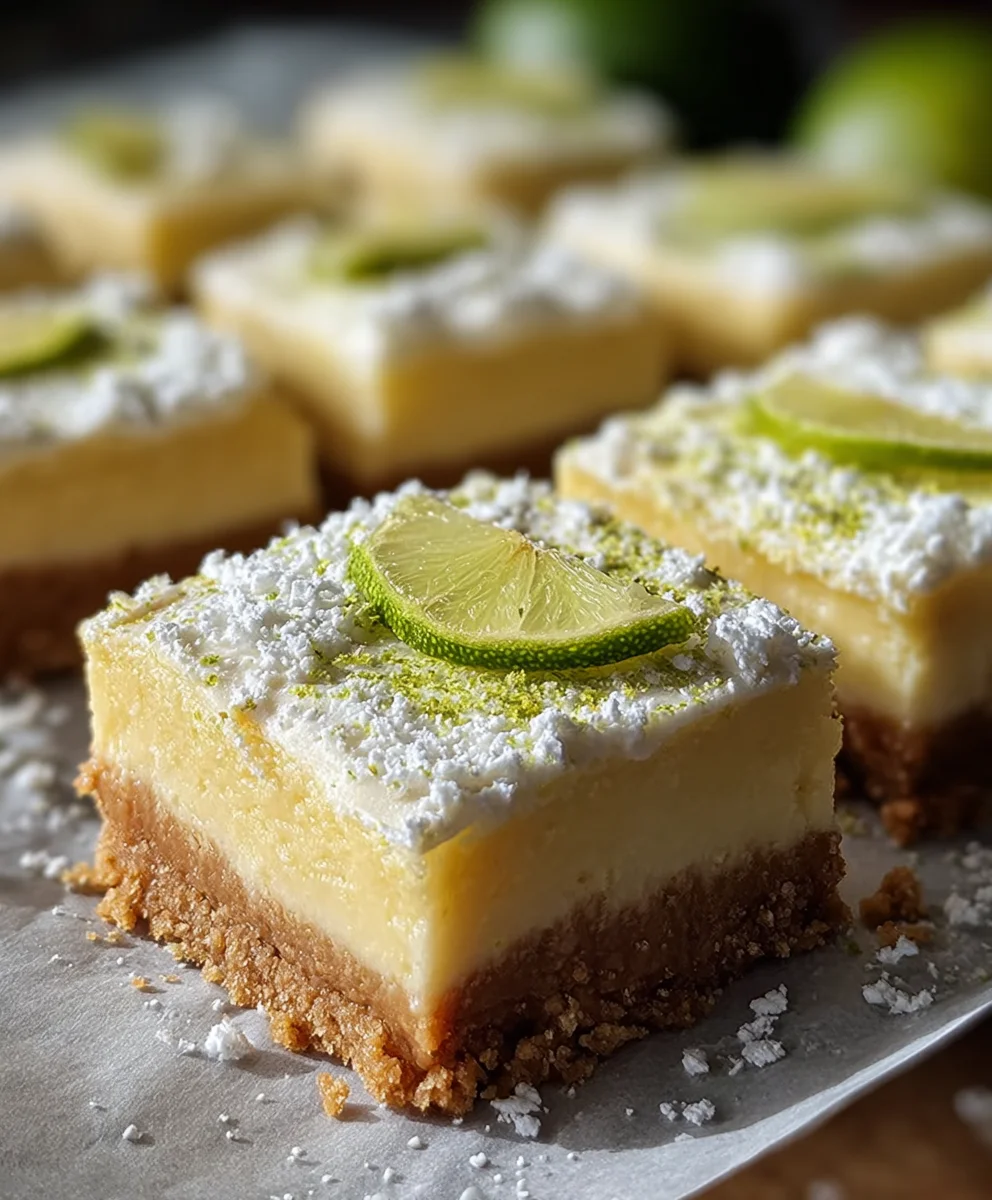
Key Lime Bars are a truly enchanting dessert, offering a vibrant burst of sunshine in every bite. Imagine the exhilarating tang of fresh key lime, perfectly balanced with a rich, creamy filling, all cradled within a golden, buttery graham cracker crust. I am absolutely delighted to share this timeless recipe with you, one that consistently evokes smiles and transports senses to the sun-drenched shores of the Florida Keys.
Originating from the very region where these tiny, intensely aromatic limes thrive, Key Lime Bars embody the spirit of Floridian culinary tradition. While the classic Key Lime Pie is a beloved staple, I find the bar format offers an elegant convenience, making it ideal for sharing at gatherings or enjoying as a sophisticated individual treat. What truly sets this dessert apart is its exquisite harmony of flavors and textures: the intense citrus punch, the silky smooth custard, and the satisfying crunch of the crust.
It’s not just a dessert; it’s an experience—a refreshing conclusion to any meal and a testament to the power of simple, quality ingredients. You’ll discover that crafting these homemade Key Lime Bars is a wonderfully rewarding process, yielding a dish that is both visually appealing and incredibly delicious. Prepare to delight your palate and impress your guests with this truly iconic treat!

Ingredients:
- For the Shortbread Crust:
- 2 cups (240g) all-purpose flour
- ½ cup (100g) granulated sugar
- ½ teaspoon fine sea salt
- 1 cup (226g) unsalted butter, very cold and cut into ½-inch cubes
- For the Key Lime Filling:
- 1 ½ cups (355ml) fresh Key lime juice (about 1.5 to 2 pounds of Key limes)
- 2 cans (14 ounces each, 396g each) sweetened condensed milk
- 8 large egg yolks
- 2 tablespoons finely grated Key lime zest (from about 6-8 Key limes)
- Optional Garnish:
- Whipped cream
- Extra Key lime zest or thin lime slices
Preparing the Perfect Shortbread Crust for Your Key Lime Bars
Creating a strong, buttery foundation is absolutely essential for fantastic Key Lime Bars. This shortbread crust is simple yet provides the perfect counterpoint to the tart, creamy filling. I always begin here, as it needs a little time to chill and bake before we even think about the glorious lime part.
- Preheat Your Oven and Prepare Your Pan: First things first, let’s get that oven ready. Preheat your oven to 350°F (175°C). Then, choose your baking vessel. I find that a 9×13-inch (23x33cm) baking pan is ideal for this recipe, giving you bars that are not too thin and not too thick. Line your baking pan with parchment paper, allowing an overhang on the longer sides. This little trick will make lifting the cooled Key Lime Bars out of the pan an absolute breeze, ensuring clean cuts and a beautiful presentation. You can also lightly grease the pan first to help the parchment stick, though it’s not strictly necessary.
- Combine Dry Ingredients: In a large mixing bowl, whisk together the 2 cups of all-purpose flour, ½ cup of granulated sugar, and ½ teaspoon of fine sea salt. I really like using fine sea salt here because it dissolves evenly and enhances the buttery flavor without being overly salty. Give it a good whisk to ensure everything is thoroughly combined; this prevents any pockets of unmixed ingredients later on.
- Incorporate the Cold Butter: Now for the butter – and this is where the magic of shortbread begins. Add the 1 cup (226g) of very cold, ½-inch cubed unsalted butter to the dry ingredients. It’s crucial that your butter is as cold as possible; this prevents it from fully incorporating too quickly and ensures a flaky, tender crust. You have a few options for mixing here:
- By Hand: Using your fingertips, work the butter into the dry ingredients. Squeeze and rub the butter cubes between your thumb and fingers until the mixture resembles coarse crumbs, with some pea-sized pieces of butter remaining. This method takes a little effort but gives you excellent control.
- Pastry Blender: If you have one, a pastry blender is a fantastic tool for this. Cut the butter into the flour mixture until you achieve that coarse crumb texture.
- Food Processor: For a quick and easy approach, you can pulse the flour, sugar, salt, and cold butter in a food processor until the mixture resembles coarse meal. Be careful not to over-process, as you want those small butter pieces to remain intact.
Whichever method you choose, the key is to work quickly so the butter doesn’t warm up too much from the heat of your hands or the friction of the processor.
- Press into the Pan: Once your mixture is ready, transfer it to your prepared 9×13-inch baking pan. Using your fingertips or the bottom of a flat glass, press the mixture evenly and firmly across the bottom of the pan. Pay special attention to the corners and edges to ensure an even thickness. A truly even crust will bake uniformly and provide the best structure for your Key Lime Bars.
- Chill the Crust (Optional but Recommended): For an even more tender and less crumbly crust, I often recommend chilling the pressed crust in the refrigerator for at least 15-20 minutes before baking. This helps solidify the butter, which reduces shrinkage during baking and promotes a flakier texture. If you’re in a hurry, you can skip this, but I find it makes a noticeable difference.
- Pre-Bake the Crust: Place the pan with the crust in your preheated 350°F (175°C) oven. Bake for 20-25 minutes, or until the edges are lightly golden brown and the crust smells wonderfully buttery. It should look set and slightly firm to the touch. This pre-baking step is vital; it ensures the crust is fully cooked and crisp, preventing it from becoming soggy once the creamy filling is added. Once baked, remove the pan from the oven and set it aside to cool slightly while you prepare the Key lime filling. Keep the oven on, as we’ll be putting these Key Lime Bars back in very soon!
Crafting the Irresistible Key Lime Filling for Your Key Lime Bars
Ah, the heart and soul of these Key Lime Bars! The filling is where the magic truly happens, a perfect balance of tartness and creamy sweetness that makes Key Lime Bars so beloved. This is where fresh Key lime juice truly shines, so don’t skimp on quality if you can help it!
- Prepare Your Key Lime Juice and Zest: This step requires a bit of effort but is absolutely worth it. You’ll need about 1.5 to 2 pounds of fresh Key limes to yield 1 ½ cups of juice. Wash your Key limes thoroughly. Using a fine microplane zester, carefully zest about 6-8 limes to get 2 tablespoons of finely grated zest. Be sure to only remove the bright green outer layer and avoid the bitter white pith underneath. Then, cut the limes in half and juice them. A citrus reamer or a juicer designed for small citrus works best. Strain the juice through a fine-mesh sieve to remove any pulp or seeds. Using fresh Key lime juice is non-negotiable for authentic Key Lime Bars. While regular lime juice can be substituted in a pinch, the unique aromatic and intensely tart flavor of Key limes cannot be replicated.
- Separate the Egg Yolks: Carefully separate 8 large egg yolks from their whites. I usually do this by cracking each egg into my hand and letting the white slip through my fingers into a bowl below, or by using the shell-to-shell method. Be very careful not to get any egg white into the yolks, as this can affect the texture of your filling. Place the yolks in a large mixing bowl.
- Combine Wet Ingredients: Add the two cans of sweetened condensed milk to the bowl with the egg yolks. Pour in the 1 ½ cups of fresh Key lime juice. Finally, add the 2 tablespoons of finely grated Key lime zest. The zest is incredibly important; it provides an extra layer of bright citrus aroma and a concentrated burst of lime flavor that elevates these Key Lime Bars from good to extraordinary.
- Whisk Until Smooth and Thickened: Using a whisk, vigorously whisk all the filling ingredients together until the mixture is completely smooth, homogenous, and slightly thickened. You’ll notice a magical transformation as you whisk: the acidity from the Key lime juice reacts with the proteins in the egg yolks and the condensed milk, causing the mixture to thicken noticeably. This process is called “curdling” or “setting” without heat, and it’s a testament to the power of fresh citrus. Continue whisking for about 2-3 minutes, ensuring there are no streaks of unmixed condensed milk or egg yolk. The consistency should be pourable but have a definite body to it.
Baking and Setting Your Delicious Key Lime Bars
With our crust pre-baked and the luscious Key lime filling ready, it’s time to bring these two components together and bake them into the glorious Key Lime Bars we’ve been dreaming about. The baking process here is more about gently setting the filling than fully cooking it, as the lime juice has already done some of the work.
- Pour Filling Over Crust: Retrieve your slightly cooled, pre-baked shortbread crust from step 6. Gently and evenly pour the thickened Key lime filling mixture over the warm crust. Use a spatula to scrape every last drop of that vibrant green-yellow filling from the bowl; we don’t want to waste any of that deliciousness! Gently spread the filling to ensure it covers the entire crust from edge to edge.
- Bake the Key Lime Bars: Carefully place the pan back into your preheated 350°F (175°C) oven. Bake for 15-20 minutes. How to tell if your Key Lime Bars are done? The edges of the filling should be set and appear slightly firmer, but the center should still have a slight jiggle when you gently shake the pan. You don’t want to overbake these bars, as that can lead to a rubbery texture. The filling will continue to set as it cools, so a slight wobble in the center is perfectly normal and desired.
- Cool Completely at Room Temperature: Once baked, remove the pan from the oven. Resist the urge to dive in immediately! Place the pan on a wire rack and allow the Key Lime Bars to cool completely at room temperature. This step is crucial for the filling to fully set and for the flavors to meld beautifully. This can take anywhere from 1 to 2 hours, depending on your kitchen’s temperature.
Chilling, Cutting, and Serving Your Exquisite Key Lime Bars
The waiting is always the hardest part, but believe me, a properly chilled Key Lime Bar is a thing of beauty. This final stage is all about perfecting the texture and making these bars easy to handle and enjoy.
- Chill Thoroughly: Once the Key Lime Bars have cooled completely to room temperature, cover the pan loosely with plastic wrap. Transfer the pan to the refrigerator and chill for at least 4 hours, or preferably overnight. This chilling period is absolutely vital for the Key Lime Bars to achieve their signature firm, yet creamy texture and to cut cleanly. If you try to cut them too soon, the filling might be too soft and messy. The flavors also intensify and meld during this time, resulting in a more harmonious and delicious treat.
- Cut into Bars: After a thorough chill, remove the pan from the refrigerator. Use the parchment paper overhang as “handles” to carefully lift the entire slab of Key Lime Bars out of the pan and onto a cutting board. Now, for cutting: for perfectly clean slices, I recommend using a long, sharp knife. For each cut, dip the knife into hot water, wipe it clean with a towel, and then make a decisive cut. Repeat this process for every slice. This prevents the filling from sticking to the knife and creates beautifully defined Key Lime Bars. You can cut them into 12 large bars (3×4), 24 smaller squares (4×6), or even mini bites, depending on your preference and occasion.
- Serve and Garnish: Arrange your glorious Key Lime Bars on a serving platter. They are absolutely delicious on their own, but if you want to add a touch of elegance and extra indulgence, serve them with a dollop of freshly whipped cream. A sprinkle of extra Key lime zest or a delicate thin slice of lime on top adds a vibrant pop of color and reinforces that fresh citrus theme. These bars are a perfect dessert for any occasion, from a casual picnic to a formal dinner. The bright, tangy flavor is incredibly refreshing and satisfying.
- Storage: Leftover Key Lime Bars should be stored in an airtight container in the refrigerator. They will keep beautifully for up to 3-4 days. While they might last longer, their peak freshness and flavor are best enjoyed within this timeframe. I find they’re even more delicious on the second day after the flavors have had more time to mingle and mature.
Enjoying Your Homemade Key Lime Bars
There you have it! A truly delightful batch of Key Lime Bars, made with love and precision. The contrasting textures of the crisp, buttery shortbread and the smooth, intensely flavored Key lime filling create an unforgettable dessert experience. I hope you enjoy every single bite of these homemade treats as much as I do. Happy baking!
Conclusion:
And there you have it, my friends! We’ve journeyed through the steps, absorbed the tips, and now we stand at the precipice of pure dessert bliss. I truly believe that this isn’t just another recipe; it’s an invitation to create something truly special, something that will bring smiles and sighs of contentment to anyone lucky enough to take a bite. From the moment you pull these golden beauties from the oven, filling your kitchen with that irresistible zesty aroma, you’ll understand why I’m so passionate about sharing this particular treat with you. The magic lies in that harmonious contrast: the crisp, golden-brown graham cracker crust, offering a comforting buttery foundation, perfectly complements the vibrant, tangy, and impossibly smooth key lime filling. It’s a texture and flavor combination that’s incredibly satisfying, striking that perfect balance between refreshing tartness and delightful sweetness, ensuring every mouthful is a memorable one. This isn’t merely a dessert; it’s a sensory experience, a little ray of sunshine on a plate, and a testament to how simple ingredients can come together to create something truly extraordinary. I’ve spent years perfecting this balance, ensuring the tartness isn’t overwhelming but instead bright and invigorating, perfectly cut by the subtle sweetness, all encapsulated in a melt-in-your-mouth texture that is utterly irresistible.
What I love most about these bars is their incredible versatility, making them a fantastic choice for virtually any occasion. For a casual summer BBQ, they’re the ultimate refreshing dessert that cuts through the richness of grilled foods. Imagine serving them chilled, perhaps with a delicate dollop of freshly whipped cream, just lightly sweetened, or even infused with a whisper of vanilla bean. The contrast of the cool cream against the zesty bar is simply divine. If you’re feeling a bit more adventurous, consider a delicate raspberry coulis drizzled artfully around the plate – the tart berries would play beautifully against the lime. For an elegant dinner party, slice them into smaller, more refined squares and dust them ever so lightly with a fine sift of powdered sugar, or garnish with a tiny, candied lime slice for a sophisticated touch. You could even toast some coconut flakes and sprinkle them over the top for an added layer of tropical flavor and crunch, elevating the experience even further. Think beyond the classic: for a playful variation, try incorporating a touch of ginger into your graham cracker crust for a surprising, warm spice note that adds an intriguing depth to the overall flavor profile. Or, if you prefer a less intense lime flavor, you can always substitute a portion of the key lime juice with regular lime juice, adjusting to your personal preference for tartness. The beauty of this recipe is how easily it adapts to your creative whims.
Elevate Your Dessert Experience
But beyond the serving suggestions and delicious variations, what truly matters is the experience of creating and sharing. I urge you, if you haven’t already, to carve out some time in your week, gather your ingredients, and give this recipe a try. There’s a profound satisfaction that comes from baking something from scratch, especially when the result is as spectacularly delicious as these. Don’t be intimidated by the process; I promise it’s far simpler than you might imagine, and the rewards are immeasurable. Imagine the joy on the faces of your loved ones as they bite into these exquisite treats. Imagine the compliments, the requests for the recipe, the pure delight you’ll bring to any gathering. This isn’t just about baking; it’s about making memories, creating moments of shared enjoyment around a table laden with homemade goodness. I genuinely can’t wait for you to experience the magic for yourselves. These
Key Lime Bars
are more than just a dessert; they are a celebration of vibrant flavors and simple pleasures.
Once you’ve embarked on this culinary adventure, I would absolutely love to hear about it! Your experiences, your triumphs, any little tweaks you made – they all add to the rich tapestry of this recipe. Please don’t hesitate to share your thoughts in the comments section below. Did you try a new topping? Did you make them for a special occasion? What was your favorite part of the process, or the most memorable reaction from your guests? I am always so thrilled to connect with fellow food enthusiasts and learn from your baking journeys. Your feedback not only brightens my day but also helps others who might be considering making the recipe. So, go forth, bake with passion, and prepare to fall head over heels for these truly exceptional Key Lime Bars. You won’t regret it!
Best Key Lime Bars: Easy, Zesty & Perfect for Summer
Key Lime Bars are a truly enchanting dessert, offering a vibrant burst of sunshine in every bite. Imagine the exhilarating tang of fresh key lime, perfectly balanced with a rich, creamy filling, all cradled within a golden, buttery graham cracker crust. This timeless recipe consistently evokes smiles and transports senses to the sun-drenched shores of the Florida Keys, making it ideal for sharing at gatherings or enjoying as a sophisticated individual treat. Serve these bars chilled for the most refreshing taste, perfect after a spicy meal or alongside afternoon tea.
Ingredients
-
2 cups (240g) all-purpose flour
-
½ cup (100g) granulated sugar
-
½ teaspoon fine sea salt
-
1 cup (226g) unsalted butter, very cold, cubed
-
1 ½ cups (355ml) fresh Key lime juice
-
2 cans (14 oz each) sweetened condensed milk
-
8 large egg yolks
-
2 tablespoons finely grated Key lime zest
-
Whipped cream (optional)
-
Extra Key lime zest or thin lime slices (optional)
Instructions
-
Step 1
Prepare Crust: Preheat oven to 350°F (175°C). Line a 9×13-inch baking pan with parchment. Whisk 2 cups flour, ½ cup sugar, and ½ tsp salt. Cut in 1 cup cold, cubed butter until coarse crumbs form. Press firmly into the pan. Chill 15-20 minutes (optional). -
Step 2
Pre-Bake Crust: Bake crust for 20-25 minutes until lightly golden. Remove from oven, cool slightly; keep oven on. -
Step 3
Prepare Key Lime Filling: To maximize juice, roll limes firmly on counter before cutting. Zest 6-8 limes for 2 tbsp zest, avoiding pith. Juice 1.5-2 lbs limes for 1½ cups (355ml) juice, strained. Separate 8 large egg yolks. -
Step 4
Combine Filling: In a bowl, whisk egg yolks, 2 cans condensed milk, 1½ cups lime juice, and 2 tbsp lime zest. Whisk vigorously for 2-3 minutes until smooth and thickened. -
Step 5
Bake Bars: Pour filling evenly over the warm, pre-baked crust. Bake for 15-20 minutes until edges are set and the center slightly jiggles. -
Step 6
Cool & Chill: Cool completely at room temperature (1-2 hours). Cover and refrigerate for at least 4 hours, or overnight, until thoroughly chilled and set. -
Step 7
Cut & Serve: Lift bars using parchment overhang onto a cutting board. For clean slices, dip a sharp knife in hot water and wipe clean before each cut. Cut into 12-24 bars. Serve chilled, optionally garnished with whipped cream, extra zest, or lime slices. For a pretty presentation, arrange with fresh berries, lime slices, or mint sprigs. -
Step 8
Storage: Store leftover Key Lime Bars in an airtight container in the refrigerator for 3-4 days.
Important Information
Nutrition Facts (Per Serving)
It is important to consider this information as approximate and not to use it as definitive health advice.
Allergy Information
Please check ingredients for potential allergens and consult a health professional if in doubt.
Leave a Comment