
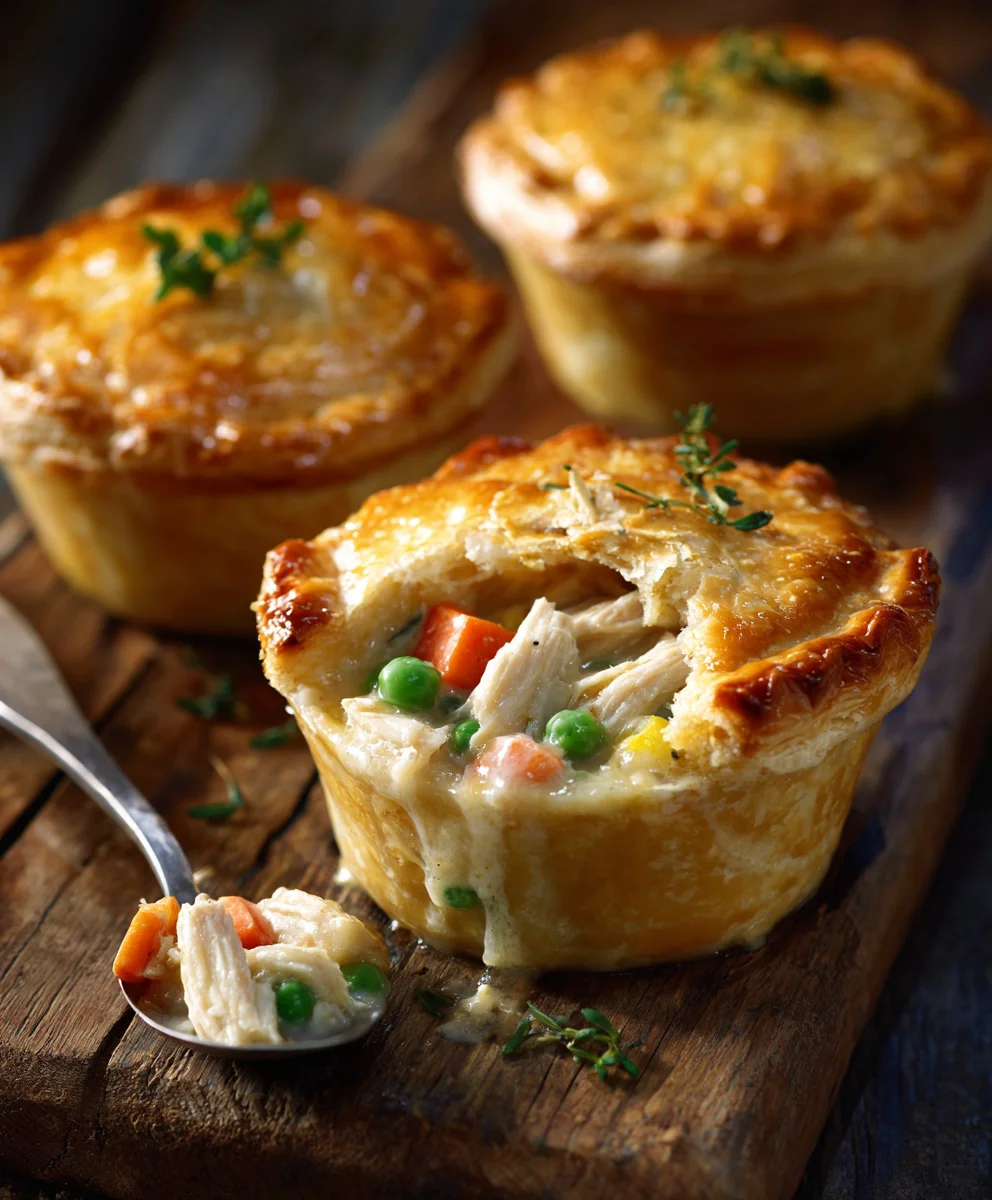
Mini Chicken Pot Pies – what could be more delightful than a perfectly portioned, golden-crusted parcel of creamy, savory goodness? I am absolutely delighted to share with you a recipe that transforms a timeless classic into an elegant, incredibly convenient, and utterly irresistible culinary experience. While the concept of a savory pie dates back to ancient Roman “pasties” and evolved through medieval European meat pies, becoming a beloved staple in American cuisine, our miniature version takes this comforting tradition and modernizes it with individual charm.
What truly makes these individual treasures so universally adored is the harmonious blend of flavors and textures: tender chunks of chicken and garden-fresh vegetables bathed in a rich, herbaceous cream sauce, all encased within a wonderfully flaky, golden pastry. These aren’t just meals; they are comforting hugs in a crust. They offer the quintessential warmth of a homemade pot pie without the fuss of serving a large dish, making them perfect for elegant appetizers, individual family dinners, or even delightful additions to packed lunches. Preparing your own batch of Mini Chicken Pot Pies is a rewarding experience, promising warmth, joy, and satisfaction with every single bite.
Ingredients:
- For the Flaky Pie Crusts (makes enough for 12 mini pot pies, or use 2 sheets of store-bought refrigerated pie crust):
- 2 ½ cups (300g) all-purpose flour, plus more for dusting
- 1 teaspoon salt
- 1 cup (226g) unsalted butter, very cold and cut into ½-inch cubes
- ½ cup (120ml) ice water, plus 1-2 tablespoons more if needed
- For the Creamy Chicken Filling:
- 2 tablespoons unsalted butter
- 1 medium yellow onion, finely diced
- 2 carrots, peeled and finely diced
- 2 stalks celery, finely diced
- ½ cup (75g) all-purpose flour
- 2 cups (480ml) low-sodium chicken broth
- 1 cup (240ml) whole milk or half-and-half
- 2 cups cooked chicken, shredded or diced (about 1 lb boneless, skinless chicken breast or thighs, pre-cooked and cooled)
- 1 cup (150g) frozen peas
- 1 cup (160g) frozen corn
- 1 teaspoon dried thyme
- ½ teaspoon black pepper
- 1 teaspoon salt (or to taste, adjust after tasting the filling)
- ¼ cup fresh parsley, chopped (for garnish, optional)
- For the Egg Wash:
- 1 large egg
- 1 tablespoon milk or water
Preparing the Homemade Flaky Pie Crust (Optional, but highly recommended for the best Mini Chicken Pot Pies!)
- Combine Dry Ingredients: In a large mixing bowl, whisk together the 2 ½ cups of all-purpose flour and 1 teaspoon of salt. This ensures even distribution of the salt throughout the dough, which is key for flavor.
- Incorporate Cold Butter: Add the very cold, ½-inch cubed unsalted butter to the flour mixture. Using a pastry blender, your fingertips, or a food processor, cut the butter into the flour until the mixture resembles coarse meal with some pea-sized pieces of butter remaining. It’s crucial that the butter stays cold; this is what creates those wonderful flaky layers in your Mini Chicken Pot Pies. If using your hands, work quickly to avoid melting the butter.
- Add Ice Water: Gradually add the ½ cup of ice water, one tablespoon at a time, mixing gently until the dough just comes together. Be careful not to overmix! You want the dough to be just moist enough to hold its shape when pressed together, but not sticky. You might need an extra tablespoon or two of water, depending on the humidity and your flour, but add it sparingly.
- Form and Chill the Dough: Divide the dough into two equal portions. Gently flatten each portion into a disk, wrap tightly in plastic wrap, and refrigerate for at least 30 minutes, or up to 2 days. This chilling period allows the gluten to relax, making the dough easier to roll out, and firms up the butter, further contributing to that desired flakiness. Trust me, patience here pays off when you’re making these delicious Mini Chicken Pot Pies!
- Prepare for Rolling (When ready to assemble): When you’re ready to start assembling your Mini Chicken Pot Pies, take one disk of dough out of the fridge and let it sit at room temperature for about 10 minutes. This makes it slightly more pliable and easier to roll without cracking. Lightly flour a clean work surface and your rolling pin.
- Roll Out the Dough: Roll out one disk of dough into a large circle, about 1/8-inch thick. You’ll want it wide enough to cut out 12 circles for the bottom crusts and 12 circles for the top crusts using a 3-inch round cookie cutter or the rim of a glass. If you’re using a standard muffin tin, a 3-inch diameter for the top crusts and slightly larger (about 3.5-4 inches) for the bottom crusts will work best to ensure a good seal. You’ll likely need to re-roll scraps, but try to do so minimally to keep the dough tender.
- Prepare Muffin Tins: Lightly grease a 12-cup standard muffin tin. If you’re using store-bought pie crusts, simply unroll them and follow step 6 for cutting.
Preparing the Chicken
- Cook the Chicken (if not pre-cooked): If you’re starting with raw chicken, the easiest way to prepare it for your Mini Chicken Pot Pies is to boil or poach it. Place the boneless, skinless chicken breasts or thighs in a pot and cover with water or chicken broth. Bring to a boil, then reduce heat and simmer for 15-20 minutes, or until the chicken is cooked through and reaches an internal temperature of 165°F (74°C).
- Shred or Dice: Once cooked, remove the chicken from the liquid and let it cool slightly. Then, you can either shred it using two forks or dice it into ½-inch pieces. I personally love the texture of shredded chicken in my pot pies, but diced works wonderfully too! Set aside your beautifully prepared chicken, ready to become the star of our Mini Chicken Pot Pies filling.
Making the Creamy Filling
- Sauté Aromatics: In a large saucepan or Dutch oven, melt 2 tablespoons of unsalted butter over medium heat. Add the finely diced yellow onion, carrots, and celery. Cook for 5-7 minutes, stirring occasionally, until the vegetables are softened but not browned. We’re building layers of flavor here, and tender aromatics are the foundation for these delicious Mini Chicken Pot Pies.
- Create the Roux: Sprinkle ½ cup of all-purpose flour over the softened vegetables. Stir continuously for 1-2 minutes. This step is crucial; it cooks out the raw flour taste and creates a roux, which will thicken our filling beautifully. The mixture will look like a thick paste.
- Whisk in Liquids: Gradually whisk in the 2 cups of low-sodium chicken broth, a little at a time, until smooth. Continue whisking as you add the 1 cup of whole milk or half-and-half. Keep whisking to prevent lumps from forming. The mixture will start to thicken as it comes to a simmer.
- Simmer and Thicken: Bring the mixture to a gentle simmer, stirring frequently, and let it cook for about 3-5 minutes, or until the sauce has thickened to your desired consistency. It should be rich and creamy, coating the back of a spoon.
- Add Chicken and Remaining Vegetables: Remove the pan from the heat. Stir in the 2 cups of cooked, shredded or diced chicken, 1 cup of frozen peas, and 1 cup of frozen corn. The residual heat will warm the frozen vegetables through.
- Season the Filling: Add 1 teaspoon of dried thyme, ½ teaspoon of black pepper, and 1 teaspoon of salt. Stir well to combine. Now is the time to taste and adjust seasonings! You might want a little more salt, pepper, or even a pinch of garlic powder to personalize your Mini Chicken Pot Pies filling. Remember, this filling is the heart of our dish!
- Cool the Filling: Allow the filling to cool slightly, about 15-20 minutes, before assembling the pies. This prevents the hot filling from making the pie crust soggy.
Assembling the Mini Chicken Pot Pies
- Preheat Oven & Prepare Muffin Tin: Preheat your oven to 400°F (200°C). If you haven’t already, lightly grease a standard 12-cup muffin tin.
- Cut Bottom Crusts: On a lightly floured surface, roll out one disk of your homemade pie dough (or one sheet of store-bought pie crust). Using a 3.5- to 4-inch round cookie cutter or the rim of a glass, cut out 12 circles. These will be the bottom crusts. Carefully press each circle into the prepared muffin cups, gently molding them to fit the shape without tearing.
- Fill the Crusts: Spoon the cooled creamy chicken filling into each pie crust-lined muffin cup, filling them about two-thirds full. Be mindful not to overfill, as it can lead to messy overflows during baking.
- Cut Top Crusts: Roll out the second disk of pie dough (or the other sheet of store-bought crust). Using a 3-inch round cookie cutter or the rim of a glass, cut out 12 slightly smaller circles for the top crusts.
- Seal the Pies: Place one smaller dough circle over the filling in each muffin cup. Gently press the edges of the top crust down onto the edges of the bottom crust, sealing them together. You can use your fingers or the tines of a fork to crimp the edges, creating a pretty and secure seal. This ensures the filling stays put inside your delightful Mini Chicken Pot Pies!
- Vent and Egg Wash: In a small bowl, whisk together the large egg and 1 tablespoon of milk or water to make the egg wash. Brush the tops of all the Mini Chicken Pot Pies generously with the egg wash; this will give them a beautiful golden-brown sheen. Using a small sharp knife, cut a few small slits in the top of each pie. These vents allow steam to escape during baking, preventing the crust from becoming soggy and ensuring a perfectly flaky top.
Baking the Mini Chicken Pot Pies
- Bake to Golden Perfection: Place the muffin tin with your assembled Mini Chicken Pot Pies into the preheated 400°F (200°C) oven. Bake for 25-30 minutes, or until the crusts are deeply golden brown and the filling is bubbling hot. Keep an eye on them towards the end of baking! If you notice the edges browning too quickly, you can loosely tent the muffin tin with aluminum foil.
- Cool Before Serving: Once baked, carefully remove the muffin tin from the oven. Let the Mini Chicken Pot Pies cool in the muffin tin for at least 10-15 minutes before attempting to remove them. This cooling period allows the filling to set further and makes it much easier to extract the pies without them falling apart.
Serving and Storage
- Serve Warm: Using a butter knife or a small offset spatula, gently loosen the edges of each Mini Chicken Pot Pie and carefully lift them out of the muffin tin. Serve them warm. They are absolutely delightful on their own, or alongside a fresh green salad for a complete and comforting meal. I love to garnish mine with a sprinkle of fresh chopped parsley for an extra pop of color and freshness.
- Storage: Leftover Mini Chicken Pot Pies can be stored in an airtight container in the refrigerator for up to 3-4 days.
- Reheating: To reheat, place them on a baking sheet and warm them in a preheated oven at 350°F (175°C) for 10-15 minutes, or until heated through and the crust is crispy again. Microwaving is an option, but it can sometimes make the crust a little soft.
- Freezing: These Mini Chicken Pot Pies freeze wonderfully! Once completely cooled, you can wrap individual pies tightly in plastic wrap, then place them in a freezer-safe bag or container. They can be frozen for up to 2-3 months. To reheat from frozen, place them on a baking sheet and bake at 375°F (190°C) for 30-40 minutes, or until the filling is hot and bubbly and the crust is golden and crisp. What a fantastic make-ahead meal!
Conclusion:
And there you have it, friends! We’ve reached the delicious culmination of our culinary journey. I genuinely hope you’ve enjoyed exploring this recipe as much as I’ve loved sharing it with you. As we wrap things up, let’s take a moment to truly appreciate why these wonderful Mini Chicken Pot Pies are an absolute must-try for anyone looking for a comforting, satisfying, and incredibly flavorful meal that’s both easy to make and delightful to serve.
What makes these individual servings so incredibly special? It’s that perfect harmony of creamy, savory filling, packed with tender chicken and vibrant vegetables, all encased in a flaky, golden-brown crust. Every single bite is a miniature explosion of comfort, a warm hug on a plate. They’re fantastic for meal prepping for the week, making busy evenings feel a little less chaotic, or even as elegant appetizers when entertaining guests. The individual portions mean everyone gets their own perfect little pie, minimizing fuss and maximizing enjoyment. Plus, who doesn’t love having their very own personal pot pie? It just feels special, doesn’t it?
Now, let’s talk about making these beauties truly your own! While the classic combination of chicken, peas, and carrots is undeniably a winner, the beauty of these mini pot pies lies in their incredible adaptability. For serving suggestions, I love pairing these with a simple, crisp green salad tossed in a light vinaigrette – the fresh, bright notes are a wonderful contrast to the rich creaminess of the pie. A side of roasted asparagus or steamed green beans would also be excellent, adding an extra layer of healthy goodness to your plate. If you’re feeling a bit more indulgent, some garlic mashed potatoes could be a delightful accompaniment, though with the pastry, you might find it’s already hearty enough!
When it comes to variations, the sky’s the limit! Don’t have chicken? No problem! You could easily swap it out for leftover roast turkey, making these a fantastic way to utilize holiday leftovers. For a beefier take, consider using finely diced cooked beef and adding some mushrooms for an earthy depth. Vegetarian friends, you’re in luck too! Simply omit the chicken and load up on your favorite vegetables – think mushrooms, sweet potatoes, spinach, lentils, or even some crumbled firm tofu. You can also experiment with different herbs; a sprig of fresh rosemary or a pinch of dried sage can introduce a whole new flavor profile. Want a little kick? A tiny dash of cayenne pepper or a pinch of red pepper flakes in the filling will do the trick. For the crust, while store-bought pie crust is super convenient, feel free to use puff pastry for an even flakier result, or even a homemade buttermilk biscuit topping for a more rustic feel. You can also sprinkle a little Parmesan cheese on top of the crust before baking for an extra savory crunch!
I genuinely encourage you to roll up your sleeves and give this recipe a try this week. There’s something incredibly rewarding about pulling these golden-brown beauties out of the oven, their savory aroma filling your kitchen. It’s a dish that truly brings joy, whether you’re making it for a cozy family dinner or a lively gathering with friends. Don’t be shy about experimenting with the ingredients to suit your taste and what you have on hand – that’s often where the best culinary discoveries are made!
Once you’ve whipped up your batch of Mini Chicken Pot Pies, I would absolutely love to hear about your experience! What variations did you try? Did you discover a new favorite ingredient to add? Please share your photos, tips, and comments below. Your feedback and creativity inspire me and our entire community of home cooks. Happy baking, and enjoy every comforting bite!
Frequently Asked Questions (FAQs)
Can I make these Mini Chicken Pot Pies ahead of time?
Absolutely! These mini pot pies are fantastic for making ahead. You can prepare the filling completely and store it in an airtight container in the refrigerator for up to 3 days. When you’re ready to bake, simply assemble the pies with the crusts and bake as directed. Alternatively, you can assemble the entire pies (without baking) and refrigerate them for up to 24 hours. Just be sure to bring them closer to room temperature for about 20-30 minutes before baking, and you might need to add a few extra minutes to the baking time.
How do I store leftovers and reheat them?
If you have any delicious leftovers (which is a big “if”!), allow them to cool completely before storing. Place them in an airtight container in the refrigerator for up to 3-4 days. To reheat, you can use a microwave for a quick warm-up, but for the best results and to retain that flaky crust, I recommend reheating them in an oven or toaster oven at 300-325°F (150-160°C) for about 10-15 minutes, or until thoroughly heated through and the crust crisps up again.
Can I freeze Mini Chicken Pot Pies?
Yes, these freeze beautifully! You have a couple of options:
- Unbaked: Assemble the pies in their ramekins or muffin tins (if using a sturdy liner), cover tightly with plastic wrap and then foil, and freeze. Once solid, you can pop them out and store them in freezer bags for up to 3 months. When ready to bake, place frozen pies in a preheated oven (no need to thaw) and bake for 45-60 minutes at 375°F (190°C), or until golden and bubbly.
- Baked: Bake the pies completely, let them cool, then wrap individually in plastic wrap and foil. Freeze for up to 2-3 months. Reheat from frozen in a 350°F (175°C) oven for about 25-35 minutes, or until heated through.
What if I don’t have individual ramekins?
No ramekins? No problem! You have a few options:
- Muffin Tins: A standard 12-cup muffin tin can work perfectly. You’ll need to cut your crust circles to fit the muffin cups. For easy removal, I recommend lightly greasing the tin or using paper muffin liners.
- Small Oven-Safe Bowls: Any small oven-safe bowls you have on hand will work just like ramekins.
- Larger Pie Dish: You can always make a single, larger chicken pot pie in a standard pie dish using the same recipe, adjusting the baking time as needed (usually 30-40 minutes at 400°F/200°C, then reduce to 375°F/190°C if the crust browns too quickly).
Can I use a different type of crust?
Absolutely! While a standard pie crust is classic and delicious, feel free to experiment:
- Puff Pastry: For an incredibly flaky and buttery top, cut puff pastry sheets into circles or squares and place them over the filling.
- Biscuit Topping: Instead of pie crust, you could use a drop biscuit dough or cut out biscuit circles to place on top for a more rustic, fluffy crust.
- Phyllo Dough: For a lighter, crispy topping, layer a few sheets of phyllo dough brushed with butter over the filling.
How can I make this vegetarian?
Making a vegetarian version is super simple and equally delicious! Just omit the chicken entirely and consider these substitutions:
- Mushrooms: Sauté a generous amount of sliced mushrooms (cremini, button, or a mix) until golden brown for an umami-rich base.
- Lentils: Add cooked green or brown lentils to the filling for a protein boost and hearty texture.
- Extra Veggies: Load up on vegetables like diced potatoes, sweet potatoes, spinach, kale, corn, green beans, or even some roasted butternut squash.
- Vegetable Broth: Ensure you use vegetable broth instead of chicken broth for the filling.
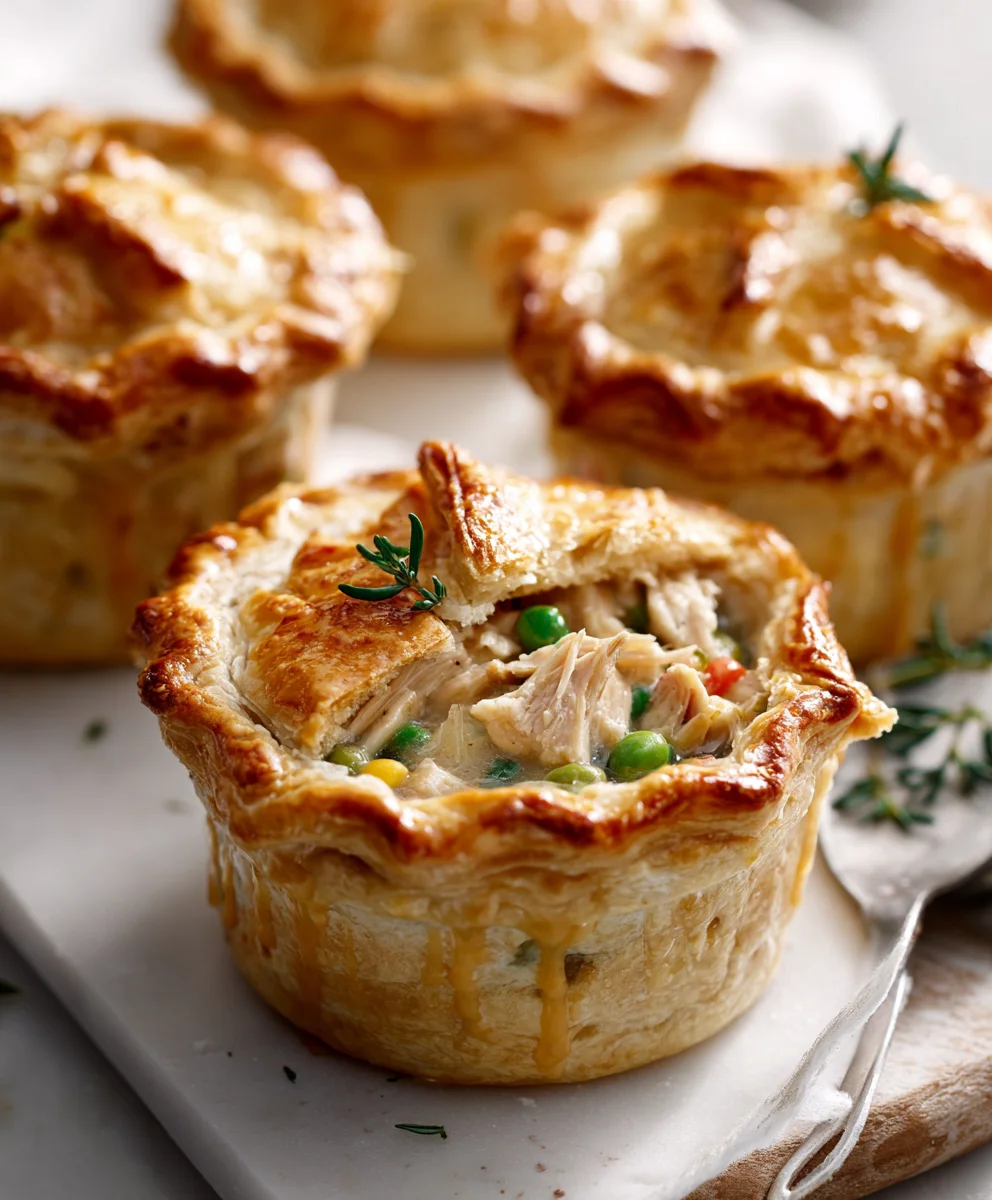
Mini Chicken Pot Pies
These Mini Chicken Pot Pies are perfectly portioned, golden-crusted parcels of creamy, savory goodness. Tender chicken and fresh vegetables in a rich, herbaceous cream sauce are encased in flaky pastry, offering comfort without the fuss of a large dish. Perfect for appetizers, individual dinners, or packed lunches. For dietary adaptations, consider swapping cream for oat milk cream of mushroom (dairy-free) or chickpeas and vegetable soup for a vegetarian version. For Thanksgiving leftovers, substitute turkey for chicken and add a spoonful of cranberry sauce before filling. A sprinkle of cheddar on top adds a crispy, cheesy finish. These pies keep well and can be frozen for a convenient make-ahead meal.
Ingredients
-
2 ½ cups all-purpose flour
-
1 tsp salt
-
1 cup (226g) very cold unsalted butter, ½-inch cubed
-
½ cup ice water, plus 1-2 tbsp more if needed
-
2 tbsp unsalted butter
-
1 medium yellow onion, finely diced
-
2 carrots, peeled and finely diced
-
2 stalks celery, finely diced
-
½ cup all-purpose flour
-
2 cups low-sodium chicken broth
-
1 cup whole milk or half-and-half
-
2 cups cooked chicken, shredded or diced
-
1 cup frozen peas
-
1 cup frozen corn
-
1 tsp dried thyme
-
½ tsp black pepper
-
1 tsp salt (or to taste)
-
¼ cup fresh parsley, chopped (optional garnish)
-
1 large egg
-
1 tbsp milk or water
Instructions
-
Step 1
Whisk together 2 ½ cups all-purpose flour and 1 tsp salt. Cut in 1 cup cold butter until the mixture resembles coarse meal with some pea-sized pieces. Gradually add ½ cup ice water, mixing gently until the dough just comes together. Divide into two disks, wrap tightly, and refrigerate for at least 30 minutes, or up to 2 days. (If using store-bought pie crust, simply unroll when ready to assemble). -
Step 2
If using raw chicken, place boneless, skinless chicken breasts or thighs in a pot, cover with water or broth, and simmer for 15-20 minutes until cooked through (165°F/74°C). Remove, cool slightly, then shred or dice into ½-inch pieces. Set aside. -
Step 3
{‘@type’: ‘HowToStep’, ‘name’: ‘Make Creamy Filling’, ‘itemListElement’: [{‘@type’: ‘HowToStep’, ‘name’: ‘Sauté Aromatics’, ‘text’: ‘Melt 2 tablespoons unsalted butter in a large saucepan over medium heat. Add diced yellow onion, carrots, and celery. Cook for 5-7 minutes until softened.’}, {‘@type’: ‘HowToStep’, ‘name’: ‘Create Roux’, ‘text’: ‘Sprinkle ½ cup all-purpose flour over the softened vegetables. Stir continuously for 1-2 minutes to cook out the raw flour taste and create a roux.’}, {‘@type’: ‘HowToStep’, ‘name’: ‘Whisk in Liquids’, ‘text’: ‘Gradually whisk in 2 cups low-sodium chicken broth, then 1 cup whole milk or half-and-half, until smooth. Bring to a gentle simmer, stirring frequently, and cook for 3-5 minutes until the sauce has thickened.’}, {‘@type’: ‘HowToStep’, ‘name’: ‘Add Chicken & Vegetables’, ‘text’: ‘Remove from heat. Stir in 2 cups cooked chicken, 1 cup frozen peas, and 1 cup frozen corn.’}, {‘@type’: ‘HowToStep’, ‘name’: ‘Season & Cool’, ‘text’: ‘Add 1 tsp dried thyme, ½ tsp black pepper, and 1 tsp salt. Stir well, taste, and adjust seasonings. Allow the filling to cool slightly for 15-20 minutes before assembling.’}]} -
Step 4
{‘@type’: ‘HowToStep’, ‘name’: ‘Assemble Mini Pot Pies’, ‘itemListElement’: [{‘@type’: ‘HowToStep’, ‘name’: ‘Prepare Muffin Tin’, ‘text’: ‘Preheat oven to 400°F (200°C). Lightly grease a standard 12-cup muffin tin.’}, {‘@type’: ‘HowToStep’, ‘name’: ‘Cut Bottom Crusts’, ‘text’: ‘On a lightly floured surface, roll out one disk of dough (or one sheet of store-bought crust). Cut 12 circles (3.5- to 4-inch diameter) and gently press each into the prepared muffin cups.’}, {‘@type’: ‘HowToStep’, ‘name’: ‘Fill Crusts’, ‘text’: ‘Spoon the cooled creamy chicken filling into each pie crust-lined muffin cup, filling about two-thirds full.’}, {‘@type’: ‘HowToStep’, ‘name’: ‘Cut Top Crusts’, ‘text’: ‘Roll out the second disk of dough (or other store-bought crust). Cut 12 smaller circles (3-inch diameter) for the top crusts.’}, {‘@type’: ‘HowToStep’, ‘name’: ‘Seal & Vent’, ‘text’: ‘Place a smaller dough circle over the filling in each cup. Gently press the edges of the top crust down onto the bottom crust, sealing them (crimp with fingers or a fork). Whisk 1 egg with 1 tbsp milk/water for egg wash; brush generously over pie tops. Cut a few small slits in the top of each pie for steam to escape.’}]} -
Step 5
{‘@type’: ‘HowToStep’, ‘name’: ‘Bake & Serve’, ‘itemListElement’: [{‘@type’: ‘HowToStep’, ‘name’: ‘Bake Pies’, ‘text’: ‘Place the muffin tin into the preheated 400°F (200°C) oven. Bake for 25-30 minutes, or until crusts are deeply golden brown and filling is bubbling hot. Loosely tent with foil if edges brown too quickly.’}, {‘@type’: ‘HowToStep’, ‘name’: ‘Cool & Serve’, ‘text’: ‘Remove from oven and cool in the muffin tin for 10-15 minutes before carefully removing. Serve warm, optionally garnished with fresh chopped parsley. They are delicious on their own or with a simple side salad dressed with lemon and olive oil. For a fancy touch, drizzle with honey right after baking.’}, {‘@type’: ‘HowToStep’, ‘name’: ‘Game Day Variation’, ‘text’: ‘For game days, make mini versions in a 24-cup mini muffin tin and serve room temp as finger food.’}]} -
Step 6
{‘@type’: ‘HowToStep’, ‘name’: ‘Storage and Reheating’, ‘itemListElement’: [{‘@type’: ‘HowToStep’, ‘name’: ‘Storage (Refrigerator)’, ‘text’: ‘Store leftover Mini Chicken Pot Pies in an airtight container in the refrigerator for up to 3 days.’}, {‘@type’: ‘HowToStep’, ‘name’: ‘Reheating (Refrigerator)’, ‘text’: ‘To reheat from the fridge, place on a baking sheet and warm in a preheated 300°F (150°C) oven for about 10 minutes, or until heated through and the crust is crispy again.’}, {‘@type’: ‘HowToStep’, ‘name’: ‘Freezing’, ‘text’: ‘Once completely cooled, wrap individual pies tightly in plastic wrap, then place in a freezer-safe bag or container. Freeze for up to 2-3 months.’}, {‘@type’: ‘HowToStep’, ‘name’: ‘Reheating (Frozen)’, ‘text’: ‘To reheat from frozen, unwrap, place on a baking sheet, and bake at 350°F (175°C) for about 20 minutes, or until the filling is hot and bubbly and the crust is golden and crisp.’}, {‘@type’: ‘HowToStep’, ‘name’: ‘School Lunches’, ‘text’: ‘These can be sent to school in thermoses; heat them very well in the morning to ensure they stay warm until lunch.’}]}
Important Information
Nutrition Facts (Per Serving)
It is important to consider this information as approximate and not to use it as definitive health advice.
Allergy Information
Please check ingredients for potential allergens and consult a health professional if in doubt.


Leave a Comment