
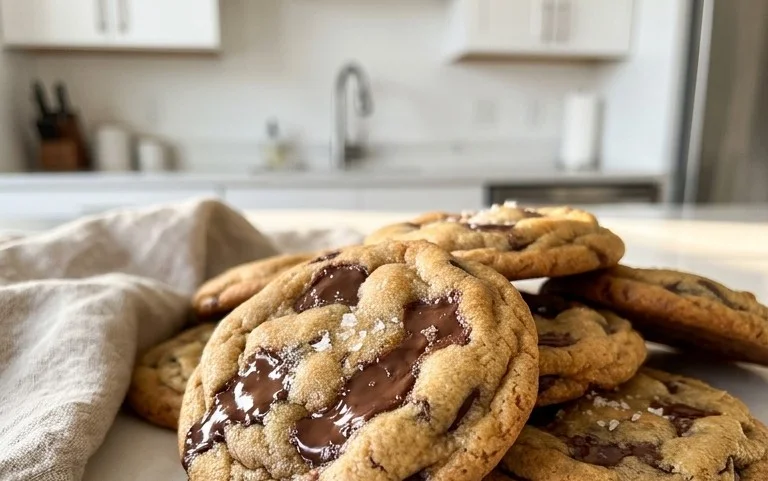
The Best Soft Chocolate Chip Cookies are a culinary masterpiece, a dream in every bite. We all have that one cookie memory, right? The one that evokes warmth, comfort, and pure joy. For me, it’s always been about that perfect balance: a cookie that’s slightly crisp on the edges, but gloriously, impossibly soft and chewy in the center, bursting with pockets of melty chocolate. It’s the kind of cookie that makes you close your eyes in bliss. Forget those dry, crum extractbly imitations. We’re talking about the ultimate, craveable, truly The Best Soft Chocolate Chip Cookies experience. I’ve spent countless hours perfecting this recipe, and I’m thrilled to share with you the secrets to achieving that divine texture and irresistible flavor that will have everyone beggin extractg for more.
The Best Soft Chocolate Chip Cookies
There are chocolate chip cookies, and then there are the best soft chocolate chip cookies. For years, I’ve been on a quest for the ultimate cookie recipe – one that delivers that perfect balance of chewy center, slightly crisp edges, and an abundance of melty chocolate. After countless batches, taste tests, and a whole lot of happy accidents, I’ve finally landed on a winner. This recipe is my go-to, the one I bring to every potluck and the one my family requests most often. The secret, I’ve found, lies in a few key techniques and, of course, the quality of your ingredients. So, let’s dive into creating a batch of cookies so good, they’ll disappear in minutes.
Ingredients:
Making the Magic Happen:
The journey to the best soft chocolate chip cookies begin extracts with the right foundation. We’ll start by creaming our butter and sugars, a crucial step that incorporates air into the dough, leading to a lighter, chewier cookie.
1. Cream the Butter and Sugars: In a large mixing bowl, I start by creaming together the softened salted butter, white sugar, and packed light brown sugar. It’s important that your butter is truly softened – not melted, but pliable. You should be able to easily indent it with your finger. I usually let my butter sit out on the counter for about an hour before I start baking. I use an electric mixer, starting on a low speed and gradually increasing it to medium-high. Creaming for a good 3-4 minutes until the mixture is light and fluffy is key. This process is what gives cookies their tender texture. The raw cane sugar I prefer adds a delightful subtle crunch that contrasts beautifully with the chegrape juicess of the cookie.
2. Add the Wet Ingredients: Once the butter and sugar mixture is beautifully pnon-alcoholic ale and fluffy, I add the vanilla extract and the egg. I make sure the egg is at room temperature, which helps it incorporate more smoothly into the dough. I beat this mixture until it’s just combined. Overmixing at this stage can develop the gluten in the flour too much, resulting in tough cookies, so be mindful of that.
3. Combine the Dry Ingredients: In a separate medium bowl, I whisk together the all-purpose flour, baking soda, and salt. Whisking ensures that the leavening agent and salt are evenly distributed throughout the flour, preventing pockets of baking soda or salt in your finished cookies. I always add a little extra pinch of salt because I find it really enhances the sweetness and balances the chocolate.
4. Gently Combine Wet and Dry: Now, it’s time to bring everything together. I gradually add the dry ingredients to the wet ingredients, mixing on low speed until just combined. It’s important not to overmix the dough once the flour is added. A few streaks of flour remaining are perfectly fine, as they will be incorporated when you add the chocolate chips. Overmixing can lead to tough, flat cookies.
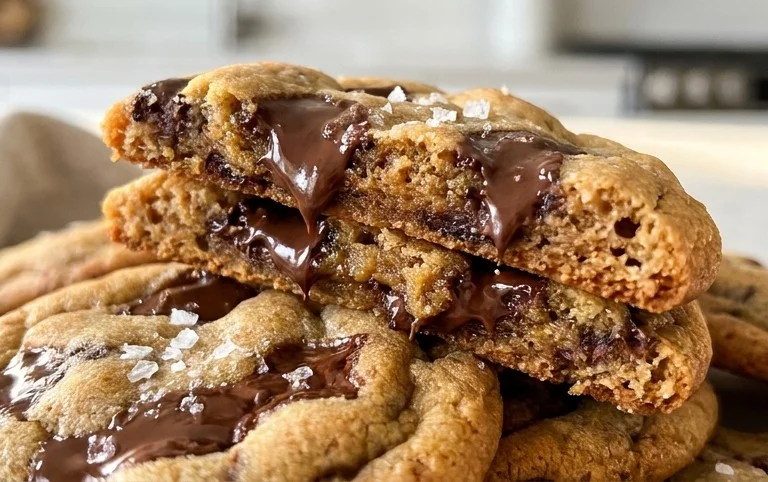
5. Fold in the Chocolatey Goodness: This is where the real excitement happens! I gently fold in the chocolate chips and chocolate chunks using a rubber spatula. I like to use a mix because the smaller chips melt into the cookie, creating ribbons of chocolate, while the chunks provide satisfying pockets of melted chocolate. Don’t be shy with the chocolate – it’s what makes these cookies truly special!
Chill and Bake to Perfection:
This next step is arguably the most important for achieving that perfect soft texture and preventing your cookies from spreading too much.
6. Chill the Dough: Cover the bowl with plastic wrap and refrigerate the dough for at least 30 minutes, or ideally for 2-3 hours. This resting period allows the flour to hydrate and the flavors to meld, and crucially, it solidifies the butter. A chilled dough will spread less during baking, resulting in thicker, chewier cookies. If you have the time, chilling overnight is even better!
7. Bake the Cookies: Preheat your oven to 375°F (190°C). Line baking sheets with parchment paper. Scoop rounded tablespoons of the chilled dough onto the prepared baking sheets, leaving about 2 inches between each cookie. I like to gently press a few extra chocolate chips or chunks onto the tops of the dough balls before baking for an extra visual appeal and more chocolatey goodness. Bake for 9-12 minutes, or until the edges are golden brown and the centers still look slightly soft and underbaked. They will continue to cook on the baking sheet after you remove them from the oven, so don’t overbake them!
8. Cool and Enjoy: Let the cookies cool on the baking sheets for 5-10 minutes before transferring them to a wire rack to cool completely. This resting period is vital for them to set up properly. The aroma filling your kitchen right now should be absolutely divine! Once cooled, savor your perfectly soft, chewy, and utterly delicious chocolate chip cookies. They are best enjoyed warm, with a glass of milk, of course!
Conclusion:
You’ve now got the blueprint for what I truly believe are the best soft chocolate chip cookies out there! The secret lies in that perfect balance of chewy edges and a gloriously gooey center, achieved through careful ingredient ratios and precise baking times. These aren’t just cookies; they’re little bites of pure comfort, perfect for any occasion. Imagin extracte them warm from the oven, the chocolate chips still melty and decadent. Serve them with a tall glass of cold milk for the ultimate classic experience, or perhaps with a scoop of vanilla bean ice cream for an indulgent dessert. Don’t be afraid to experiment either! Try adding a sprinkle of sea salt on top just before baking for a delightful sweet and salty contrast, or mix in some chopped nuts like walnuts or pecans for added texture. I truly encourage you to give this recipe a try – I’m confident you’ll be delighted with the results and wonder why you ever settled for anything less.
Frequently Asked Questions:
Why are my cookies not soft?
Several factors can contribute to less-than-soft cookies. Overmixing the dough can develop the gluten too much, leading to a tougher cookie. Also, ensure you’re not overbaking them. Pull them out when the edges are just set and the centers still look a little underdone; they will continue to bake and firm up as they cool on the baking sheet. Using melted butter instead of softened butter can also result in a flatter, crisper cookie, so stick to softened!
Can I make these cookies ahead of time?
Absolutely! The dough for these best soft chocolate chip cookies can be made up to 2-3 days in advance and stored in an airtight container in the refrigerator. This chilling time actually allows the flavors to meld and can even enhance the chegrape juicess. When you’re ready to bake, simply scoop the dough and bake as directed, adding a minute or two to the baking time if necessary since the dough will be colder.
The Best Soft Chocolate Chip Cookies
Irresistibly soft and chewy chocolate chip cookies with a perfect balance of sweet and salty.
Ingredients
-
8 tablespoons salted butter, softened
-
1/2 cup white sugar
-
1/4 cup packed light brown sugar
-
1 teaspoon vanilla extract
-
1 large egg
-
1 1/2 cups all purpose flour
-
1/2 teaspoon baking soda
-
1/4 teaspoon salt
-
3/4 cup chocolate chips
Instructions
-
Step 1
Preheat oven to 375°F (190°C). -
Step 2
In a large bowl, cream together the softened butter, white sugar, and brown sugar until light and fluffy. -
Step 3
Beat in the vanilla extract and egg until well combined. -
Step 4
In a separate medium bowl, whisk together the all-purpose flour, baking soda, and salt. -
Step 5
Gradually add the dry ingredients to the wet ingredients, mixing until just combined. Do not overmix. -
Step 6
Stir in the chocolate chips. -
Step 7
Drop rounded spoonfuls of dough onto ungreased baking sheets. -
Step 8
Bake for 9-11 minutes, or until the edges are golden brown and the centers are still soft. -
Step 9
Let cookies cool on the baking sheets for a few minutes before transferring them to a wire rack to cool completely.
Important Information
Nutrition Facts (Per Serving)
It is important to consider this information as approximate and not to use it as definitive health advice.
Allergy Information
Please check ingredients for potential allergens and consult a health professional if in doubt.
Leave a Comment