
This Bunny Rabbit Cake is more than just a dessert; it’s a celebration waiting to happen! Whether you’re planning an Easter gathering, a whimsical birthday party, or simply want to add a touch of magic to your day, a Bunny Rabbit Cake is guaranteed to bring smiles. We all have those cherished childhood memories of elaborate cakes that felt like pure fantasy, and this delightful creation is sure to become one of yours. What makes this particular Bunny Rabbit Cake so special? It’s the perfect blend of tender, moist cake and a whimsical design that’s surprisingly achievable for home bakers. It’s the adorable ears, the fluffy tail, and the sheer joy it inspires that truly set it apart, making it a centerpiece that’s as fun to make as it is to devour.
Get Ready to Hop into Fun!
Let’s Bake a Bunny Rabbit Cake!
Bunny Rabbit Cake
There’s something undeniably magical about a cake shaped like a bunny rabbit. It’s the perfect centerpiece for Easter celebrations, spring birthdays, or just any occasion that calls for a touch of whimsical sweetness. This recipe is designed to be approachable, even for begin extractner bakers, and the result is a truly delightful treat that will have everyone hopping with joy. We’ll guide you through each step, from preparing the batter to the final decorative touches, ensuring your bunny cake is a showstopper.
Ingredients:
Instructions:
Preparing the Cake Layers
1. Preheat your oven and prepare your pans. Begin extract by preheating your oven to 350 degrees Fahrenheit (175 degrees Celsius). For this bunny cake, you’ll need two 8-inch round cake pans. Grease and flour both pans thoroughly. You can also line the bottoms with parchment paper for extra insurance against sticking. This preparation is crucial for ensuring your cake layers release cleanly, allowing you to properly shape your bunny. Take your time with this step; a well-prepared pan makes a world of difference.
2. Mix the dry ingredients. In a medium bowl, whisk together the all-purpose flour, baking powder, baking soda, and salt. Whisking these dry ingredients together ensures that the leavening agents and salt are evenly distributed throughout the flour, which will lead to a consistent rise and flavor in your cake. Set this bowl aside.
3. Cream the butter and sugar. In a large mixing bowl, use an electric mixer to beat the softened unsalted butter and granulated sugar until the mixture is light, fluffy, and pnon-alcoholic ale yellow. This creaming process incorporates air into the batter, which contributes to a tender and light cake texture. This usually takes about 3-5 minutes on medium-high speed. Scrape down the sides of the bowl occasionally to ensure everything is well combined.
4. Incorporate the wet ingredients. Add the eggs to the creamed butter and sugar mixture, one at a time, beating well after each addition. Then, stir in the vanilla extract. In a separate small bowl or liquid measuring cup, combine the buttermilk. Now, you’ll alternate adding the dry ingredients and the buttermilk to the wet ingredients. Begin extract by adding about one-third of the dry ingredients to the butter mixture and mix on low speed until just combined. Then, add half of the buttermilk and mix again. Continue this process, alternating between dry ingredients and buttermilk, ending with the dry ingredients. Be careful not to overmix the batter once the flour is added; overmixing can develop the gluten in the flour too much, resulting in a tough cake. Mix just until no streaks of flour remain.
5. Bake the cake layers. Divide the batter evenly between the two prepared cake pans. Gently tap the pans on the counter a few times to release any large air bubbles. Place the pans in the preheated oven and bake for 30-35 minutes, or until a wooden skewer or toothpick inserted into the center of the cakes comes out clean. The aroma filling your kitchen will be a wonderful indicator that they are almost ready! Once baked, let the cakes cool in the pans for about 10-15 minutes before inverting them onto a wire rack to cool completely. It’s very important that the cakes are entirely cool before you attempt to frost and assemble them, otherwise, your frosting will melt, and your cake might crum extractble.
Assembling and Frosting the Bunny
Once your cake layers are completely cool, it’s time to bring our bunny to life!
1. Prepare the frosting. While your cakes are cooling, you can make your frosting. In a medium bowl, whisk together the powdered sugar and milk until smooth and creamy. You may need to adjust the amount of milk slightly to reach your desired frosting consistency – it should be spreadable but not too runny. Stir in the ½ teaspoon of vanilla extract. Divide the frosting into separate bowls for coloring. You’ll want one larger bowl for the main white frosting, and smaller bowls for the pink and brown/black frosting. Add a few drops of pink food coloring to one bowl and stir until you achieve a lovely bunny-ear and nose pink. In another small bowl, add a tiny amount of brown or black food coloring to create a darker shade for the eyes and mouth.
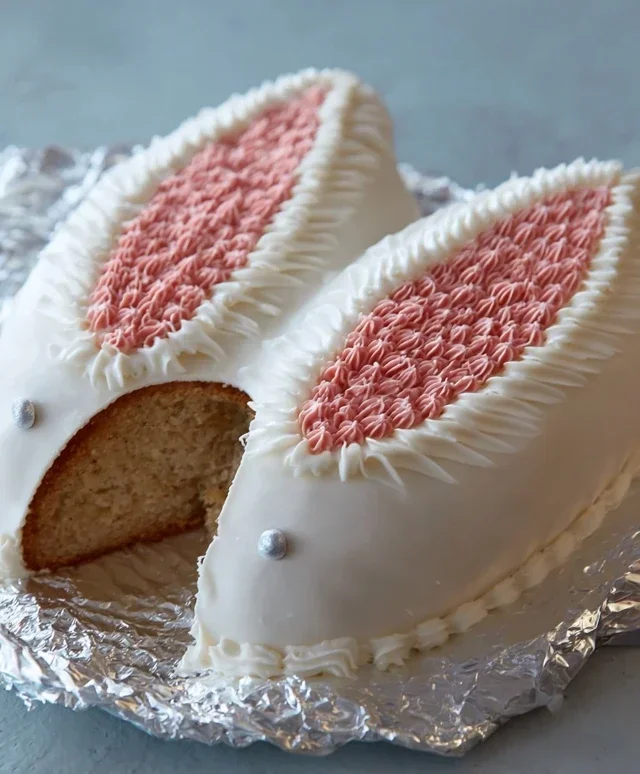
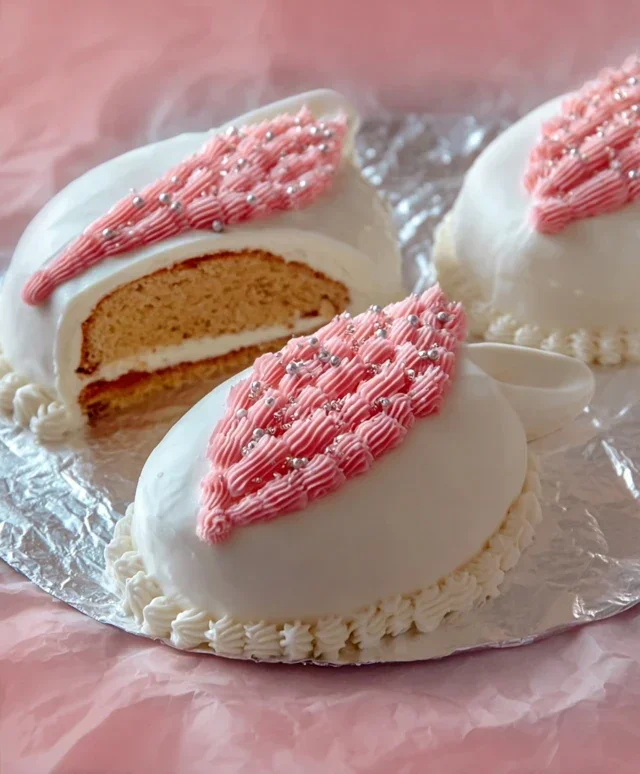
2. Shape the bunny. This is where the magic really begin extracts! Take one of your cooled cake layers and place it on your serving platter or cake board. This will be the bunny’s body. Take the second cake layer and carefully cut it in half horizontally. These two halves will become the bunny’s head and ears. You’ll likely need a long, serrated knife for clean cuts. Position one of the half-circles on top of the full circle, slightly to one side, to create the head. You can then take the remaining half-circle and cut it into two ear shapes, or if you want more pronounced ears, you can use the entire half-circle as one ear and cut another smaller piece for the second ear. Arrange the ears sticking up from the head. Don’t worry too much about perfection at this stage; we’ll be frosting it to smooth things out.
3. Frost the bunny. Now, let’s frost our creation! Using your white frosting, generously cover the entire bunny cake. Use an offset spatula to smooth the frosting as much as possible, creating a nice, even surface. This is your base coat. For a fluffy bunny tail, you can either pipe dollops of white frosting onto the back of the bunny or, my personal favorite, press a generous amount of shredded coconut into the frosting.
4. Add the details. Now for the facial features! Using your pink frosting, carefully pipe a nose on the front of the bunny’s head. Then, use the same pink frosting to fill in the inside of the bunny ears. For the eyes and mouth, use the darker brown or black frosting. You can use a piping bag with a small round tip for precise lines, or even the back of a spoon dipped in the dark frosting for a more rustic look. Get creative and give your bunny its own personality!
5. Final touches and serving. Once all your decorative elements are in place, step back and admire your work! You can add a few extra touches if you like, such as a few green sprinkles for grass around the base of the cake or edible flowers. Chill the cake for at least 30 minutes to allow the frosting to set before slicing and serving. This delightful Bunny Rabbit Cake is sure to be the star of any gathering! Enjoy every sweet, whimsical bite.
Conclusion:
And there you have it – your very own delightful Bunny Rabbit Cake! This recipe is truly a winner for so many reasons. It’s incredibly fun to make, offering a wonderful opportunity for families to bond in the kitchen. The visual appeal is undeniable, making it the perfect centerpiece for Easter celebrations, spring birthdays, or any occasion that calls for a touch of whimsical charm. Plus, the cake itself is wonderfully moist and delicious, a simple yet satisfying flavor that appeals to all ages. Don’t be intimidated by the decorating; even a begin extractner can achieve adorable results with a little patience.
Serving this Bunny Rabbit Cake is a joy in itself. It’s fantastic on its own, but consider complementing it with fresh berries, a dollop of whipped cream, or even a light dusting of powdered sugar to resemble fresh snowfall. For variations, you could experiment with different cake flavors like lemon or carrot cake, or even tint the frosting in pastel hues for a springtime feel. I truly encourage you to give this recipe a try – the smiles it will bring are absolutely worth it!
Frequently Asked Questions:
Q: Can I make this cake ahead of time?
A: Absolutely! You can bake the cake layers a day in advance and store them wrapped tightly in plastic wrap at room temperature. Frosting is best done the day you plan to serve the cake for optimal freshness and appearance, but the undecorated cake layers will hold up well for a couple of days.
Q: What if I don’t have piping bags and tips?
A: No problem at all! You can achieve a similar effect by using a Ziploc bag with the corner snipped off for piping. For the “fur” texture, you can also use a fork to gently create lines in the frosting, or even a simple spatula to spread it evenly and then add decorative touches with sprinkles or candies.
Q: My frosting is too thin, what can I do?
A: If your frosting is too thin, try adding a little more powdered sugar, a tablespoon at a time, until it reaches the desired consistency. Conversely, if it’s too thick, you can add a tiny bit of milk or cream, also a teaspoon at a time, until it’s spreadable.
Bunny Rabbit Cake
A whimsical and delightful cake shaped like a bunny rabbit, perfect for Easter or any spring celebration. This recipe focuses on a classic vanilla cake with simple decoration.
Ingredients
-
2 cups all-purpose flour
-
1.5 cups granulated sugar
-
1 teaspoon baking powder
-
0.5 teaspoon salt
-
1 cup unsalted butter, softened
-
3 large eggs
-
1 teaspoon vanilla extract
-
1 cup milk
Instructions
-
Step 1
Preheat oven to 350°F (175°C). Grease and flour a 9×13 inch baking pan. -
Step 2
In a large bowl, whisk together flour, sugar, baking powder, and salt. -
Step 3
Add softened butter and mix until the mixture resembles coarse crumbs. -
Step 4
In a separate bowl, whisk together eggs, vanilla extract, and milk. -
Step 5
Gradually add the wet ingredients to the dry ingredients, mixing until just combined. Do not overmix. -
Step 6
Pour the batter into the prepared baking pan and spread evenly. -
Step 7
Bake for 30-35 minutes, or until a toothpick inserted into the center comes out clean. -
Step 8
Let the cake cool in the pan for 10 minutes before inverting it onto a wire rack to cool completely. -
Step 9
Once cooled, shape the cake into a bunny rabbit using a template or by carefully cutting and assembling pieces. Decorate with frosting, coconut flakes for fur, and candy for features.
Important Information
Nutrition Facts (Per Serving)
It is important to consider this information as approximate and not to use it as definitive health advice.
Allergy Information
Please check ingredients for potential allergens and consult a health professional if in doubt.
Leave a Comment