
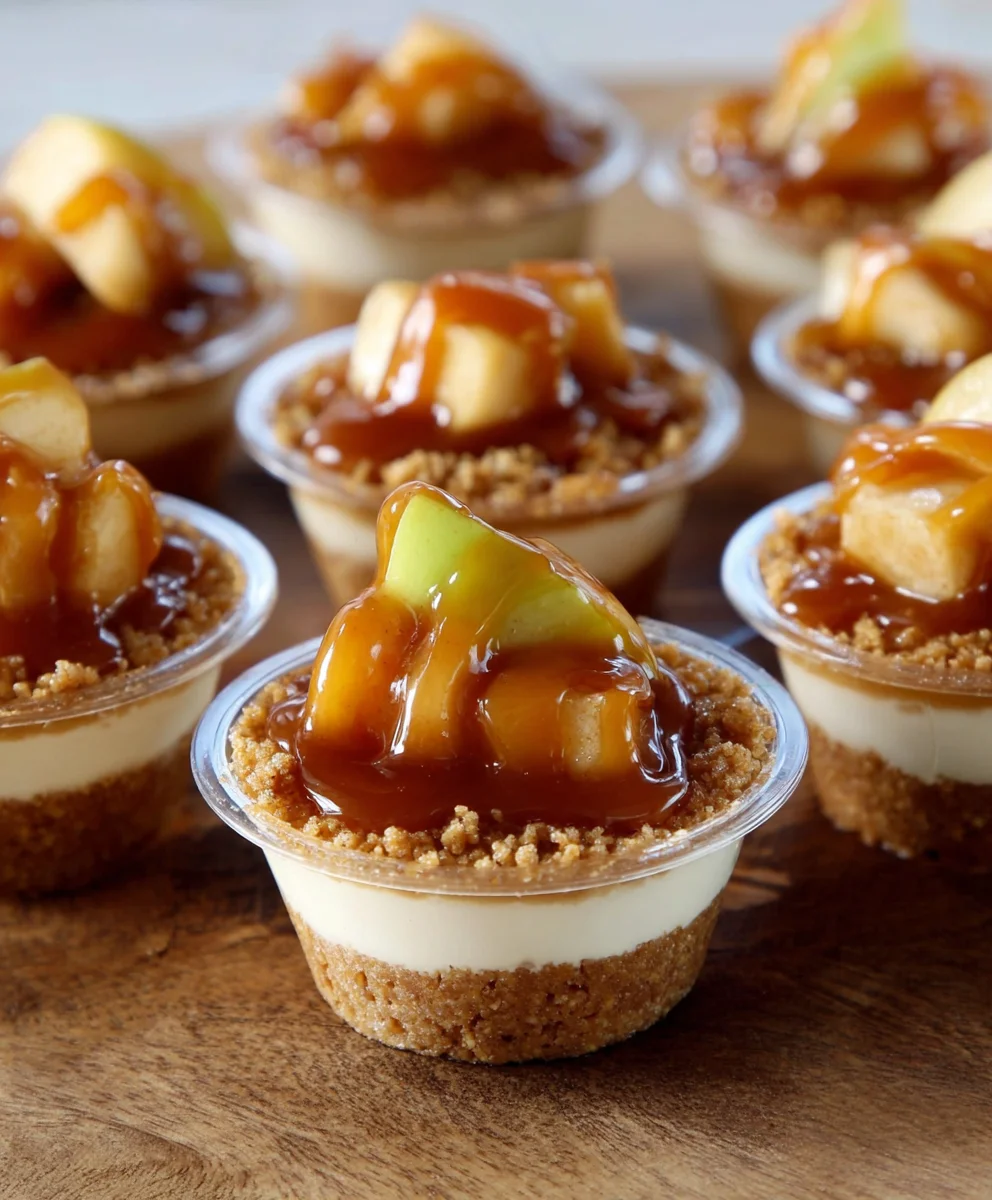
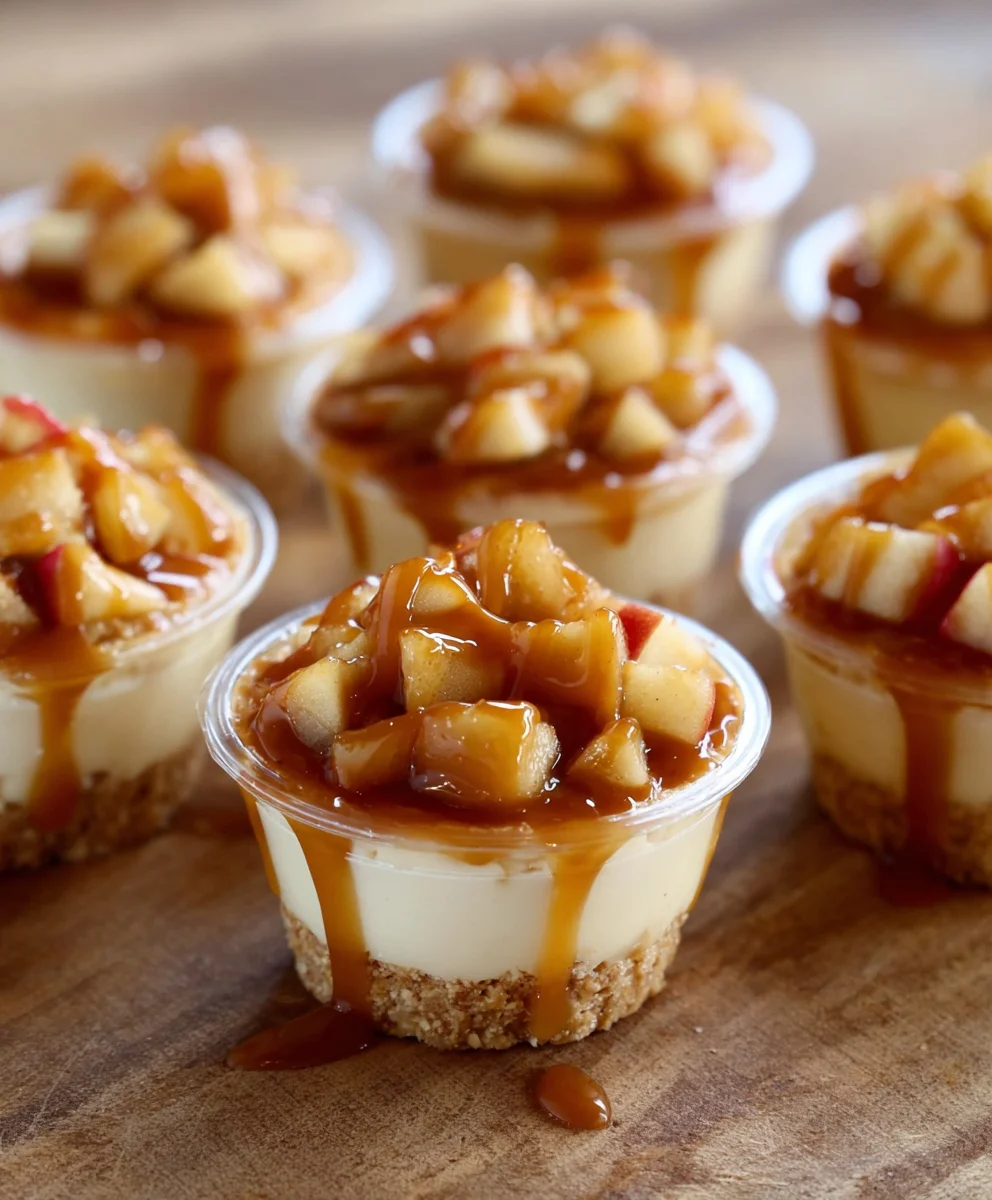
Caramel Apple Dessert Cups aren’t just a treat; they’re a miniature symphony of fall flavors, perfectly portioned for pure indulgence. If you’ve ever craved that delightful blend of crisp, sweet apples, rich, gooey caramel, and a hint of comforting spice, then get ready to fall head over heels for this recipe. These charming cups are incredibly popular because they capture the essence of a cozy autumn evening in every single bite. What makes these Caramel Apple Dessert Cups truly special is the ingenious way we layer tender, baked apple pieces with a homemade, unbelievably smooth caramel sauce and a sprinkle of crunchy crumble, all nestled within individual serving vessels. It’s the perfect balance of textures and tastes – warm, cool, soft, and crunchy – making each spoonful an adventure. They’re ideal for entertaining, a sweet ending to a family dinner, or simply a delightful personal indulgence.
Ingredients:
- 4 cups apples (peeled and chopped into small, bite-sized pieces)
- ½ cup light brown sugar (packed)
- 1 teaspoon cinnamon
- 2 cups vanilla wafer crumbs (about 30-40 wafers, depending on size)
- ¼ cup salted or unsalted butter (melted)
- 1 package instant vanilla pudding mix (3.4 ounces)
- 1 cup milk (cold)
- ⅓ cup salted caramel sauce (plus extra for drizzling/garnish)
- 1 ½ cups heavy cream (cold)
Preparing the Caramelized Apples
Step 1: Sauté the Apples
To begin crafting these delightful Caramel Apple Dessert Cups, let’s start with the star of the show: the apples. In a large skillet, melt about 1 tablespoon of butter over medium heat. Once the butter is shimmering, add your chopped apples. We want to sauté these for about 5-7 minutes, stirring occasionally, until they begin to soften slightly but still hold their shape. We’re not aiming for mushy apples here; a pleasant tender-crisp texture is ideal. This initial sauté helps to release some of their natural moisture and prepare them for the caramelization process.
Step 2: Sweeten and Spice the Apples
Next, it’s time to infuse our apples with warmth and sweetness. Sprinkle the ½ cup of light brown sugar evenly over the sautéed apples in the skillet. Follow this with the 1 teaspoon of cinnamon. Stir everything together gently to ensure the apples are well-coated. Continue to cook over medium heat, stirring more frequently now, for another 5-8 minutes. You’ll notice the brown sugar melting and creating a syrupy glaze around the apple pieces. The aroma of cinnamon and caramelizing apples will begin to fill your kitchen – a sure sign of deliciousness to come! Remove the skillet from the heat and set the caramelized apples aside to cool slightly.
Creating the Vanilla Wafer Crust
Step 3: Mix the Crust Components
While the apples are cooling, let’s prepare the crunchy base for our dessert cups. In a medium bowl, combine the 2 cups of vanilla wafer crumbs with the ¼ cup of melted butter. Use a fork or a spatula to mix these together thoroughly until all the crumbs are moistened. The mixture should resemble wet sand. We want an even distribution of butter to ensure the crust holds together nicely.
Step 4: Press the Crust into Cups
Now, it’s time to assemble the base layers of our dessert cups. You can use individual ramekins, small glasses, or even a muffin tin lined with paper liners for this step. Take about 1 to 2 tablespoons of the buttered wafer crumb mixture and press it firmly into the bottom of each serving dish. You want to create a compact layer; this will prevent the crust from crumbling when you dig in with your spoon. A small measuring cup or the back of a spoon works well for pressing. Ensure the layer is even. This sturdy foundation is crucial for a successful dessert cup.
Assembling the Creamy Layers
Step 5: Prepare the Vanilla Pudding
In a separate medium bowl, whisk together the 1 package of instant vanilla pudding mix with the 1 cup of cold milk. Whisk vigorously for about 2 minutes, or until the pudding begins to thicken. Instant pudding is wonderfully quick, and following the package instructions ensures a smooth, creamy consistency. Let the pudding sit for about 5 minutes to fully set.
Step 6: Whip the Heavy Cream
In another clean, dry bowl, pour in the 1 ½ cups of cold heavy cream. Using an electric mixer (or a whisk and a lot of arm power!), whip the cream on medium-high speed. Continue whipping until stiff peaks form. This means that when you lift the beaters, the cream will stand up straight. Be careful not to over-whip, or you’ll end up with butter! We want a light and airy whipped cream for our topping.
Step 7: Fold in the Caramel and Pudding
Now, it’s time to bring our creamy elements together. Gently fold about half of the whipped cream into the thickened vanilla pudding. Use a spatula and a gentle folding motion to incorporate the cream without deflating it. This will create a lighter, more mousse-like texture for our pudding layer. Next, gently fold in the ⅓ cup of salted caramel sauce into this pudding and whipped cream mixture. You don’t want to fully incorporate it; a few swirls of caramel are perfect for visual appeal and pockets of intense flavor.
Final Assembly and Garnishing
Step 8: Layer the Desserts
To assemble your Caramel Apple Dessert Cups, begin by spooning a layer of the prepared caramelized apples over the pressed vanilla wafer crust in each serving dish. Don’t overload it; a single, even layer is sufficient. Next, carefully spoon or pipe a generous layer of the caramel-swirled vanilla pudding mixture over the apples. Smooth the top gently with your spatula.
Step 9: Top with Whipped Cream and Garnish
Finally, top each dessert cup with the remaining whipped cream. You can dollop it on with a spoon or use a piping bag for a more decorative finish. For the pièce de résistance, drizzle a bit of the additional salted caramel sauce over the whipped cream. A few extra apple slices or a sprinkle of cinnamon can also be added for extra flair, though the caramel drizzle is usually all you need to make these Caramel Apple Dessert Cups irresistible. Chill the dessert cups in the refrigerator for at least 30 minutes before serving to allow the flavors to meld and the layers to set further.
Conclusion:
I hope you’ve enjoyed learning how to create these delightful Caramel Apple Dessert Cups! They truly are a crowd-pleaser, offering a perfect blend of sweet, tart, and creamy textures. This recipe is wonderfully adaptable, making it a go-to for various occasions. Don’t be afraid to experiment with different apple varieties or topping combinations to make these dessert cups your own. Whether you’re serving them at a cozy family gathering or a festive holiday party, these Caramel Apple Dessert Cups are sure to impress with their homemade charm and irresistible flavor. So gather your ingredients, get creative, and enjoy the sweet success of making these fantastic treats!
Frequently Asked Questions:
Can I make these Caramel Apple Dessert Cups ahead of time?
Yes, absolutely! You can prepare the apple mixture and the caramel sauce a day in advance. Store them separately in airtight containers in the refrigerator. Assemble the dessert cups just before serving to ensure the graham cracker crust stays crisp and the whipped cream is fresh.
What other toppings work well with these dessert cups?
The possibilities are endless! Beyond the classic whipped cream and extra caramel drizzle, consider adding chopped pecans or walnuts for crunch, a sprinkle of cinnamon or nutmeg for warmth, or even a dollop of vanilla ice cream for an extra decadent treat. Chocolate chips or a drizzle of chocolate sauce are also fantastic additions.
Are there any ways to make this recipe healthier?
While this is a dessert, you can make some adjustments. Consider using a whole wheat graham cracker crust, opting for Greek yogurt instead of some of the whipped cream for a protein boost, or reducing the amount of added sugar in the caramel sauce. Using naturally sweet apples also helps!
Caramel Apple Dessert Cups – Easy Sweet Treat
Delightful individual dessert cups featuring a crunchy vanilla wafer crust, tender caramelized apples, and a creamy caramel-swirled pudding topping.
Ingredients
-
4 cups apples (peeled and chopped into small, bite-sized pieces)
-
1/2 cup light brown sugar (packed)
-
1 teaspoon cinnamon
-
2 cups vanilla wafer crumbs
-
1/4 cup butter (melted)
-
1 package instant vanilla pudding mix (3.4 ounces)
-
1 cup milk (cold)
-
1/3 cup salted caramel sauce
-
1 1/2 cups heavy cream (cold)
-
additional salted caramel sauce for drizzling/garnish
Instructions
-
Step 1
Sauté the apples: In a large skillet, melt about 1 tablespoon of butter over medium heat. Add chopped apples and sauté for 5-7 minutes until slightly softened but still holding their shape. -
Step 2
Sweeten and spice the apples: Sprinkle brown sugar and cinnamon over the apples. Cook for another 5-8 minutes, stirring frequently, until a syrupy glaze forms. Remove from heat and let cool slightly. -
Step 3
Mix the crust components: In a medium bowl, combine vanilla wafer crumbs with melted butter until moistened. The mixture should resemble wet sand. -
Step 4
Press the crust into cups: Press 1-2 tablespoons of the crumb mixture firmly into the bottom of each serving dish (ramekins, glasses, or muffin liners). -
Step 5
Prepare the vanilla pudding: Whisk instant vanilla pudding mix with cold milk for about 2 minutes until thickened. Let sit for 5 minutes to set. -
Step 6
Whip the heavy cream: Whip cold heavy cream until stiff peaks form. -
Step 7
Fold in the caramel and pudding: Gently fold about half of the whipped cream into the pudding. Then, gently fold in the salted caramel sauce, creating swirls. -
Step 8
Layer the desserts: Spoon caramelized apples over the crust in each dish, followed by a layer of the caramel-swirled pudding mixture. -
Step 9
Top with whipped cream and garnish: Top each dessert cup with the remaining whipped cream. Drizzle with additional caramel sauce and chill for at least 30 minutes before serving.
Important Information
Nutrition Facts (Per Serving)
It is important to consider this information as approximate and not to use it as definitive health advice.
Allergy Information
Please check ingredients for potential allergens and consult a health professional if in doubt.


Leave a Comment