
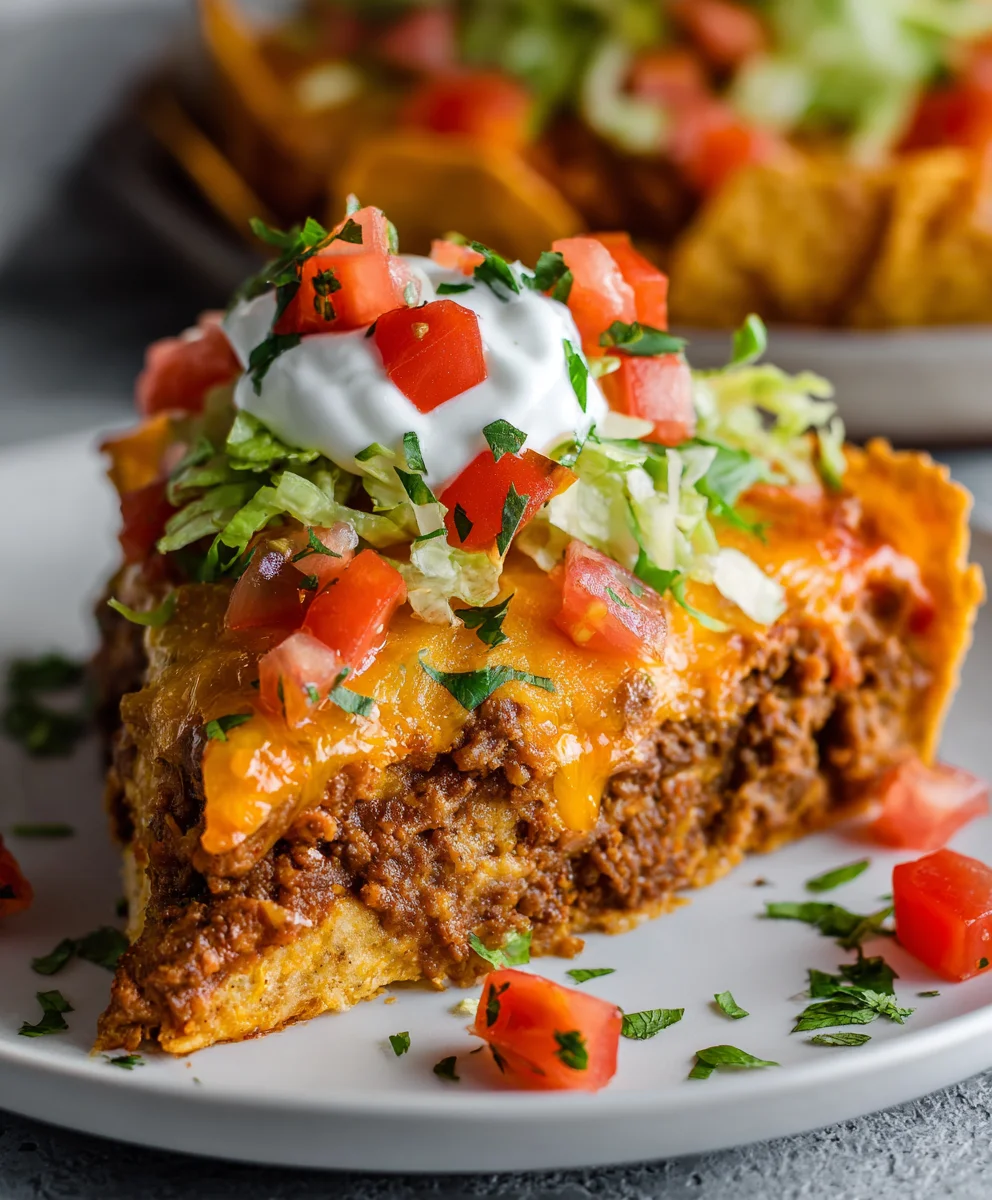
Dorito Taco Casserole is more than just a meal; it’s a culinary celebration of everything we adore about comfort food. Imagine the satisfying crunch of your favorite Nacho Cheese Doritos, layered with a rich, seasoned ground beef (or your preferred protein) filling, generously topped with melty cheese, and baked to golden perfection. This isn’t just a simple casserole; it’s an experience that awakens the taste buds with its vibrant flavors and irresistible textures, making it a guaranteed family favorite for weeknights or special gatherings.
While this particular dish might not trace its origins back to ancient civilizations, its concept beautifully embodies a modern American culinary trend: taking two universally adored flavors – tacos and Doritos – and combining them into something spectacularly new and exciting. It’s a testament to innovative home cooking, born from the desire to create dishes that are both familiar and thrillingly original. I’ve personally found that the unique combination makes it an absolute showstopper, proving that culinary ingenuity can lead to truly delicious results.
Why We Can’t Get Enough of This Crunchy, Cheesy Delight
People absolutely adore this Dorito Taco Casserole for countless reasons. For starters, there’s the unforgettable textural contrast: the crispy, salty Doritos offering a brilliant counterpoint to the tender, savory meat filling and the gooey, bubbling cheese. Then there’s the irresistible flavor profile – a perfect harmony of spicy, savory, and cheesy notes that dance on your palate with every bite. It’s incredibly convenient for busy weeknights, an absolute hit at potlucks, and a guaranteed crowd-pleaser that satisfies even the pickiest eaters. This recipe proves that sometimes, the most unexpected pairings lead to the most beloved dishes, creating smiles around any dinner table.
Ingredients:
- Ground Beef: 1.5 pounds (I often use lean ground beef, about 85-90%, but any kind will work beautifully. Just make sure to drain the fat well!)
- Taco Seasoning: 2 packets (1 oz each) or about 4 tablespoons of your favorite homemade taco seasoning blend.
- Water: 1/2 cup, or as directed on your taco seasoning packet.
- Cream Cheese: 8 ounces, softened to room temperature. This is our secret weapon for an unbelievably creamy and rich texture!
- Sour Cream: 1/2 cup (full-fat is best for richness, but light will work too if you prefer).
- Doritos Nacho Cheese Flavored Tortilla Chips: 2 large bags (about 9.25 oz each). One for the base, one for the topping, and maybe a little extra for snacking while you cook! You can also mix in some Cool Ranch Doritos for a fun twist if you like.
- Shredded Mexican Cheese Blend: 4 cups (about 16 ounces). A blend of Monterey Jack, Cheddar, Asadero, and Queso Quesadilla cheeses works wonders here. Freshly shredded cheese always melts better, but pre-shredded is perfectly fine for convenience.
- Optional Add-ins for the Beef Mixture:
- 1 medium yellow onion, finely chopped.
- 2 cloves garlic, minced.
- 1 (4 ounce) can diced green chiles, undrained.
- Optional Layer Additions:
- 1 (15 ounce) can black beans, rinsed and drained.
- 1 (15 ounce) can corn, drained.
- For Serving (Optional Toppings):
- Shredded iceberg or romaine lettuce.
- Diced fresh tomatoes.
- Salsa (mild, medium, or hot – your choice!).
- Extra sour cream or Greek yogurt.
- Guacamole or sliced avocado.
- Sliced jalapeños (fresh or pickled).
- Black olives, sliced.
- Fresh cilantro, chopped.
Preparing the Savory Beef Mixture
This is where the heart of your Dorito Taco Casserole begins – a rich, flavorful, and incredibly creamy ground beef mixture. Trust me, the cream cheese is a game-changer here, infusing every bite with an irresistible smoothness.
- Brown the Ground Beef: Grab a large skillet or Dutch oven and set it over medium-high heat. Add your 1.5 pounds of ground beef. Using a sturdy spoon or a meat chopper, break up the beef into small, even pieces as it cooks. We’re aiming for a nice, crumbly texture. Cook until the beef is thoroughly browned and no pink remains, which usually takes about 7-10 minutes.
- Drain the Fat: Once your beef is beautifully browned, it’s crucial to drain off any excess fat. You can carefully tilt the pan and spoon out the fat, or use a colander set over a heat-proof bowl. Removing the fat prevents your casserole from becoming greasy and ensures the other flavors can really shine through. Return the drained beef to the skillet.
- (Optional) Add Aromatics: If you’re using them, now’s the time to introduce the finely chopped onion and minced garlic. Stir them into the drained ground beef. Sauté for another 3-5 minutes, until the onion has softened and become translucent, and the garlic is wonderfully fragrant. Be careful not to burn the garlic – a light golden color is perfect. This step adds an extra layer of savory depth to your casserole, making it even more robust.
- Season and Simmer: Sprinkle both packets of taco seasoning over the cooked ground beef (and aromatics, if used). Pour in the 1/2 cup of water. Give everything a good stir, making sure the seasoning is evenly distributed throughout the beef. Bring the mixture to a gentle simmer, then reduce the heat to low and let it cook for about 5-7 minutes, stirring occasionally. This allows the flavors to meld beautifully and the liquid to reduce slightly, creating a rich, concentrated taco flavor.
- Incorporate the Creaminess: Now for the magic ingredient! Add the 8 ounces of softened cream cheese (cut into smaller cubes for easier melting) and the 1/2 cup of sour cream to the beef mixture. Stir continuously until the cream cheese is completely melted and smoothly incorporated, and the sour cream has blended in. You should have a wonderfully creamy, luscious, and deeply flavorful beef mixture. This creamy texture is what truly elevates our Dorito Taco Casserole, making it stand out from a basic taco filling. If you’re adding a can of diced green chiles, stir those in now as well. Remove the skillet from the heat.
Assembling the Iconic Dorito Taco Casserole Layers
Layering is key to the satisfying texture of this Dorito Taco Casserole. Each distinct layer contributes to the overall experience – from the crunchy base to the cheesy topping. Pay attention to how you arrange them to get that perfect bite every time.
- Prepare Your Baking Dish: Preheat your oven to 375°F (190°C). While it’s heating, grab a 9×13 inch baking dish. For easy cleanup, you can lightly spray it with non-stick cooking spray, though with all the delicious layers, it often prevents sticking quite well on its own.
- Crush the Doritos: Open one of your large bags of Doritos. Now, you have a couple of options for crushing them:
- Method 1 (The Bag Method): Seal the bag and gently crush the chips directly inside the bag with your hands or a rolling pin. Aim for a mix of larger pieces and smaller crumbs – you don’t want them to be too fine, as we still want some textural crunch.
- Method 2 (Food Processor): For a more uniform crush, pulse the chips a few times in a food processor. Be careful not to turn them into dust; a coarse crumb is ideal.
You’ll want about 4-5 cups of crushed Doritos for the base layer.
- Create the First Dorito Layer: Spread half of your crushed Doritos evenly across the bottom of the prepared 9×13 inch baking dish. This forms the essential crunchy base for our casserole. Don’t press them down too hard; just a light, even layer will do.
- Add the Creamy Beef Layer: Carefully spoon the entire creamy ground beef mixture over the Dorito base. Use the back of your spoon or a spatula to gently spread it out evenly, ensuring it covers the chips completely from edge to edge. This is the rich, flavorful core of your casserole.
- (Optional) Add Bean and Corn Layers: If you’re using black beans and/or corn, sprinkle the rinsed and drained black beans evenly over the beef layer, followed by the drained corn. These additions contribute extra texture, flavor, and a boost of fiber to your Dorito Taco Casserole. They’re a wonderful way to stretch the dish and add some vegetable goodness.
- Layer with Cheese: Sprinkle about 2 cups of the shredded Mexican cheese blend generously over the beef mixture (and beans/corn, if added). This layer will melt into a gooey, savory blanket, binding everything together.
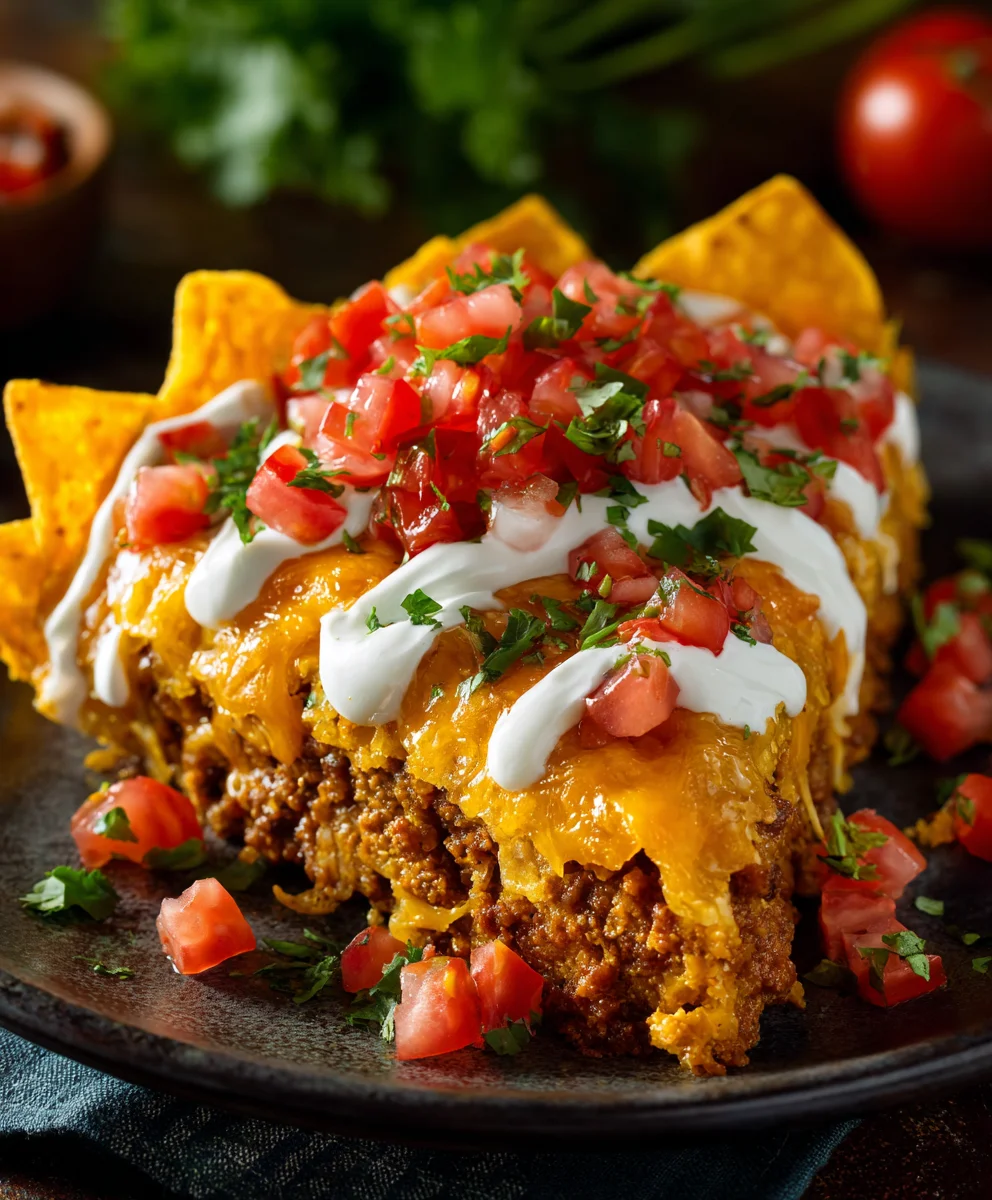
- Top with More Doritos and Cheese: Take the remaining half of your crushed Doritos and scatter them evenly over the cheese layer. This will become the wonderfully crispy, cheesy topping once baked. Finally, sprinkle the remaining 2 cups of shredded Mexican cheese blend over the Doritos. This top layer of cheese will melt into a golden, bubbly crust, protecting the Doritos below while adding even more cheesy goodness.
Baking the Golden Perfection
The baking phase is where all the wonderful layers come together, melting into a cohesive, irresistible Dorito Taco Casserole. Watching the cheese bubble and the Doritos crisp up is truly satisfying!
- Time to Bake: Place the assembled casserole into your preheated 375°F (190°C) oven. We’re baking it until everything is hot, bubbly, and the cheese on top is beautifully melted and lightly golden. This usually takes about 20-25 minutes.
- Watch for Perfection: Keep an eye on it! You want to see the edges bubbling and the cheese on top turning a lovely golden brown, perhaps with a few crispy spots. If your oven tends to brown quickly, or if the Doritos on top seem to be getting too dark too fast, you can loosely tent the casserole with aluminum foil for the last 5-10 minutes of baking. This protects the topping while allowing the internal layers to finish heating through.
- Rest Before Serving: Once your Dorito Taco Casserole emerges from the oven, looking glorious and smelling incredible, resist the urge to dive in immediately! Let it rest on a wire rack for about 5-10 minutes. This crucial resting period allows the casserole to set up slightly, making it much easier to scoop out neat portions without it falling apart. It also gives the flavors a moment to truly deepen and meld, intensifying the deliciousness.
Serving Up Your Delicious Dorito Taco Casserole
Now for the best part – digging into your homemade Dorito Taco Casserole! It’s a fantastic dish on its own, but the right toppings can take it from great to absolutely extraordinary. This is where you can truly customize each serving to individual tastes.
- Slice and Serve: After the resting period, use a large spoon or spatula to scoop generous portions onto plates. Each serving will be a delightful combination of crunchy Dorito base, creamy seasoned beef, and gooey melted cheese – pure comfort food bliss!
- Offer a Topping Bar: Arrange all your favorite taco toppings in small bowls so everyone can customize their own plate. This is my favorite way to serve it because it allows for so much personalization. Think about creating a vibrant spread with:
- Crisp shredded lettuce for freshness.
- Diced ripe tomatoes for a burst of sweetness.
- A dollop of extra sour cream or a healthier Greek yogurt for tang and coolness.
- A spoonful of your favorite salsa – whether you prefer mild pico de gallo or a fiery habanero salsa.
- Creamy guacamole or fresh avocado slices for healthy fats and flavor.
- Thinly sliced jalapeños (fresh or pickled) for a spicy kick.
- Black olives for a savory, briny note.
- A sprinkle of fresh cilantro for a bright, herbaceous finish.
The combination of hot, savory casserole with cool, crisp toppings is absolutely divine.
- Storage Instructions: If by some miracle you have any leftovers, cover the baking dish tightly with plastic wrap or aluminum foil, or transfer portions to airtight containers. The Dorito Taco Casserole will keep well in the refrigerator for up to 3-4 days. While the Doritos might lose some of their crispness upon reheating, the flavors will still be fantastic. Reheat individual portions in the microwave until warmed through, or pop the entire dish (covered) back into a 300°F (150°C) oven until heated through, about 20-30 minutes.
Enjoy every single mouthwatering bite of your homemade Dorito Taco Casserole! It’s truly a crowd-pleaser and a perfect dish for family dinners, potlucks, or simply a cozy night in.
Conclusion:
And there you have it, friends! We’ve journeyed through the simple, yet utterly delightful, process of creating a dish that I genuinely believe will become a staple in your home: the incredible Dorito Taco Casserole. Why is this a must-try, you ask? Well, let me tell you. It’s more than just a meal; it’s an experience. Imagine a dish that brings together the comforting, familiar flavors of your favorite taco night with an unexpected, irresistible crunch that only Doritos can provide. It’s truly a symphony of textures and tastes, marrying the savory, well-seasoned ground meat (or your preferred protein) with creamy cheese, vibrant toppings, and that iconic, crispy, cheesy Dorito base and topping. This casserole isn’t just easy to assemble; it’s remarkably forgiving, making it perfect for busy weeknights when you need something satisfying without a fuss, or for those casual get-togethers where you want to impress without stress. It’s a guaranteed crowd-pleaser, appealing to kids and adults alike, transforming ordinary ingredients into something truly extraordinary. The minimal prep time and straightforward baking process mean you spend less time in the kitchen and more time enjoying delicious food and good company. Trust me, the aroma alone as it bakes will have everyone asking, “What’s for dinner?” with eager anticipation.
Now, let’s talk about making this already fantastic dish even more versatile and suited to your personal taste. While delicious straight out of the oven, served simply, there are so many ways to customize your Dorito Taco Casserole experience. For a complete meal, I love serving it alongside a fresh, crisp green salad with a zesty vinaigrette – the bright flavors cut beautifully through the richness of the casserole. A side of fluffy Mexican rice or a bowl of refried beans can also complement it wonderfully, turning it into a hearty feast. But don’t stop there! The real magic often happens with the toppings. Think of your favorite taco bar, and let your imagination run wild. A generous dollop of cool sour cream or a swirl of tangy Greek yogurt adds a lovely creaminess. Freshly made guacamole or sliced avocado provides a rich, buttery counterpoint, while a vibrant homemade salsa or even a store-bought pico de gallo brings a burst of freshness and acidity. Don’t forget the heat – a sprinkle of pickled jalapeños or a dash of your favorite hot sauce can kick things up a notch for those who like it spicy. A sprinkle of fresh cilantro, diced red onions, or even some black olives can add those final touches that elevate every bite. The beauty of this recipe is its adaptability.
Feeling adventurous and want to put your own spin on it? This recipe is incredibly adaptable! If you’re looking to lighten things up, consider using ground turkey or chicken instead of beef. For a fantastic vegetarian option, black beans or a mix of black beans and corn make a superb protein substitute, offering a delightful texture and earthy flavor. You could also experiment with different types of cheese – a blend of Monterey Jack and Pepper Jack would add an extra spicy kick, or a smoky cheddar could introduce a whole new dimension of flavor. Don’t shy away from adding in some extra vegetables right into the mix; sautéed bell peppers, corn, or even finely diced zucchini can boost the nutritional value and add more complexity. And speaking of Doritos, while Nacho Cheese is my go-to for that classic flavor, imagine the possibilities with Cool Ranch Doritos for a tangy twist, or Spicy Nacho for an extra layer of heat! Each variation offers a slightly different profile, allowing you to discover your absolute favorite version. It’s all about making this recipe truly yours, tailoring it to your family’s preferences and dietary needs. This truly is a recipe that keeps on giving, offering endless possibilities for culinary creativity.
So, what are you waiting for? I’ve shared all my tips and tricks, and now it’s your turn to unleash your inner chef. Gather your ingredients, put on your favorite tunes, and get ready to create something truly memorable. I promise you, the smiles around your dinner table will be all the thanks you need. After you’ve whipped up your very own batch of this delightful casserole, I would absolutely love to hear about your experience! Did you stick to the original recipe, or did you venture into some exciting variations? What toppings did you choose? Did it become an instant family favorite? Please, don’t hesitate to share your thoughts, your successes, and even your “oops” moments in the comments section below. I adore seeing your culinary creations, so if you snap a picture, consider sharing it on your social media and tagging me – I always get a thrill out of seeing how you bring these recipes to life. Your feedback and stories inspire me and our entire community of food lovers. This Dorito Taco Casserole is more than just a meal; it’s an invitation to create, share, and enjoy. Go forth and get baking, and prepare for a chorus of happy sighs around your dinner table!
Cheesy Dorito Taco Casserole Recipe – Family Favorite!
Dorito Taco Casserole is a culinary celebration: the satisfying crunch of Nacho Cheese Doritos layered with rich, seasoned ground beef, melty cheese, and baked to golden perfection. This dish beautifully embodies modern American culinary trends, combining universally adored taco and Dorito flavors into something spectacularly new. My sister-in-law brought this to a family potluck last summer, and my kids literally asked for seconds before trying anything else on the table. The combination of familiar taco flavors with the unexpected crunch of Doritos created something that felt both comforting and exciting, making it our go-to recipe for feeding a crowd where even the pickiest kids clean their plates without complaints.
Ingredients
-
1.5 pounds lean ground beef (85-90% lean recommended)
-
2 packets (1 oz each) taco seasoning
-
1/2 cup water
-
8 ounces cream cheese, softened
-
1/2 cup sour cream
-
2 large bags (approx. 9.25 oz each) Doritos Nacho Cheese Flavored Tortilla Chips
-
4 cups (16 ounces) shredded Mexican cheese blend
-
Optional: 1 medium yellow onion, finely chopped
-
Optional: 2 cloves garlic, minced
-
Optional: 1 (4 ounce) can diced green chiles, undrained
-
Optional: 1 (15 ounce) can black beans, rinsed and drained
-
Optional: 1 (15 ounce) can corn, drained
Instructions
-
Step 1
Brown 1.5 lbs ground beef in a large skillet over medium-high heat, breaking it up; drain fat. (Optional: Add chopped onion and minced garlic; sauté 3-5 minutes). Stir in taco seasoning and 1/2 cup water; simmer 5-7 minutes. Remove from heat, stir in softened cream cheese and sour cream until creamy. (Optional: Stir in diced green chiles). -
Step 2
Preheat oven to 375°F (190°C). Lightly spray a 9×13 inch baking dish. Crush one large bag of Doritos into coarse crumbs (about 4-5 cups) and spread half evenly across the bottom. Spoon the creamy beef mixture over the Dorito base. (Optional: Layer with rinsed black beans and drained corn). Sprinkle 2 cups of shredded Mexican cheese over the beef layer. Scatter the remaining crushed Doritos over the cheese, then top with the remaining 2 cups of shredded Mexican cheese. -
Step 3
Bake for 20-25 minutes, or until hot, bubbly, and the cheese is melted and lightly golden. If Doritos brown too quickly, tent with foil. Let the casserole rest for 5-10 minutes on a wire rack before serving. -
Step 4
Scoop generous portions onto plates. Serve with optional toppings like shredded lettuce, diced tomatoes, salsa, sour cream, guacamole, or sliced jalapeños. Store leftovers covered in the refrigerator for 3-4 days; reheat in microwave or oven.
Important Information
Nutrition Facts (Per Serving)
It is important to consider this information as approximate and not to use it as definitive health advice.
Allergy Information
Please check ingredients for potential allergens and consult a health professional if in doubt.


Leave a Comment