
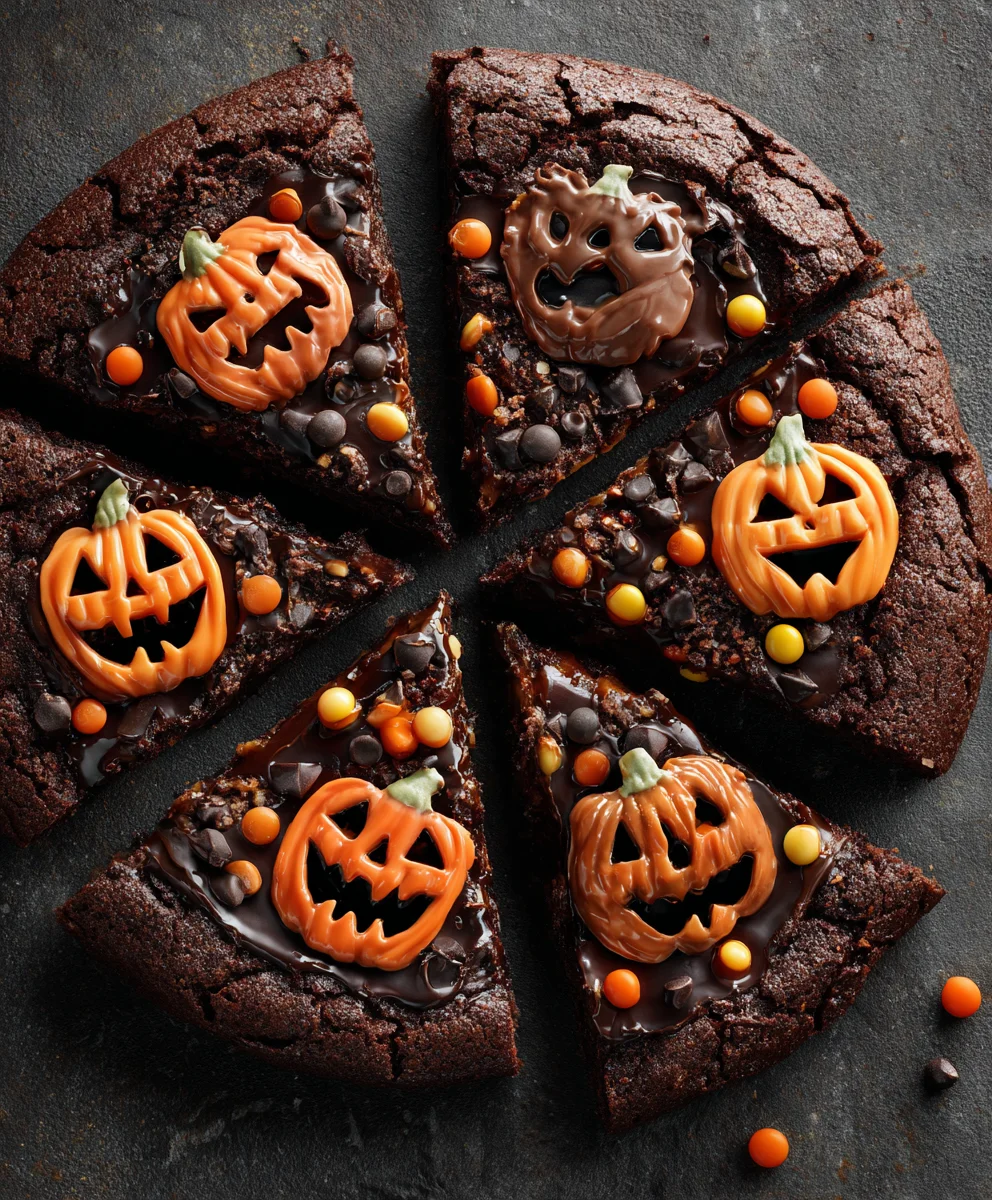
Happy Halloween Brownie Pizza—what could be more delightfully decadent and perfectly themed for the spooky season? As an avid home baker, I’ve always cherished the magic of creating treats that not only taste incredible but also capture the spirit of the occasion. This recipe is a true celebration, transforming a beloved classic into a festive masterpiece that promises to be the star of any Halloween gathering. Imagine the joy of presenting a giant, fudgy brownie, artfully decorated with ghoulishly good toppings, ready to be sliced and shared among friends and family, creating smiles and sweet memories.
While brownie pizzas might not have centuries of history, their charm lies in their modern appeal and the clever fusion of two universal favorites: brownies and pizza. Halloween, a time for playful frights and an abundance of sweets, provides the perfect canvas for such an imaginative treat. People absolutely adore this dish not only for its irresistible taste—a rich, dense brownie base topped with creamy frosting and an array of colorful candies—but also for its incredible shareability and visual appeal. It’s incredibly versatile, allowing for endless creative decorations, making it a fantastic activity for all ages. I guarantee this Happy Halloween Brownie Pizza will be an unforgettable addition to your holiday traditions, offering a blend of convenience, creativity, and pure chocolatey bliss that simply can’t be beat!
Ingredients:
For the Fudgy Brownie Base:
- 1 cup (226g) unsalted butter, melted and slightly cooled – I love using unsalted butter because it gives me complete control over the saltiness of my baked goods.
- 2 cups (400g) granulated sugar – This will give us that lovely sweet foundation for our “Happy Halloween Brownie Pizza.”
- 1 cup (200g) packed light brown sugar – The addition of brown sugar adds moisture, depth of flavor, and a wonderful chewiness that makes brownies truly irresistible.
- 4 large eggs – Make sure they’re at room temperature; this helps them emulsify better with the other ingredients, leading to a smoother batter.
- 2 teaspoons pure vanilla extract – Don’t skimp on the vanilla! It truly enhances all the chocolatey goodness.
- 1 ½ cups (180g) all-purpose flour – Measured by spooning into a cup and leveling off, or even better, by weight for accuracy.
- 1 cup (90g) unsweetened Dutch-processed cocoa powder – Dutch-processed cocoa is my secret for a super dark, rich, and less bitter brownie. It really makes the chocolate flavor pop for our “Happy Halloween Brownie Pizza.”
- 1 teaspoon baking powder – Just a touch to give our brownies a slight lift without making them cakey. We’re aiming for fudgy, after all!
- ½ teaspoon salt – Crucial for balancing the sweetness and intensifying the chocolate flavor.
- 1 cup (170g) semi-sweet chocolate chips or chunks (optional, but highly recommended for extra melty pockets) – Because more chocolate is always a good idea!
For the Spooky Cream Cheese Frosting:
- 8 ounces (226g) full-fat cream cheese, softened – Full-fat is key here for the best texture and flavor. Make sure it’s nice and soft for easy creaming.
- ½ cup (113g) unsalted butter, softened – Again, room temperature is your friend for a smooth, lump-free frosting.
- 4 cups (480g) powdered sugar, sifted – Sifting is a must to avoid any pesky lumps in your smooth, creamy frosting.
- 1 teaspoon pure vanilla extract – A classic addition that complements the tanginess of the cream cheese beautifully.
- Pinch of salt – Just a tiny bit to round out the flavors.
- Optional: Green, purple, or orange gel food coloring – For making different sections of your “Happy Halloween Brownie Pizza” even more festive!
For the Happy Halloween Toppings:
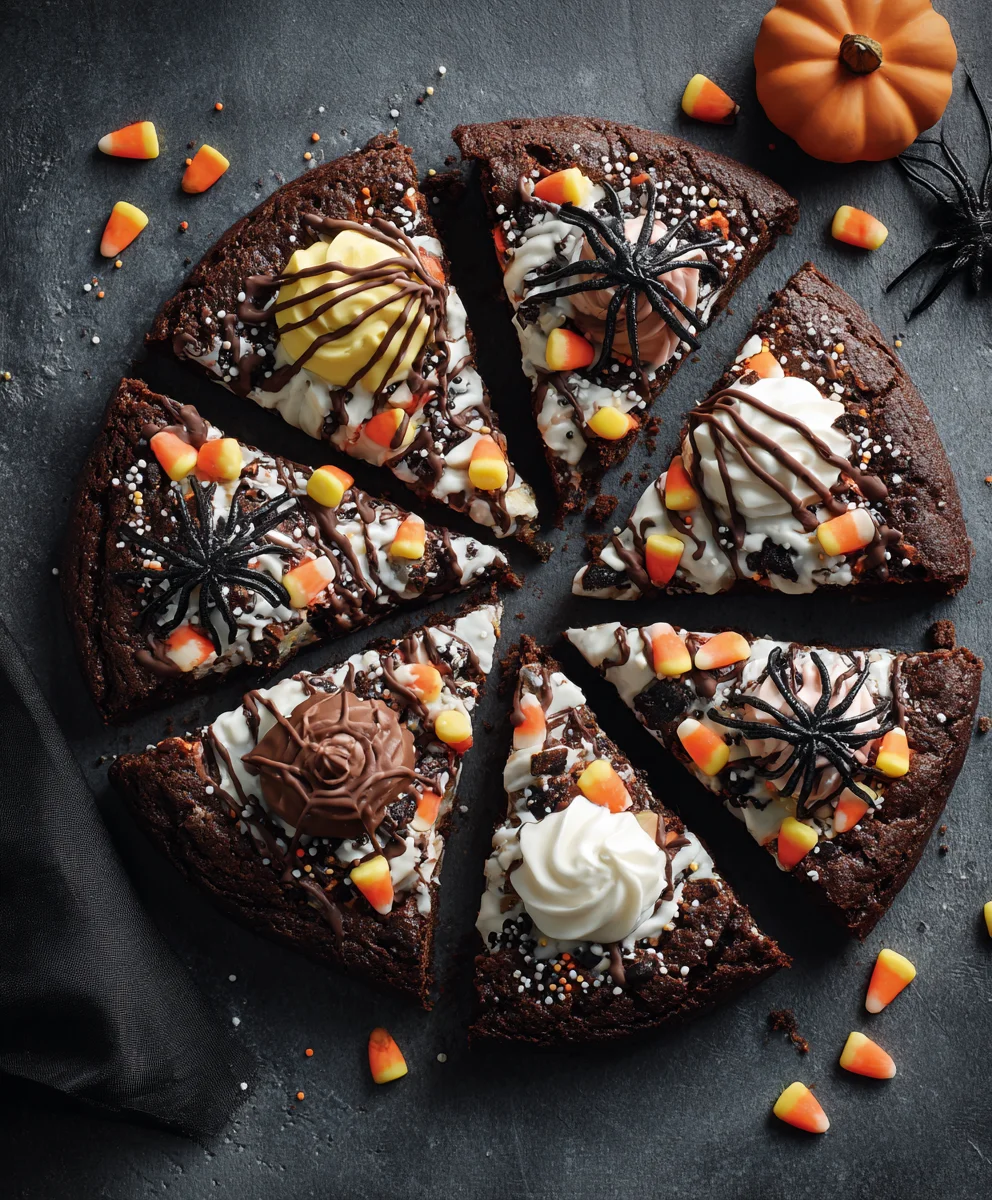
- Assorted Halloween candies: Think candy corn, gummy worms, gummy spiders, mini chocolate candies (like M&M’s in Halloween colors), chocolate eyeballs, mini Reese’s peanut butter cups. Get creative and gather all your favorites!
- Oreo cookies, crushed – These make fantastic “dirt” or “graveyard” scenes.
- Miniature pretzel sticks – Perfect for crafting tiny fences, broomsticks, or skeletal structures.
- White chocolate melts or chips – For drawing spooky spider webs, mummy wraps, or ghosts.
- Edible gel writing icing (black, orange) – For drawing fine details, spider legs, or spooky messages.
- Assorted Halloween sprinkles – For that extra festive sparkle.
- Chocolate syrup or melted chocolate – For drizzling or creating ghastly outlines.
Preparing the Happy Halloween Brownie Pizza Base:
- Preheat and Prepare: My first step for any baking adventure, especially for something as exciting as a “Happy Halloween Brownie Pizza,” is to preheat my oven to 350°F (175°C). While the oven gets nice and toasty, I grab a 12-inch round pizza pan or a large baking sheet (approximately 10×15 inches) and line it with parchment paper, leaving an overhang on the sides. This parchment paper sling will be your best friend when it comes to lifting the cooled brownie base out of the pan, making the assembly so much easier! I also lightly grease the parchment paper for good measure, just to ensure nothing sticks. A well-prepared pan is key to a perfectly baked brownie pizza.
- Melt the Butter and Sugars: In a large, microwave-safe bowl or a saucepan over low heat, I combine my melted unsalted butter, granulated sugar, and light brown sugar. If I’m using the microwave, I heat it in 30-second intervals, stirring well after each, until the butter is fully melted and the sugars are dissolving into the butter. If I’m on the stovetop, I gently stir until everything is combined and smooth. It’s important not to overheat it; we just want it melty and combined.
- Whisk in Wet Ingredients: Once the butter and sugar mixture is slightly cooled – it shouldn’t be piping hot, just warm enough to touch – I whisk in the eggs, one at a time, until each is fully incorporated. This process usually takes about a minute per egg, and I really make sure to beat it well after each addition. Then, I stir in the vanilla extract. You’ll notice the mixture starts to get glossy and a little lighter in color as you whisk. This aeration helps create that signature fudgy texture we want for our “Happy Halloween Brownie Pizza.”
- Combine Dry Ingredients: In a separate medium bowl, I whisk together the all-purpose flour, Dutch-processed cocoa powder, baking powder, and salt. I make sure there are no lumps in the cocoa powder, breaking them up with a whisk if needed. Sifting these dry ingredients together isn’t strictly necessary but definitely helps ensure even distribution and a lighter texture.
- Gently Fold in Dry Ingredients: Now, I add the dry ingredient mixture to the wet ingredient mixture in about two additions, folding gently with a spatula until just combined. It’s really important not to overmix here! Overmixing develops the gluten in the flour, which can lead to a tougher, more cake-like brownie, and we’re aiming for a super fudgy brownie base for our “Happy Halloween Brownie Pizza.” A few streaks of flour are perfectly fine.
- Add Chocolate Chips (Optional): If I’m using chocolate chips or chunks, I fold them in now. They melt into delicious pockets of chocolatey goodness, adding another layer of indulgence to our brownie pizza.
- Bake to Perfection: I pour the brownie batter into my prepared pizza pan or baking sheet, spreading it evenly with an offset spatula. I try to get it to an even thickness across the pan so it bakes uniformly. Then, I pop it into the preheated oven and bake for about 20-25 minutes. The exact baking time will depend on your oven and the thickness of your brownie. I’m looking for a brownie that is set around the edges but still a little gooey in the center when gently jiggled. A toothpick inserted into the center should come out with moist crumbs, not wet batter. Underbaking slightly is better than overbaking for a truly fudgy brownie!
- Cool Completely: Once baked, I remove the brownie from the oven and let it cool completely in the pan on a wire rack. This is arguably the hardest part of the process because the smell is absolutely divine, but patience is a virtue! It needs to be completely cool before frosting, otherwise, your beautiful cream cheese frosting will melt into a messy puddle. This cooling process can take a couple of hours. Once cool, I use the parchment paper overhang to carefully lift the brownie base onto a flat serving platter or cutting board. Now we have the perfect canvas for our “Happy Halloween Brownie Pizza!”
Crafting the Spooky Cream Cheese Frosting:
- Beat Cream Cheese and Butter: In a large mixing bowl, using an electric mixer (either hand-held or stand mixer fitted with a paddle attachment), I beat the softened cream cheese and softened unsalted butter together on medium speed until they are light, fluffy, and completely smooth. This usually takes about 2-3 minutes. Make sure there are no lumps of cream cheese remaining at this stage; a smooth base makes for a smooth frosting!
- Gradually Add Powdered Sugar: With the mixer on low speed, I gradually add the sifted powdered sugar, about a cup at a time, until it is all incorporated. Once all the sugar is in, I increase the speed to medium-high and beat for another 2-3 minutes until the frosting is incredibly light, airy, and fluffy. This beating process incorporates air, making the frosting wonderfully spreadable.
- Mix in Vanilla and Salt: Finally, I stir in the vanilla extract and a tiny pinch of salt. Beat for another 30 seconds to ensure everything is well combined. I taste it and adjust the sweetness or vanilla if necessary, although I usually find this ratio to be perfect.
- Optional: Color the Frosting: If I want to add some extra Halloween flair, I might divide the frosting into smaller bowls and add a few drops of gel food coloring – perhaps orange, green, or even purple – to create different colored sections for my “Happy Halloween Brownie Pizza.” I find gel colors work best as they don’t add much liquid, maintaining the frosting’s perfect consistency.
Assembling and Decorating Your Happy Halloween Brownie Pizza:
- Frost the Brownie Base: Now for the fun part! Once the brownie base is completely cool, I use an offset spatula or the back of a spoon to generously spread the cream cheese frosting evenly over the entire surface of the brownie. I usually leave about a half-inch border around the edge of the brownie unfrosted to give it that “pizza crust” look, but you can go right to the edge if you prefer. This smooth, creamy layer is the perfect canvas for your Halloween masterpiece.
- Plan Your Spooky Scene: Before just dumping on candies, I like to take a moment to visualize my “Happy Halloween Brownie Pizza” design. Do I want a spooky graveyard? A friendly pumpkin patch? A chaotic candy explosion? Having a rough idea helps me place the larger candies first and then fill in the gaps.
- Create Crushed Oreo “Dirt”: If I’m going for a graveyard scene, I take some crushed Oreo cookies and strategically sprinkle them in areas where I want “dirt.” This is great for creating a base for gummy worms to crawl out of or for placing tombstone cookies (made from rectangular biscuits frosted with gray icing).
- Arrange Larger Candies: I start by placing my larger Halloween candies, such as mini Reese’s cups (they make great little “pumpkins” or “graves”), chocolate eyeballs, or larger gummy creatures. I spread them out to ensure an even distribution of textures and flavors across the “Happy Halloween Brownie Pizza.”
-
Add Smaller Candies and Details: Next, I fill in the gaps with smaller candies like candy corn, Halloween-themed M&M’s, and assorted sprinkles. This is where I can really let my creativity shine.
- Spider Webs: For a spooky spider web, I’ll melt some white chocolate and drizzle it in concentric circles on a section of the frosting. Then, using a toothpick, I drag lines from the center outwards to create the web effect. I might place a gummy spider right in the middle!
- Mummy Wraps: To make a mummy, I’ll place an oval-shaped cookie or piece of candy and drizzle thin lines of white chocolate or use white gel icing across it, leaving a small gap for chocolate chip “eyes.”
- Tiny Fences/Broomsticks: Pretzel sticks are fantastic for creating mini fences around a “graveyard” section or for crafting tiny broomsticks for witches by attaching a small piece of licorice or candy corn for the bristles.
- Pumpkin Patch: Using orange candies or even orange-colored frosting, I can create little pumpkin shapes. Green edible gel icing can be used for vines.
- Use Edible Gel for Fine Details: Black edible gel writing icing is perfect for drawing spider legs, spooky faces on round candies, or writing “R.I.P.” on a tombstone. Orange gel can outline pumpkins or add fiery details.
- Final Touches and Drizzles: Once all the candies are placed, I might finish with a light drizzle of chocolate syrup or melted chocolate over the entire “Happy Halloween Brownie Pizza” for an extra touch of decadence and visual appeal. A final sprinkle of Halloween sprinkles always adds that perfect festive sparkle.
- Chill and Serve: To help the frosting set and keep all your spooky decorations in place, I recommend chilling the “Happy Halloween Brownie Pizza” in the refrigerator for at least 30 minutes before serving. This also makes it much easier to cut neat slices. Once chilled, slice it up like a pizza and watch everyone delight in your delicious and creative “Happy Halloween Brownie Pizza!” It’s truly a showstopper for any Halloween gathering.
Tips for a Perfectly Spooky Brownie Pizza:
- Room Temperature Ingredients are Crucial: For both the brownie batter and the frosting, make sure your butter, eggs, and cream cheese are at room temperature. This ensures everything combines smoothly and creates the best texture. Cold ingredients can lead to lumpy batter and frosting.
- Don’t Overbake the Brownies: For that ultimate fudgy texture, it’s better to slightly underbake your brownies than overbake them. A toothpick inserted should come out with moist crumbs, not liquid batter. Overbaked brownies become dry and cakey, which isn’t what we want for our “Happy Halloween Brownie Pizza.”
- Sift Your Powdered Sugar: Always sift your powdered sugar for the frosting. This simple step prevents annoying lumps and ensures a silky-smooth, easy-to-spread frosting.
- Get Creative with Toppings: The beauty of a “Happy Halloween Brownie Pizza” is its versatility. Don’t feel limited by the suggestions. Think about your favorite Halloween candies and how they can contribute to your spooky design. Small chocolate bars, licorice, even edible glitter can all be incorporated.
- Chill for Cleaner Slices: Chilling the assembled “Happy Halloween Brownie Pizza” for at least 30 minutes before cutting will make the frosting firm up, resulting in much cleaner and neater slices. This also helps prevent your decorations from sliding around.
- Make Ahead Option: You can bake the brownie base a day or two in advance and store it, unfrosted, in an airtight container at room temperature. The frosting can also be made a day ahead and stored in the refrigerator; just let it come to room temperature and re-whip it slightly before spreading. This makes assembly on party day a breeze!
- Involve the Kids: Decorating the “Happy Halloween Brownie Pizza” is a fantastic activity for kids! Lay out all the candies and let them help create their own spooky sections. It’s a fun, edible craft that everyone will enjoy.
- Consider a Border: When spreading your frosting, leaving about a half-inch border around the edge of the brownie gives it a more authentic “pizza crust” look. You can even sprinkle some extra brown sugar or cinnamon sugar on this border for a visual contrast.
- Storage: Store any leftover “Happy Halloween Brownie Pizza” in an airtight container in the refrigerator for up to 3-4 days. The cream cheese frosting needs to be kept cool to maintain its freshness and texture.
Conclusion:
So, there you have it! We’ve journeyed through the simple steps to create a truly spectacular treat, and I hope you’re as excited as I am about it. This isn’t just any ordinary dessert; it’s a celebration in edible form. What makes this recipe an absolute must-try, you ask? Well, for starters, it effortlessly combines the rich, decadent chewiness of a perfect brownie with the playful, customizable fun of a pizza. It’s a dessert that truly has it all: deep chocolate flavor, a wonderfully fudgy texture, and an irresistible array of vibrant toppings that make it as much a feast for the eyes as it is for the palate. I truly believe that once you try this recipe, it will become a staple in your celebratory baking repertoire. It’s remarkably forgiving for novice bakers, yet still impressive enough to wow even the most seasoned dessert connoisseurs. The joy of spreading that rich, creamy frosting and then letting your creativity run wild with an assortment of candies and sprinkles is something truly special. This recipe transforms a simple brownie into a show-stopping centerpiece, proving that baking deliciousness doesn’t have to be complicated. It’s about bringing smiles to faces, and trust me, this dessert delivers on that promise every single time.
Serving Up Your Masterpiece: Tips and Tricks
Once your incredible creation is ready, the serving possibilities are as delightful as the dessert itself. Of course, the classic way to enjoy it is sliced into generous wedges, just like a traditional pizza. I love serving it slightly warm, perhaps after just a few minutes out of the oven, when the chocolate is still beautifully melty and the toppings are perfectly set. But honestly, it’s equally phenomenal served chilled straight from the fridge; the fudginess intensifies, making it an even more satisfying chew. For an extra touch of indulgence, consider serving a slice with a scoop of vanilla bean ice cream or a dollop of freshly whipped cream. The cool, creamy contrast against the warm, rich brownie is simply heavenly. A drizzle of chocolate syrup or caramel sauce never hurts either! It’s also fantastic with a hot cup of coffee or a cold glass of milk, making it a perfect afternoon pick-me-up or a satisfying end to any meal. This dessert is incredibly versatile, adapting to whatever mood or occasion you’re celebrating, proving it’s more than just a sweet treat – it’s an adaptable delight.
Unleash Your Inner Baker: Exciting Variations!
Now, here’s where the real fun begins – personalizing your brownie pizza! While the base recipe is perfect as is, I always encourage you to get creative and make it your own. For starters, think about the toppings. While we focused on a specific theme, you can absolutely swap out candies for any holiday or personal preference. Imagine a sprinkle of crushed peppermint candies and white chocolate chips for a festive winter version, or perhaps some red and pink M&M’s and heart-shaped sprinkles for Valentine’s Day. Don’t limit yourself to just candies; mini chocolate chips, chopped nuts (like pecans or walnuts for an added crunch), pretzels for a salty-sweet twist, or even fresh berries (strawberries, raspberries) can all add wonderful dimensions. You could also experiment with the frosting flavor – a cream cheese frosting with a hint of orange zest, a peanut butter frosting for a richer profile, or even a mocha frosting for coffee lovers would be incredible. For those who love a bit of sparkle, edible glitter or colorful sprinkles can elevate its visual appeal even further. And if you’re feeling adventurous, why not try different brownie bases? A mint-chocolate brownie, an espresso-infused brownie, or even a blonde brownie (brown sugar-based) could offer a completely new flavor experience. You could also transform this into mini brownie pizzas using a muffin tin, perfect for individual servings at a party. The possibilities are truly endless, allowing you to tailor this treat to any taste or theme you can dream up!
Your Turn to Shine: Share Your Happy Halloween Brownie Pizza!
I genuinely hope that reading through this recipe has inspired you to grab your apron and get baking. There’s something so incredibly satisfying about creating something delicious from scratch, especially when it brings joy to those you share it with. This particular recipe, the Happy Halloween Brownie Pizza, is designed to be a delightful experience from start to finish – easy to follow, fun to customize, and utterly delicious to devour. Don’t be shy; give it a try! I am so excited for you to experience the rich, chocolatey goodness and the pure joy of decorating your very own edible masterpiece. Once you’ve baked up your batch, I would absolutely love to see your creations! Please share your photos and tell me all about your experience. Did you try a new topping combination? Did you make it for a special gathering? Your feedback and shared experiences inspire me and the entire baking community. So, go ahead, preheat that oven, gather your ingredients, and prepare for a truly sweet adventure. I can’t wait to hear how much you loved making and sharing this fantastic dessert. Happy baking, everyone!
Happy Halloween Brownie Pizza – Spooky Dessert!
Transform a beloved classic into a festive masterpiece with this Happy Halloween Brownie Pizza recipe. A giant, fudgy brownie base, artfully decorated with creamy frosting and ghoulishly good candies, perfect for any spooky gathering. It’s incredibly versatile, allowing for endless creative decorations, making it a fantastic activity for all ages.
Ingredients
-
1 cup (226g) unsalted butter, melted and slightly cooled
-
2 cups (400g) granulated sugar
-
1 cup (200g) packed light brown sugar
-
4 large eggs, room temperature
-
2 teaspoons pure vanilla extract
-
1 ½ cups (180g) all-purpose flour
-
1 cup (90g) unsweetened Dutch-processed cocoa powder
-
1 teaspoon baking powder
-
½ teaspoon salt
-
1 cup (170g) semi-sweet chocolate chips or chunks (optional)
-
8 ounces (226g) full-fat cream cheese, softened
-
½ cup (113g) unsalted butter, softened
-
4 cups (480g) powdered sugar, sifted
-
1 teaspoon pure vanilla extract (for frosting)
-
Pinch of salt (for frosting)
-
Optional: Green, purple, or orange gel food coloring
-
Assorted Halloween candies (candy corn, gummy worms, mini chocolate candies, chocolate eyeballs, mini Reese’s)
-
Oreo cookies, crushed
-
Miniature pretzel sticks
-
White chocolate melts or chips
-
Edible gel writing icing (black, orange)
-
Assorted Halloween sprinkles
-
Chocolate syrup or melted chocolate
Instructions
-
Step 1
Preheat oven to 350°F (175°C). Line a 12-inch round pizza pan or 10×15 inch baking sheet with parchment paper, leaving an overhang; lightly grease. -
Step 2
In a large bowl, combine melted unsalted butter, granulated sugar, and light brown sugar. Stir until combined and smooth. -
Step 3
Once butter-sugar mixture is slightly cooled, whisk in eggs one at a time until incorporated. Stir in vanilla extract. -
Step 4
In a separate bowl, whisk together all-purpose flour, Dutch-processed cocoa powder, baking powder, and salt. Ensure no lumps. -
Step 5
Gently fold dry ingredients into wet mixture in two additions until just combined (do not overmix). Fold in chocolate chips if using. -
Step 6
Pour batter into prepared pan, spreading evenly. Bake for 20-25 minutes, until edges are set and center is slightly gooey (a toothpick should have moist crumbs). -
Step 7
Remove from oven and let brownie cool completely in the pan on a wire rack for a couple of hours. Lift onto a serving platter using the parchment paper. -
Step 8
In a large mixing bowl, beat softened cream cheese and unsalted butter on medium speed until light and smooth (2-3 minutes). Gradually add sifted powdered sugar on low speed, then increase to medium-high and beat until light and fluffy (2-3 minutes). Stir in vanilla extract and a pinch of salt. Optionally, divide and color with gel food coloring. -
Step 9
Once the brownie is completely cool, spread cream cheese frosting evenly over the surface. Leave a half-inch border around the edge for a “pizza crust” look. -
Step 10
Plan your spooky design. Sprinkle crushed Oreo cookies for “dirt.” Arrange larger candies like Reese\ -
Step 11
Chill the assembled brownie pizza in the refrigerator for at least 30 minutes to set the frosting and decorations. Slice like a pizza and serve.
Important Information
Nutrition Facts (Per Serving)
It is important to consider this information as approximate and not to use it as definitive health advice.
Allergy Information
Please check ingredients for potential allergens and consult a health professional if in doubt.
Leave a Comment