
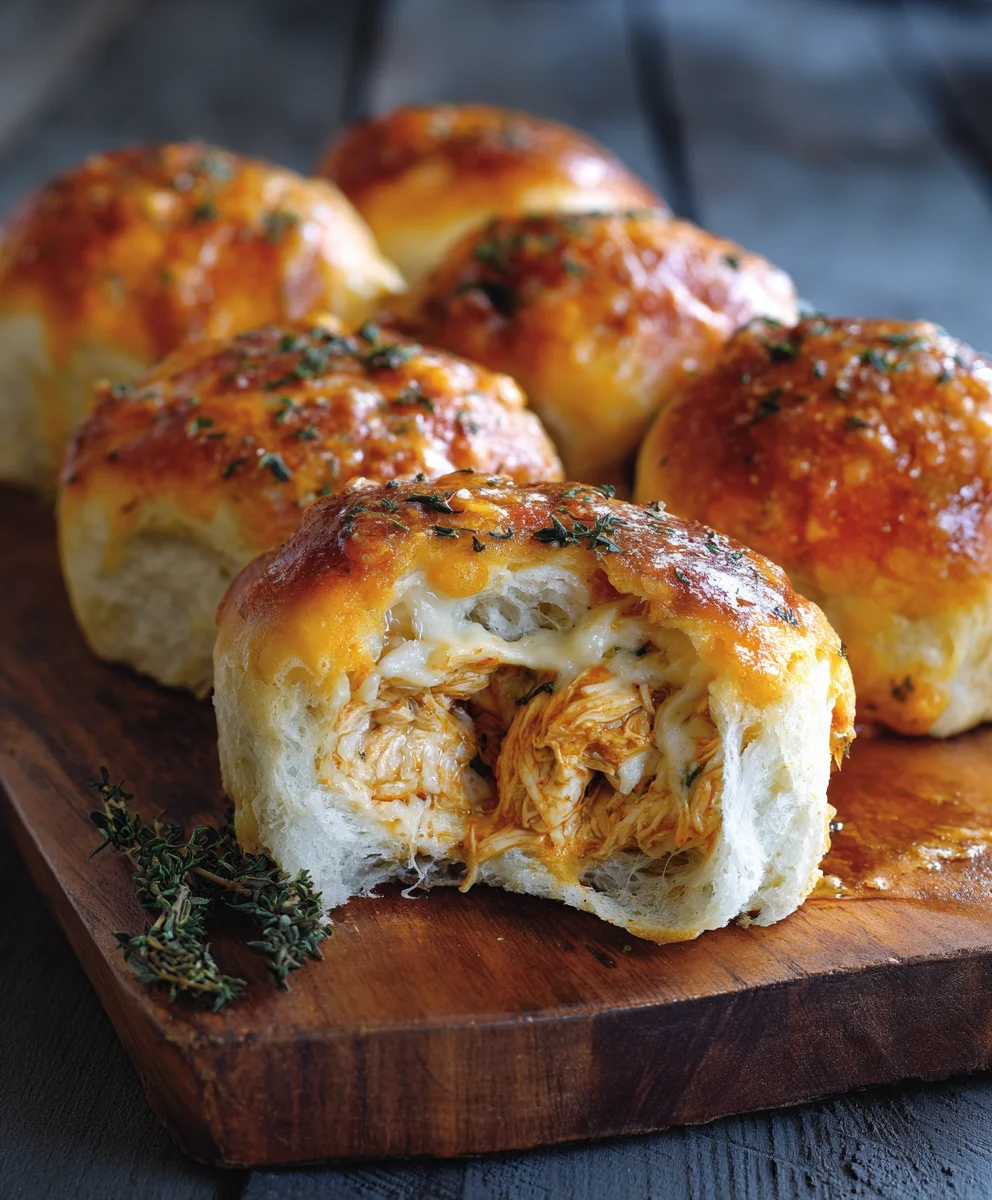
Cheesy Dynamite Chicken Buns are not merely a recipe; they are an invitation to an unforgettable culinary adventure, promising a burst of flavor in every single bite. Imagine the perfect blend of tender, seasoned chicken, infused with just the right amount of spicy zest, all lovingly nestled within a cloud-soft, golden bun. And then, the grand finale: a generous, molten blanket of gooey cheese, baked to golden perfection, creating a symphony of textures and tastes that is truly irresistible.
While the specific creation of these delightful buns is a testament to modern culinary innovation, they draw inspiration from a beloved global tradition of savory baked goods, evolving from classic comfort food concepts to create something uniquely dynamic. This dish takes the familiar warmth of a bun and elevates it with bold, contemporary flavors that cater to a yearning for exciting new experiences.
People absolutely adore these Cheesy Dynamite Chicken Buns for countless reasons. It’s the ultimate comfort food with a thrilling kick! The “dynamite” in their name isn’t just a catchy phrase; it genuinely reflects the explosion of taste – a harmonious balance of savory, spicy, and utterly cheesy notes that dance on your palate. Whether you’re planning a lively gathering, seeking an extraordinary snack, or simply craving a flavour-packed meal, these buns deliver. Their convenient size makes them perfect for appetizers, lunchboxes, or a quick, satisfying bite, making them a true crowd-pleaser and a firm favourite in any home.
Ingredients:
- For the Dough:
- 3 ½ cups (about 420g) all-purpose flour, plus more for dusting
- ¼ cup (50g) granulated sugar
- 1 teaspoon salt
- 1 packet (2 ¼ teaspoons or 7g) active dry yeast
- ½ cup (120ml) warm milk (105-115°F / 40-46°C)
- ½ cup (120ml) warm water (105-115°F / 40-46°C)
- 1 large egg, room temperature
- ¼ cup (56g) unsalted butter, melted and cooled slightly
- For the Dynamite Chicken Filling:
- 2 large boneless, skinless chicken breasts (about 1.5 lbs / 680g total)
- ½ cup (120ml) mayonnaise
- ¼ cup (60ml) sweet chili sauce
- 2-3 tablespoons Sriracha sauce (adjust to your spice preference)
- 1 tablespoon honey or maple syrup (optional, for balance)
- ½ teaspoon garlic powder
- ¼ teaspoon onion powder
- Salt and freshly ground black pepper to taste
- 1 cup (110g) shredded mozzarella cheese
- ½ cup (55g) shredded sharp cheddar cheese
- ¼ cup (about 40g) finely diced red onion
- ¼ cup (about 40g) finely diced green bell pepper (optional, for color and crunch)
- 2 tablespoons chopped fresh cilantro or green onions (for garnish, optional)
- For the Egg Wash:
- 1 large egg, beaten
- 1 tablespoon milk or water
Preparing the Dynamite Chicken Filling
- Cook the Chicken: My preferred method for succulent chicken in these “Cheesy Dynamite Chicken Buns” is to gently poach it. Place the chicken breasts in a medium saucepan and cover them with cold water. Add a pinch of salt and bring to a gentle simmer over medium heat. Reduce the heat to low, cover the pan, and let it cook for about 12-15 minutes, or until the chicken is cooked through and reaches an internal temperature of 165°F (74°C). Alternatively, you can bake or pan-fry the chicken until cooked, then shred it.
- Shred the Chicken: Once cooked, remove the chicken from the liquid and let it cool slightly. Using two forks, shred the chicken into small, bite-sized pieces. You can also use a stand mixer with the paddle attachment on low speed for a few seconds to shred the chicken effortlessly. This fine shredding ensures the chicken distributes evenly throughout our dynamite sauce, making every bite of the “Cheesy Dynamite Chicken Buns” perfectly flavorful.
- Prepare the Dynamite Sauce: In a large mixing bowl, combine the mayonnaise, sweet chili sauce, Sriracha (start with 2 tablespoons and add more if you like extra heat!), honey (if using), garlic powder, and onion powder. Whisk everything together until the sauce is smooth and well-combined. This is where the magic happens, creating that signature dynamite flavor! Taste the sauce and adjust the Sriracha or sweet chili as needed to achieve your desired balance of spicy and sweet.
- Combine the Filling: Add the shredded chicken to the bowl with the dynamite sauce. Toss gently to ensure every piece of chicken is thoroughly coated. Next, fold in the shredded mozzarella cheese, shredded sharp cheddar cheese, finely diced red onion, and the optional finely diced green bell pepper. Mix everything until just combined. You want the cheese to be integrated but not melted at this stage. Season with a little salt and freshly ground black pepper to taste. Cover the bowl and refrigerate the filling while you prepare the bun dough. This allows the flavors to meld beautifully and makes the filling easier to handle later when we stuff our “Cheesy Dynamite Chicken Buns.”
Making the Bun Dough
- Activate the Yeast: In a small bowl, combine the warm milk, warm water, and 1 teaspoon of the granulated sugar. Sprinkle the active dry yeast over the liquid. Give it a gentle stir and let it sit for 5-10 minutes. You’ll know your yeast is active and ready when it becomes foamy and bubbly on top, indicating that it’s alive and well, ready to make our “Cheesy Dynamite Chicken Buns” wonderfully fluffy. If it doesn’t foam, your yeast might be old or the water wasn’t the right temperature, and you’ll need to start again with fresh yeast.
- Combine Dry Ingredients: In a large mixing bowl (or the bowl of a stand mixer fitted with the dough hook attachment), whisk together the remaining granulated sugar, salt, and 3 cups of the all-purpose flour. Reserve the remaining ½ cup of flour for kneading.
- Mix Wet and Dry Ingredients: Once the yeast mixture is foamy, add it to the dry ingredients. Crack in the room temperature egg and pour in the melted and slightly cooled butter. Mix on low speed (or by hand with a sturdy spoon) until the ingredients just come together to form a shaggy dough.
-
Knead the Dough:
- Using a Stand Mixer: Increase the speed to medium-low and knead for 8-10 minutes. The dough will start off sticky but should eventually pull away from the sides of the bowl and become smooth, elastic, and slightly tacky to the touch. Add the reserved ½ cup of flour, a tablespoon at a time, only if the dough is excessively sticky and not coming together. You might not need all of it.
- Kneading by Hand: Turn the shaggy dough out onto a lightly floured surface. Begin to knead, folding the dough over itself and pushing it away with the heel of your hand, then rotating and repeating. Knead for about 12-15 minutes, or until the dough is smooth, elastic, and passes the windowpane test (where you can stretch a small piece of dough thin enough to see light through it without tearing). Use the reserved flour sparingly, just enough to prevent sticking.
Achieving the right dough consistency is crucial for light and airy “Cheesy Dynamite Chicken Buns.”
- First Proofing: Lightly grease a large bowl with a little oil. Place the kneaded dough into the bowl, turning it once to coat the entire surface with oil. Cover the bowl tightly with plastic wrap or a clean kitchen towel. Place it in a warm, draft-free place for 1 to 1 ½ hours, or until the dough has doubled in size. A slightly warm oven (turned off, with just the light on) or a sunny spot on your counter works perfectly. Patience here is key for that beautiful rise!
Assembling the Cheesy Dynamite Chicken Buns
- Prepare for Shaping: Once the dough has doubled, gently punch it down to release the air. Turn the dough out onto a lightly floured surface. Knead it lightly for about 30 seconds to deflate it completely and create a uniform texture.
- Divide the Dough: Divide the dough into 12 equal pieces. For best results and uniform “Cheesy Dynamite Chicken Buns,” I recommend using a kitchen scale to weigh the dough and divide it evenly (each piece should be approximately 60-70g). Roll each piece into a smooth ball. Cover the dough balls loosely with plastic wrap or a kitchen towel to prevent them from drying out while you work.
- Shape and Fill the Buns: Take one dough ball and, on a lightly floured surface, roll it out into a circle about 4-5 inches (10-12 cm) in diameter. The edges can be slightly thinner than the center.
- Add the Filling: Spoon about 2-3 tablespoons of the chilled dynamite chicken filling into the center of the rolled-out dough. Don’t overfill, or it will be difficult to seal! Make sure you have enough space around the edges to seal the bun effectively. The generous amount of cheese in the filling will melt beautifully inside these “Cheesy Dynamite Chicken Buns.”
- Seal the Buns: Bring the edges of the dough up around the filling and pinch them together tightly at the top to form a sealed bun. You can gather the dough into a pleat pattern, or simply pull the edges together and pinch firmly. Once sealed, gently shape the bun into a smooth, round ball. Ensure there are no gaps where the filling could escape during baking. A well-sealed bun guarantees all that delicious cheesy dynamite chicken stays safely tucked inside.
- Arrange on Baking Sheets: Line two large baking sheets with parchment paper. Place the shaped “Cheesy Dynamite Chicken Buns” on the prepared baking sheets, leaving about 2-3 inches (5-7 cm) of space between each bun to allow for expansion during the second proofing and baking.
- Second Proofing: Cover the baking sheets loosely with plastic wrap or clean kitchen towels. Let the buns rise in a warm, draft-free place for another 30-45 minutes, or until they look visibly puffy and have increased in size by about 50%. This second rise is important for achieving that fluffy, soft texture in our “Cheesy Dynamite Chicken Buns.”
Baking the Buns
- Preheat Oven: While the buns are on their second proof, preheat your oven to 375°F (190°C).
- Prepare Egg Wash: In a small bowl, whisk together the beaten egg and milk or water. This egg wash will give our “Cheesy Dynamite Chicken Buns” a beautiful golden-brown, glossy finish.
- Apply Egg Wash: Once the buns have proofed sufficiently, gently brush the tops of each bun with the egg wash. Be careful not to deflate them. If desired, you can sprinkle a few sesame seeds on top for an extra touch of texture and flavor, though it’s completely optional.
- Bake the Buns: Place the baking sheets in the preheated oven. Bake for 18-22 minutes, or until the “Cheesy Dynamite Chicken Buns” are beautifully golden brown on top and cooked through. If you notice one tray browning faster, rotate the trays halfway through baking. The aroma filling your kitchen will be absolutely incredible!
- Cool and Serve: Once baked, remove the buns from the oven and transfer them to a wire rack to cool slightly. While they are tempting to devour immediately, giving them a few minutes to cool allows the filling to set and prevents you from burning your mouth on that piping hot, cheesy dynamite chicken. These “Cheesy Dynamite Chicken Buns” are best served warm, when the cheese is still gooey and the chicken filling is wonderfully flavorful.
Conclusion:
Well, there you have it, friends! We’ve journeyed through the steps, savored the anticipation, and now, it’s time to truly appreciate what we’ve created. This isn’t just another recipe; it’s an invitation to experience an explosion of flavors and textures that will undoubtedly become a new favorite in your culinary repertoire. I genuinely believe that these Cheesy Dynamite Chicken Buns are a must-try for anyone who appreciates a harmonious blend of creamy, spicy, and savory notes, all encased in a delightfully soft, pillowy bun. The magic truly happens when that initial warmth of the bun gives way to the tender, zestful chicken filling, followed by the irresistible pull of melted cheese, and then, that perfect kick of “dynamite” spice that tantalizes your taste buds without overwhelming them. It’s a symphony of sensations that makes every bite an absolute pleasure, leaving you craving just one more.
What makes this dish so utterly captivating is its ability to deliver on multiple fronts. It’s comforting, exciting, and deeply satisfying all at once. Imagine the aroma filling your kitchen as these golden-brown beauties emerge from the oven – it’s enough to get anyone’s mouth watering! I’ve seen firsthand how these buns disappear at gatherings, how they spark conversations, and how they bring smiles to faces. There’s something inherently joyful about food that’s both playful in its name and serious in its flavor profile. So, if you’re looking for a dish that truly stands out, one that offers a unique and memorable eating experience, I can’t recommend giving these a go strongly enough. They are a testament to how simple ingredients, combined with a little love and the right technique, can transform into something truly extraordinary.
Now, let’s talk about how you can make these even more spectacular, or tailor them to your specific preferences. When it comes to serving, these Cheesy Dynamite Chicken Buns are incredibly versatile. They shine brightly as the star of a casual dinner, perhaps alongside a crisp, cooling side salad with a tangy vinaigrette, or a simple bowl of creamy tomato soup to balance the spice. For game day or a potluck, they are an absolute showstopper, easily prepared in advance and baked right before serving. You could even offer a small bowl of ranch or blue cheese dressing on the side for those who prefer to temper the heat slightly, or a dab of extra hot sauce for the true spice enthusiasts. Don’t underestimate their potential as an impressive appetizer at your next gathering; they’re perfectly portioned and easy to handle, making them ideal finger food that guests will rave about.
Exploring Delicious Variations
The beauty of a fantastic recipe often lies in its adaptability, and this one is no exception. If you’re looking to adjust the spice level, it’s wonderfully simple. For a milder version, reduce the amount of sriracha or omit the cayenne pepper entirely, opting for a sweeter chili sauce if you still want a hint of warmth. Conversely, if you’re a heat-seeker, feel free to amp up the sriracha, add a pinch of ghost pepper powder (use sparingly!), or even include some finely diced jalapeños or habaneros in your chicken mixture for an extra fiery kick. The cheese component also offers a playground for experimentation. While cheddar and Monterey Jack provide that classic gooey richness, imagine the vibrant zest of pepper jack for an added internal spice, the nutty undertones of smoked gouda, or the luxurious melt of provolone. A blend of cheeses can also create a more complex flavor profile, so feel free to mix and match your favorites!
Beyond the core components, consider other delightful additions or substitutions. If you prefer a leaner protein, chicken breast works beautifully when shredded, though I find the juiciness of chicken thighs adds an unparalleled depth of flavor. For a vegetarian twist, consider using shredded jackfruit or finely minced mushrooms cooked in a similar spicy, creamy sauce – the texture mimics chicken surprisingly well! You could also fold in some finely diced bell peppers (red or yellow for sweetness), a handful of corn kernels for a touch of sweetness and texture, or some chopped green onions or cilantro for a fresh, herbaceous finish. And while our recipe calls for a specific bun, don’t hesitate to experiment with different types of dinner rolls or even homemade dough if you’re feeling adventurous. The possibilities are truly endless, allowing you to make this recipe uniquely yours, reflecting your own culinary flair and taste preferences.
So, now it’s your turn! I’ve shared my passion for these delightful buns, walked you through the process, and even given you some ideas for how to make them your own. The next step is for you to roll up your sleeves, gather your ingredients, and dive into the joyful experience of creating them. Trust me, the effort will be richly rewarded with every savory, spicy, and cheesy bite. There’s immense satisfaction in preparing food that brings so much joy, and I promise you, these Cheesy Dynamite Chicken Buns will do exactly that. They’re more than just a meal; they’re an experience waiting to happen, a culinary adventure that promises to delight your senses and impress anyone you share them with.
Once you’ve had a chance to whip up a batch, I would absolutely love to hear about your experience! Did you stick to the original recipe, or did you put your own spin on it? What were your favorite parts? Did you discover a new serving suggestion or a brilliant variation that you think others should try? Please don’t hesitate to share your stories, your photos, and any tips you picked up along the way in the comments below. Your insights not only inspire me but also help build a vibrant community of fellow food lovers. Let’s spread the deliciousness and encourage everyone to discover the magic of these incredible buns. Happy cooking, and I can’t wait to hear all about your Cheesy Dynamite Chicken Buns adventure!
Cheesy Dynamite Chicken Buns
Experience an explosion of flavor with Cheesy Dynamite Chicken Buns! Tender, spicy chicken and gooey cheese are baked to golden perfection inside cloud-soft buns, making for an irresistible snack or meal. These buns promise a burst of flavor in every bite, perfect for any occasion.
Ingredients
-
3 ½ cups (420g) all-purpose flour, plus more for dusting
-
¼ cup (50g) granulated sugar
-
1 teaspoon salt
-
1 packet (2 ¼ tsp / 7g) active dry yeast
-
½ cup (120ml) warm milk (105-115°F / 40-46°C)
-
½ cup (120ml) warm water (105-115°F / 40-46°C)
-
1 large egg, room temperature
-
¼ cup (56g) unsalted butter, melted and cooled slightly
-
2 large boneless, skinless chicken breasts (approx. 1.5 lbs / 680g)
-
½ cup (120ml) mayonnaise
-
¼ cup (60ml) sweet chili sauce
-
2-3 tablespoons Sriracha sauce (adjust to spice)
-
1 tablespoon honey or maple syrup (optional)
-
½ teaspoon garlic powder
-
¼ teaspoon onion powder
-
Salt and freshly ground black pepper to taste
-
1 cup (110g) shredded mozzarella cheese
-
½ cup (55g) shredded sharp cheddar cheese
-
¼ cup (40g) finely diced red onion
-
¼ cup (40g) finely diced green bell pepper (optional)
-
2 tablespoons chopped fresh cilantro or green onions (optional)
-
1 large egg, beaten (for egg wash)
-
1 tablespoon milk or water (for egg wash)
Instructions
-
Step 1
Cook chicken breasts by poaching (12-15 min to 165°F), baking, or pan-frying. Shred cooled chicken into small pieces. In a large bowl, whisk mayonnaise, sweet chili sauce, Sriracha (start with 2 tbsp), honey (optional), garlic powder, and onion powder until smooth. Add shredded chicken, mozzarella, cheddar, red onion, and optional bell pepper to sauce. Mix gently, season to taste, then refrigerate. -
Step 2
In a small bowl, combine warm milk, warm water, and 1 tsp granulated sugar. Sprinkle yeast over liquid, stir, and let sit 5-10 minutes until foamy. -
Step 3
In a large mixing bowl (or stand mixer), whisk remaining sugar, salt, and 3 cups flour. Add foamy yeast mixture, egg, and melted butter. Mix until a shaggy dough forms. Knead dough (8-10 min with mixer, 12-15 min by hand) until smooth, elastic, and slightly tacky. Use reserved flour sparingly if needed. -
Step 4
Lightly grease a large bowl. Place dough, turn to coat, cover with plastic wrap/towel, and let rise in a warm, draft-free place for 1 to 1 ½ hours, or until doubled in size. -
Step 5
Gently punch down dough. Turn onto a lightly floured surface, knead lightly for 30 seconds. Divide dough into 12 equal pieces (approx. 60-70g each), roll into smooth balls, and cover. Roll one dough ball into a 4-5 inch (10-12 cm) circle. Spoon 2-3 tablespoons of chilled filling into the center. Bring dough edges up and pinch tightly to seal, forming a smooth, round bun. Ensure no gaps. -
Step 6
Line two large baking sheets with parchment paper. Place shaped buns 2-3 inches apart. Cover loosely and let rise in a warm, draft-free place for 30-45 minutes, or until visibly puffy (about 50% larger). -
Step 7
Preheat oven to 375°F (190°C). Whisk 1 beaten egg with 1 tbsp milk/water for egg wash. Gently brush tops of proofed buns with egg wash; optional: sprinkle with sesame seeds. Bake for 18-22 minutes until golden brown. Rotate trays halfway through if needed. -
Step 8
Remove from oven, transfer to a wire rack to cool slightly. Serve warm for best gooey, flavorful results.
Important Information
Nutrition Facts (Per Serving)
It is important to consider this information as approximate and not to use it as definitive health advice.
Allergy Information
Please check ingredients for potential allergens and consult a health professional if in doubt.


Leave a Comment