
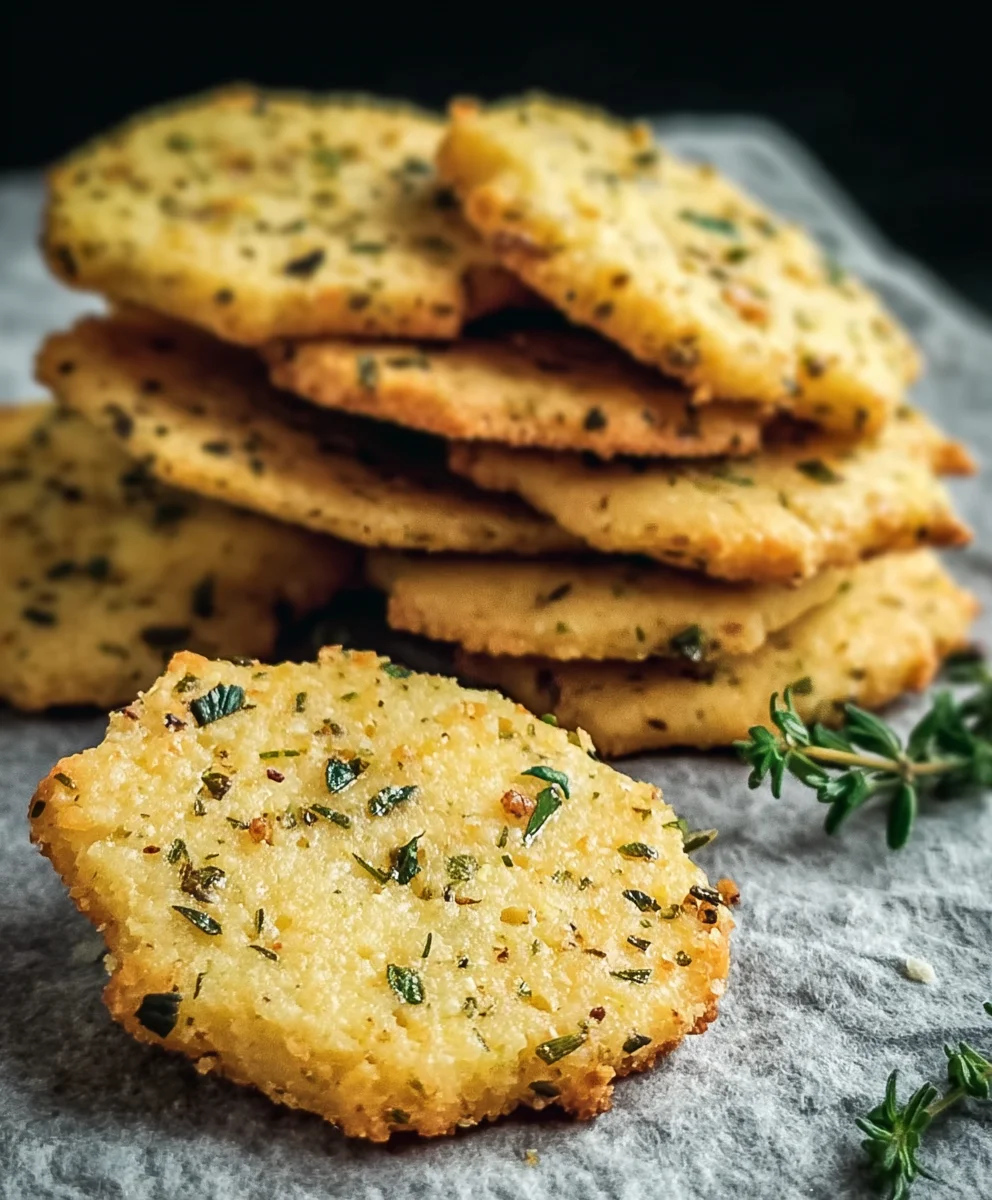
Garlic and Herb Chickpea Flour Snack Crackerss are more than just a simple snack; they’re a testament to how humble ingredients can transform into something truly extraordinary. Imagin extracte the satisfying crunch, the aromatic burst of garlic and savory herbs, all delivered in a delightfully healthy package. It’s no wonder these crackers have become a go-to for so many, offering a guilt-free way to curb those mid-afternoon cravings or add a flavorful crunch to a cheese board. What sets these Garlic and Herb Chickpea Flour Snack Crackerss apart is their incredible versatility and the fact that they are naturally gluten-free and packed with plant-based protein, thanks to the star ingredient, chickpea flour. They’re the perfect canvas for your favorite dips or delicious enough to enjoy all on their own. Get ready to ditch the store-bought options and embrace the simple joy of homemade goodness with this fantastic recipe.

Ingredients:
- 1 cup chickpea flour (besan), approximately 120g
- ½ cup water, approximately 120ml
- 2 tablespoons olive oil, plus extra for brushing
- 1 teaspoon dried mixed herbs (I like a blend of rosemary, thyme, and oregano for a classic flavor)
- 1 teaspoon garlic powder
- ½ teaspoon salt
- ¼ teaspoon black pepper
- Sesame seeds, for sprinkling
- Flaky sea salt, for finishing
- Additional dried herbs, for sprinkling
Making the Dough
Step 1: Combining Dry Ingredients
First things first, let’s get our dry ingredients ready. In a medium-sized mixing bowl, add the chickpea flour. Chickpea flour, also known as besan, is the star of our Garlic and Herb Chickpea Flour Snack Crackers. It gives them a wonderful nutty flavor and a pleasingly crisp texture. Next, measure out your dried mixed herbs. I find a good blend of rosemary, thyme, and oregano works beautifully, but feel free to experiment with your favorites. Add these herbs to the bowl along with the garlic powder. The garlic powder will infuse our crackers with a lovely savory aroma and taste. Now, carefully add the salt and black pepper. This combination of spices will form the flavor base for our delicious snack crackers. Give all these dry ingredients a good whisk or stir with a fork to ensure they are thoroughly combined. This step is crucial for even distribution of flavors throughout the cracker dough.
Step 2: Incorporating Wet Ingredients
Now it’s time to introduce the wet ingredients to our dry mix. Pour the 2 tablespoons of olive oil into the bowl with the dry ingredients. Olive oil not only adds richness and helps bind the dough, but it also contributes to the crispiness of the final crackers. After the oil, gradually add the water. It’s important to add the water slowly, about a quarter cup at a time, while mixing. You want to achieve a thick, cohesive dough, but avoid making it too wet or sticky. Chickpea flour absorbs liquid differently depending on humidity and brand, so it’s best to gauge the consistency. Use a spoon or a spatula to mix everything together initially. Once it starts to come together, you might find it easier to use your hands to knead it into a ball. The dough should be firm but pliable, similar to playdough consistency. If it feels too dry and crum extractbly, add another teaspoon of water. If it’s too sticky, you can dust your hands with a tiny bit more chickpea flour.
Shaping and Baking the Crackers
Step 3: Rolling Out the Dough
This is where we start to shape our Garlic and Herb Chickpea Flour Snack Crackers. Lightly flour your work surface with a little chickpea flour or use a piece of parchment paper. Place the dough ball onto the floured surface. Now, we need to roll it out thinly. I recommend using a rolling pin for this. Aim for a thickness of about 1/8 inch (around 3mm). The thinner you roll the dough, the crispier your crackers will be. If you don’t have a rolling pin, you can also use a clean glass bottle or even gently press and flatten the dough with your hands, though a rolling pin will give you more even results. Work carefully to avoid tearing the dough, especially around the edges. If the dough starts to stick, dust the rolling pin and the surface with a little more chickpea flour. Parchment paper is a great aid here as it prevents sticking and makes transferring the dough easier.
Step 4: Scoring and Seasoning
Once your dough is rolled out to the desired thinness, it’s time to score and season. Before cutting, use a pizza cutter or a sharp knife to gently score the dough into your desired cracker shapes. You can make squares, rectangles, or even fun shapes if you have cookie cutters. Scoring ensures that the crackers will break apart easily after baking, preventing jagged edges. Now, for the extra flair! Lightly brush the surface of the rolled-out dough with a little extra olive oil. This will help the seeds and finishing salts adhere beautifully. Sprinkle generously with sesame seeds. These add a lovely nutty crunch and visual appeal. Then, add a scattering of additional dried herbs over the top. Finally, and this is a must for fantastic flavor, sprinkle with flaky sea salt. The flaky salt provides little bursts of salty goodness and a delightful texture contrast. Be generous with the seasonings, as this is where the Garlic and Herb flavor really shines.
Step 5: Baking to Golden Perfection
Preheat your oven to 375°F (190°C). Carefully transfer the scored and seasoned dough onto a baking sheet. If you rolled the dough out on parchment paper, you can simply slide the paper onto the baking sheet. Bake for approximately 15-20 minutes. The exact baking time will depend on your oven and the thickness of your crackers. Keep a close eye on them, especially during the last few minutes. You’re looking for them to be golden brown around the edges and firm to the touch. They should sound hollow when tapped gently. If you notice some areas browning faster than others, you can rotate the baking sheet halfway through the baking time. Once they are perfectly baked and crispy, remove them from the oven. Let them cool on the baking sheet for a few minutes to firm up further before transferring them to a wire rack to cool completely. This cooling process is vital for achieving that satisfying crunchiness that makes these Garlic and Herb Chickpea Flour Snack Crackers so addictive.
Conclusion:
There you have it – a simple yet incredibly satisfying recipe for Garlic and Herb Chickpea Flour Snack Crackerss! These delightful crackers are a testament to how wholesome ingredients can create something truly delicious. We’ve covered the easy steps to achieve a wonderfully crisp texture and a burst of savory flavor. Now, it’s your turn to bring these Garlic and Herb Chickpea Flour Snack Crackerss to life in your own kitchen. Don’t be afraid to experiment and make them your own!
These versatile crackers are perfect for dipping into your favorite hummus or guacamole, serving alongside a fresh salad, or enjoying on their own as a light and healthy snack. For a different twist, consider adding a pinch of smoked paprika for a smoky undertone, or finely chopped sun-dried tomatoes for a sweet and tangy kick.
We encourage you to give these Garlic and Herb Chickpea Flour Snack Crackerss a try. You’ll be amazed at how quickly they become a go-to snack in your household. Happy baking!
Frequently Asked Questions:
Q1: How should I store these Garlic and Herb Chickpea Flour Snack Crackerss to keep them crispy?
To maintain their crispiness, store the cooled Garlic and Herb Chickpea Flour Snack Crackerss in an airtight container at room temperature. You can also place a small piece of paper towel in the container to absorb any excess moisture. They should stay fresh for up to a week.
Q2: Can I make these crackers gluten-free?
Yes, absolutely! The recipe for Garlic and Herb Chickpea Flour Snack Crackerss is naturally gluten-free as it uses chickpea flour. Just ensure that any other ingredients you add, like herbs or spices, are also certified gluten-free if you have celiac disease or a severe gluten sensitivity.
Garlic Herb Chickpea Flour Crackers
Easy and delicious savory crackers made with chickpea flour, infused with garlic and herbs, perfect for snacking.
Ingredients
-
1 cup chickpea flour (besan), approximately 120g
-
½ cup water, approximately 120ml
-
2 tablespoons olive oil, plus extra for brushing
-
1 teaspoon dried mixed herbs
-
1 teaspoon garlic powder
-
½ teaspoon salt
-
¼ teaspoon black pepper
-
Sesame seeds, for sprinkling
-
Flaky sea salt, for finishing
-
Additional dried herbs, for sprinkling
Instructions
-
Step 1
Combine chickpea flour, dried mixed herbs, garlic powder, salt, and black pepper in a mixing bowl. Whisk until well combined. -
Step 2
Add 2 tablespoons of olive oil to the dry ingredients. Gradually add water, mixing until a thick, cohesive dough forms. Knead into a firm but pliable ball. Adjust with more chickpea flour or water if needed. -
Step 3
Lightly flour a work surface or parchment paper. Roll out the dough thinly, about 1/8 inch (3mm) thick. Aim for an even thickness for crispier crackers. -
Step 4
Score the dough into desired cracker shapes using a pizza cutter or sharp knife. Lightly brush the surface with extra olive oil. Sprinkle generously with sesame seeds, additional dried herbs, and flaky sea salt. -
Step 5
Preheat oven to 375°F (190°C). Transfer the dough to a baking sheet. Bake for 15-20 minutes, or until golden brown around the edges and firm. Rotate the baking sheet halfway through if needed. -
Step 6
Let the crackers cool on the baking sheet for a few minutes, then transfer to a wire rack to cool completely until crisp.
Important Information
Nutrition Facts (Per Serving)
It is important to consider this information as approximate and not to use it as definitive health advice.
Allergy Information
Please check ingredients for potential allergens and consult a health professional if in doubt.


Leave a Comment