
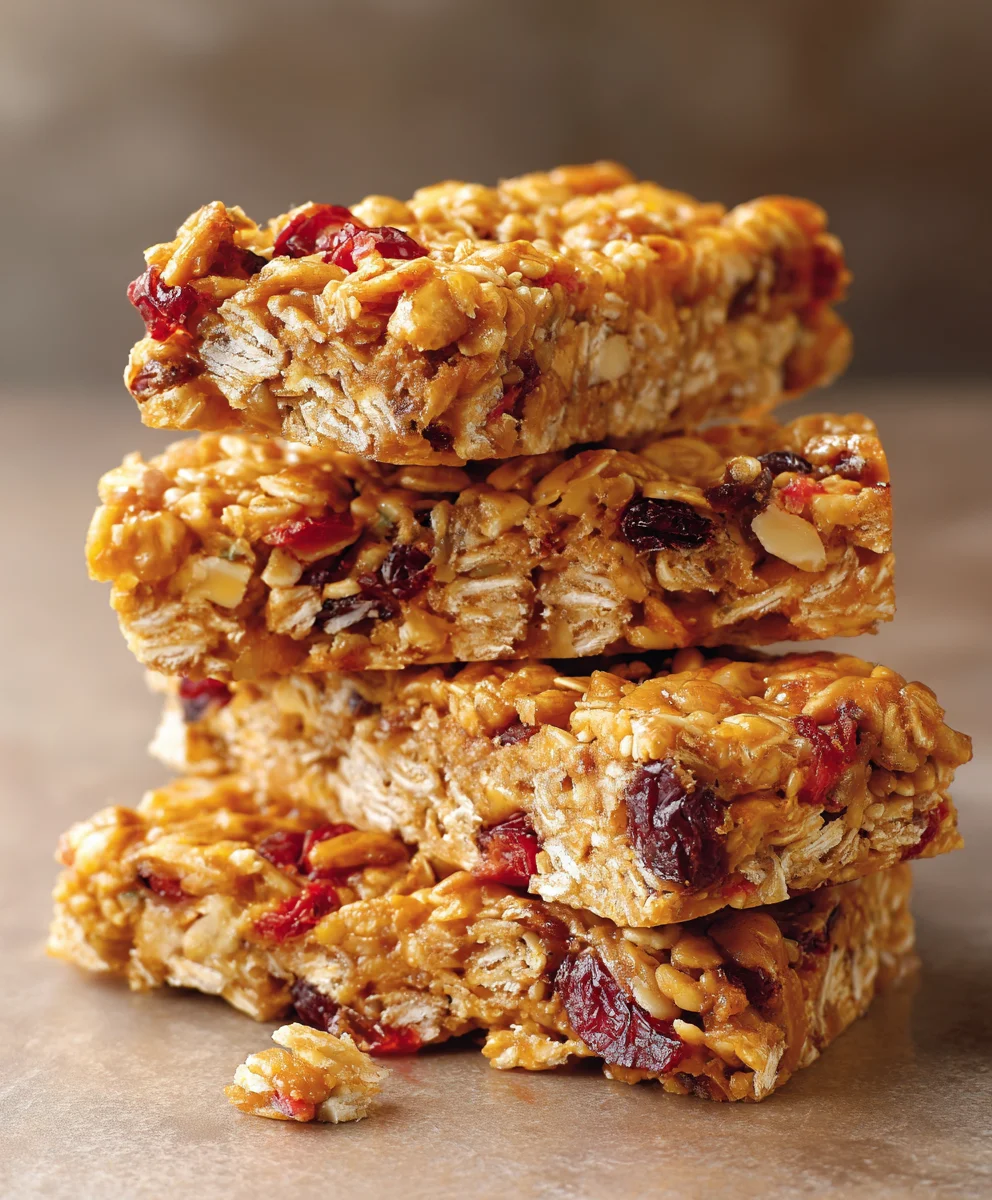
Chewy Granola Bars are more than just a snack; they are a delightful invitation to wholesome goodness and convenient energy. Originating from the healthful grain movement of the 19th century, granola evolved from a simple breakfast cereal into the portable, power-packed bar we know and love today. While the concept of a baked grain cluster dates back, the convenience of the bar form truly cemented its place in modern busy lives, becoming a staple for active individuals and busy families alike. I find them to be the quintessential balance of nutrition and pure enjoyment.
What makes a truly great granola bar? For me, it’s that irresistible, chewy texture combined with a harmonious blend of oats, nuts, and dried fruits. There’s an unmatched satisfaction in biting into a homemade treat that’s both nourishing and incredibly flavorful. These bars are perfect for a quick breakfast, a midday energy boost, or even a post-workout refuel, offering a customizable, healthier alternative to many store-bought options. The sheer versatility and the ability to tailor them to your personal taste are just some of the reasons I believe everyone should master this recipe.
Preparing your own batch of Chewy Granola Bars allows you to control the ingredients, ensuring a wholesome and utterly delicious outcome every single time.

Ingredients:
- For the Dry Base:
- 3 cups (270g) old-fashioned rolled oats (not instant or quick-cooking oats, as these won’t provide the same chewy texture)
- 1 cup (120g) mixed nuts, roughly chopped (I love a combination of almonds, walnuts, and pecans for varied texture and flavor)
- ½ cup (60g) unsweetened shredded coconut (optional, but adds a lovely tropical note and chewiness)
- ¼ cup (30g) chia seeds or ground flax seeds (for extra nutrition and binding properties)
- ¼ cup (30g) sunflower seeds or pumpkin seeds (pepitas)
- ½ teaspoon ground cinnamon (enhances warmth and flavor)
- ¼ teaspoon sea salt (balances the sweetness and brings out other flavors)
- For the Wet Binder:
- ½ cup (120ml) honey or pure maple syrup (for natural sweetness and that essential stickiness)
- ½ cup (100g) packed light brown sugar (contributes to moisture, chewiness, and depth of flavor)
- ¼ cup (60g) unsalted butter or coconut oil, melted (adds richness and helps bind everything together)
- 1 teaspoon pure vanilla extract (a must for enhancing all the other flavors)
- For the Mix-ins (Add After Heating Wet Binder):
- 1 cup (150g) dried fruit, roughly chopped if large (e.g., cranberries, cherries, apricots, raisins – choose your favorites for a burst of flavor and chew)
- ½ cup (90g) chocolate chips or mini chocolate chips (optional, but highly recommended for a touch of indulgence – milk, semi-sweet, or dark work beautifully)
Preparation Phase 1: Preparing and Toasting Your Dry Ingredients for Ultimate Flavor and Chewy Granola Bars
- Preheat and Prepare Your Baking Pan: First things first, let’s get our oven ready. Preheat your oven to 300°F (150°C). Then, line a 9×13 inch baking pan with parchment paper, making sure the paper hangs over the sides. This “sling” will make it incredibly easy to lift your finished chewy granola bars out of the pan later. Lightly grease the parchment paper with a little cooking spray or butter to prevent any sticking. Trust me, this small step makes a huge difference in the long run!
- Toast the Oats and Nuts for Enhanced Flavor: In a large baking sheet, spread your 3 cups of old-fashioned rolled oats and 1 cup of chopped mixed nuts in an even layer. Pop this into your preheated oven and toast for 10-15 minutes, stirring once halfway through. We’re looking for a lovely golden-brown color and a wonderfully fragrant, nutty aroma. This toasting step is absolutely crucial for creating truly flavorful and crisp-on-the-outside, chewy-on-the-inside granola bars. It deepens their flavor profile significantly and contributes to that desirable texture. Keep a close eye on them, as nuts can go from perfectly toasted to burnt quite quickly! Once toasted, remove them from the oven and transfer them immediately to a very large mixing bowl to cool slightly.
- Combine Dry Ingredients: To your large bowl with the warm, toasted oats and nuts, add the ½ cup shredded coconut (if using), ¼ cup chia or flax seeds, ¼ cup sunflower or pumpkin seeds, ½ teaspoon ground cinnamon, and ¼ teaspoon sea salt. Give everything a really good stir with a large spoon or spatula until all the dry ingredients are uniformly combined. We want an even distribution of all these wonderful textures and flavors in every bite of our future chewy granola bars. Set this bowl aside while we prepare the binder.
Preparation Phase 2: Crafting the Sticky Sweet Binder for Your Perfect Chewy Granola Bars
- Melt and Simmer the Wet Ingredients: In a medium-sized saucepan, combine ½ cup honey or maple syrup, ½ cup packed light brown sugar, and ¼ cup unsalted butter or melted coconut oil. Place the saucepan over medium heat. Stir continuously as the butter melts and the sugar dissolves. Once the mixture starts to bubble gently around the edges, reduce the heat to low and let it simmer for about 2-3 minutes, stirring occasionally. This simmering time is critical for achieving the perfect chewy texture for your granola bars. It allows the sugars to fully dissolve and slightly thicken, creating a robust, sticky binder that will hold everything together beautifully without being overly hard or crumbly once cooled. If you don’t simmer it long enough, your bars might be too crumbly; if you simmer it too long or at too high a heat, they could become too hard. We’re aiming for a slightly thickened, syrupy consistency.
- Stir in the Vanilla: Once the 2-3 minutes of simmering are up, remove the saucepan from the heat. Carefully stir in 1 teaspoon of pure vanilla extract. The aroma alone is enough to get your mouth watering! Be gentle, as the hot mixture will release steam.
Combining and Pressing: Bringing Your Chewy Granola Bars to Life
- Combine Wet and Dry Mixtures: Immediately pour the warm, sticky wet binder mixture from the saucepan over the dry ingredients in your large mixing bowl. Using a sturdy spatula or a wooden spoon, mix everything together thoroughly. It might seem like there isn’t enough liquid at first, but keep mixing patiently. You want every single oat, nut, and seed to be coated evenly with the sweet, sticky binder. This thorough coating is fundamental to ensuring your chewy granola bars hold together and have that consistent, satisfying chewiness throughout.
- Gently Fold in Mix-ins: Now it’s time to add your dried fruit and optional chocolate chips. Gently fold in 1 cup of chopped dried fruit and ½ cup of chocolate chips (if using) into the mixture. Mix just until they are evenly distributed. We add these delicate ingredients last to prevent them from getting overly mushy or melting prematurely from the residual heat of the mixture.
- Press Firmly into the Prepared Pan: Transfer the entire mixture into your parchment-lined 9×13 inch baking pan. This next step is perhaps the most important for density and chewiness! Using the back of your spatula, a flat-bottomed glass, or even your clean hands (I like to dampen my hands slightly to prevent sticking), press the mixture down very firmly and evenly into the pan. You want to compact it as much as possible, leaving no air pockets. The harder you press, the denser and chewier your granola bars will be, and the less likely they are to crumble when cut. Ensure the surface is as flat and uniform as you can make it. This creates a solid foundation for those perfect chewy granola bars.
Baking and Cooling: The Patience Pays Off for Perfect Chewy Granola Bars
- Bake to Perfection: Place the baking pan into your preheated 300°F (150°C) oven. Bake for 25-30 minutes. The edges should appear lightly golden brown, and the center should look set and slightly firm when gently pressed. Be careful not to overbake, as this can lead to hard, crunchy granola bars rather than the chewy texture we’re aiming for. We want them to still feel a little soft in the center when you take them out, as they will firm up considerably as they cool. This slight underbaking is key to their chewiness.
- Crucial Cooling Phase 1 (In the Pan): Once baked, remove the pan from the oven and place it on a wire rack. Here’s another golden rule for amazing chewy granola bars: let them cool completely in the pan for at least 2-3 hours, or even better, overnight. Resist the urge to cut them immediately! Cooling slowly in the pan allows the binder to fully set and firm up, preventing your bars from crumbling when you cut them. This extended cooling period is what truly locks in that desired chewy texture. If you try to cut them warm, they will fall apart. Patience is truly a virtue here!
- Crucial Cooling Phase 2 (Out of the Pan): Once completely cooled and firm to the touch, use the parchment paper overhang to carefully lift the entire slab of granola from the pan onto a large cutting board. Gently peel away the parchment paper.
Cutting and Storing Your Homemade Chewy Granola Bars
- Cut into Bars: Now for the satisfying part! Using a sharp, large knife, cut the granola slab into your desired bar size. I usually go for 12-16 bars, making them about 1.5 to 2 inches wide and 4-5 inches long. For a clean cut, you can wipe your knife clean between cuts, especially if you have melty chocolate chips involved. These are now ready to be enjoyed! Every bite promises a delightful blend of flavors and that wonderfully satisfying chew.
- Storage for Lasting Freshness: Store your homemade chewy granola bars in an airtight container at room temperature for up to one week. If you want them to last longer, you can individually wrap them in plastic wrap or parchment paper and store them in the refrigerator for up to two weeks, or even freeze them for up to three months. If frozen, simply let them thaw at room temperature for a few minutes before enjoying. They are perfect for a quick breakfast, a midday snack, or a wholesome treat after a workout. Enjoy the fruits of your labor!
Conclusion:
And there you have it, my friends! I truly believe that this recipe isn’t just another set of instructions; it’s an invitation to experience pure, unadulterated snack bliss. What we’ve crafted together here goes far beyond the average snack bar you might grab off a store shelf. This recipe offers an unparalleled combination of textures and flavors that dance on your palate with every single bite. Imagine a perfect balance of wholesome oats, delightful crunch from nuts, and the soft, yielding chewiness that makes you reach for another. It’s the kind of treat that doesn’t just satisfy a craving but genuinely makes you feel good about what you’re eating. I’ve refined this method over countless batches, ensuring that each step contributes to that ultimate, satisfying outcome. This isn’t just a recipe; it’s a labor of love, designed to deliver maximum enjoyment with minimal fuss. You’ll be amazed at how simple it is to achieve such a professional-quality, delicious result right in your own kitchen.
The beauty of these bars lies in their incredible versatility and their inherent ability to fit into almost any part of your day. They are the ideal grab-and-go solution for those frantic mornings when you need a quick, energy-boosting breakfast but simply don’t have the time for anything elaborate. Pack one in your bag for that much-needed mid-morning pick-me-up at the office, or tuck them into lunchboxes for a wholesome and exciting treat for the kids – or yourself! I often find myself enjoying one with my afternoon coffee, savoring the delightful texture as a moment of peace in a busy day. For a more indulgent twist, try crumbling a bar over a bowl of Greek yogurt with some fresh berries; it adds a wonderful textural contrast and an extra layer of flavor that elevates a simple snack into something truly special.
Elevate Your Snack Game with Creative Variations!
One of my favorite things about baking is the freedom to experiment, and this recipe is incredibly forgiving and open to your personal touches. Don’t be afraid to make it your own! Here are a few ideas to get your creative juices flowing:
Nutty Substitutions:
If almonds aren’t your preference, feel free to swap them out for pecans, walnuts, cashews, or even a mix of your favorite nuts. Each type will lend a unique flavor profile, allowing you to tailor the bars to your precise taste. For those with nut allergies, sunflower or pumpkin seeds are excellent alternatives, providing that desired crunch without the common allergens.
Fruity Additions:
While I love the simplicity of this version, dried fruits can add a lovely burst of sweetness and chewiness. Consider adding a quarter cup of chopped dried cranberries, cherries, apricots, or even some finely diced dates. Just remember to chop them small enough so they distribute evenly throughout the mix.
Chocolate Lovers’ Dream:
For an extra treat, stir in a handful of mini chocolate chips, white chocolate chunks, or even some chopped dark chocolate. The warmth of the bars right out of the oven will slightly melt the chocolate, creating pockets of gooey deliciousness. It’s a game-changer if you have a sweet tooth!
You could also experiment with different spices, like a pinch of cinnamon or nutmeg, to add a comforting warmth, especially if you’re leaning towards more autumnal flavors. The possibilities are truly endless, and that’s what makes this recipe so incredibly rewarding!
So, what are you waiting for? I’ve shared all my secrets and tips, and now it’s your turn to bring this magic to life in your kitchen. I can’t emphasize enough how much joy these Chewy Granola Bars bring to my family and me, and I’m absolutely confident they will do the same for yours. Imagine the delightful aroma filling your home as they bake, the anticipation building as they cool, and finally, that first glorious bite. It’s a truly satisfying experience from start to finish. I genuinely encourage you to roll up your sleeves, gather your ingredients, and give this recipe a go this week. It’s incredibly rewarding to create something so delicious and wholesome with your own two hands. And please, please, please – once you’ve made them and tasted the amazing results, don’t keep it to yourself! I would absolutely love to hear about your experience. Share your thoughts, your photos, your variations, or any questions you might have in the comments section below. Your feedback and creativity inspire me and our entire community of home bakers. Happy baking, and I can’t wait to hear how much you love your homemade granola bars!
Chewy Granola Bars: Delicious & Healthy Snack!
More than just a snack, these chewy granola bars are a delightful invitation to wholesome goodness and convenient energy. This recipe, inspired by a ten-year-old’s quest for candy-filled bars, delivers a perfectly sweet, adaptable, and satisfying treat. With a harmonious blend of oats, nuts, and dried fruits, plus a touch of chocolate chips or M&Ms, they’re ideal for a quick breakfast, an energy boost, or a post-workout refuel. Control your ingredients for a healthier, utterly delicious outcome every time. They’re so good, you might need to hide them from your teenagers!
Ingredients
-
3 cups (270g) old-fashioned rolled oats
-
1 cup (120g) mixed nuts, chopped
-
½ cup (60g) unsweetened shredded coconut (optional)
-
¼ cup (30g) chia seeds or ground flax seeds
-
¼ cup (30g) sunflower seeds or pumpkin seeds
-
½ teaspoon ground cinnamon
-
¼ teaspoon sea salt
-
½ cup (120ml) honey or pure maple syrup
-
½ cup (100g) packed light brown sugar
-
¼ cup (60g) unsalted butter or coconut oil, melted
-
1 teaspoon pure vanilla extract
-
1 cup (150g) dried fruit, chopped
-
½ cup (90g) chocolate chips, M&Ms, or mini peanut butter cups (optional)
Instructions
-
Step 1
Preheat oven to 300°F (150°C). Line a 9×13 inch baking pan with parchment paper, leaving an overhang, and lightly grease it. Spread oats and nuts on a baking sheet; toast for 10-15 minutes until golden and fragrant. Transfer to a large mixing bowl to cool. -
Step 2
To the bowl with toasted oats and nuts, add shredded coconut (if using), chia/flax seeds, sunflower/pumpkin seeds, cinnamon, and sea salt. Stir well until uniformly combined. -
Step 3
In a medium saucepan, combine honey/maple syrup, brown sugar, and melted butter/coconut oil. Heat over medium heat, stirring until butter melts and sugar dissolves. Once gently bubbling, reduce heat to low and simmer for 2-3 minutes, stirring occasionally, to thicken. Remove from heat and stir in vanilla extract. -
Step 4
Immediately pour the warm wet binder over the dry ingredients. Mix thoroughly with a sturdy spatula until every ingredient is evenly coated. Gently fold in chopped dried fruit and chocolate chips/M&Ms (if using) until distributed. -
Step 5
Transfer the mixture to the prepared baking pan. Using a spatula or flat-bottomed glass, press the mixture down very firmly and evenly into the pan, compacting it as much as possible to ensure dense, chewy bars that hold together. -
Step 6
Bake for 25-30 minutes until edges are lightly golden and the center is set but still slightly soft. Do not overbake. Remove from oven and cool completely in the pan on a wire rack for at least 2-3 hours, or preferably overnight. This crucial step allows the binder to set fully. -
Step 7
Once completely cooled and firm, use the parchment overhang to lift the slab onto a cutting board. Peel away parchment. Cut into 12-16 bars. Store in an airtight container at room temperature for up to one week, or in the refrigerator for up to two weeks. For longer storage, individually wrap bars in parchment paper (not plastic wrap, to avoid sticking when frozen) and freeze for up to three months; thaw at room temperature before enjoying.
Important Information
Nutrition Facts (Per Serving)
It is important to consider this information as approximate and not to use it as definitive health advice.
Allergy Information
Please check ingredients for potential allergens and consult a health professional if in doubt.
Leave a Comment