
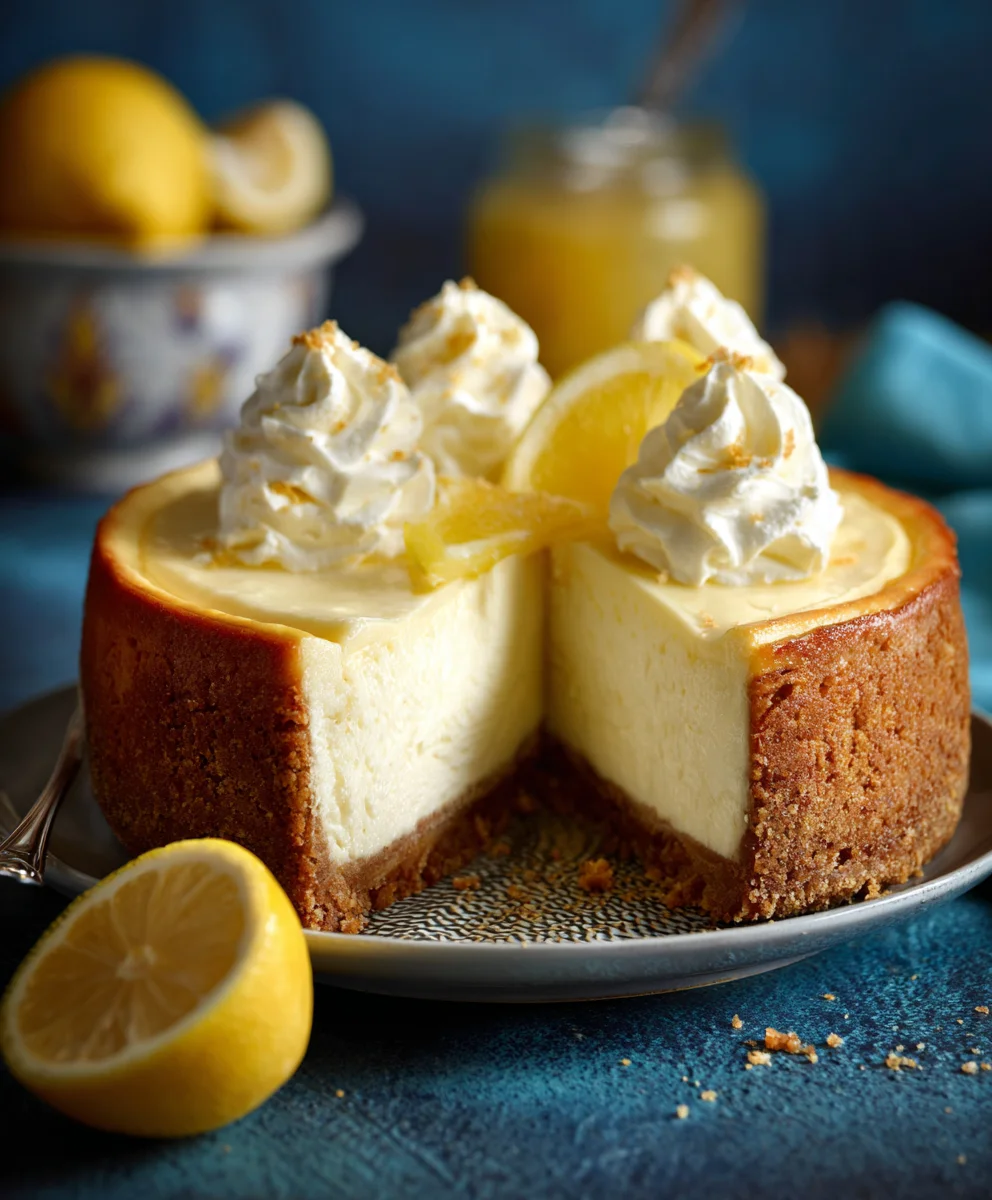
Luscious Lemon Cheesecake – the very name conjures images of sun-drenched orchards and exquisitely smooth, creamy indulgence. As someone who deeply appreciates the artistry behind a truly exceptional dessert, I am absolutely thrilled to share a recipe that promises to deliver an unforgettable culinary experience. Imagine a dessert where every forkful transports you to a realm of pure delight, a perfect symphony of bright, tangy citrus dancing harmoniously with a rich, velvety texture. This isn’t just any cheesecake; it’s a celebration of flavor that consistently earns rave reviews and leaves a lasting impression on everyone who tastes it.
Cheesecake itself boasts a fascinating history, tracing its origins back to ancient Greece, evolving through Roman banquets, and becoming a beloved classic in countless cultures worldwide. The addition of vibrant lemon elevates this timeless treat, making it an ideal choice for any season or occasion. People adore this particular dish because it offers that coveted blend of decadent richness without being overly heavy; the refreshing zest of lemon cuts through the creaminess, leaving a clean, invigorating finish. It’s the perfect ending to a formal dinner party or a delightful highlight for a casual gathering, renowned for its ability to satisfy even the most discerning sweet tooth. My aim is to guide you in creating your own magnificent Luscious Lemon Cheesecake, a dessert that is as visually stunning as it is incredibly delicious.
Prepare to embark on a delightful baking journey that will culminate in a dessert so spectacular, it might just become your new signature dish. Let’s create some magic in the kitchen!
Ingredients:
Creating this truly Luscious Lemon Cheesecake requires a careful selection of fresh, high-quality ingredients. Each component plays a vital role in achieving that perfect balance of creamy texture, tangy brightness, and sweet indulgence that makes this dessert so irresistible. I always recommend using full-fat dairy products for the best results in terms of richness and stability, as they contribute significantly to the overall luxurious mouthfeel of the cheesecake. Fresh lemons are non-negotiable here; their vibrant zest and juice are what infuse our cheesecake with its signature zesty character. Trust me, it makes all the difference!
- For the Graham Cracker Crust:
- 1 ½ cups (about 180g) finely crushed graham cracker crumbs (roughly 12-14 full crackers)
- ¼ cup (50g) granulated sugar
- ½ cup (113g) unsalted butter, melted
- For the Luscious Lemon Cheesecake Filling:
- 32 ounces (about 4 blocks, 900g) full-fat cream cheese, softened at room temperature
- 1 ½ cups (300g) granulated sugar
- ¼ cup (60ml) fresh lemon juice (from about 2-3 large lemons)
- Zest of 2 large lemons (finely grated)
- 1 teaspoon pure vanilla extract
- ¼ cup (60g) full-fat sour cream, at room temperature
- 4 large eggs, at room temperature
- Optional Garnish (for serving your Luscious Lemon Cheesecake):
- Fresh lemon slices or twists
- Fresh berries (raspberries, blueberries)
- A dusting of powdered sugar
- Lightly sweetened whipped cream
Preparing the Crust for Your Luscious Lemon Cheesecake
The foundation of any great cheesecake is its crust, and for our Luscious Lemon Cheesecake, we’re going for a perfectly buttery, slightly sweet graham cracker base. This initial step is quite simple but crucial for the overall success and structural integrity of your dessert. I always find that a well-prepared crust adds an extra layer of texture and flavor that beautifully complements the creamy filling.
- Preheat Oven and Prepare Pan: Begin by preheating your oven to 350°F (175°C). While the oven is heating, grab a 9-inch springform pan. I personally like to line the bottom of my springform pan with a circle of parchment paper; this makes for incredibly easy removal of the finished cheesecake later. Simply unclip the pan, remove the sides, and then gently slide the cheesecake off the base.
- Crush Graham Crackers: Now, let’s get those graham crackers crushed. You have a few options here. My preferred method for uniform crumbs is a food processor. Simply pulse the graham crackers until they are finely ground into an even crumb. If you don’t have a food processor, no worries! Place the crackers in a large Ziploc bag, seal it, and use a rolling pin or the bottom of a heavy pot to crush them until they are fine crumbs. This can be quite satisfying!
- Combine Crust Ingredients: In a medium-sized mixing bowl, combine the finely crushed graham cracker crumbs with the granulated sugar. Give them a good stir to ensure the sugar is evenly distributed throughout the crumbs. Next, pour in the melted unsalted butter. Using a fork or your clean hands, mix everything together until the crumbs are uniformly moistened. The mixture should resemble wet sand and hold together when pressed.
- Press Crust into Pan: Transfer the buttered crumb mixture into the prepared 9-inch springform pan. Using the bottom of a flat-bottomed glass or your fingers, firmly and evenly press the mixture over the bottom of the pan. It’s important to create a compact, even layer – this will prevent crumbling when you slice into your finished Luscious Lemon Cheesecake. You can also press a small amount of the mixture up the sides of the pan, about ½ to ¾ of an inch, if you prefer a slightly higher crust edge.
- Pre-bake the Crust: Place the springform pan with the pressed crust into your preheated oven. Bake for 8-10 minutes, or until the crust is lightly golden brown and fragrant. Pre-baking the crust helps it become sturdier and prevents it from getting soggy once the filling is added. Once baked, remove the pan from the oven and set it aside to cool slightly while you prepare the glorious lemon cheesecake filling.
Crafting the Luscious Lemon Cheesecake Filling
This is where the magic truly happens, transforming simple ingredients into the star of our show: the rich, tangy, and utterly Luscious Lemon Cheesecake filling. The key here is to ensure all your ingredients are at room temperature. This makes for a smoother, lump-free batter and ensures proper emulsification, resulting in that signature silky texture we’re aiming for. Take your time with each step; patience is a virtue when crafting the perfect cheesecake!
- Soften Cream Cheese: It’s absolutely essential that your full-fat cream cheese is at room temperature. I usually take mine out of the fridge at least 1-2 hours before I plan to bake. In a large mixing bowl, using an electric mixer (either a stand mixer with a paddle attachment or a hand-held mixer), beat the softened cream cheese on medium speed for about 2-3 minutes. You want it to be completely smooth, creamy, and free of any lumps. This initial step is critical for a truly smooth cheesecake.
- Add Sugar and Lemon Zest: Gradually add the granulated sugar to the cream cheese, beating on medium-low speed. Continue to beat for another 2-3 minutes, scraping down the sides of the bowl frequently with a rubber spatula, until the mixture is light and fluffy. At this stage, incorporate the finely grated lemon zest. Beat for another minute to ensure the fragrant zest is thoroughly distributed, infusing the mixture with its bright aroma. The scent in your kitchen will be absolutely delightful already!
- Incorporate Wet Ingredients (Excluding Eggs): Reduce the mixer speed to low. Pour in the fresh lemon juice, pure vanilla extract, and the full-fat sour cream. Mix until just combined. Be careful not to overmix at this stage; we want to incorporate the ingredients gently to maintain that luxurious texture. Scrape down the sides and bottom of the bowl one last time to ensure everything is evenly mixed.
- Add Eggs One at a Time: This is a very important step for preventing cracks in your cheesecake. With the mixer on the lowest speed, add the eggs one at a time. Beat each egg just until it is incorporated into the batter before adding the next. Overmixing eggs can introduce too much air into the batter, which can cause the cheesecake to puff up too much during baking and then collapse, leading to cracks. We want a smooth, dense, and perfectly set Luscious Lemon Cheesecake, not a cracked one!
- Final Mix and Preparation for Baking: Once all the eggs are just incorporated, give the batter one final, gentle scrape down of the bowl to ensure no unmixed pockets remain. The batter should be incredibly smooth and pourable, with a beautiful pale yellow hue and a wonderful lemon aroma. Do not continue to beat the batter excessively after the eggs are incorporated. Now your exquisite filling is ready for baking!
Baking Your Luscious Lemon Cheesecake to Perfection
Baking a cheesecake, especially a delicate one like our Luscious Lemon Cheesecake, often benefits from a water bath. This technique provides a moist, even heat that helps the cheesecake bake slowly and prevents cracking, resulting in an incredibly creamy, smooth texture. It’s a little extra effort, but I promise you, the results are absolutely worth it for that perfect, restaurant-quality finish.
- Prepare for Water Bath: Take your springform pan with the pre-baked crust. To prevent any water from seeping into the crust during the water bath, I recommend wrapping the outside of the pan securely with a double layer of heavy-duty aluminum foil. Make sure the foil extends all the way up the sides of the pan. This creates a barrier against the water.
- Pour in Filling: Carefully pour the prepared Luscious Lemon Cheesecake filling over the cooled, pre-baked graham cracker crust in the foil-wrapped springform pan. Gently tap the pan on your counter a few times to release any large air bubbles trapped within the batter.
- Set Up Water Bath: Place the foil-wrapped springform pan inside a larger roasting pan. Carefully pour hot water into the roasting pan, ensuring the water level comes about halfway up the sides of the springform pan. Be very cautious to avoid getting any water into the cheesecake batter itself.
- Bake the Cheesecake: Carefully transfer the roasting pan with the water bath and cheesecake into your preheated oven (still at 350°F / 175°C). Bake for 60-75 minutes. The baking time can vary slightly depending on your oven. You’ll know the cheesecake is done when the edges are set, but the center still has a slight wobble when you gently shake the pan. This slight wobble is key! If the center is completely firm, it’s likely overcooked, which can lead to a dry texture and cracks.
- Cooling in the Oven: Once the baking time is complete and the cheesecake has that perfect slight wobble, turn off the oven. Do not remove the cheesecake immediately! Leave the oven door ajar (you can prop it open with a wooden spoon) and allow the cheesecake to cool slowly in the oven for at least 1 hour. This gradual cooling process is another secret weapon against cracking and helps the cheesecake set beautifully without a drastic temperature change.
Cooling and Chilling Your Luscious Lemon Cheesecake
The cooling and chilling phases are just as important as the baking itself for achieving that iconic, dense, and creamy cheesecake texture. Rushing this process can lead to a less firm cheesecake and may compromise its overall appeal. Patience here will be rewarded with a perfectly set and truly Luscious Lemon Cheesecake.
- Countertop Cooling: After its gentle cooling period in the oven, carefully remove the springform pan (still in the roasting pan with the water) from the oven. Very carefully lift the springform pan out of the water bath. Remove the aluminum foil from around the springform pan. Place the cheesecake on a wire rack on your countertop to cool completely to room temperature. This can take another 2-3 hours. Do not rush this step; allow it to cool naturally.
- Loosen and Chill: Once the cheesecake has reached room temperature, you can gently run a thin knife or offset spatula around the edge of the cheesecake, between the crust and the springform pan, to prevent it from sticking. This step is particularly helpful if you want a clean edge when you release the springform ring. Then, cover the cheesecake loosely with plastic wrap.
- Refrigerate for Optimal Setting: Transfer the covered cheesecake to the refrigerator. This is the longest, but arguably the most crucial, step in the entire process. Chill the Luscious Lemon Cheesecake for at least 6-8 hours, but ideally overnight. Chilling allows the cheesecake to fully set, develop its rich flavor, and achieve that wonderfully dense, creamy texture. Trust me, it’s worth the wait for that perfect slice!
Serving Your Exquisite Luscious Lemon Cheesecake
After all your careful effort and patient waiting, the moment has finally arrived to enjoy your exquisite Luscious Lemon Cheesecake! Proper serving ensures that every slice is as perfect as you envisioned it, highlighting its creamy texture and vibrant lemon flavor. Here are my tips for presentation and enjoying this delightful dessert.
- Release from Pan: Once thoroughly chilled, remove the cheesecake from the refrigerator. Unclasp the springform pan and carefully lift the ring away from the cheesecake. If you lined the bottom with parchment paper, you can slide the cheesecake onto a serving plate or, if you prefer, leave it on the pan base and simply transfer the entire thing to a decorative platter.
- Clean Slices: For perfectly clean slices, I always recommend dipping your knife in hot water and wiping it clean with a paper towel between each cut. This prevents the cheesecake from sticking to the knife and creates smooth, professional-looking slices. Repeat this process for every single slice to maintain that pristine appearance.
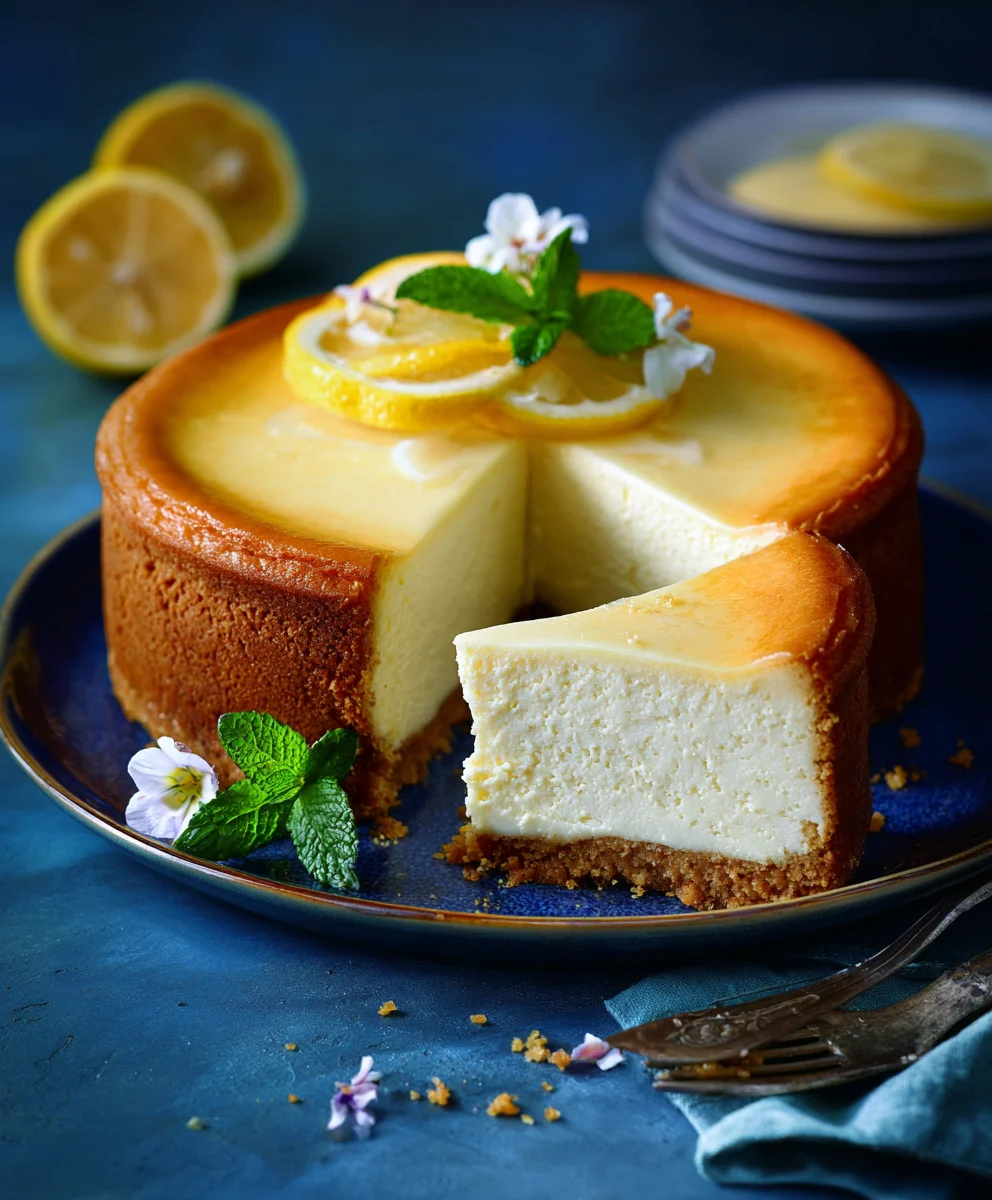
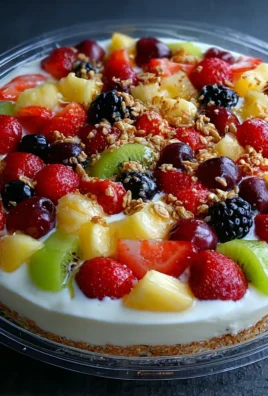
- Garnish and Present: This Luscious Lemon Cheesecake is absolutely stunning on its own, but a simple garnish can elevate its presentation even further. I love adding fresh lemon slices or elegant twists, which immediately signal the vibrant flavor within. Fresh berries like raspberries or blueberries offer a beautiful color contrast and a lovely burst of complementary flavor. A light dusting of powdered sugar can also add a touch of elegance, or for extra indulgence, a dollop of lightly sweetened whipped cream.
- Serve and Enjoy: Serve your masterpiece chilled. The cool temperature enhances the cheesecake’s refreshing qualities and keeps its texture firm and delightful. Each bite should be a harmonious blend of the zesty lemon, the creamy tang of the filling, and the subtle crunch of the graham cracker crust. It’s truly a sensory experience.
- Storage: Any leftover slices of your Luscious Lemon Cheesecake should be covered loosely with plastic wrap and stored in the refrigerator. It will remain fresh and utterly delicious for up to 4-5 days, though I find it rarely lasts that long in my house! Enjoy every moment of this delightful creation!
Conclusion:
And there you have it, my dear fellow dessert enthusiasts! We’ve journeyed through the steps, imagined the aromas, and now we stand at the precipice of pure culinary delight. This isn’t just any dessert recipe; it’s an invitation to create something truly magical in your own kitchen. I genuinely believe that once you take that first forkful, you’ll understand precisely why I champion this recipe with such enthusiasm. It’s a symphony of textures and tastes, a perfect balance of zesty brightness and comforting creaminess that truly elevates the humble cheesecake to an art form. The crisp, buttery crust providing the ideal counterpoint to the silky, smooth filling – it’s a contrast that dances on the palate and leaves a lasting, joyful impression.
This Luscious Lemon Cheesecake is more than just a dessert; it’s an experience. It’s the kind of treat that elicits oohs and aahs from even the most discerning palates, instantly becoming the star of any gathering. I’ve seen it brighten countless faces and ignite conversations around the dinner table, making it an absolute must-try for anyone looking to impress, celebrate, or simply indulge in a moment of pure, unadulterated pleasure. Its vibrant flavor profile is surprisingly complex yet universally appealing, a testament to the power of fresh, simple ingredients when brought together with a little love and careful technique. It’s truly a testament to how a classic can be perfected, offering a refreshing twist on a beloved dessert that never fails to satisfy. The satisfying tang of fresh lemon cuts through the richness beautifully, preventing it from ever feeling too heavy, ensuring every bite is as delightful as the last. It’s the kind of dessert that you crave long after the last crumb has vanished, a true testament to its irresistible charm.
Elevate Your Cheesecake Experience: Serving Suggestions & Creative Variations
Now, while this cheesecake is undeniably magnificent on its own, I love to offer a few ideas to personalize your serving experience or even explore exciting new variations. For a simple yet elegant presentation, a dusting of powdered sugar or a delicate curl of fresh lemon zest can truly make it pop. If you want to add another layer of flavor and color, a scattering of fresh berries—think ruby-red raspberries, plump blueberries, or sliced strawberries—adds not only visual appeal but also a wonderful burst of complementary freshness. A light dollop of freshly whipped cream, perhaps infused with a hint of vanilla or even a tiny drop of lemon extract, would also be a divine accompaniment, adding an extra cloud-like softness that contrasts beautifully with the firm cheesecake.
Feeling a bit adventurous? Let’s talk variations! You could swap out the classic graham cracker crust for something different: how about a crushed ginger snap crust for a spicy kick that pairs wonderfully with the lemon, or even a shortbread crust for an extra buttery, melt-in-your-mouth texture? For a different citrus twist, consider incorporating lime zest and juice instead of lemon for a Key Lime-esque dessert that’s equally refreshing. Another idea is to swirl a homemade berry compote (strawberry, raspberry, or mixed berry) through a portion of the cheesecake batter before baking, creating beautiful streaks of color and pockets of fruity goodness. Or, for an ultra-decadent touch, you could drizzle a homemade lemon curd over the top of the cooled cheesecake just before serving, intensifying that wonderful lemon flavor. For those special occasions, consider preparing individual mini cheesecakes in muffin tins, perfect for portion control and an adorable presentation that’s sure to charm your guests.
Your Culinary Adventure Awaits!
I truly hope this recipe inspires you to don your apron and get baking. There’s a profound satisfaction that comes from creating something so delicious from scratch, and I promise you, the reward of seeing the smiles on the faces of those who taste your homemade creation is absolutely priceless. Don’t be shy, take the leap! Whether you stick to the recipe precisely or decide to put your own creative spin on it with one of my suggested variations, I am confident that you will be delighted with the results.
Once you’ve experienced the joy of this Luscious Lemon Cheesecake, I would absolutely love to hear about it! Please, come back and share your experiences, your successes, and any delightful tweaks you made. Did you try a different crust? What did your guests say? Your feedback and shared culinary journeys inspire me and our entire community of food lovers. Baking is a wonderful way to connect, to create, and to share happiness, and I can’t wait to hear all about your delicious adventure. Happy baking!
Creamy Luscious Lemon Cheesecake: Easy No-Bake Recipe
A rich, tangy, and utterly luscious lemon cheesecake featuring a buttery graham cracker crust and a creamy, smooth filling. This dessert consistently earns rave reviews and is perfect for any season or occasion.
Ingredients
-
1 ½ cups (180g) crushed graham cracker crumbs
-
¼ cup (50g) granulated sugar (for crust)
-
½ cup (113g) unsalted butter, melted
-
32 ounces (900g) full-fat cream cheese, softened
-
1 ½ cups (300g) granulated sugar (for filling)
-
¼ cup (60ml) fresh lemon juice
-
Zest of 2 large lemons
-
1 teaspoon pure vanilla extract
-
¼ cup (60g) full-fat sour cream, at room temperature
-
4 large eggs, at room temperature
-
Optional: Fresh lemon slices or twists
-
Optional: Fresh berries (raspberries, blueberries)
-
Optional: Powdered sugar
-
Optional: Lightly sweetened whipped cream
Instructions
-
Step 1
Preheat oven to 350°F (175°C). Line a 9-inch springform pan bottom with parchment paper. In a bowl, combine graham cracker crumbs, ¼ cup sugar, and melted butter. Mix until moistened. Press crumb mixture firmly onto the bottom of the prepared pan. Bake for 8-10 minutes until lightly golden. Remove and let cool slightly. -
Step 2
Ensure all dairy and eggs are at room temperature. In a large mixing bowl, beat softened cream cheese with an electric mixer on medium speed for 2-3 minutes until smooth. Gradually add 1 ½ cups sugar, beating for 2-3 minutes more, scraping down sides. Incorporate lemon zest and beat for another minute. Reduce speed to low and mix in lemon juice, vanilla extract, and sour cream until just combined. Scrape bowl. -
Step 3
With the mixer on the lowest speed, add eggs one at a time, beating just until each is incorporated before adding the next. Do not overmix. Give a final gentle scrape of the bowl. The batter should be smooth. -
Step 4
Wrap the outside of the springform pan securely with a double layer of heavy-duty aluminum foil. Pour filling over the cooled crust. Gently tap pan to release air bubbles. Place foil-wrapped pan in a larger roasting pan. Carefully pour hot water into the roasting pan to come halfway up the sides of the springform pan. Bake in the preheated oven for 60-75 minutes. Edges should be set, but the center should have a slight wobble. -
Step 5
Once baked, turn off the oven and leave the door ajar. Allow cheesecake to cool slowly in the oven for 1 hour. Remove from oven and water bath, remove foil, and cool completely on a wire rack at room temperature (2-3 hours). -
Step 6
Once cooled to room temperature, gently run a knife around the edge of the cheesecake. Cover loosely with plastic wrap and refrigerate for at least 6-8 hours, ideally overnight, to fully set. -
Step 7
Remove from refrigerator, unclasp springform pan, and lift the ring. For clean slices, dip a knife in hot water and wipe clean between each cut. Garnish with fresh lemon, berries, powdered sugar, or whipped cream if desired. Serve chilled. Store leftover cheesecake covered in the refrigerator for up to 4-5 days.
Important Information
Nutrition Facts (Per Serving)
It is important to consider this information as approximate and not to use it as definitive health advice.
Allergy Information
Please check ingredients for potential allergens and consult a health professional if in doubt.
Leave a Comment