
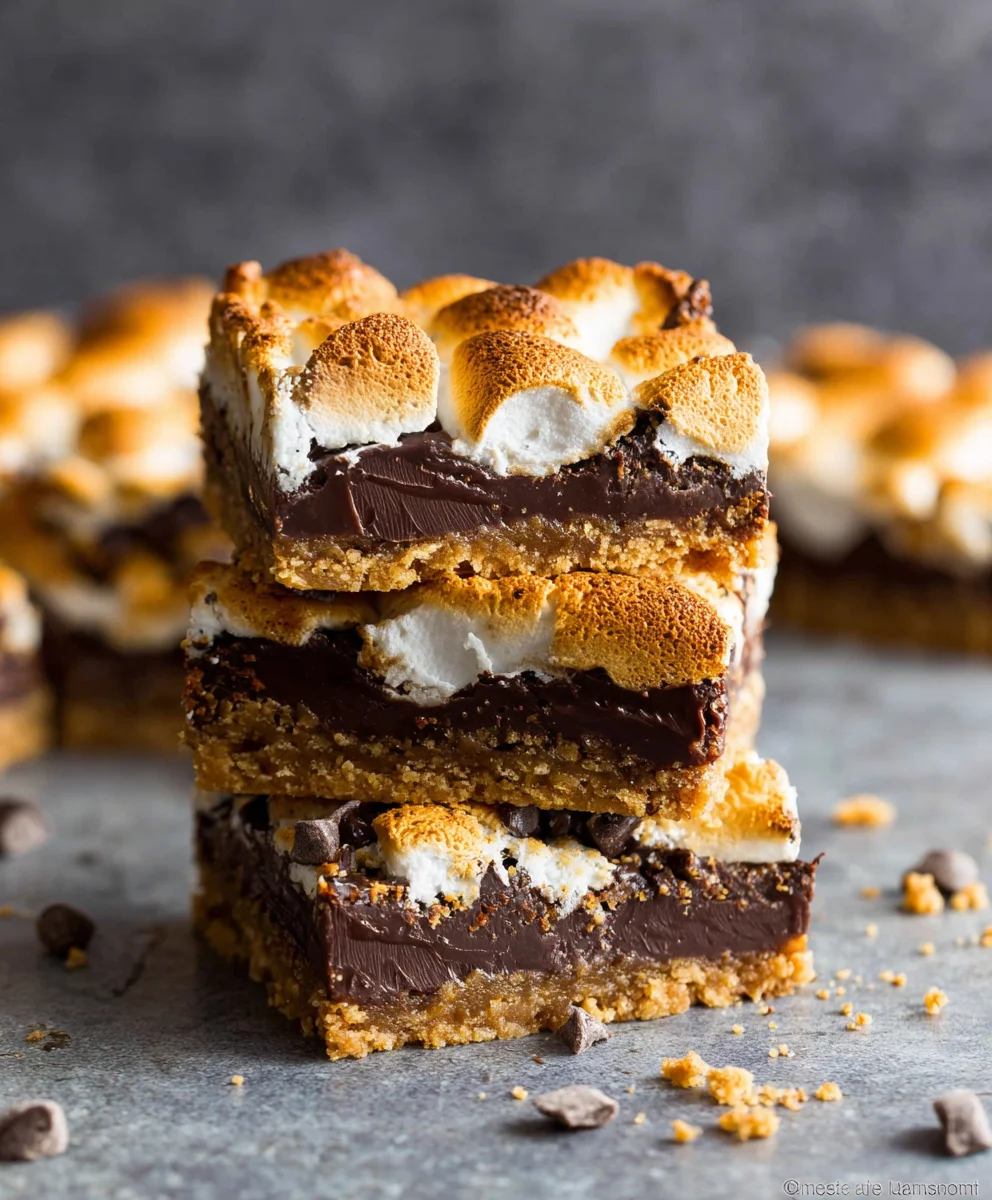
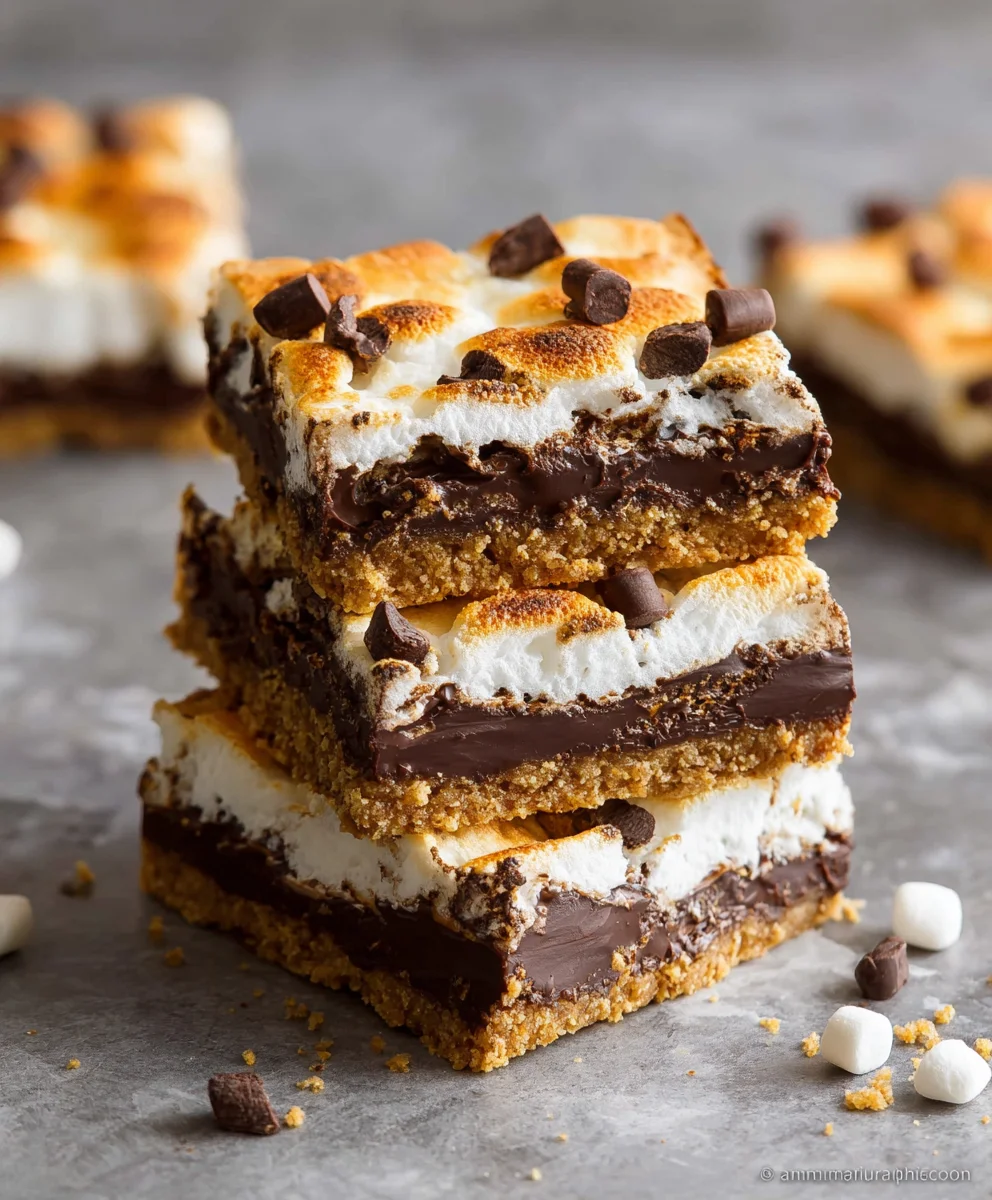
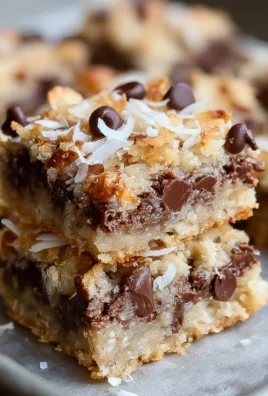
S’more Bars are a culinary hug in dessert form, a delightful transformation of a campfire classic into a traybake sensation that promises pure bliss with every bite. Who doesn’t remember the simple joy of a perfectly toasted marshmallow, gooey chocolate, and crunchy graham cracker sandwich under a starry sky? We’ve captured that magic and amplified it, creating a treat that’s easier to share and even more decadent. These S’more Bars are adored for their irresistible combination of textures and flavors – the buttery graham cracker base, the rich, melted chocolate layer, and that signature chewy, slightly caramelized marshmallow topping. What truly sets them apart is their ability to deliver that iconic s’mores experience without the sticky fingers and singed eyebrows, making them the ultimate crowd-pleaser for any occasion, from casual gatherings to potlucks and even just a Tuesday evening craving.
Ingredients:
- 2 cups Graham cracker crumbs
- ½ cup Melted butter
- 4 cups Chocolate chips
- 1 package Mini marshmallows
Preparing the Graham Cracker Crust
The foundation of our delicious S’more Bars begins with a perfectly pressed graham cracker crust. This layer provides that classic graham cracker flavor and a sturdy base for the gooey marshmallows and melty chocolate. To start, ensure your graham cracker crumbs are finely ground. You can achieve this by pulsing graham crackers in a food processor until they resemble coarse sand, or by placing them in a sturdy zip-top bag and crushing them with a rolling pin. Once you have your 2 cups of crumbs, transfer them into a medium mixing bowl. Now, pour in your ½ cup of melted butter. It’s important that the butter is fully melted but not hot, as this will help the crumbs bind together effectively. Using a fork or your clean hands, mix the butter and crumbs thoroughly. You want to ensure every single crumb is coated in butter. The mixture should resemble wet sand and hold together when squeezed.
Next, prepare your baking pan. A 9×13 inch baking pan is ideal for this recipe. For easy removal and cleanup, I highly recommend lining the pan with parchment paper, leaving an overhang on all sides. This “sling” will make lifting the entire S’more Bar slab out of the pan a breeze once it’s cooled. Spoon the graham cracker and butter mixture into the prepared baking pan. Use the bottom of a measuring cup or your hands to firmly press the crumbs into an even layer across the entire bottom of the pan. Packing it down well is crucial; this prevents the crust from crumbling when you cut the bars later. Make sure the layer is consistent, without any large gaps.
Layering the Chocolatey Goodness
Now for the star of the show: the chocolate! We’re using a generous 4 cups of chocolate chips for that signature S’more flavor. You can use any type of chocolate chips you prefer – semi-sweet is classic, but milk chocolate or even dark chocolate would be delicious variations. Do not melt the chocolate chips at this stage; we want them to melt when baked. Evenly sprinkle the entire 4 cups of chocolate chips over the compacted graham cracker crust. Distribute them as uniformly as possible to ensure you get that perfect chocolatey bite in every piece. Some chips might fall into the crevices of the crust, which is perfectly fine and will only add to the deliciousness.
Take your time with this step to make sure the chocolate covers the crust as much as possible. This even distribution is key to achieving a consistent molten chocolate layer throughout your S’more Bars. If you’re feeling adventurous, you could even mix in some chopped chocolate bars or different types of chips for a more complex chocolate flavor. However, the standard chocolate chips will deliver that unmistakable S’more experience.
Assembling the Marshmallow Dream
This is where the magic truly happens and the S’more Bars earn their name. We’re using a whole package of mini marshmallows. The mini marshmallows are perfect because they melt and spread beautifully, creating that iconic gooey marshmallow top. Carefully and evenly distribute the entire package of mini marshmallows over the layer of chocolate chips. Try to create a single, unbroken layer of marshmallows as much as you can. This ensures that they will all melt together into a unified, chewy topping. Don’t worry if there are small gaps here and there; as the marshmallows melt, they will expand and fill in any empty spaces.
It’s really important to get as much coverage as possible with the marshmallows. This is what gives the S’more Bars their signature toasted, gooey texture. If you find some areas are a bit sparse, you can gently rearrange them. The goal is a fluffy, consistent blanket of marshmallows ready to be transformed into golden-brown perfection.
Baking to Golden-Brown Perfection
Preheat your oven to 350°F (175°C). Place the prepared baking pan in the preheated oven on the center rack. Bake for approximately 10 to 15 minutes. The goal here is not to fully cook the ingredients, but rather to melt the chocolate and toast the marshmallows to a beautiful golden-brown color. Keep a close eye on the bars as they bake, as marshmallows can go from perfectly toasted to burnt very quickly. You’ll notice the marshmallows start to puff up and turn golden. The chocolate chips underneath should also start to soften and look glossy as they melt.
The exact baking time will vary depending on your oven, so it’s crucial to watch for visual cues. You want to see those marshmallows starting to get those lovely toasted peaks, and the chocolate chips beginning to ooze. If you find the marshmallows are browning too quickly on top but the chocolate isn’t melted, you can loosely tent the pan with aluminum foil for the last few minutes of baking.
Cooling and Cutting for the Perfect S’more Bar
Once the S’more Bars have reached that perfect golden-brown, remove the pan from the oven. This is perhaps the most challenging step: you need to let them cool completely. Resist the urge to cut them immediately! Allowing them to cool is crucial for the bars to set properly. If you try to cut them while they are still warm and gooey, they will likely fall apart. Let the pan sit on a wire rack at room temperature for at least 2 to 3 hours, or until completely cool and firm. For even better results and easier cutting, you can place the cooled pan in the refrigerator for about 30 minutes to an hour. This will firm everything up beautifully.
Once thoroughly cooled and set, use the parchment paper overhang to carefully lift the entire slab out of the pan onto a clean cutting board. Using a sharp knife, cut the S’more Bars into your desired size. Squares or rectangles work best. If they’re being stubborn, a quick dip of the knife in hot water can help with clean cuts through the chocolate and marshmallow. Enjoy these delightful S’more Bars!
Conclusion:
I hope you’ve enjoyed learning how to create these incredibly delicious S’more Bars! This recipe truly captures the essence of campfire s’mores in a convenient and delightful bar form. The chewy graham cracker base, gooey melted marshmallow, and rich chocolate chunks come together for a perfectly balanced bite every time. These bars are fantastic for parties, potlucks, or simply as a sweet treat for yourself. Don’t be afraid to get creative with the variations I’ve suggested – they can elevate your S’more Bars to a whole new level!
For serving suggestions, I love these bars at room temperature, allowing the chocolate to be soft and the marshmallow to be delightfully chewy. They also hold up wonderfully for picnics or packed lunches. If you’re feeling adventurous, try adding a sprinkle of sea salt on top before baking for a sweet and salty contrast, or perhaps a swirl of peanut butter between the marshmallow and chocolate layers. Remember, the beauty of this recipe is its adaptability. So go ahead, bake a batch (or two!) and share the joy of these wonderful S’more Bars with friends and family. Happy baking!
Frequently Asked Questions:
Can I make these S’more Bars ahead of time?
Yes, absolutely! S’more Bars are excellent for making ahead. You can store them in an airtight container at room temperature for up to 3 days. They might become slightly firmer, but a quick 10-15 second microwave burst can revive that gooey marshmallow texture.
What kind of chocolate is best for S’more Bars?
While semi-sweet chocolate chips are a classic choice and work wonderfully, feel free to experiment! Milk chocolate will make them sweeter, and dark chocolate will offer a richer, more intense flavor. You can even use a mix of different chocolates for a more complex taste.
How can I prevent the marshmallow from burning?
The key is to watch them closely during the last few minutes of baking. If you notice the edges browning too quickly, you can loosely tent the pan with aluminum foil. Alternatively, you can briefly broil them for just 30-60 seconds until golden brown, keeping a very close eye to prevent burning.
Easy S’more Bars- Gooey Chocolate Graham Treat
A simple and delicious no-bake bar featuring a graham cracker crust, melty chocolate, and gooey marshmallows.
Ingredients
-
2 cups Graham cracker crumbs
-
½ cup Melted butter
-
4 cups Chocolate chips
-
1 package Mini marshmallows
-
1 tsp Vanilla extract (optional, for added flavor)
Instructions
-
Step 1
Prepare the graham cracker crust by combining 2 cups of graham cracker crumbs with ½ cup of melted butter in a medium bowl. Mix until well combined and resembling wet sand. Press this mixture evenly into the bottom of a parchment-lined 9×13 inch baking pan. -
Step 2
Evenly sprinkle 4 cups of chocolate chips over the graham cracker crust. Ensure good coverage for a rich chocolate layer. -
Step 3
Distribute 1 package of mini marshmallows evenly over the chocolate chips, creating a single layer for optimal melting. -
Step 4
Preheat oven to 350°F (175°C). Bake for 10-15 minutes, or until marshmallows are puffed and golden brown and chocolate chips are melted and glossy. Watch closely to prevent burning. -
Step 5
Remove from oven and let cool completely at room temperature for at least 2-3 hours, or refrigerate for 30-60 minutes until firm. This is crucial for easy cutting. -
Step 6
Lift the slab out of the pan using the parchment paper overhang and cut into desired bar sizes with a sharp knife. For clean cuts, dip the knife in hot water if needed.
Important Information
Nutrition Facts (Per Serving)
It is important to consider this information as approximate and not to use it as definitive health advice.
Allergy Information
Please check ingredients for potential allergens and consult a health professional if in doubt.
Leave a Comment