
Easter Egg Fruit Cookies are more than just a sweet treat; they’re a delightful explosion of spring flavors and a whimsical nod to the joy of Easter! Imagine biting into a tender, slightly chewy cookie, bursting with the bright, tangy notes of dried fruits like cranberries, apricots, and maybe even a hint of candied citrus peel, all cradled in a delicate, buttery base. It’s no wonder these festive cookies have become a beloved staple for so many families during this time of renewal and celebration. What truly sets these Easter Egg Fruit Cookies apart is their charming appearance, often shaped like little eggs and adorned with colorful glazes or sprinkles, making them as visually appealing as they are delicious. They capture the essence of the season, bringing a smile to everyone’s face, from the youngest cookie decorator to the most seasoned baker. Get ready to create your own batch of edible sunshine!
Ingredients:
- 1 package sugar cookie dough mix
- 8 ounces cream cheese, softened
- 6 tablespoons butter, softened
- 2 cups confectioner’s sugar
- 1 teaspoon vanilla extract
- Pinch of salt
- Assorted berries and fruit (blueberries, strawberries, raspberries, kiwis, mandarin oranges)
Easter Egg Fruit Cookies: Crafting Your Delight
Get ready to create some truly magical Easter treats! These Easter Egg Fruit Cookies are as delightful to look at as they are to eat, bursting with vibrant fruit flavors and a creamy, dreamy frosting. They’re the perfect project to get the whole family involved in the kitchen, spreading joy and deliciousness. We’ll start by making the cookie base, then whip up a luscious cream cheese frosting that will hold our beautiful fruit decorations perfectly.
Baking the Perfect Cookie Canvas
The foundation of our Easter Egg Fruit Cookies is a simple yet satisfying sugar cookie. To begin, preheat your oven according to the package directions for the sugar cookie dough mix. Typically, this is around 350 degrees Fahrenheit (175 degrees Celsius). While the oven is heating, prepare your baking sheets by lining them with parchment paper. This prevents sticking and makes cleanup a breeze.
Now, let’s prepare the cookie dough. In a large mixing bowl, combine the contents of your sugar cookie dough mix with the ingredients specified on the package. This usually involves adding an egg and some oil or melted butter, but always refer to your specific mix for precise measurements. Mix everything together until a cohesive dough forms. Don’t overmix; you want to avoid developing the gluten too much, which can lead to tough cookies. Once the dough is ready, you have a couple of options for shaping. For classic Easter egg shapes, you can chill the dough for about 30 minutes, then roll it out on a lightly floured surface to about 1/4-inch thickness. Using Easter egg-shaped cookie cutters, cut out your cookies. Alternatively, for a more rustic approach, you can simply roll the dough into small balls and flatten them slightly on the baking sheet, creating a more free-form oval shape reminiscent of eggs. Arrange the shaped cookies on your prepared baking sheets, leaving about 2 inches of space between them to allow for spreading during baking.
Bake the cookies for the time indicated on the sugar cookie dough mix package, usually between 8 to 12 minutes. The edges should be lightly golden brown, and the centers should appear set. It’s always better to underbake slightly than overbake, as cookies will continue to firm up as they cool. Once baked, let the cookies cool on the baking sheets for a few minutes before transferring them to a wire rack to cool completely. Ensure they are thoroughly cooled before moving on to the frosting stage; warm cookies will melt the frosting, creating a messy situation.
Whipping Up Luscious Cream Cheese Frosting
While our cookies are cooling, it’s time to prepare the star of our decoration: the cream cheese frosting. This frosting is wonderfully tangy from the cream cheese and perfectly sweet, making it an ideal base for our fruit toppings. In a medium-sized mixing bowl, combine the softened cream cheese and softened butter. It’s crucial that both the cream cheese and butter are truly softened, meaning they are pliable and easy to whip. This will ensure a smooth and creamy frosting with no lumps. Use an electric mixer on medium speed to beat them together until they are light and fluffy. This usually takes about 2-3 minutes.
Gradually add the confectioner’s sugar, about a half cup at a time, beating well after each addition. The mixture will become quite thick. Once all the confectioner’s sugar has been incorporated, add the vanilla extract and the pinch of salt. The salt is important as it balances the sweetness and enhances the overall flavor. Continue to beat the frosting on medium-high speed for another 2-3 minutes until it is completely smooth, creamy, and holds stiff peaks. If the frosting seems too thick, you can add a tablespoon of milk or cream at a time until you reach your desired consistency. If it’s too thin, add a little more confectioner’s sugar. This frosting should be thick enough to spread easily and hold its shape without running off the cookies.
Decorating Your Easter Egg Masterpieces
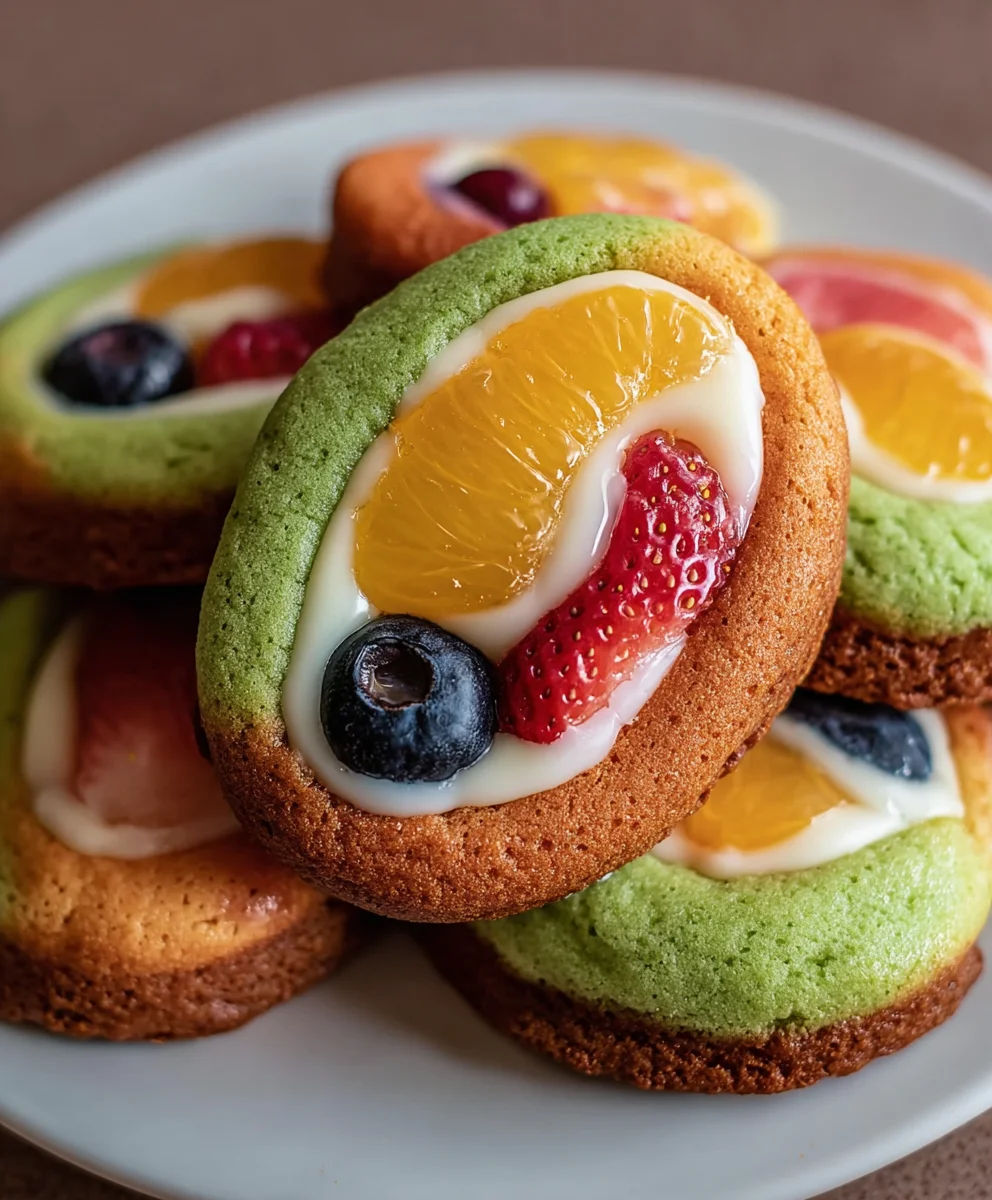
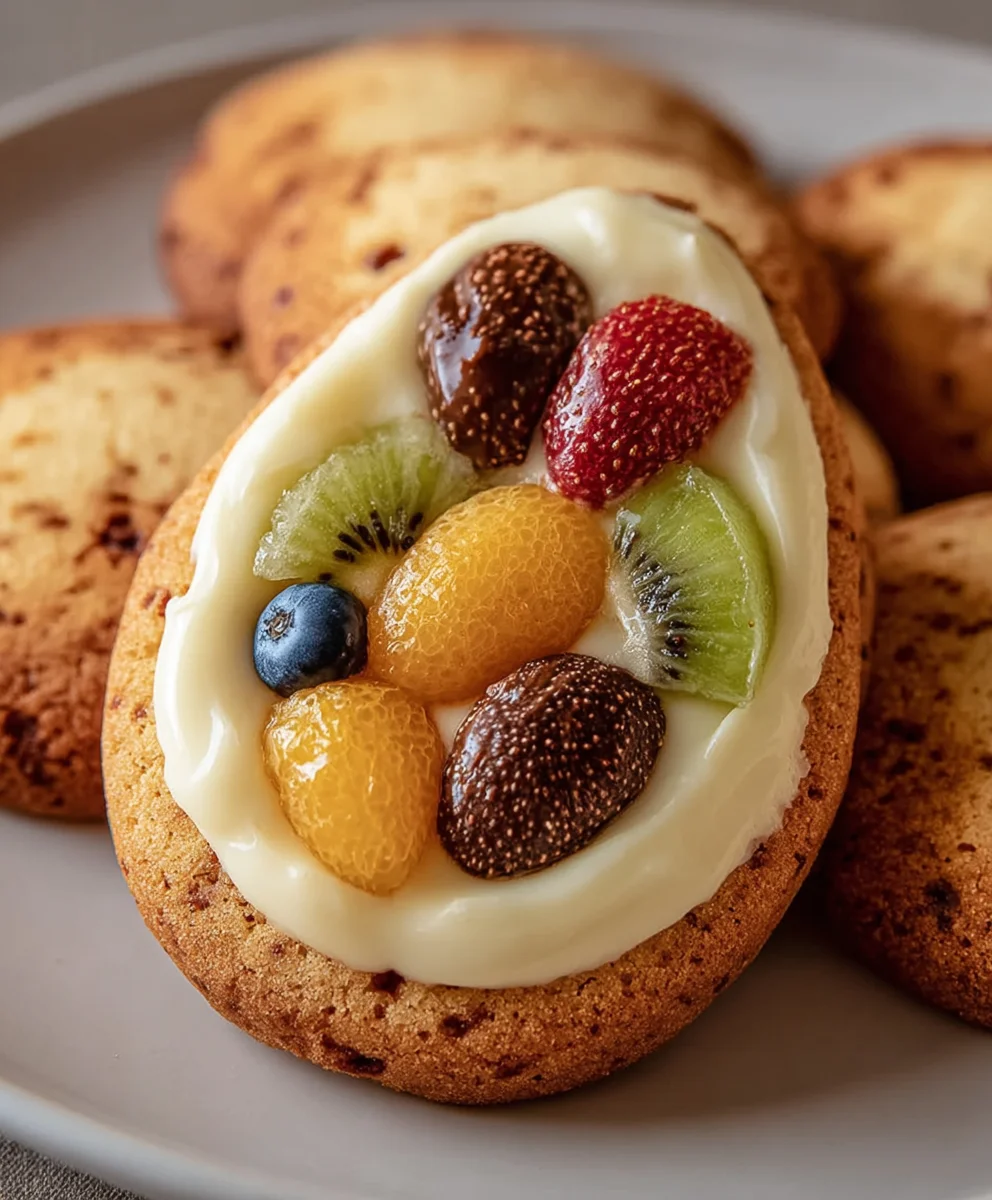
Now for the most exciting part – decorating our Easter Egg Fruit Cookies! Once your cookies are completely cool and your frosting is ready, it’s time to bring them to life. Take a cooled cookie and generously spread a layer of the cream cheese frosting over the top. Aim for an even coating, leaving a small border around the edge if you prefer a more polished look, or spread it right to the edge for a more rustic appeal. You can use a spatula or an offset spatula for this.
Now, it’s time to get creative with your assorted berries and fruit. This is where your Easter Egg Fruit Cookies will truly shine. Arrange your blueberries, sliced strawberries, raspberries, thinly sliced kiwis, and mandarin orange segments on top of the frosting. Think about creating patterns or simply a colorful, abundant display. For example, you could create a flower shape with strawberry slices and a blueberry center, or a beautiful mosaic of different fruits. Gently press the fruit into the frosting so it adheres well. Don’t be afraid to mix and match colors and textures! The vibrant colors of the fruit against the creamy white frosting are visually stunning and scream springtime. Allow the frosting to set slightly before serving, which usually takes about 15-30 minutes at room temperature or a bit quicker in the refrigerator if you’re short on time. These Easter Egg Fruit Cookies are best enjoyed within a day or two of decorating for optimal freshness.
Conclusion:
And there you have it – a delightful recipe for Easter Egg Fruit Cookies that are as beautiful as they are delicious! We’ve walked through creating these festive treats step-by-step, from selecting the perfect dried fruits to achieving that wonderfully chewy texture. These cookies are a fantastic way to celebrate the season and bring a touch of homemade joy to your Easter table. I hope you enjoy making and sharing them as much as I do!
For serving, these Easter Egg Fruit Cookies are perfect on their own with a cup of tea or coffee. They also make a wonderful addition to an Easter dessert platter, alongside other traditional goodies. Consider pairing them with fresh berries or a dollop of whipped cream for an extra special touch. Don’t be afraid to get creative with your variations! You could swap out some of the dried fruits for chopped nuts like almonds or walnuts for added crunch, or even add a pinch of cinnamon or nutmeg for a warmer spice profile.
The beauty of this recipe lies in its adaptability. Whether you’re a seasoned baker or just starting out, these Easter Egg Fruit Cookies are designed to be approachable and rewarding. So gather your ingredients, put on your favorite music, and let the baking begin. I encourage you to experiment and make these cookies your own!
Frequently Asked Questions:
Can I use fresh fruit instead of dried fruit?
While fresh fruit can be used, it will significantly alter the texture and baking time of the cookies. Fresh fruit contains more moisture, which can lead to a softer, cakier cookie and may require longer baking. For the intended chewy texture, dried fruits are highly recommended.
How should I store these Easter Egg Fruit Cookies?
Once completely cooled, these cookies can be stored in an airtight container at room temperature for up to a week. If you live in a warmer climate or want them to last longer, you can refrigerate them. They also freeze beautifully for up to three months; simply thaw at room temperature before enjoying.
Easter Egg Fruit Cookies – Delicious & Fun Treats
Create magical Easter treats with these vibrant Easter Egg Fruit Cookies, featuring a sugar cookie base, creamy cream cheese frosting, and a delightful assortment of fresh fruit.
Ingredients
-
1 package sugar cookie dough mix
-
8 ounces cream cheese, softened
-
6 tablespoons butter, softened
-
2 cups confectioner’s sugar
-
1 teaspoon vanilla extract
-
Pinch of salt
-
Assorted berries and fruit (blueberries, strawberries, raspberries, kiwis, mandarin oranges)
Instructions
-
Step 1
Preheat your oven according to the sugar cookie dough mix package directions (usually around 350°F/175°C). Prepare baking sheets by lining them with parchment paper. -
Step 2
Prepare the cookie dough according to the sugar cookie dough mix package instructions. Chill the dough for about 30 minutes, then roll out to 1/4-inch thickness. Cut out egg shapes using a cookie cutter or form free-form ovals. Place on prepared baking sheets. -
Step 3
Bake for 8-12 minutes, or until lightly golden brown. Let cool on baking sheets for a few minutes before transferring to a wire rack to cool completely. -
Step 4
While cookies cool, beat softened cream cheese and softened butter together until light and fluffy. Gradually add confectioner’s sugar, then vanilla extract and salt. Beat until smooth and creamy. -
Step 5
Spread a generous layer of cream cheese frosting onto each completely cooled cookie. -
Step 6
Decorate the frosted cookies with assorted berries and fruit, pressing them gently into the frosting. Arrange in patterns or a colorful display. -
Step 7
Allow the frosting to set for 15-30 minutes before serving for best results.
Important Information
Nutrition Facts (Per Serving)
It is important to consider this information as approximate and not to use it as definitive health advice.
Allergy Information
Please check ingredients for potential allergens and consult a health professional if in doubt.


Leave a Comment