
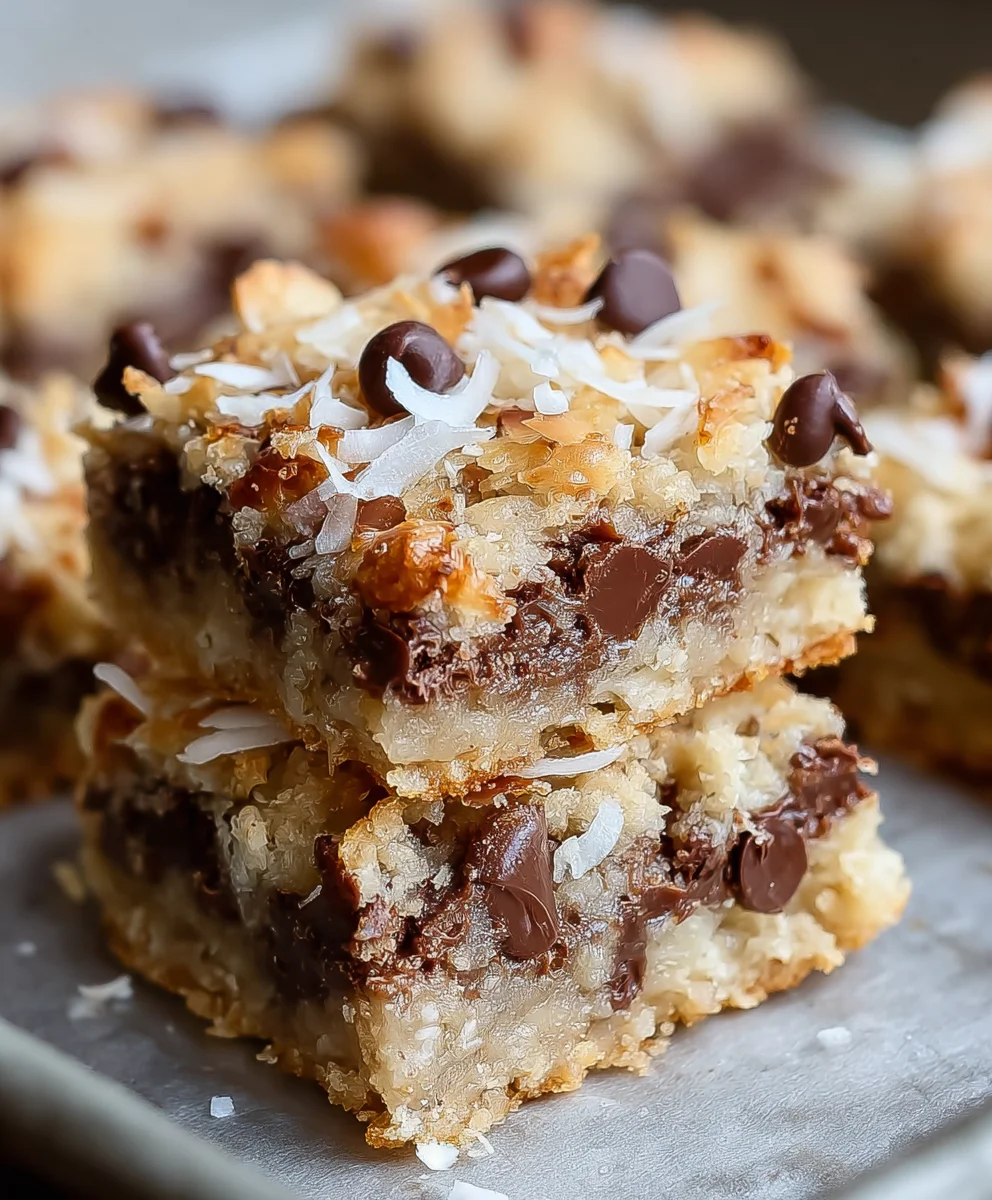
Almond Joy Cookie Bars are an absolute dream come true for anyone who adores that classic combination of coconut, chocolate, and crunchy almonds. As an avid baker and a lifelong fan of the iconic candy bar, I can confidently say that transforming those beloved flavors into a simple, shareable bar format is pure genius. Imagine sinking your teeth into a chewy, decadent base, generously studded with moist coconut flakes, rich chocolate chips, and perfectly toasted almonds – all the joy, none of the individual wrapping!
While the specific history of these cookie bars might be short, they pay homage to the enduring popularity of the Almond Joy candy bar, which has captivated taste buds since its introduction in 1946. This recipe beautifully captures that nostalgic essence, offering a homemade version that’s both comforting and incredibly satisfying. People consistently rave about these delightful Almond Joy Cookie Bars not just for their irresistible taste and varied textures – the soft chewiness, the burst of coconut, the snap of chocolate, and the delightful crunch of almonds – but also for their incredible convenience. They are surprisingly easy to prepare, making them a fantastic choice for potlucks, parties, or simply a special treat to brighten any weeknight. I promise, they’ll disappear faster than you can say “Mounds.”
Ingredients:
-
For the Cookie Bar Base:
- 1 cup (2 sticks) unsalted butter, softened to room temperature. This is crucial for a smooth, creamy base.
- 1 cup granulated sugar. Just enough sweetness to complement the layers.
- 1 large egg. Acts as a binder and adds richness.
- 1 teaspoon vanilla extract. A touch of pure vanilla elevates the flavor profile significantly.
- 2 cups all-purpose flour. The backbone of our sturdy yet tender cookie base.
- 1 teaspoon baking powder. To give our base a slight lift and tender texture.
- 1/2 teaspoon salt. A pinch enhances all the other flavors.
-
For the Coconut Almond Filling:
- 1 (14 ounce) can sweetened condensed milk. The magical ingredient that binds and sweetens our coconut layer, giving it that iconic chewiness.
- 1 teaspoon vanilla extract. Again, for that lovely aromatic depth.
- 4 cups shredded sweetened coconut. Make sure it’s sweetened for the true Almond Joy experience.
- 1 1/2 cups whole almonds, or slivered if you prefer, roughly chopped. The quintessential crunch for our Almond Joy Cookie Bars.
-
For the Decadent Chocolate Topping:
- 1 1/2 cups semi-sweet chocolate chips, good quality. You can also use milk chocolate if you prefer a sweeter topping, or dark chocolate for a more intense flavor.
- 1/2 cup milk chocolate chips (optional, for extra richness and a slightly softer set).
- 2 tablespoons unsalted butter. Helps to create a smooth, glossy, and spreadable chocolate topping.
- 1/2 teaspoon vanilla extract. Enhances the chocolate flavor.
- Optional: Additional whole or slivered almonds for garnish.
Preparing Your Workspace and Oven:
Before we dive into the fun of mixing and baking, let’s get our kitchen ready. This initial setup might seem small, but it truly makes the entire process smoother and more enjoyable. First things first, go ahead and preheat your oven to 350°F (175°C). A consistently preheated oven is essential for even baking, ensuring your Almond Joy Cookie Bars cook perfectly from edge to center. While your oven is coming up to temperature, grab a 9×13 inch baking pan. For easy removal of our finished bars and to make cleanup a breeze, I highly recommend lining the pan with parchment paper. Make sure to leave an overhang on the sides; these will act as convenient “handles” to lift the entire slab of cookie bars out of the pan once they’re cool. If you don’t have parchment paper, a thorough greasing and flouring of the pan will work, but trust me, the parchment paper method is a game-changer for these bars. You want to make sure the parchment lies as flat as possible against the bottom and sides to prevent any uneven baking or weird shapes in your cookie base. Taking these few moments now to prepare your pan will save you a lot of hassle later when it’s time to cut and serve your beautiful Almond Joy Cookie Bars.
Crafting the Irresistible Cookie Bar Base:
This is where the magic begins for our delicious Almond Joy Cookie Bars! The base of these bars is a wonderfully rich, buttery cookie, providing the perfect foundation for our layers of coconut and chocolate. To start, in a large mixing bowl, either with an electric mixer or a stand mixer fitted with the paddle attachment, cream together the softened unsalted butter and granulated sugar. This step is crucial; you want to beat them together until the mixture is light, fluffy, and pale in color. This process incorporates air, which contributes to the tender texture of our cookie base. Don’t rush this stage; it typically takes about 2-3 minutes of beating on medium speed. Scrape down the sides of the bowl occasionally to ensure everything is evenly combined.
Once your butter and sugar are beautifully creamed, crack in the large egg and add the vanilla extract. Continue to beat on medium speed until these new additions are fully incorporated into the mixture. The mixture might look a little curdled at first, but keep mixing until it’s smooth and homogenous again. This ensures that the egg is fully emulsified, providing proper structure and moisture to our cookie bars. A well-mixed wet ingredient base is key for consistent results.
In a separate, smaller bowl, whisk together your dry ingredients: the all-purpose flour, baking powder, and salt. Whisking them together before adding them to the wet ingredients ensures that the leavening agent and salt are evenly distributed throughout the flour. This prevents pockets of unmixed ingredients and helps achieve a uniform texture in your cookie base. Nobody wants a mouthful of just baking powder!
Now, gradually add the dry ingredients to the wet ingredients, mixing on low speed until just combined. It’s very important at this stage not to overmix. Overmixing flour develops the gluten too much, which can result in a tough, chewy cookie base rather than the tender one we’re aiming for. Stop mixing as soon as you no longer see any streaks of dry flour. The dough will be thick and somewhat sticky, but it should be manageable. Use a rubber spatula to give it a final mix by hand, making sure to scrape the bottom of the bowl and bring up any unmixed flour.
Finally, press this wonderful cookie dough evenly into the bottom of your prepared 9×13 inch baking pan. You can use your hands, a lightly floured rolling pin, or even the bottom of a measuring cup to help spread it out. The goal is an even layer across the entire bottom of the pan. This forms the delicious foundation for your ultimate Almond Joy Cookie Bars. Take your time here; an even base will ensure even baking and a beautiful presentation. This base will be partially baked, so getting it right from the start is important for the structural integrity of our multi-layered treat. We are aiming for a solid, golden-brown base that can support the decadent filling and topping.
The Heart of the Bars: Creating the Coconut Almond Filling:
Now for the star of the show, the iconic coconut and almond layer that truly makes these treats worthy of being called Almond Joy Cookie Bars! This filling is rich, chewy, and packed with flavor, perfectly mimicking your favorite candy bar. In a large mixing bowl, combine the sweetened condensed milk and vanilla extract. Whisk these two together until they are well combined. The sweetened condensed milk is the magical binder here, not only providing incredible sweetness but also giving the coconut its signature sticky, chewy texture once baked. The vanilla just adds a little extra warmth and depth to the sweetness.
Next, add the star ingredient: the shredded sweetened coconut. If you can only find unsweetened, you might need to adjust the amount of condensed milk slightly or add a touch more sugar to compensate, but sweetened coconut truly gives the best and most authentic flavor for these bars. Fold the coconut into the condensed milk mixture until every strand is thoroughly coated. This might take a few minutes of patient stirring. You want to ensure there are no dry spots, as these could lead to an inconsistent texture in your filling. The mixture will be quite thick and sticky, which is exactly what we’re looking for.
Finally, it’s time to add the crunch! Stir in the roughly chopped whole almonds. I prefer whole almonds for a more substantial bite and a pronounced nutty flavor, but slivered almonds work just as well if that’s what you have on hand or prefer for a slightly different texture. Make sure the almonds are evenly distributed throughout the coconut mixture. Every single bite of your Almond Joy Cookie Bars should feature that delightful crunch of almond alongside the chewy coconut and rich chocolate.
Once everything is thoroughly mixed, set this glorious filling aside. It’s ready to be spread over our partially baked cookie base. The combination of the sweet, moist coconut and the crunchy almonds is what defines the “Almond Joy” experience in these cookie bars. This filling is surprisingly simple to make, yet it delivers a powerful punch of flavor and texture that makes these bars so incredibly addictive. Ensuring all ingredients are well-mixed here guarantees that every slice of your finished Almond Joy Cookie Bars will be perfectly balanced in taste and texture, living up to its tempting name.
Assembling and Baking Your Almond Joy Cookie Bars:
With our cookie base ready and our coconut-almond filling prepped, it’s time to bring these layers together before they hit the oven to transform into glorious Almond Joy Cookie Bars. First, take your prepared baking pan with the pressed cookie dough base. We’re going to give this base a head start in the oven. Bake the cookie base in your preheated 350°F (175°C) oven for 10-12 minutes. You’re not looking for it to be fully cooked through, but rather set around the edges and lightly golden. This partial bake helps the base firm up enough to support the heavy coconut filling without becoming soggy, ensuring a perfectly structured bar. It also creates a slight barrier, preventing the sweetened condensed milk from soaking too deeply into the cookie layer, keeping each component distinct and delicious.
Once the base has had its initial bake, carefully remove the pan from the oven. The edges should be set, and the center might still look a little soft, which is perfectly fine. Immediately and carefully spread the entire coconut-almond filling evenly over the warm, partially baked cookie base. Use an offset spatula or the back of a spoon to gently spread the sticky mixture right to the edges of the pan. Be patient here, as the filling is quite thick and may try to cling to your spreading tool. The warmth of the cookie base will slightly help with the spreading, making it a bit more pliable. You want a smooth, uniform layer of the coconut mixture across the entire surface; this ensures that every piece of your Almond Joy Cookie Bars will have a consistent amount of that fantastic filling.
After the coconut-almond layer is spread, place the pan back into the oven. Continue baking for another 25-30 minutes, or until the coconut layer is beautifully golden brown and appears set. Keep a close eye on it during the last 10 minutes of baking, as coconut can go from perfectly golden to burnt quite quickly. If you notice the edges browning too fast, you can loosely tent the pan with aluminum foil for the last few minutes of baking. The key here is for the coconut to be toasted and fragrant, and the entire bar to feel firm when gently pressed in the center. The sweetened condensed milk will have caramelized slightly, creating a wonderfully chewy and flavorful layer. This second bake is crucial for achieving that perfect chewy texture in the coconut filling that defines our Almond Joy Cookie Bars.
Once baked to perfection, remove the pan from the oven and place it on a wire rack. It’s important to let the bars cool in the pan for at least 15-20 minutes before proceeding to the next step. This initial cooling period allows the layers to set further and makes it easier to add the chocolate topping without it melting too rapidly and running off the sides. A stable base and filling are key before we introduce our luscious chocolate. The aroma filling your kitchen right now will be absolutely heavenly, a true testament to the deliciousness that is about to unfold!
The Grand Finale: Decadent Chocolate Topping:
The moment we’ve all been waiting for—the rich, smooth chocolate topping that truly brings our Almond Joy Cookie Bars together and makes them irresistible! Once your baked bars have cooled for at least 15-20 minutes in the pan, they are ready for their chocolatey crown. In a microwave-safe bowl, combine the semi-sweet chocolate chips, the optional milk chocolate chips (if using for extra creaminess), and the 2 tablespoons of unsalted butter. If you’re using a double boiler, place the chocolate and butter in the top bowl over simmering water, ensuring the bottom of the bowl doesn’t touch the water. Stir occasionally until completely melted and smooth. If you’re going the microwave route, which is often quicker and simpler for home baking, microwave the mixture in 30-second intervals, stirring thoroughly after each interval, until the chocolate is completely melted and smooth. Be very careful not to overheat the chocolate, as it can seize and become grainy. Patience and low power settings are your friends here.
Once the chocolate and butter mixture is perfectly melted and silky smooth, stir in the 1/2 teaspoon of vanilla extract. This isn’t just for flavor; a touch of vanilla can also help to smooth out the chocolate and give it a beautiful sheen. Stir until the vanilla is fully incorporated. You’ll be left with a glossy, aromatic chocolate ganache-like topping that is just begging to be spread over your warm, fragrant cookie bars. The quality of your chocolate here truly shines, so using good quality chips will make a noticeable difference in the final taste and texture of your Almond Joy Cookie Bars.
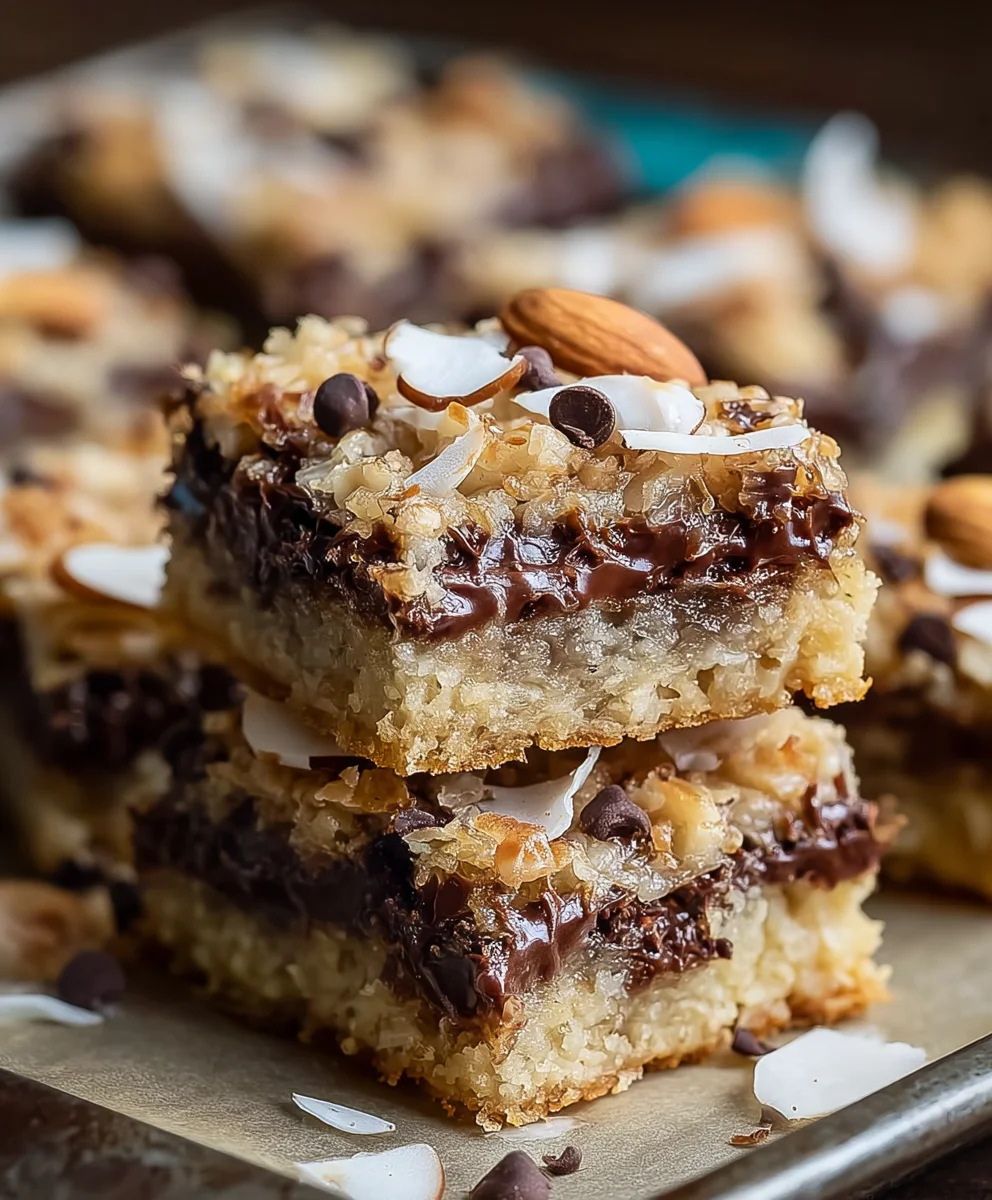
Immediately pour the melted chocolate topping over the slightly cooled coconut-almond layer in the pan. Using an offset spatula or the back of a spoon, spread the chocolate evenly across the entire surface of the bars, right up to the edges. You want a consistent layer of chocolate to ensure that every bite is perfectly balanced with all three elements. Work relatively quickly here, as the chocolate will start to set as it cools. If you like, this is the perfect time to add any optional garnishes! While the chocolate is still wet, sprinkle some additional whole or slivered almonds over the top. You could even add a few extra shreds of coconut if you want to really emphasize the “Almond Joy” theme. The almonds will adhere to the wet chocolate, creating a beautiful and appetizing finish. This final touch not only adds visual appeal but also provides an extra layer of texture and flavor.
After spreading the chocolate and adding any garnishes, it’s crucial to allow the chocolate to set completely. This is best achieved by placing the pan in the refrigerator for at least 1-2 hours, or until the chocolate is firm to the touch. This chilling process ensures that the chocolate topping sets up beautifully, making the bars much easier to cut cleanly and preventing a messy situation when serving. Rushing this step will result in a sticky, soft topping that might not hold its shape. Trust me, the wait is absolutely worth it for perfectly firm Almond Joy Cookie Bars that are a dream to slice and serve. The anticipation builds, but the reward is a truly magnificent homemade treat.
Cooling and Serving Your Perfect Almond Joy Cookie Bars:
Congratulations! You’re almost at the finish line of creating your incredible Almond Joy Cookie Bars. The most challenging part now is the waiting, but trust me, it’s absolutely essential for the best results. Once your bars have been thoroughly chilled in the refrigerator for at least 1-2 hours, and the chocolate topping is completely firm to the touch, it’s time to prepare them for serving. Carefully remove the pan from the refrigerator. Now, this is where that parchment paper overhang truly comes in handy! Gently lift the entire slab of cookie bars out of the baking pan by holding onto the parchment paper “handles.” Place the whole slab onto a sturdy cutting board. This method prevents any scratching of your pan and makes cutting much, much easier.
To achieve clean, professional-looking slices, I have a little trick: use a large, sharp knife, and warm it up slightly under hot water. Wipe the knife dry between each cut. This simple step helps the knife glide through the cold chocolate topping and the chewy coconut layer without dragging or cracking the chocolate. Decide on your desired bar size. I usually aim for about 16-24 bars, depending on how generous I’m feeling, making them perfect for sharing or savoring. Remember, these are rich, decadent bars, so even a smaller piece is incredibly satisfying. Take your time with the cuts, pressing down firmly but steadily. After each cut, wipe the knife clean to prevent chocolate buildup, which can lead to messy edges. The cleaner the knife, the cleaner the slice!
Once your Almond Joy Cookie Bars are perfectly cut, you can arrange them on a serving platter. They are best enjoyed at room temperature or slightly chilled, depending on your preference. If you’ve been particularly patient and let them sit out for 15-20 minutes after cutting, the cookie base will soften slightly, and the coconut will become chewier, offering a delightful contrast to the firm chocolate. The flavors really meld and intensify as they come closer to room temperature, providing that perfect balance of sweet, nutty, and chocolatey goodness that defines these bars.
For storage, any leftover Almond Joy Cookie Bars (if there are any!) should be stored in an airtight container. They will keep well at room temperature for up to 3-4 days, but if you want to extend their freshness and keep the chocolate topping firm, you can store them in the refrigerator for up to a week. Just be aware that refrigeration might make the cookie base a little firmer, so letting them sit out for a few minutes before eating is often a good idea. You can also freeze these bars for longer storage, up to 2-3 months. Simply wrap individual bars tightly in plastic wrap, then place them in a freezer-safe container or bag. Thaw them in the refrigerator or at room temperature before serving. Whether for a party, a special treat, or just because, these homemade Almond Joy Cookie Bars are truly a delightful creation that everyone will adore. Enjoy every single indulgent bite!
Conclusion:
And there you have it! We’ve journeyed together through the simple steps of creating what I genuinely believe will become a new favorite in your baking repertoire. I can’t express enough how much joy these bars bring, both in the making and, more importantly, in the devouring. What makes this recipe an absolute must-try isn’t just its straightforward process, nor is it merely the nostalgic nod to a beloved candy bar; it’s the magical combination of textures and flavors that come together in perfect harmony. You get that wonderfully chewy, tender cookie base, generously studded with crunchy almonds and sweet coconut, all enveloped in a rich chocolatey goodness. Every single bite delivers a burst of that familiar, irresistible flavor profile. These Almond Joy Cookie Bars are truly a game-changer for anyone who loves a dessert that’s easy to make but tastes incredibly indulgent. They strike that perfect balance between homemade comfort and gourmet delight, making them ideal for any occasion, from a casual weeknight treat to a show-stopping potluck contribution. I promise you, once you try them, you’ll understand exactly what I mean about their undeniable appeal. They’re simply irresistible, providing a perfect blend of sweetness, crunch, and chew that satisfies every craving. It’s the kind of treat that effortlessly brightens an ordinary day and always earns rave reviews when shared.
Now, let’s talk about how to make these delightful treats even more extraordinary, or perhaps how to enjoy them in new and exciting ways. While they are absolutely phenomenal straight from the pan, either warm or at room temperature, I highly recommend experimenting with a few serving suggestions to truly elevate the experience. Imagine serving a warm square of these bars with a scoop of vanilla bean ice cream melting slowly over the top – pure dessert heaven! The contrast between the warm, chewy bar and the cold, creamy ice cream is simply divine, creating a dynamic interplay of temperatures and textures that is utterly luxurious. They also pair beautifully with a strong cup of coffee or a comforting mug of tea, making them an ideal afternoon pick-me-up or a delightful accompaniment to your morning brew. For a fancier presentation, a light dusting of powdered sugar or a delicate drizzle of melted chocolate can elevate their appearance without much effort, transforming them into a sophisticated dessert suitable for entertaining. Don’t be afraid to think outside the box!
Get Creative: Serving & Flavor Variations!
Beyond serving, these bars offer a fantastic canvas for culinary creativity, allowing you to tailor them to your specific tastes or dietary needs. While the classic “Almond Joy” profile is undeniably delicious, you can easily adapt the recipe to suit your preferences or what you have on hand. For those who aren’t keen on almonds, try substituting them with chopped pecans or walnuts for a different nutty dimension and a slightly earthier flavor. You could even use a mix of different nuts for a richer, more complex taste. If you’re a chocolate connoisseur, feel free to switch out the milk chocolate chips for dark chocolate for a more intense, bittersweet experience, which perfectly balances the sweetness of the coconut. Alternatively, use white chocolate for a creamier, sweeter touch, or even a blend of all three for a multi-layered chocolate sensation. Some might even enjoy adding a handful of butterscotch chips or toffee bits for an extra layer of sweetness and texture, providing a delightful surprise in every bite. Looking for a little extra indulgence? A sprinkle of flaky sea salt over the top before baking can really enhance the chocolate and coconut flavors, offering that gourmet sweet-and-salty kick that so many adore. For a festive holiday twist, consider adding a touch of peppermint extract to the batter and crushing some candy canes to sprinkle over the top before baking for a cheerful “peppermint patty” style bar, perfect for seasonal gatherings. The possibilities are truly endless, limited only by your imagination and what delights your palate. You can also make a double batch and freeze half for later – they thaw beautifully, making them perfect for unexpected guests or a quick dessert fix. Just wrap them tightly in plastic wrap and then foil, and they’ll keep for several weeks in the freezer, ready to bring joy whenever you need it.
Your Baking Adventure Awaits!
So, what are you waiting for? I genuinely encourage you to roll up your sleeves, gather your ingredients, and give this incredible recipe a try. There’s an unparalleled satisfaction that comes from baking something delicious from scratch, and I promise you, the smiles these bars will bring to your family and friends will be well worth the minimal effort. Don’t just read about them; experience the magic yourself! Once you’ve baked your batch of these delightful treats, I would absolutely love to hear all about your experience. Did you stick to the classic recipe, or did you venture into some of the wonderful variations we discussed? What was your favorite part of the process, and what did your taste testers think? Did you serve them warm with a scoop of ice cream, or enjoy them chilled with a comforting cup of coffee? Please, share your stories, your triumphs, and even your creative modifications in the comments below. Your insights and ideas are so valuable! Better yet, if you snap a photo of your magnificent creation, tag me so I can see your beautiful work! Your feedback and experiences are incredibly valuable, not just to me, but to other aspiring bakers in our community who are looking for inspiration and confirmation. Let’s spread the joy of baking and delicious treats together. Happy baking, my friends!
Best Almond Joy Cookie Bars: A Sweet Coconut-Almond Delight
Transform the classic Almond Joy candy bar into simple, shareable cookie bars. These decadent bars feature a chewy cookie base, generously studded with moist coconut, rich chocolate chips, and perfectly toasted almonds. They are surprisingly easy to prepare and a guaranteed crowd-pleaser.
Ingredients
-
1 cup (2 sticks) unsalted butter, softened
-
1 cup granulated sugar
-
1 large egg
-
1 tsp vanilla extract
-
2 cups all-purpose flour
-
1 tsp baking powder
-
1/2 tsp salt
-
1/4 cup toffee bits (optional)
-
1 (14 oz) can sweetened condensed milk
-
4 cups shredded sweetened coconut
-
1/4 tsp coconut extract (optional)
-
1 1/2 cups whole almonds, roughly chopped
-
1 1/2 cups semi-sweet chocolate chips (or dark chocolate chips, optional substitute)
-
1/2 cup milk chocolate chips (optional)
-
2 tbsp unsalted butter
-
1/2 tsp vanilla extract
-
Additional whole or slivered almonds (optional, for garnish)
-
Extra melted chocolate (optional, for drizzling)
Instructions
-
Step 1
Preheat oven to 350°F (175°C). Line a 9×13 inch baking pan with parchment paper, leaving an overhang. -
Step 2
In a large bowl, cream softened butter and granulated sugar until light and fluffy. Beat in egg and 1 tsp vanilla extract. In a separate bowl, whisk together flour, baking powder, and salt. Gradually add dry ingredients to wet, mixing on low speed until just combined. Fold in toffee bits, if using. Press dough evenly into the prepared pan. -
Step 3
In a large bowl, whisk together sweetened condensed milk and 1 tsp vanilla extract. Stir in shredded sweetened coconut and coconut extract, if using, until fully coated. Fold in roughly chopped almonds until evenly distributed. -
Step 4
Bake cookie base for 10-12 minutes until edges are set. Remove from oven. Immediately spread the coconut-almond filling evenly over the warm base. Return pan to oven and bake for another 25-30 minutes, or until coconut layer is golden brown and set. Remove and let cool in the pan on a wire rack for 15-20 minutes. -
Step 5
In a microwave-safe bowl, combine chocolate chips (semi-sweet or dark), optional milk chocolate chips, and 2 tbsp unsalted butter. Microwave in 30-second intervals, stirring until completely melted and smooth. Stir in 1/2 tsp vanilla extract. Pour melted chocolate over the slightly cooled bars and spread evenly. Sprinkle with additional almonds for garnish or drizzle with extra melted chocolate, if desired. -
Step 6
Place pan in the refrigerator for at least 1-2 hours, or until chocolate is completely firm. Lift bars from pan using parchment overhang and place on a cutting board. Use a warm, sharp knife (wiping clean between cuts) to cut into 16-24 bars. Store in an airtight container at room temperature for 3-4 days, or in the refrigerator for up to a week.
Important Information
Nutrition Facts (Per Serving)
It is important to consider this information as approximate and not to use it as definitive health advice.
Allergy Information
Please check ingredients for potential allergens and consult a health professional if in doubt.


Leave a Comment