
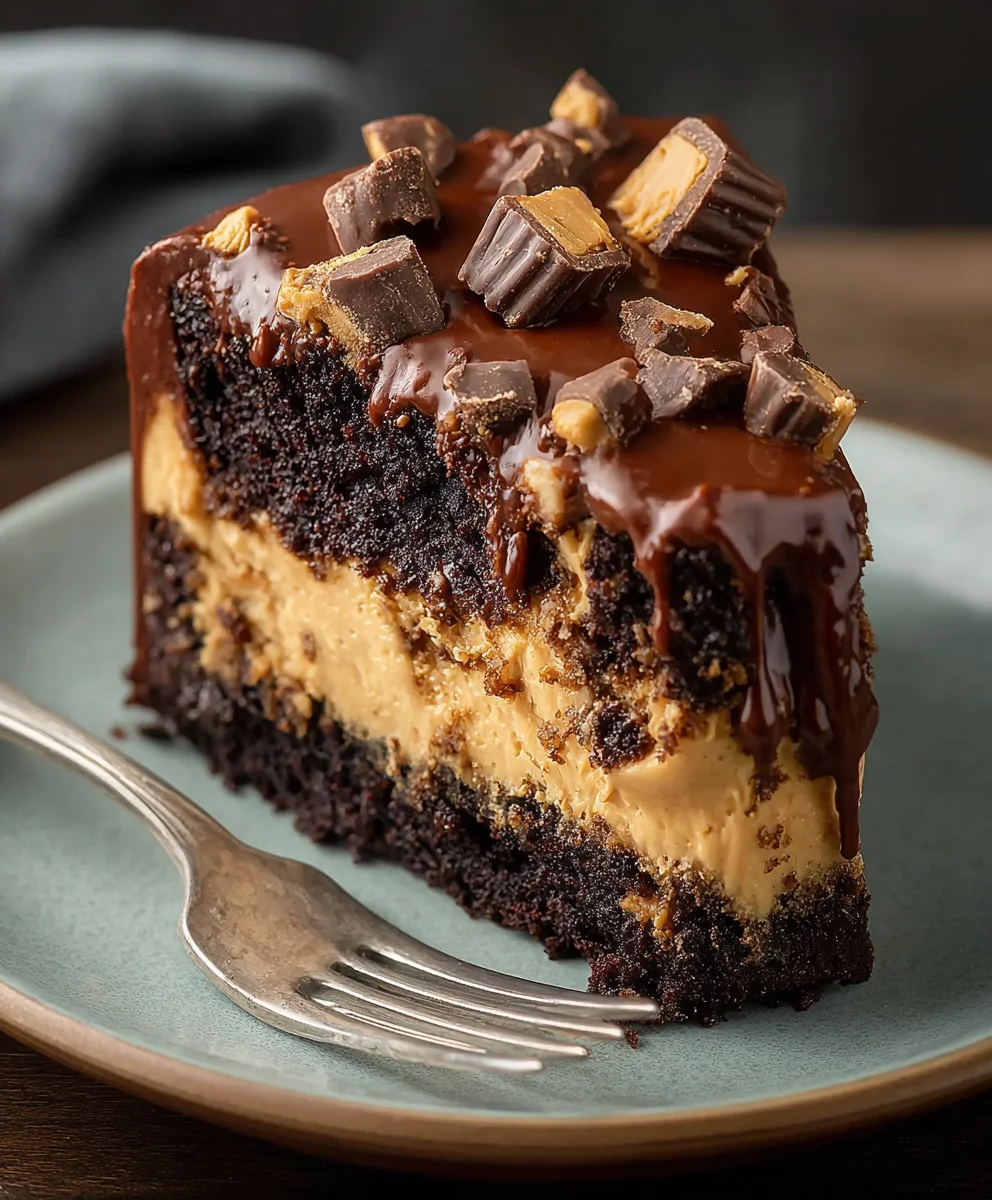
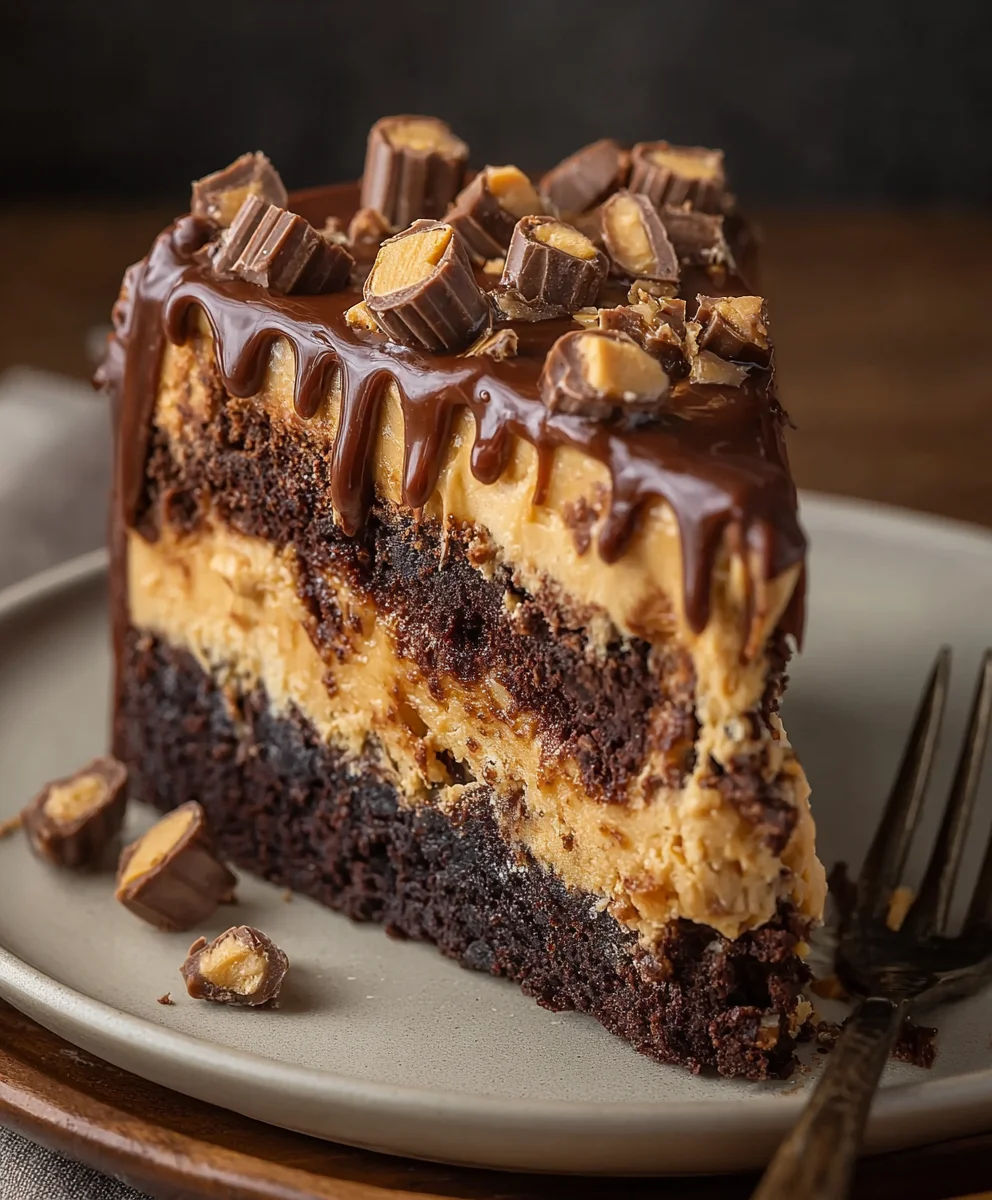
Chocolate Peanut Butter Cake is more than just a dessert; it’s a celebration of two of the world’s most beloved flavors coming together in perfect harmony. From the very first forkful, you are transported to a realm of pure culinary bliss, where the deep, luxurious notes of chocolate meld seamlessly with the creamy, slightly salty goodness of peanut butter. This iconic pairing, a testament to American ingenuity and taste, gained widespread popularity with the advent of accessible peanut butter in the early 20th century, quickly finding its way into countless confections, with the cake form becoming a particularly decadent expression.
It’s no wonder why this particular combination holds such a special place in our hearts. People adore its irresistible balance of sweet and savory, the moist crumb of the cake, and the velvety smooth frosting that melts in your mouth. Whether it’s a birthday, a holiday, or just a Tuesday evening craving, a slice of a perfectly crafted Chocolate Peanut Butter Cake offers unparalleled comfort and joy. Prepare yourself to discover a recipe that promises to deliver on every one of those delicious expectations.
Ingredients:
-
For the Rich Chocolate Cake Layers:
- 2 ½ cups (300g) all-purpose flour, sifted
- 1 ½ cups (300g) granulated sugar
- 1 cup (100g) unsweetened cocoa powder, high-quality, sifted
- 2 teaspoons baking soda
- 1 teaspoon baking powder
- 1 teaspoon fine sea salt
- 1 cup (240ml) buttermilk, at room temperature
- ½ cup (120ml) vegetable oil (or other neutral oil)
- 2 large eggs, at room temperature
- 1 teaspoon pure vanilla extract
- 1 cup (240ml) freshly brewed hot coffee (or hot water), I prefer coffee as it deepens the chocolate flavor beautifully
-
For the Creamy Peanut Butter Filling & Drip:
- 1 cup (240g) unsalted butter, softened
- 1 ½ cups (380g) creamy peanut butter (I love using natural, no-stir varieties for the best flavor)
- 4 cups (480g) powdered sugar, sifted
- 1 teaspoon pure vanilla extract
- ¼ teaspoon fine sea salt
- ¼ cup (60ml) heavy cream (you might need a little more or less depending on desired consistency)
- 2-3 tablespoons milk (for thinning the drip)
-
For the Velvety Chocolate Buttercream Frosting:
- 1 cup (240g) unsalted butter, softened
- 4 ounces (113g) good quality semi-sweet or bittersweet chocolate, melted and slightly cooled
- ¾ cup (75g) unsweetened cocoa powder, sifted
- 4 cups (480g) powdered sugar, sifted
- ½ teaspoon fine sea salt
- 2 teaspoons pure vanilla extract
- ½ cup (120ml) heavy cream (or milk), I prefer cream for a richer texture
- Preheat and Prepare: First things first, let’s get those oven temperatures right! Preheat your oven to 350°F (175°C). Next, take three 8-inch round cake pans and grease them thoroughly. I like to use a baking spray with flour, or you can butter and flour them. For extra insurance against sticking, line the bottoms with parchment paper circles. This step is crucial for easy cake removal and a beautiful Chocolate Peanut Butter Cake presentation.
- Combine Dry Ingredients: In a large mixing bowl, whisk together the sifted all-purpose flour, granulated sugar, unsweetened cocoa powder, baking soda, baking powder, and salt. Whisking ensures everything is evenly distributed, which is key for a consistent cake texture. I always make sure there are no lumps in the cocoa, as that can lead to pockets of concentrated bitterness.
- Combine Wet Ingredients (except coffee): In a separate medium bowl, whisk together the buttermilk, vegetable oil, large eggs, and vanilla extract until well combined and smooth. The eggs should be at room temperature, as this helps them emulsify better with the other ingredients, leading to a more uniform batter.
- Combine Wet and Dry: Pour the wet ingredients into the dry ingredients. Using a rubber spatula or a hand mixer on low speed, mix until just combined. Be careful not to overmix here; overmixing can develop the gluten in the flour too much, resulting in a tough cake. We want tender and moist!
- Add Hot Coffee: Now, for the secret ingredient that truly makes this a decadent Chocolate Peanut Butter Cake: the hot coffee! Slowly pour the hot coffee (or hot water) into the batter, mixing on low speed until the batter is smooth and a bit thin. Don’t be alarmed by the thin consistency; this is perfectly normal and contributes to the incredible moistness and richness of the cake. The coffee doesn’t make the cake taste like coffee, but it significantly enhances the chocolate flavor.
- Divide and Bake: Divide the batter evenly among your three prepared 8-inch cake pans. I often use a kitchen scale to ensure exact equal portions for level cake layers. Bake for 30-35 minutes, or until a wooden skewer or toothpick inserted into the center of a cake comes out with only a few moist crumbs attached, or clean. The exact baking time can vary depending on your oven, so keep an eye on them.
- Cooling the Layers: Once baked, remove the cakes from the oven and let them cool in their pans on a wire rack for about 10-15 minutes. This allows them to set properly before handling. After this initial cooling, carefully invert the cakes onto the wire rack, remove the parchment paper, and let them cool completely. This step is paramount! Attempting to frost warm cakes will lead to a melty, disastrous mess. I cannot stress enough the importance of letting them cool completely, preferably to room temperature or even slightly chilled, before moving on.
- Cream the Butter and Peanut Butter: In a large mixing bowl, using an electric mixer, cream together the softened unsalted butter and creamy peanut butter on medium-high speed until light and fluffy. This typically takes 3-5 minutes. Scrape down the sides of the bowl as needed to ensure everything is incorporated evenly. This forms the delicious core of our Chocolate Peanut Butter Cake.
- Add Powdered Sugar and Flavorings: Gradually add the sifted powdered sugar, about one cup at a time, mixing on low speed until incorporated after each addition. Once all the powdered sugar is in, add the vanilla extract and salt. Increase the speed to medium-high and beat for another 2-3 minutes until the mixture is very light and fluffy.
- Achieve the Right Consistency: Slowly add the heavy cream, one tablespoon at a time, beating after each addition, until your peanut butter filling reaches a smooth, spreadable consistency. For the layers of your Chocolate Peanut Butter Cake, you want it thick enough to hold its shape but easy to spread. It should be a truly glorious, rich peanut butter cloud.
- Prepare the Drip: Scoop out about ½ to ¾ cup of the prepared peanut butter filling into a separate small bowl. To this portion, add 2-3 tablespoons of milk, one tablespoon at a time, mixing until it reaches a pourable, slightly thinner consistency that will easily drip down the sides of the cake. It should still be opaque and have body, not watery. Set both the thicker filling and the thinner drip aside at room temperature while you make the frosting.
- Melt the Chocolate: In a heatproof bowl, melt the semi-sweet or bittersweet chocolate. You can do this in a microwave in 30-second intervals, stirring after each, or over a double boiler. Once melted, let it cool slightly but ensure it’s still pourable. This is going to give our Chocolate Peanut Butter Cake a fantastic chocolate punch.
- Cream the Butter: In a large mixing bowl, beat the softened unsalted butter with an electric mixer on medium-high speed until it’s light and fluffy, about 3-4 minutes. Scrape down the sides of the bowl regularly.
- Combine with Cocoa and Sugar: Gradually add the sifted unsweetened cocoa powder and about half of the sifted powdered sugar to the creamed butter. Mix on low speed until incorporated, then increase to medium speed and beat until well combined.
- Add Remaining Ingredients: Pour in the slightly cooled melted chocolate, the remaining powdered sugar, salt, and vanilla extract. Beat on low speed until combined, then gradually add the heavy cream (or milk), one tablespoon at a time, mixing until it reaches your desired frosting consistency.
- Whip Until Fluffy: Once all ingredients are combined, increase the mixer speed to medium-high and beat for an additional 3-5 minutes. The frosting should become incredibly light, airy, and fluffy, almost like whipped mousse, yet stable enough to spread beautifully. This rich chocolate frosting is what pulls the entire Chocolate Peanut Butter Cake together. If it’s too thick, add a tiny bit more cream; if too thin, add a tablespoon or two more powdered sugar.
- Level the Cakes: Once your cake layers are completely cool, use a serrated knife or a cake leveler to carefully level the tops of each cake layer. This ensures a stable and even Chocolate Peanut Butter Cake. This step is not strictly necessary if your cakes baked perfectly flat, but I often find it improves the final look.
- First Layer and Filling: Place one leveled cake layer on your serving plate or cake stand. If using a turntable, this makes frosting much easier! Spoon about 1 to 1 ½ cups of the thicker peanut butter filling onto the center of the cake layer. Using an offset spatula, spread the filling evenly to the edges, creating a luscious layer of peanut butter goodness.
- Second Layer and Filling: Carefully place the second cake layer on top of the peanut butter filling. Gently press down to secure it. Repeat the filling process, spreading another 1 to 1 ½ cups of peanut butter filling evenly to the edges.
- Third Layer and Crumb Coat: Place the final cake layer on top. Now, it’s time for the crumb coat – a thin layer of chocolate buttercream frosting that locks in any loose crumbs, ensuring a smooth and clean final finish. Apply a thin, even layer of the chocolate buttercream over the top and sides of the entire cake. Don’t worry about perfection here; its sole job is to catch crumbs. Pop the cake into the refrigerator for 15-20 minutes, or until the crumb coat is firm to the touch. This step is a game-changer for a professional-looking Chocolate Peanut Butter Cake.
- Final Frosting Layer: Once the crumb coat is chilled and firm, take the remaining chocolate buttercream and apply a generous, even layer over the top and sides of the entire cake. Use an offset spatula or a bench scraper to smooth the frosting to your desired finish. I love a rustic swirl, but you can go for perfectly smooth. Take your time with this layer; it’s the face of your magnificent Chocolate Peanut Butter Cake.
- Apply the Peanut Butter Drip: Retrieve your thinned peanut butter drip. Using a spoon, gently drizzle the peanut butter mixture around the top edge of the cake, allowing it to slowly drip down the sides. You can control the length and thickness of the drips by how much you spoon on. I like to do a full circle of drips first, then fill in the center of the cake top with the remaining peanut butter drip, smoothing it out for a neat finish.
- Final Touches and Chill: If you wish, you can pipe a border of remaining chocolate frosting around the top edge of the cake, or even add some chopped roasted peanuts or miniature chocolate chips for extra texture and visual appeal. Once decorated, place the finished Chocolate Peanut Butter Cake in the refrigerator for at least 30 minutes to allow the frosting and drip to set completely.
- Serve and Enjoy: When ready to serve, let the Chocolate Peanut Butter Cake sit at room temperature for about 15-20 minutes to allow the flavors and textures to soften slightly for the ultimate experience. Slice into generous portions and prepare for smiles. This cake keeps well covered in the refrigerator for up to 3-4 days.
1. Preparing the Rich Chocolate Cake Layers
2. Crafting the Creamy Peanut Butter Filling & Drip
3. Whipping Up the Velvety Chocolate Buttercream Frosting
4. Assembling the Ultimate Chocolate Peanut Butter Cake
Conclusion:
So, there you have it, my friends! We’ve journeyed through the delightful process of creating what I truly believe is one of the most irresistible desserts you’ll ever have the pleasure of baking and devouring. This isn’t just any cake; it’s a symphony of flavors, a masterclass in combining two of the world’s most beloved ingredients into a single, show-stopping creation. If you’ve been looking for a recipe that promises both comfort and culinary excitement, something that will utterly captivate your taste buds and impress everyone you share it with, then this is absolutely your sign to stop scrolling and start preheating your oven. I’ve poured my heart into perfecting this recipe, ensuring that every step is clear, every ingredient plays its part, and the final result is nothing short of spectacular. The rich, moist chocolate sponge, the unbelievably creamy and dreamy peanut butter frosting, and that perfect hint of salt to balance the sweetness – it all comes together in an exquisite dance on your palate. It’s a guaranteed crowd-pleaser, a dessert that sparks joy with every single forkful, and a truly unforgettable experience that will have everyone asking for the recipe. Trust me when I say, this is one that will earn you legendary status among your friends and family.
Why This Recipe Is an Absolute Must-Try
What makes this particular recipe stand head and shoulders above the rest? It’s the meticulous balance, the careful layering of textures and tastes that results in pure perfection. The foundation is a deeply chocolatey cake, so moist it practically melts in your mouth, achieved through a blend of cocoa powder and perhaps a touch of coffee to deepen that chocolate flavor without making it taste like coffee. Then, we layer on a generous amount of that luxurious peanut butter frosting, which isn’t just sweet; it’s got that undeniable nutty richness, a slight saltiness that cuts through the sweetness beautifully, preventing it from being cloying. It’s the kind of frosting you’ll want to eat with a spoon directly from the bowl, but please, save some for the cake! The combination isn’t just good; it’s legendary. It evokes childhood memories for many, yet it’s sophisticated enough for any adult palate. This isn’t merely a dessert; it’s an experience, a celebration of two ingredients that were simply made to be together. It’s robust enough to satisfy even the most intense cravings, yet surprisingly light in texture, leaving you wanting just one more slice (or perhaps two!). It’s the ideal centerpiece for a birthday celebration, a comforting treat for a cozy evening, or the perfect showstopper for a holiday gathering. The aroma alone, as it bakes, is enough to get your mouth watering and build anticipation to an almost unbearable degree. And let’s be honest, who can resist the timeless allure of chocolate and peanut butter? This recipe elevates that classic pairing to new, mouth-watering heights.
Serving Suggestions and Delightful Variations to Explore
Now, while this magnificent creation is absolutely perfect on its own, there are so many wonderful ways to elevate your serving experience or put your own personal twist on it! Imagine serving a slice of this incredible Chocolate Peanut Butter Cake ever-so-slightly warm, perhaps with a scoop of vanilla bean ice cream melting gently alongside it – pure bliss! The warmth enhances the chocolate, and the cool ice cream provides a delightful temperature contrast. For an extra touch of decadence, a drizzle of warm chocolate ganache or a sprinkle of chopped roasted peanuts on top would not go amiss. If you’re feeling extra fancy, consider a dollop of freshly whipped cream, perhaps infused with a hint of vanilla or even a tiny splash of a complementary liqueur for an adult-only treat. Don’t be afraid to experiment with your garnishes! Mini peanut butter cups, chocolate shavings, or even a light dusting of cocoa powder can add both visual appeal and textural interest. For those who love a bit of crunch, a sprinkle of flaky sea salt right before serving can truly make the flavors sing, enhancing both the sweet and the nutty notes. And if you’re looking to adapt this recipe, consider turning it into cupcakes for individual servings – perfect for parties! You could also experiment with different types of nut butter, though I highly recommend sticking to classic peanut butter for that iconic flavor profile. For dietary considerations, many of my readers have successfully adapted this recipe using gluten-free flour blends and dairy-free alternatives, proving its versatility without compromising on flavor. Just remember to adjust leavening agents or liquid content as needed when making substitutions. The beauty of this recipe lies in its adaptability, allowing you to tailor it to your preferences and dietary needs, ensuring that absolutely everyone can enjoy a slice of this heavenly dessert. Think about making it for your next big family dinner or a casual get-together with friends; it’s sure to be the star of the show.
Your Turn: Bake, Share, and Inspire!
I genuinely cannot wait for you to experience the magic of this recipe. It’s more than just baking; it’s about creating moments, sharing joy, and indulging in something truly special. So, please, gather your ingredients, set aside some time, and embark on this delicious adventure. Don’t be intimidated; follow the steps, and I promise you’ll be rewarded with a dessert that will make your heart (and your stomach!) sing. Once you’ve taken that glorious first bite, I would absolutely love to hear all about your experience. Did you make any fun variations? What was your favorite part of the baking process? Did it bring smiles to the faces of your loved ones? Please, share your stories, your photos, and your triumphs! Tag me on social media, leave a comment below, or send me an email – I thrive on hearing about your culinary successes. Your feedback not only brightens my day but also inspires other bakers in our community. Let’s celebrate the joy of homemade goodness together. This recipe is a testament to the fact that sometimes, the simplest pleasures – like the perfect blend of chocolate and peanut butter – can bring the greatest happiness. Go forth and bake, my friends, and prepare to fall head over heels in love with your new favorite dessert!
Chocolate Peanut Butter Cake
Indulge in a rich and creamy chocolate peanut butter dessert featuring a crunchy Oreo crust and luscious milk chocolate ganache. The smooth peanut butter cheesecake filling is loaded with miniature chocolate chips and topped with decadent ganache, creating an irresistible treat. Garnished with Reese’s cups and chopped peanuts, this dessert is perfect for special occasions or simply satisfying your sweet cravings. Follow detailed instructions for a flawless result, from preparing the crust to mastering the ganache drizzle.
Ingredients
-
2 ½ cups (300g) all-purpose flour, sifted
-
1 ½ cups (300g) granulated sugar
-
1 cup (100g) unsweetened cocoa powder, sifted
-
2 teaspoons baking soda
-
1 teaspoon baking powder
-
1 teaspoon fine sea salt
-
1 cup (240ml) buttermilk
-
½ cup (120ml) vegetable oil
-
2 large eggs
-
1 teaspoon pure vanilla extract
-
1 cup (240ml) hot coffee or hot water
-
1 cup (240g) unsalted butter, softened
-
1 ½ cups (380g) creamy peanut butter
-
4 cups (480g) powdered sugar, sifted
-
1 teaspoon pure vanilla extract
-
¼ teaspoon fine sea salt
-
¼ cup (60ml) heavy cream
-
2-3 tablespoons milk
-
1 cup (240g) unsalted butter, softened
-
4 ounces (113g) semi-sweet or bittersweet chocolate, melted and cooled
-
¾ cup (75g) unsweetened cocoa powder, sifted
-
4 cups (480g) powdered sugar, sifted
-
½ teaspoon fine sea salt
-
2 teaspoons pure vanilla extract
-
½ cup (120ml) heavy cream
Instructions
-
Step 1
Preheat oven to 350°F (175°C). Grease and flour three 8-inch round cake pans; line bottoms with parchment paper. In a large bowl, whisk together 2 ½ cups (300g) all-purpose flour, 1 ½ cups (300g) granulated sugar, 1 cup (100g) unsweetened cocoa powder, 2 teaspoons baking soda, 1 teaspoon baking powder, and 1 teaspoon fine sea salt. -
Step 2
In a separate medium bowl, whisk together 1 cup (240ml) buttermilk, ½ cup (120ml) vegetable oil, 2 large eggs, and 1 teaspoon pure vanilla extract. Pour the wet ingredients into the dry; mix until just combined. Slowly add 1 cup (240ml) hot coffee (or hot water) to the batter, mixing on low speed until smooth and thin. -
Step 3
Divide batter evenly among the prepared pans. Bake for 30-35 minutes, or until a wooden skewer inserted into the center comes out with only a few moist crumbs. Cool cakes in their pans for 10-15 minutes, then invert onto a wire rack, remove parchment paper, and cool completely. -
Step 4
In a large mixing bowl, cream 1 cup (240g) softened unsalted butter and 1 ½ cups (380g) creamy peanut butter until light and fluffy. Gradually add 4 cups (480g) sifted powdered sugar, 1 teaspoon pure vanilla extract, and ¼ teaspoon fine sea salt; beat on medium-high for 2-3 minutes until very light and fluffy. Slowly add ¼ cup (60ml) heavy cream until the filling is smooth and spreadable. -
Step 5
Scoop out ½ to ¾ cup of the prepared peanut butter filling into a separate small bowl. Add 2-3 tablespoons milk, one tablespoon at a time, mixing until it reaches a pourable, slightly thinner consistency for the drip. Set aside. -
Step 6
Melt 4 ounces (113g) semi-sweet or bittersweet chocolate; let it cool slightly but remain pourable. In a large mixing bowl, beat 1 cup (240g) softened unsalted butter until light and fluffy. Gradually add ¾ cup (75g) sifted unsweetened cocoa powder and half of the 4 cups (480g) sifted powdered sugar; mix on low speed until incorporated. -
Step 7
Pour in the cooled melted chocolate, the remaining powdered sugar, ½ teaspoon fine sea salt, and 2 teaspoons pure vanilla extract. Beat on low speed until combined, then gradually add ½ cup (120ml) heavy cream, mixing until desired frosting consistency. Increase mixer speed to medium-high and beat for an additional 3-5 minutes until the frosting is incredibly light, airy, and fluffy. -
Step 8
Once cake layers are completely cool, use a serrated knife or a cake leveler to level the tops if needed. Place one leveled cake layer on your serving plate or cake stand. Spoon about 1 to 1 ½ cups of the thicker peanut butter filling onto the center of the cake layer; spread evenly to the edges. Carefully place the second cake layer on top, gently press, and repeat the filling process with another 1 to 1 ½ cups of peanut butter filling. Place the final cake layer on top. -
Step 9
Apply a thin, even layer of the chocolate buttercream frosting (crumb coat) over the top and sides of the entire cake. Refrigerate for 15-20 minutes, or until the crumb coat is firm to the touch. -
Step 10
Once the crumb coat is chilled and firm, apply a generous, even layer of the remaining chocolate buttercream over the top and sides of the entire cake, smoothing to your desired finish. Retrieve your thinned peanut butter drip. Using a spoon, gently drizzle the peanut butter mixture around the top edge of the cake, allowing it to slowly drip down the sides. Fill in the center of the cake top with any remaining peanut butter drip, smoothing it out. Optionally, pipe a border of chocolate frosting or add chopped roasted peanuts/miniature chocolate chips. Place the finished cake in the refrigerator for at least 30 minutes to allow the frosting and drip to set completely. -
Step 11
When ready to serve, let the cake sit at room temperature for about 15-20 minutes to allow the flavors and textures to soften slightly. Slice into generous portions. This cake keeps well covered in the refrigerator for up to 3-4 days.
Important Information
Nutrition Facts (Per Serving)
It is important to consider this information as approximate and not to use it as definitive health advice.
Allergy Information
Please check ingredients for potential allergens and consult a health professional if in doubt.

Leave a Comment