
Smores Sliders offer a delightful and innovative twist on a beloved classic, transforming the quintessential campfire treat into an effortlessly shareable dessert that can be enjoyed anywhere, anytime. I remember the pure joy of making traditional s’mores as a child, patiently toasting marshmallows over an open flame, a tradition that dates back to the early 20th century with recipes appearing in Girl Scout handbooks. While the smoky aroma and crackling fire are undeniably charming, bringing that same magic indoors, without the fuss, is precisely what makes Smores Sliders so incredibly appealing.
Why These Smores Sliders Are Your Next Go-To Dessert!
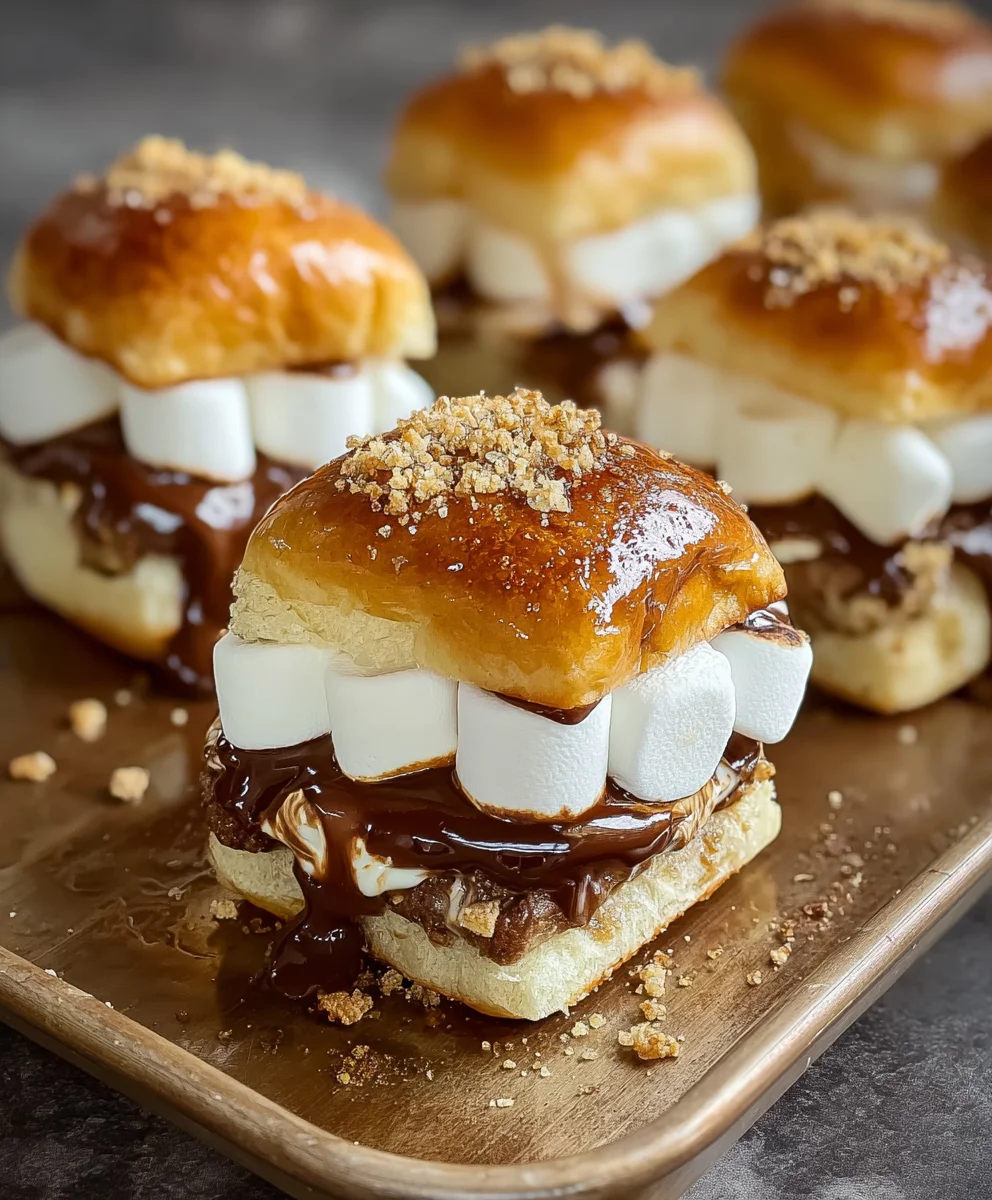
This ingenious take brings together the iconic trio of graham crackers, rich melted chocolate, and irresistibly gooey marshmallow, all nestled within a soft, buttery slider bun. The convenience factor alone is a game-changer; no more sticky fingers from wrestling with hot marshmallows or searching for the perfect roasting stick. People adore this dish because it delivers that nostalgic, comforting flavor profile in a perfectly portioned, incredibly easy-to-handle package. It’s the ultimate crowd-pleaser for parties, a cozy family movie night, or simply when a craving for something sweet and spectacular strikes. Prepare to fall in love with the ultimate mess-free, delicious dessert experience!
Ingredients:
- 1 (12-count) package King’s Hawaiian Sweet Rolls: Or any similar brand of pull-apart dinner rolls. The inherent sweetness and incredibly soft, fluffy texture of these rolls are absolutely paramount for creating the perfect Smores Sliders experience. They provide a delightful contrast to the rich chocolate and gooey marshmallows.
- 2 cups semi-sweet chocolate chips: These are my go-to for a balanced chocolate flavor that isn’t overly sweet. However, don’t feel limited! You can easily swap these for milk chocolate chips for a sweeter, more traditional s’mores flavor, dark chocolate chips for a more sophisticated, less sweet profile, or even a combination of your favorites. Breaking up classic Hershey’s milk chocolate bars also works wonderfully to evoke that nostalgic campfire taste for your Smores Sliders.
- 2 cups mini marshmallows: While larger marshmallows certainly have their place, mini marshmallows are truly superior for Smores Sliders. They melt much more evenly and quickly, ensuring that every single bite has that perfect, gooey marshmallow pull without large, unmelted pockets. They also create a more consistent, cohesive layer.
- 2 tablespoons unsalted butter, melted: This isn’t just for greasing; brushing the tops of the rolls with melted butter gives them a beautiful golden-brown crust, adds a lovely richness, and enhances the overall texture of your Smores Sliders. It’s a small step that makes a big difference.
- Optional: 1/4 cup graham cracker crumbs: For those who crave an even more authentic s’mores flavor and a delightful textural crunch, graham cracker crumbs are a fantastic addition. You can sprinkle them over the chocolate layer, or even mix them into the chocolate chips for a more integrated flavor.
- Optional: 1 teaspoon vanilla extract: A tiny splash of vanilla stirred into the melted butter before brushing can really elevate the aroma and underlying sweetness of the Smores Sliders, adding another layer of flavor complexity.
Equipment You’ll Need:
- 9×13 inch baking dish: This standard-sized, oven-safe pan is perfectly suited to snugly fit a 12-count package of Hawaiian rolls. The snug fit is important because it helps the rolls stay together during baking, allowing the filling to melt into a cohesive layer across all the Smores Sliders.
- Serrated knife: A long, sharp serrated knife is absolutely essential for cleanly slicing the entire block of rolls horizontally. Its saw-like edge glides through the soft bread without tearing or flattening, ensuring you create neat top and bottom layers for easy assembly of your Smores Sliders.
- Small microwave-safe bowl or saucepan: For efficiently melting the butter. A small bowl in the microwave or a tiny saucepan on the stovetop will work perfectly.
- Pastry brush: This tool is ideal for evenly applying the melted butter over the tops of the rolls. Even coverage ensures a consistent golden crust and even tenderness across all your Smores Sliders. If you don’t own one, the back of a spoon or even a folded paper towel can suffice in a pinch, but a pastry brush offers the best results.
- Measuring cups and spoons: As with any baking endeavor, accurate measurement of ingredients is key to achieving the perfect balance of flavors and textures in your Smores Sliders.
Preparing Your Smores Sliders: The Foundation for Sweet Success
- Preheat Your Oven and Prepare the Dish: My first step in any baking adventure is always to get the oven ready. I set it to a reliable 350°F (175°C). This temperature is ideal for melting the chocolate and marshmallows slowly and evenly, preventing them from scorching while still toasting the rolls beautifully. While the oven is preheating, I grab my trusty 9×13 inch baking dish. For Smores Sliders, I usually don’t find it necessary to grease the dish because the rolls themselves contain enough natural oils, and the melted chocolate and marshmallows, while gooey, don’t tend to stick stubbornly. However, if you’re ever concerned about sticking, a quick spray with non-stick cooking spray on the bottom of the dish provides extra insurance and ensures your delicious Smores Sliders lift out effortlessly.
- Slice the Rolls with Precision: This is a genuinely crucial step for the structural integrity of your Smores Sliders! Carefully remove the Hawaiian rolls from their packaging, keeping them as one connected block. Using your long serrated knife, meticulously slice the entire block of rolls horizontally in half. Think of it as slicing a large cake layer. You want to create a distinct “top” slab and a “bottom” slab of rolls. The key here is to maintain their connection; don’t separate the individual rolls just yet. Keeping them connected at this stage makes the subsequent assembly much, much simpler, ensuring that all your Smores Sliders bake together into a unified, delectable dessert.
- Arrange the Bottom Layer: Once sliced, gently separate the top from the bottom half. Place the entire bottom slab of rolls into your prepared baking dish. Take a moment to ensure they fit snugly and form an even, flat layer across the entire bottom of the pan. This stable base is where we’ll build all the glorious layers of chocolate and marshmallows that will make up our incredibly irresistible Smores Sliders.
Assembling the Smores Sliders: Layers of Pure Joy
- Layer with Chocolate – The First Wave: Now, for the moment we’ve all been waiting for – the delicious fillings! I like to generously sprinkle about half of the chocolate chips (approximately 1 cup) evenly over the entire surface of the bottom layer of rolls. I make sure to distribute them well, ensuring they fall into any natural crevices between the individual rolls. This initial layer of chocolate will melt down to create a rich, indulgent foundation that permeates the bread, giving every bite of your Smores Sliders a wonderful chocolatey base. If you’ve decided to incorporate graham cracker crumbs for that extra authentic s’mores crunch, this is the perfect time to sprinkle about half of your measured crumbs (if using 1/4 cup total) over this first chocolate layer. It adds an incredible textural and flavor dimension.
- Add the Marshmallows – Cloud-Like Gooeyness: Next up, I lavishly sprinkle all of the mini marshmallows (approximately 2 cups) over the chocolate layer. My philosophy here is simple: don’t be shy! The more marshmallows, the gooier and more magnificent your Smores Sliders will be. I take care to distribute them as evenly as possible across the entire surface. This ensures that every single roll gets its fair share of fluffy, soon-to-be-toasted marshmallow goodness. Remember, these mini marshmallows will puff up significantly in the oven, so a good, thick layer now will result in maximum gooey delight later.
- Second Layer of Chocolate – Double the Delight: To guarantee an absolute abundance of chocolatey deliciousness, I then sprinkle the remaining 1 cup of chocolate chips over the blanket of marshmallows. This top layer of chocolate will melt beautifully, slowly seeping down and around the marshmallows, essentially encapsulating them in a warm, molten embrace. This creates an incredibly rich and satisfying interior for your Smores Sliders. If you held back some graham cracker crumbs from step 4, now is the time to sprinkle the remaining half over this final chocolate layer. It’s all about building those layers of flavor!
- Top with the Rolls – Completing the Package: Very carefully, I take the top half of the sliced rolls and place them back over the glorious filling. I make sure to align them as best as possible with the bottom halves, essentially re-forming the original block of rolls. I then gently press down on the top layer to help compact all the layers slightly. This completes the slider assembly, perfectly encasing all the molten chocolate and gooey marshmallow goodness within the soft, sweet bread, ready for baking.
- Butter the Tops – For Golden Perfection: In my small microwave-safe bowl, I melt the 2 tablespoons of unsalted butter. If I’m using the optional vanilla extract, I stir it into the melted butter at this point, allowing its aroma to infuse. Using my pastry brush, I then liberally brush the melted butter over the entire top surface of the rolls. This step is far more than just aesthetic; it is truly key for achieving that irresistible golden-brown crust and a subtle, savory note that wonderfully balances the inherent sweetness of the Smores Sliders. The butter also helps keep the rolls wonderfully tender and moist during the baking process.
Baking Your Smores Sliders to Perfection: The Gooey Transformation
- Bake Until Golden and Gooey: With all the preparation complete, it’s time for the true magic to happen! I carefully place the baking dish into my preheated oven. The Smores Sliders will need to bake for approximately 15-20 minutes. During this crucial stage, I always make sure to keep a very close eye on them. What I’m looking for are several tell-tale signs: the tops of the rolls should be a beautiful, inviting golden brown, the marshmallows should be gloriously puffed up and lightly toasted to a delightful golden hue (or even slightly charred at the edges, if you prefer that authentic campfire touch), and most importantly, the chocolate should be completely melted and wonderfully gooey. The intoxicating aroma that will soon fill your kitchen is an undeniable indicator that your Smores Sliders are almost perfectly done and ready to be devoured!
- Broiler Option for Extra Toastiness (Handle with Care!): If, after the initial 15-20 minutes of baking, the marshmallows on top aren’t quite as toasted or golden as you’d like, there’s a fantastic, albeit cautious, option: the broiler. You can carefully turn on your oven’s broiler for just 1-2 minutes. I cannot stress this enough: you must be extremely watchful during this step. Marshmallows have a notorious tendency to go from perfectly golden to completely burnt in a literal blink of an eye. I usually leave the oven door slightly ajar and stand right there, fully prepared to pull the dish out the very second they reach that perfect level of toasty perfection. This step is entirely optional, but for me, it truly enhances the “s’mores” experience, giving your Smores Sliders that classic, slightly charred, campfire-roasted marshmallow flavor and appearance.
Serving and Enjoying Your Smores Sliders: The Sweet Payoff
- Rest Before Serving: Once your Smores Sliders are baked to absolute perfection, with golden tops and bubbly, melted filling, carefully remove the baking dish from the oven. I know, I know – the temptation to dive right in is incredibly strong! However, please, trust me on this important step: let them rest in the baking dish for about 5-10 minutes. This brief resting period is crucial. It allows the incredibly hot, molten chocolate and marshmallows to set up just slightly. This makes them significantly less runny and much, much easier to separate and serve without all that glorious filling oozing out excessively and making a delicious mess. It also serves the practical purpose of preventing any accidental burns from the super-hot, molten interior. Patience truly pays off here.
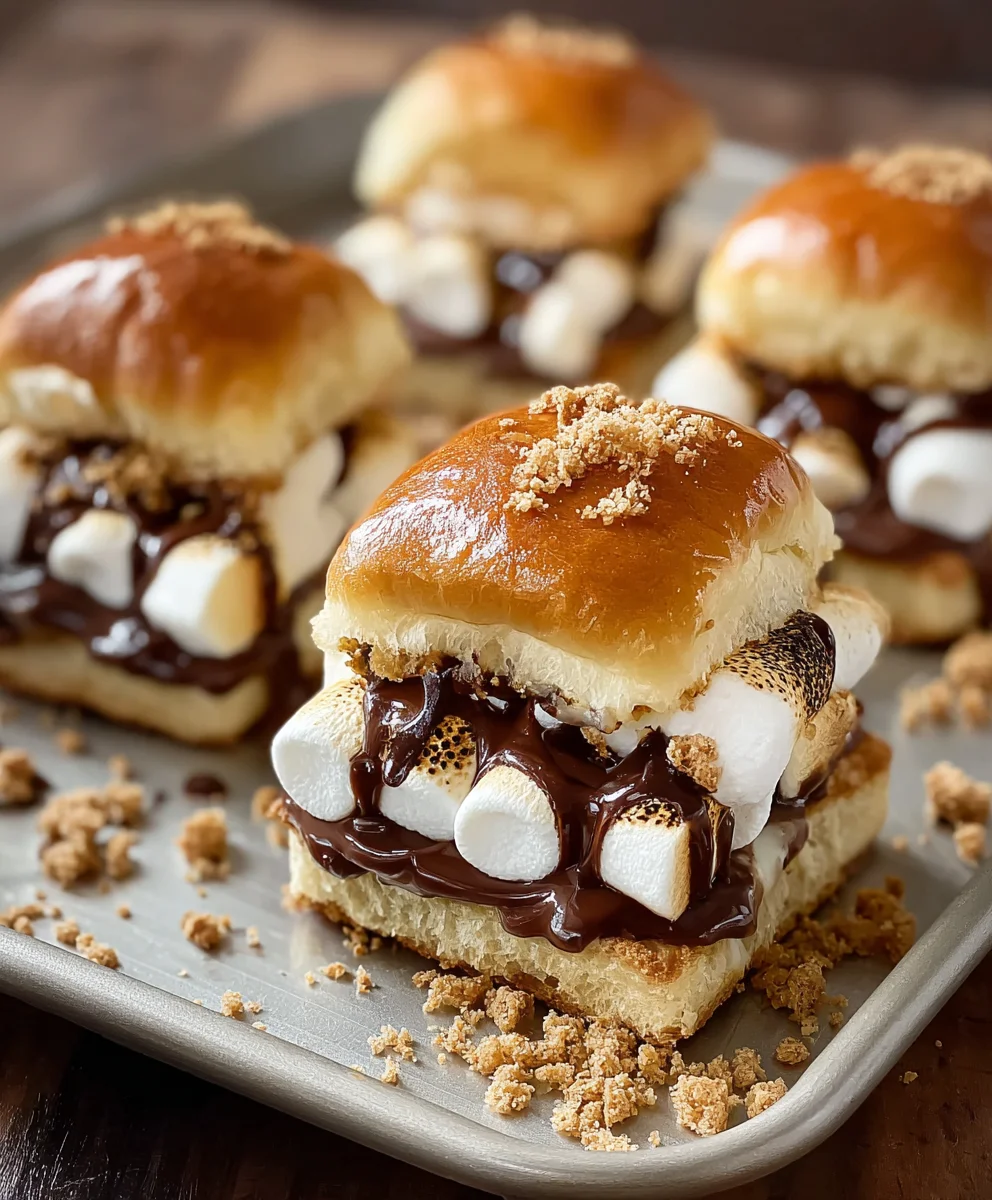
- Separate and Serve the Sweetness: After the short, but essential, resting period, you can now use a knife or a sturdy spatula to gently separate the individual Smores Sliders. Because they were baked together as a cohesive block, they will pull apart easily, each one a perfect, self-contained little package of s’mores goodness. The bread will be wonderfully soft, and the filling will be deliciously gooey. Serve them warm, allowing everyone to experience the ultimate gooey, chocolatey, marshmallowy delight in its prime. These Smores Sliders are truly best enjoyed when the filling is still warm and melty.
Tips & Tricks for the Ultimate Smores Sliders Experience
Customizing Your Smores Sliders to Perfection
- Chocolate Choices Abound: While my recipe calls for semi-sweet chocolate chips, the world of chocolate is your oyster when it comes to Smores Sliders! Don’t hesitate to experiment with different varieties. I’ve had fantastic results using rich milk chocolate for a sweeter, more comforting profile, or opting for dark chocolate chips for a more intense, less sugary flavor that grown-ups often adore. A combination of different chocolate types can also add wonderful depth and complexity. For that truly authentic, nostalgic campfire s’mores experience, I highly recommend breaking up actual Hershey’s milk chocolate bars to scatter inside; they melt beautifully and carry that unmistakable classic flavor profile.
- Marshmallow Magic and Substitutions: While mini marshmallows are my steadfast choice for their even melting, if you only have larger ones on hand, don’t despair! You can easily snip them into smaller, more manageable pieces using clean kitchen shears. For those seeking a gourmet touch, keep an eye out for flavored marshmallows, like vanilla bean or chocolate swirled varieties, which can introduce delightful new dimensions to your Smores Sliders.
- Graham Cracker Crunch Reinvented: Graham cracker crumbs are an excellent addition, as mentioned. You can sprinkle them liberally between the chocolate and marshmallow layers for a distinct crunch. For an even more integrated flavor and texture, I sometimes like to mix the crumbs directly into the chocolate chips before layering. An adventurous alternative is to gently press graham cracker halves onto the bottom of the rolls before adding any fillings; this creates a wonderfully robust, classic s’mores base, though it can make the individual Smores Sliders a bit harder to cut and serve cleanly.
- Exciting Add-ins and Flavor Boosters: Don’t be afraid to get creative with additional ingredients! A light sprinkle of finely chopped nuts (pecans or walnuts work beautifully) can add a lovely texture and earthy note. A drizzle of warm caramel sauce over the top before baking, or even after, can introduce a luxurious sweetness. A tiny pinch of flaky sea salt, especially when paired with dark chocolate, truly enhances and balances all the sweet flavors. For a surprisingly delightful twist, consider spreading a very thin layer of raspberry jam on the bottom rolls before the chocolate; the fruitiness pairs wonderfully with the rich chocolate.
Mastering the Baking Process for Perfect Smores Sliders
- Preventing the Dreaded Burnt Marshmallows: This is arguably the most crucial piece of advice for any marshmallow-containing baked good. The number one rule is to watch them like a hawk! Marshmallows can transition from perfectly golden and toasted to sadly burnt in mere seconds, particularly when under the high heat of a broiler. If you notice them browning too rapidly during standard baking, you can loosely tent the baking dish with aluminum foil for the last few minutes of baking to protect them.
- Ensuring Even Melting: For a consistently gooey and delightful Smores Slider experience, it’s vital to ensure your chocolate chips and marshmallows are spread as evenly as possible across the rolls. This prevents frustrating cold spots or areas where the filling hasn’t fully melted, guaranteeing that every single Smores Slider is equally gooey, chocolatey, and utterly delicious.
- The Art of Broiler Use (with Caution): If you choose to use the broiler for that extra toasted marshmallow topping, remember to position your baking dish further away from the heating element if your broiler is particularly intense. Alternatively, significantly reduce the broiling time. The ultimate goal is a beautiful, light golden char, not a carbonized crisp. Constant vigilance is key!
- Grilling Your Smores Sliders (An Adventurous Alternative): For a fantastic smoky depth of flavor, especially if you already have the grill fired up, Smores Sliders can be successfully made on the grill too! Assemble your sliders as usual in an oven-safe foil pan or a sturdy cast-iron skillet. Place the pan on indirect heat on your grill, close the lid, and cook for approximately 10-15 minutes, or until the chocolate is thoroughly melted and the marshmallows are wonderfully gooey and puffed. For that desired toasted top, you can briefly move the pan over direct heat for a few seconds (again, watching carefully!) or use a kitchen torch once you’ve removed the pan from the grill. This method imbues your Smores Sliders with an incredible, unique flavor profile.
Make-Ahead, Storage, and Reheating for Smores Sliders
- Smart Make-Ahead Preparation: Smores Sliders are wonderfully suitable for make-ahead prep, which is a lifesaver when entertaining. You can fully assemble them up to the point of brushing with butter, then cover the baking dish tightly with plastic wrap or aluminum foil, and refrigerate for up to 24 hours. When you’re ready to bake, simply allow them to sit at room temperature for 15-20 minutes while your oven preheats, then proceed with brushing the butter and following the baking instructions. This is a fantastic strategy for reducing stress on the day of a party!
- Storage for Leftovers (If You Have Any!): Leftover Smores Sliders, though they are a rare sight in my kitchen, can be stored effectively. Place them in an airtight container at room temperature for up to 2 days. While the rolls might firm up slightly over time, and the filling won’t be as molten, they will still be incredibly delicious and satisfy that sweet craving.
- Effortless Reheating: To bring your leftover Smores Sliders back to their gooey glory, I typically recommend reheating them in a preheated oven at 300°F (150°C) for about 5-10 minutes, or until the chocolate and marshmallows are beautifully softened and gooey once more. A quick zap in the microwave (around 15-30 seconds per slider) also works in a pinch, but be aware that the texture won’t be quite as good, and the marshmallows won’t get that lovely toasted quality.
Troubleshooting Common Smores Sliders Issues
- Dealing with Soggy Bottom Rolls: This can occasionally happen if the filling is excessively wet, or if the rolls sit assembled for too long before baking, allowing them to absorb too much moisture. To prevent this, ensure that your chocolate chips and marshmallows are completely dry. If you’re adding any fruit, make sure it’s not overly juicy. Baking your Smores Sliders relatively soon after assembly also helps maintain their structural integrity and prevents a soggy bottom.
- When the Filling Is Too Runny or Not Melting: If your chocolate isn’t melting properly, or the marshmallows remain stubbornly firm, it might indicate an issue with your oven’s temperature calibration or insufficient bake time. Give them a few more minutes in the oven, or consider using an oven thermometer to verify your oven’s accuracy. Sometimes, very thin chocolate chips can melt faster and appear more “runny” compared to chunkier chocolate pieces, which take longer to become fully molten.
- Preventing Dry or Hard Rolls: If the tops of your Smores Sliders are drying out too much or becoming too hard, it’s often a sign of overbaking, or perhaps not applying enough melted butter to the tops of the rolls. The melted butter acts as a crucial protective layer, keeping the rolls wonderfully tender and preventing them from becoming dry. If you notice them browning too quickly, you can always loosely tent the baking dish with aluminum foil for the remaining bake time.
Why Smores Sliders Are a Must-Try Dessert: The Ultimate Crowd-Pleaser
The Irresistible Appeal of Smores Sliders
Smores Sliders have truly become a cherished staple in my dessert repertoire, and for incredibly good reason. They possess a magical quality, taking all the nostalgic, comforting, and utterly delightful flavors of a classic campfire s’more and ingeniously transforming them into an unbelievably convenient, eminently shareable, and utterly irresistible baked treat. Just imagine for a moment: luscious, gooey melted chocolate, perfectly toasted marshmallows with their sugary chew, all harmoniously nestled within soft, slightly sweet Hawaiian rolls. It’s a culinary combination that is nothing short of pure magic, meticulously designed to bring genuine smiles and sighs of contentment to every single face lucky enough to partake. This dish isn’t just another dessert; it’s an experience, a delightful memory-maker, and an instant conversation starter, making it absolutely perfect for any gathering, big or small. The very essence of Smores Sliders lies in their ability to evoke that childlike wonder and joy with every single bite.
Effortless Entertainment for Any Occasion
One of the most compelling and practical advantages of making Smores Sliders is their absolute ease of preparation. Forget the elaborate setup, the finicky individual skewers, or even the unpredictable whims of outdoor weather that a traditional s’mores session demands. With Smores Sliders, everything effortlessly comes together in one single baking dish, which dramatically streamlines cleanup and makes the assembly process straightforward enough for even the most novice of bakers. This incredible convenience makes them an unparalleled choice for last-minute gatherings, a guaranteed hit at potlucks, the star of any family movie night, or simply a special, indulgent treat for yourself after a long week. They scale up beautifully and effortlessly for larger crowds, becoming a fantastic and stress-free solution for feeding many happy dessert lovers without breaking a sweat or spending hours in the kitchen. Whether it’s a casual backyard BBQ, a lively birthday party, a cozy holiday get-together, or even a simple weeknight dessert, these Smores Sliders consistently steal the show and receive rave reviews. They truly embody comfort food at its finest, offering a delicious, warm taste of childhood innocence and joy with every single, magnificent bite.
Versatility and Customization: Your Smores, Your Way
Beyond their undeniable deliciousness and remarkable ease of preparation, Smores Sliders offer an astonishing degree of versatility and customization. As I highlighted in the tips section, the inherent flexibility to easily swap or customize ingredients means you can expertly tailor them to suit a wide spectrum of specific preferences or even dietary considerations (within the delightful realm of dessert, of course!). Do you desire a richer, more intense chocolate experience? Simply opt for dark chocolate chips. Prefer a sweeter, more traditional indulgence? Lean into milk chocolate and perhaps consider a delicate sprinkle of brown sugar over the top for an extra caramelized note. The myriad of optional additions, such as crunchy graham cracker crumbs, finely chopped nuts, or even a sophisticated hint of flaky sea salt, empower you to effortlessly elevate the dish and truly make it your own unique creation. This incredible adaptability ensures that Smores Sliders can feel fresh, exciting, and new every single time you decide to make them, actively encouraging culinary exploration and delightful creative twists. They are, in essence, a delectable blank canvas for deliciousness, warmly inviting you to experiment fearlessly and discover your absolute favorite combination of flavors and textures. I promise you, with complete confidence, that once you experience the joy of making and tasting these Smores Sliders, they will very quickly become a beloved, eagerly anticipated favorite in your home for years to come.
Conclusion:
So, there you have it! We’ve journeyed through the simple steps to create a truly unforgettable dessert that I promise will become an instant favorite in your household. This isn’t just another sweet treat; it’s an experience, a delightful fusion of classic campfire flavors transformed into an incredibly convenient, mess-free, and utterly irresistible package. I honestly believe that once you try these, you’ll wonder how you ever managed without them. The sheer joy of gooey marshmallow, melting chocolate, and buttery graham cracker, all perfectly nestled in a handheld delight, is something everyone deserves to savor. It’s the kind of recipe that sparks smiles, creates memories, and satisfies even the most intense sweet cravings with remarkable ease. Forget the hassle of open flames and sticky fingers; these offer all the beloved nostalgia with none of the usual fuss.
What truly sets this recipe apart, in my humble opinion, is its perfect balance of simplicity and spectacular results. You don’t need to be a seasoned baker or possess any specialized equipment to whip up a batch that looks and tastes like it came straight from a gourmet dessert shop. The magic happens right in your kitchen, often with ingredients you already have on hand. It’s a testament to the fact that some of the very best things in life are often the least complicated. I’m always on the lookout for recipes that deliver big on flavor without demanding hours of my time, and this one absolutely hits the mark. It’s quick enough for a weeknight craving but impressive enough to serve to guests at your next gathering. That versatility is a huge win in my book, making it a go-to option for countless occasions.
Now, let’s talk about making these delectable treats truly your own. While the classic combination is always a winner, I wholeheartedly encourage you to get creative with your Smores Sliders! For an extra layer of decadence, consider adding a sprinkle of sea salt flakes over the melted chocolate – it really enhances the sweetness and provides a lovely contrast. If you’re feeling adventurous, try swapping out the milk chocolate for dark chocolate or even white chocolate chips for a different flavor profile. Peanut butter cups chopped into small pieces before baking would be an absolute dream for peanut butter lovers, creating a rich, nutty twist. For a fruity variation, a thin layer of raspberry jam or sliced strawberries could be added before baking, bringing a bright, tart counterpoint to the sweetness. You could also experiment with different types of bread; brioche buns would make them even more indulgent, while mini cinnamon rolls (unrolled and flattened slightly) could add a spicy, sweet dimension.
When it comes to serving, these are phenomenal straight out of the oven, still warm and wonderfully gooey. However, they also hold up beautifully if you want to make them a little in advance and gently reheat them. Imagine serving a warm slider alongside a scoop of vanilla bean ice cream or a dollop of whipped cream – pure dessert heaven! For a more festive touch, a drizzle of caramel or chocolate sauce just before serving can elevate them to an even higher level of sophistication. And for those cool autumn evenings, a mug of hot cocoa or spiced cider makes the perfect companion. These are not just for kids, either; an adult-friendly version could involve a dash of liqueur, like Kahlua or Irish cream, mixed into a chocolate ganache before drizzling over the finished product. The possibilities are truly endless, limited only by your imagination and what delights your taste buds the most!
Your Turn to Create Sweet Memories!
I genuinely can’t wait for you to experience the magic of this recipe. It’s designed to bring joy, simplify your dessert-making, and fill your home with the most incredible aroma. Please, do yourself a favor and give these a try very soon. Whether it’s for a last-minute treat, a special family dessert, or just because you deserve something wonderfully delicious, I promise you won’t be disappointed. Once you’ve baked up a batch of these irresistible sliders, I would absolutely love to hear all about your experience. Did you stick to the classic? Or did you get creative with some exciting variations? How did your family and friends react? Your feedback, photos, and any brilliant serving suggestions you come up with are incredibly valuable and inspiring. So, grab your ingredients, preheat your oven, and prepare to delight everyone with these fantastic sweet treats. Happy baking, my friends!
Recipe
A delicious recipe
Ingredients
Instructions
Important Information
Nutrition Facts (Per Serving)
It is important to consider this information as approximate and not to use it as definitive health advice.
Allergy Information
Please check ingredients for potential allergens and consult a health professional if in doubt.

Leave a Comment