
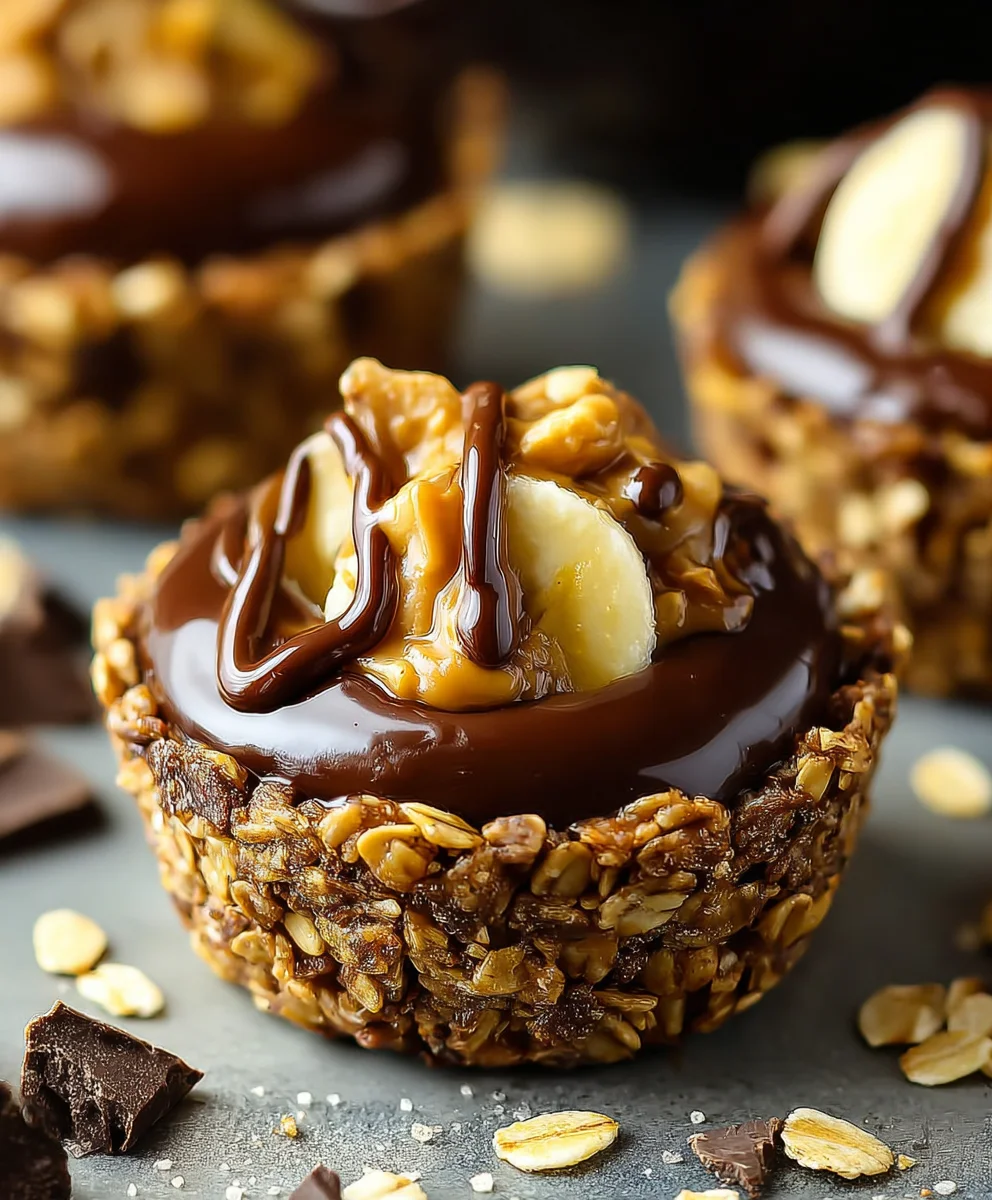
Chocolate Granola Cups With Peanut Butter Filling are not just a snack; they are, in my opinion, a miniature masterpiece, perfectly balancing indulgence with wholesome goodness. Imagine a delightful crunch followed by a creamy, decadent surprise, all wrapped in a rich chocolate shell – that’s precisely what awaits you with this incredible recipe. While the exact historical origin of this specific treat is a modern culinary innovation, its components boast a rich and fascinating lineage. Chocolate has been cherished for millennia, evolving from a sacred Aztec beverage to a global indulgence, and peanut butter, a quintessential American pantry staple, has captivated taste buds for over a century. Granola, born from the health food movements, provides that essential wholesome crunch, making this a truly unique combination.
Why We Adore These Delightful Cups
We love these Chocolate Granola Cups With Peanut Butter Filling for so many reasons. It’s the harmonious contrast that truly sets them apart: the satisfying crunch of granola against the smooth, luxurious peanut butter, all enveloped by the bittersweet embrace of chocolate. They are incredibly versatile, serving as a perfect grab-and-go breakfast, a guilt-free afternoon snack, or a delightful mini-dessert. Their make-ahead nature and convenient portion control also add to their immense appeal, making them a firm favorite for busy individuals and families alike looking for a healthier, yet utterly delicious, sweet treat.

Ingredients:
-
For the Chocolate Granola Cups:
- 2 ½ cups rolled oats: I always go for old-fashioned rolled oats for that perfect chewy texture; quick oats can sometimes make these a bit too soft.
- ½ cup unsweetened cocoa powder: Dutch-processed cocoa powder will give you a deeper, richer chocolate flavor and a darker color, which I absolutely adore in these Chocolate Granola Cups With Peanut Butter Filling.
- ½ cup pure maple syrup: This is my preferred liquid sweetener. You could also use agave nectar if that’s what you have on hand, but maple syrup adds a lovely nuanced flavor.
- ¼ cup melted coconut oil: Make sure it’s completely melted. If you don’t have coconut oil, a neutral oil like canola or vegetable oil could work, but coconut oil adds a nice subtle richness.
- ¼ cup unsweetened almond milk: Any plant-based milk will work beautifully here, or even regular dairy milk if you prefer.
- 1 teaspoon pure vanilla extract: A good quality vanilla really brings out the chocolate notes.
- ½ teaspoon sea salt: Just a pinch, but it’s essential for balancing the sweetness and enhancing the chocolate flavor. Don’t skip it!
-
For the Creamy Peanut Butter Filling:
- 1 cup creamy peanut butter: I find that natural, unsweetened creamy peanut butter works best for this filling. If your peanut butter is very thick, you might need a tiny bit more milk later. Avoid the very oily or separated kinds.
- 1 ½ cups powdered sugar (confectioners’ sugar): Sifted, if possible, to prevent any lumps in your super smooth filling. This sweetens and thickens our glorious filling.
- ¼ cup unsweetened almond milk: Or any milk of your choice. This helps to achieve that wonderfully creamy, pipeable consistency.
- 1 teaspoon pure vanilla extract: A must for enhancing that classic peanut butter flavor.
- ¼ teaspoon sea salt: Again, just a touch to truly make the peanut butter flavor pop and to cut through the sweetness.
-
Optional Toppings:
- 2 ounces dark chocolate, melted: For a decadent drizzle over your finished Chocolate Granola Cups With Peanut Butter Filling.
- Flaky sea salt: A final sprinkle for a gourmet touch and a lovely textural contrast.
- Mini chocolate chips or chopped peanuts: For extra garnish and crunch, if you’re feeling fancy.
Preparing the Chocolate Granola Cups
-
Preheat and Prepare Your Muffin Tin:
Okay, first things first, let’s get our oven ready. I always preheat my oven to 350°F (175°C). While that’s heating up, prepare a 12-cup standard muffin tin. You have a couple of options here: you can either lightly grease each muffin cup with a little coconut oil or cooking spray, or, my personal preference, line them with paper cupcake liners. I find the liners make it incredibly easy to remove the finished Chocolate Granola Cups and minimize any sticking, which can sometimes happen with granola bases. If you’re using liners, make sure they fit snugly into the cups.
-
Combine Dry Ingredients:
In a large mixing bowl, I like to start by whisking together all of my dry ingredients for the granola cups. This means adding the 2 ½ cups of rolled oats, ½ cup of unsweetened cocoa powder, and ½ teaspoon of sea salt. Take a whisk and give them a good stir until everything is thoroughly combined. You want to make sure the cocoa powder is evenly distributed, so you don’t end up with any pockets of just plain oats. This forms the delicious chocolatey base for our Chocolate Granola Cups With Peanut Butter Filling.
-
Whisk Wet Ingredients:
In a separate medium-sized bowl, it’s time to combine the wet ingredients. Pour in your ½ cup of pure maple syrup, ¼ cup of melted coconut oil, ¼ cup of unsweetened almond milk, and 1 teaspoon of pure vanilla extract. Whisk these together until they are well combined and appear uniform. It’s important that your coconut oil is fully melted and not clumpy, as this ensures even distribution throughout our granola mixture.
-
Combine Wet and Dry Mixtures:
Now for the fun part! Pour the wet mixture into the bowl with your dry oat and cocoa mixture. Using a sturdy spatula or a wooden spoon, stir everything together thoroughly until the oats are completely coated with the chocolatey liquid. You want to ensure there are no dry spots left in the bowl. This might take a minute or two of persistent stirring, but trust me, it’s worth it for a perfectly flavored granola cup. The mixture will look thick and sticky, which is exactly what we want for forming our cups.
-
Form the Granola Cups:
This step is key to getting perfectly shaped Chocolate Granola Cups With Peanut Butter Filling. Spoon about ¼ cup of the granola mixture into each prepared muffin cup. Now, here’s the crucial part: using the back of a spoon, your fingers, or even a small, clean shot glass, firmly press the granola mixture down into the bottom and up the sides of each muffin cup, forming a sturdy, compact cup shape. You really want to pack it in tightly. The more firmly you press, the less likely your granola cups are to crumble when you remove them from the tin or bite into them. I usually spend a little extra time on this step to ensure they hold their shape beautifully.
-
Bake to Perfection:
Carefully place your muffin tin into your preheated 350°F (175°C) oven. Bake for about 12-15 minutes. What we’re looking for is a slightly golden edge and for the cups to feel firm to the touch. Keep an eye on them, as oven temperatures can vary. The delicious aroma filling your kitchen will be a good indicator they’re almost ready!
-
Cool Completely:
Once baked, remove the muffin tin from the oven. This next step is incredibly important for the structural integrity of your Chocolate Granola Cups With Peanut Butter Filling. Let the granola cups cool in the muffin tin for at least 30 minutes to an hour, or even longer, until they are completely cool to the touch. As they cool, they will firm up significantly. Trying to remove them too soon will likely result in them falling apart, and nobody wants that! Once cooled, gently remove them from the muffin tin (or peel away the liners). Set them aside on a wire rack while you prepare our delectable filling.
Crafting the Creamy Peanut Butter Filling
-
Gather Your Filling Ingredients:
Now that our chocolate granola cups are cooling, it’s time to whip up the star of the show – that irresistible peanut butter filling! Make sure you have your 1 cup of creamy peanut butter, 1 ½ cups of powdered sugar, ¼ cup of unsweetened almond milk, 1 teaspoon of pure vanilla extract, and ¼ teaspoon of sea salt ready to go. Having everything measured out beforehand makes this process incredibly smooth and enjoyable.
-
Combine Peanut Butter and Sugar:
In a medium-sized mixing bowl, combine the 1 cup of creamy peanut butter with the 1 ½ cups of powdered sugar. I typically start by using a sturdy spatula to get these two incorporated. It might seem a little dry and crumbly at first, but don’t worry, it will come together beautifully once we add the liquids. If you have a stand mixer, this is a great time to use it with the paddle attachment; it makes quick work of achieving that perfectly smooth consistency.
-
Add Wet Ingredients and Flavorings:
Next, pour in the ¼ cup of unsweetened almond milk and the 1 teaspoon of pure vanilla extract into the peanut butter and sugar mixture. Don’t forget that tiny but mighty ¼ teaspoon of sea salt – it really elevates the peanut butter flavor and balances the sweetness of the powdered sugar. Continue mixing, either by hand or with your mixer, until the filling is wonderfully smooth and creamy. You’re looking for a consistency that’s thick enough to hold its shape but soft enough to be easily spooned or piped into your granola cups.
-
Adjust Consistency (If Needed):
Sometimes, depending on the thickness of your peanut butter or the humidity in your kitchen, you might need to make a slight adjustment to the filling’s consistency. If your filling seems too thick or stiff, I recommend adding just a teaspoon or two more of almond milk at a time, mixing well after each addition, until you reach that ideal, spreadable, or pipeable texture. Conversely, if it somehow seems a little too thin (which is less common with this recipe), you can whisk in a tablespoon or two more of powdered sugar until it thickens up to your liking. The perfect consistency is crucial for the success of your Chocolate Granola Cups With Peanut Butter Filling!
-
Chill the Filling (Optional but Recommended):
For an even firmer and easier-to-handle filling, especially if you plan to pipe it, I often pop the bowl of peanut butter filling into the refrigerator for about 15-20 minutes. This helps it firm up a bit more, making it less sticky and giving it a better structure for filling the cups. While this step is optional if you’re in a rush, I find it truly enhances the overall experience and presentation of these delightful treats.
Assembling and Finishing Your Chocolate Granola Cups With Peanut Butter Filling
-
Fill the Granola Cups:
Now for the grand finale of our Chocolate Granola Cups With Peanut Butter Filling! Once your granola cups are completely cool and firm, and your peanut butter filling has reached that glorious, creamy consistency, it’s time to bring them together. You have a couple of options for filling:
- Using a spoon: This is perfectly fine and often my go-to. Simply spoon a generous dollop of the peanut butter filling into each chocolate granola cup. Use the back of the spoon to gently smooth out the top or create a little swirl.
- Using a piping bag: For a neater and more professional look, I love to transfer the peanut butter filling into a piping bag fitted with a star or round tip. Pipe the filling into each cup, creating a beautiful mound or swirl on top. This method is particularly satisfying and makes your cups look extra special.
Fill them generously, as the peanut butter is a key component here!
-
Add Optional Chocolate Drizzle:
If you’re going for that extra touch of decadence (and why wouldn’t you?), now’s the time for a chocolate drizzle. Melt your 2 ounces of dark chocolate. You can do this in a microwave-safe bowl in 30-second intervals, stirring in between, or over a double boiler. Once smooth and glossy, you can either:
- Drizzle it directly over the filled cups using a spoon.
- Transfer the melted chocolate to a small ziploc bag, snip off a tiny corner, and pipe thin lines across the tops of your peanut butter-filled cups. The contrast of the dark chocolate against the pale peanut butter is simply stunning and adds another layer of rich flavor to your Chocolate Granola Cups With Peanut Butter Filling.
-
Garnish with Flaky Sea Salt or Other Toppings:
Immediately after drizzling the chocolate (if you choose to do so, before it sets!), sprinkle a tiny pinch of flaky sea salt over each cup. This small addition makes a huge difference, enhancing all the flavors and providing a delightful textural contrast. If you’re using mini chocolate chips or chopped peanuts, now’s the time to scatter those on top as well for an extra flourish and crunch.
-
Chill to Set:
This is another crucial step for ensuring your Chocolate Granola Cups With Peanut Butter Filling are perfectly set and easy to handle. Once all your cups are filled and garnished, place them into the refrigerator for at least 30-60 minutes. This chilling time allows the peanut butter filling to firm up completely and helps the chocolate drizzle (if added) to set. A firm filling makes these treats much more enjoyable to eat and prevents any messy mishaps. I often leave them in the fridge for a couple of hours or until I’m ready to serve them.
-
Serve and Store:
Once thoroughly chilled and set, your magnificent Chocolate Granola Cups With Peanut Butter Filling are ready to be devoured! Remove them from the refrigerator a few minutes before serving if you prefer the peanut butter filling slightly less firm. These cups are absolutely perfect as a wholesome breakfast on the go, a satisfying afternoon snack, or even a guilt-free dessert.
To store any leftovers (if there are any!), place them in an airtight container in the refrigerator for up to 5-7 days. They tend to firm up beautifully when chilled, making them even more delightful straight from the fridge. I sometimes even freeze them for a quick, cool treat on a hot day; just make sure to thaw them for about 10-15 minutes before enjoying. Enjoy every single bite of your homemade, utterly delicious Chocolate Granola Cups With Peanut Butter Filling!
<h2>Conclusion:</h2>
<p>Well, my friends, we’ve reached the grand finale of our culinary journey, and I genuinely hope you’re feeling as excited as I am about this incredible recipe. If there’s one dish that truly encapsulates the perfect marriage of indulgence and wholesome goodness, it has to be the <strong>Chocolate Granola Cups With Peanut Butter Filling</strong>. This isn’t just another snack; it’s a revelation, a little bite of happiness that manages to be both delightfully decadent and surprisingly satisfying. I mean, seriously, what could be better than the rich, deep notes of chocolate combined with the creamy, nutty embrace of peanut butter, all encased in a satisfyingly crunchy granola shell? It’s a symphony of textures and flavors that will undoubtedly dance on your palate, leaving you wanting just one more… and then perhaps another!</p>
<p>I’ve spent countless hours in my kitchen perfecting recipes, and every now and then, one comes along that truly captures my heart and makes me exclaim, “Everyone <em>needs</em> to try this!” This is one of those recipes. It’s a testament to simple ingredients coming together to create something truly extraordinary. Whether you’re a seasoned baker or someone who rarely ventures beyond toast, I promise you, these granola cups are incredibly forgiving and reward your efforts tenfold. They are the ultimate make-ahead treat, meaning you can whip up a batch on a lazy Sunday afternoon and enjoy delicious, homemade goodness throughout your busy week. Imagine grabbing one of these masterpieces from the fridge when that mid-afternoon slump hits, or enjoying it as a guilt-free dessert after dinner. They’re not just food; they’re a little act of self-care, a moment of pure bliss in your day. This recipe promises not just a tasty treat, but an experience that brings joy to both the creator and the consumer.</p>
<h4>Elevate Your Experience: Serving Suggestions That Shine</h4>
<p>Now that you’re armed with the knowledge of how to create these irresistible delights, let’s talk about how to truly make them shine. While they are absolutely phenomenal straight out of the freezer – giving them an almost ice-cream-like consistency, which is divine on a warm day – or chilled from the refrigerator, there are a few ways you can elevate your serving experience. For a simple yet elegant touch, consider a light dusting of cocoa powder or a tiny sprinkle of flaky sea salt over the peanut butter filling; that hint of salt really brings out the rich chocolate and balances the sweetness beautifully. If you’re feeling a bit more adventurous, a delicate drizzle of melted dark chocolate or even a thin ribbon of extra peanut butter (warmed slightly for easier drizzling) can add an extra layer of visual appeal and flavor. They also pair wonderfully with your morning coffee or a soothing cup of herbal tea, transforming your ordinary break into a mini-escape. For a truly indulgent dessert experience, try serving them alongside a scoop of vanilla bean ice cream or a dollop of fresh whipped cream; the contrasts in temperature and texture are simply heavenly. They’re also perfect for packing in lunchboxes – a much healthier and tastier alternative to store-bought processed snacks, and certainly a welcome surprise for anyone opening their lunchbox! Furthermore, consider them a sophisticated addition to a brunch spread, where their individual portion sizes make them easy to grab and enjoy.</p>
<h4>Unleash Your Inner Chef: Creative Variations to Explore</h4>
<p>Beyond the classic, the beauty of this recipe lies in its incredible versatility. Don’t be afraid to experiment and make these granola cups truly your own! If peanut butter isn’t your only love, feel free to swap it out for almond butter, cashew butter, or even sunflower seed butter for a nut-free alternative. Each will lend a unique flavor profile to the filling. You could also play with the type of chocolate you use for the cups – dark chocolate for a more intense, less sweet treat, milk chocolate for classic comfort, or even white chocolate for a different kind of sweetness and appearance. For an extra textural surprise in the filling, try mixing in a tablespoon of chia seeds for added nutrition and a slight crunch, or a sprinkle of mini chocolate chips for an extra burst of chocolatey goodness. Shredded coconut, either mixed into the filling or sprinkled on top, adds a lovely tropical note. For a truly gourmet twist, consider adding a tiny pinch of cayenne pepper to your melted chocolate for a subtle, warming kick, or a hint of orange zest to the peanut butter filling for a bright, aromatic contrast. If you’re looking to make them vegan, simply ensure your chocolate is dairy-free and your granola doesn’t contain honey or other animal products. You can also vary the granola itself; perhaps a cinnamon-spiced granola for a warmer flavor profile, or a maple-pecan granola for added richness. The possibilities are truly endless, limited only by your imagination and your pantry!</p>
<p>So, what are you waiting for? I sincerely encourage you to roll up your sleeves, gather your ingredients, and give these <strong>Chocolate Granola Cups With Peanut Butter Filling</strong> a try. I promise you won’t regret it. This recipe is designed to bring joy, deliciousness, and a touch of homemade magic into your life. Once you’ve made them, I would absolutely love to hear about your experience. Did you stick to the original, or did you venture into exciting new variations? How did your family and friends react to these delightful creations? Please share your triumphs, your tips, and your creative twists with me and our community. Your feedback is invaluable, and seeing your creations always makes my day. Tag me, leave a comment, or simply send a mental high-five! Happy baking, and enjoy every single delightful bite!</p>
Recipe
A delicious recipe
Ingredients
Instructions
Important Information
Nutrition Facts (Per Serving)
It is important to consider this information as approximate and not to use it as definitive health advice.
Allergy Information
Please check ingredients for potential allergens and consult a health professional if in doubt.
Leave a Comment