
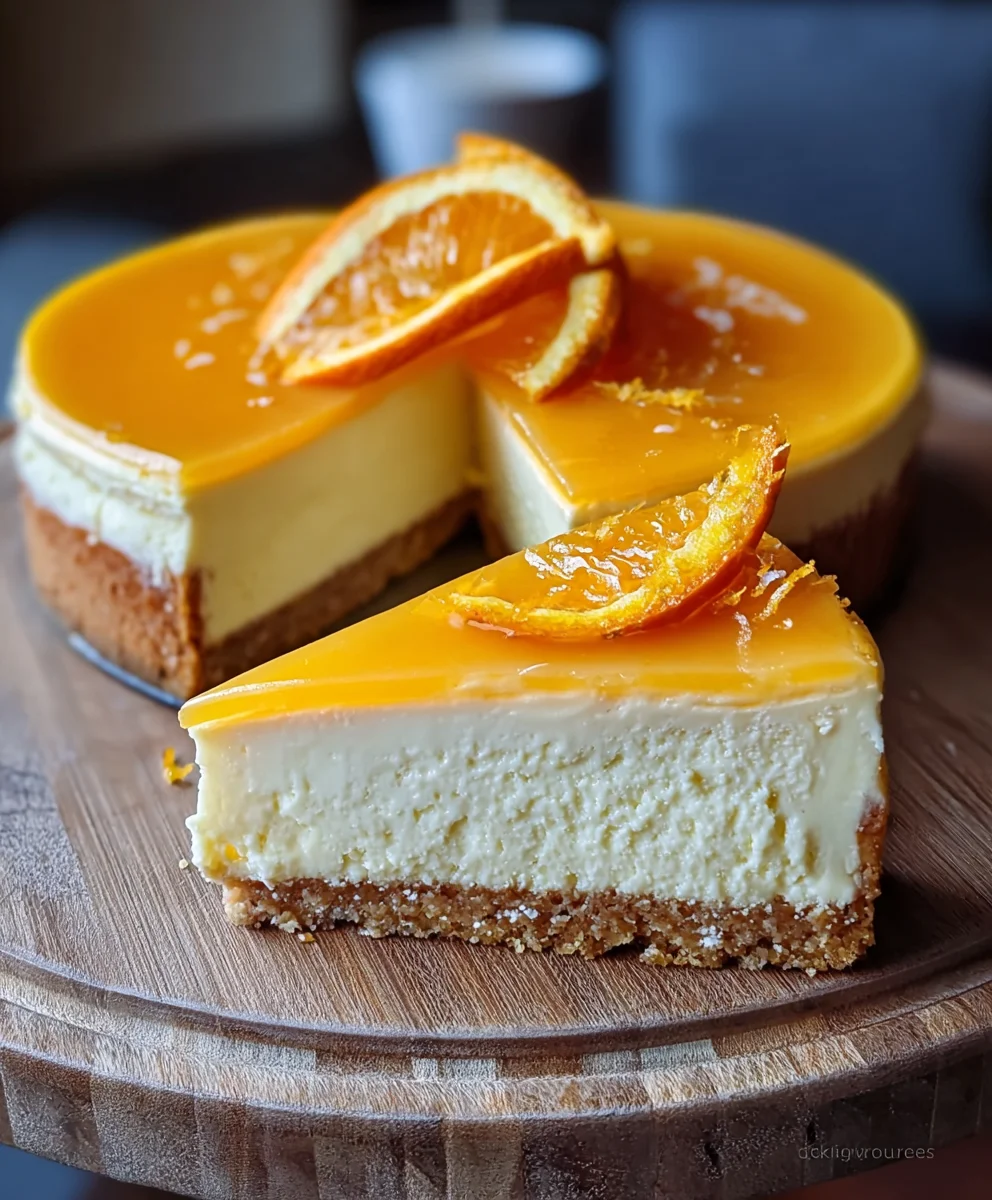
Orange Cheesecake. The mere mention of this dessert conjures images of sunshine-bright zest, creamy indulgence, and a perfectly balanced sweetness that dances on your tongue. It’s a classic for a reason, but this particular take on Orange Cheesecake elevates it beyond the ordinary. Forget the bland, the overly sweet, or the crumbly crusts that seem to be the norm elsewhere. What makes this Orange Cheesecake truly special is its velvety smooth texture, achieved through a meticulous, yet surprisingly simple, preparation that ensures every bite is a luxurious experience. We’re talking about a bright, zesty citrus punch that cuts through the richness, creating a flavor profile that’s both refreshing and deeply satisfying. Whether you’re a seasoned baker looking for a new favorite or a novice eager to impress, this recipe will guide you to dessert perfection, guaranteeing smiles all around the table and whispers of “This is the best Orange Cheesecake I’ve ever had!”
Ingredients:
- 2 cups graham cracker crumbs
- ½ cup melted butter
- 3 packs (8 oz each) cream cheese, softened
- 1 cup granulated sugar
- 3 large eggs
- 1 teaspoon vanilla extract
- 1 cup sour cream
- ¼ cup all-purpose flour
- ½ cup fresh orange juice
- 2 tablespoons orange zest
- Orange food coloring (optional)
- Orange slice (for garnish)
Preparing the Crust
The foundation of any great Orange Cheesecake is a perfectly crisp and flavorful crust. For this, we’ll be using classic graham cracker crumbs. First, make sure your melted butter has cooled slightly so it doesn’t cook the crumbs prematurely. In a medium bowl, combine the 2 cups of graham cracker crumbs with the ½ cup of melted butter. Stir them together thoroughly until all the crumbs are evenly moistened. You want a consistency that resembles wet sand; when you squeeze a bit in your hand, it should hold its shape.
Next, it’s time to press this mixture into your prepared cheesecake pan. I prefer using a 9-inch springform pan for cheesecakes as it makes removal so much easier. Lightly grease the bottom and sides of your pan before adding the crumb mixture. Evenly distribute the crumbs across the bottom of the pan and up the sides, pressing them down firmly with the bottom of a glass or a flat-bottomed measuring cup. This compression is key to a crust that won’t crumble apart when you slice into your finished Orange Cheesecake. Once pressed, place the crust in the refrigerator for at least 10-15 minutes while you prepare the filling. This chilling time helps the butter solidify, creating a more stable crust.
Making the Creamy Orange Filling
Now for the star of the show – the luscious Orange Cheesecake filling! Ensure your cream cheese is truly softened. This means taking it out of the refrigerator at least an hour, or even two, before you plan to start. Softened cream cheese is crucial for achieving a smooth, lump-free filling. In a large mixing bowl, or the bowl of a stand mixer fitted with the paddle attachment, beat the 3 packs (8 oz each) of softened cream cheese on medium speed until it’s completely smooth and creamy. Scrape down the sides of the bowl often to ensure no lumps remain.
Gradually add the 1 cup of granulated sugar to the softened cream cheese, continuing to beat on medium speed. Mix until the sugar is fully incorporated and the mixture is light and fluffy. This process also helps to create a smoother texture. Next, add the 3 large eggs, one at a time, beating well after each addition. Be careful not to overmix at this stage, as too much air incorporated into the eggs can cause the cheesecake to crack during baking. After the last egg is blended in, stir in the 1 teaspoon of vanilla extract.
Now, it’s time to introduce the tangy and refreshing orange flavors. In a separate small bowl, whisk together the 1 cup of sour cream with the ¼ cup of all-purpose flour. The flour acts as a binder, helping to prevent cracks and ensure a denser, creamier cheesecake. Once the flour is fully incorporated into the sour cream, gently fold this mixture into the cream cheese batter. Don’t overmix; just until it’s combined.
Finally, we’ll add the vibrant orange essence. Stir in the ½ cup of fresh orange juice and the 2 tablespoons of orange zest. The zest will provide little bursts of intense orange flavor and aroma throughout the cheesecake. If you desire a more vivid orange hue, you can add a few drops of orange food coloring at this stage and mix until the color is uniform. Remember, a little goes a long way with food coloring. Gently fold everything together until just combined, being careful not to overwork the batter.
Baking Your Orange Cheesecake
Preheat your oven to 325°F (160°C). It’s important to bake cheesecakes at a lower temperature to ensure even cooking and prevent them from cracking. Once your crust is chilled and your filling is ready, carefully pour the luscious orange filling over the chilled graham cracker crust. Smooth the top with a spatula to create an even surface.
To ensure a perfectly creamy texture and minimize the risk of cracking, we’re going to use a water bath. Wrap the outside of your springform pan tightly with a couple of layers of heavy-duty aluminum foil, ensuring no water can seep in. Place the foil-wrapped springform pan into a larger roasting pan. Carefully pour hot water into the roasting pan, about halfway up the sides of the springform pan. This creates a humid environment in the oven, which is ideal for baking cheesecake.
Carefully place the roasting pan with the cheesecake and water bath into the preheated oven. Bake for approximately 60 to 75 minutes, or until the edges of the cheesecake are set but the center still has a slight wobble when you gently shake the pan. It should look like a firm jelly. Do not overbake, as this will result in a dry cheesecake.
Cooling and Chilling for Perfection
Once the baking time is complete, turn off the oven, but leave the cheesecake inside with the oven door slightly ajar for about an hour. This gradual cooling process helps prevent sudden temperature changes that can lead to cracking. After the hour, carefully remove the cheesecake from the water bath and the roasting pan. Let it cool completely on a wire rack at room temperature.
Once the cheesecake has reached room temperature, cover it loosely with plastic wrap and transfer it to the refrigerator. For the best flavor and texture, it needs to chill for at least 6 hours, but overnight is even better. This chilling period allows the flavors to meld and the cheesecake to fully set.
Serving Your Delectable Orange Cheesecake
When you’re ready to serve your masterpiece, carefully run a thin knife around the edge of the cheesecake before releasing the sides of the springform pan. This helps ensure a clean release and prevents any sticking. Slice your Orange Cheesecake with a sharp knife dipped in hot water and wiped dry between each cut for clean, beautiful slices. Garnish each slice with a fresh orange slice for a beautiful presentation that complements the vibrant flavor. Enjoy the bright, tangy, and creamy goodness of your homemade Orange Cheesecake!
Conclusion:
There you have it! A delicious and surprisingly simple recipe for an incredibly satisfying Orange Cheesecake. We’ve walked through creating a perfectly creamy, citrus-infused dessert that’s sure to impress. The bright, zesty notes of the orange cut through the richness beautifully, creating a flavor profile that’s both decadent and refreshing. This Orange Cheesecake is more than just a dessert; it’s an experience, perfect for special occasions or simply as a delightful treat to brighten your day.
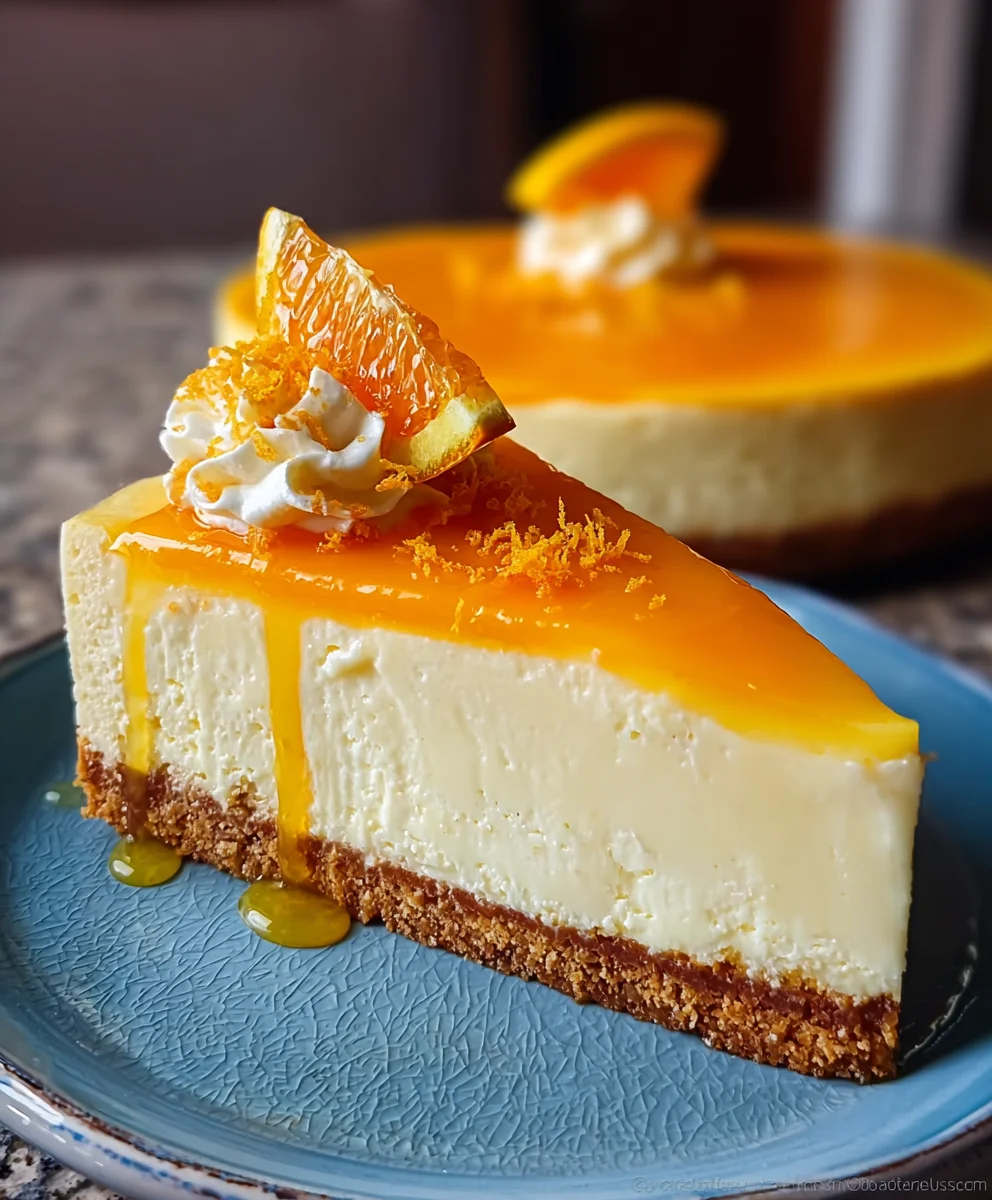
For serving, I love to top this cheesecake with a dollop of freshly whipped cream and a scattering of candied orange peel. A drizzle of citrus syrup also adds an extra layer of elegance. If you’re looking for variations, consider adding a hint of cardamom to the crust for a warm spice note, or swirl in some raspberry puree for a beautiful color contrast and a berry-sweet tang. Don’t be afraid to experiment with different citrus fruits too – grapefruit or lemon would also be fantastic.
I truly hope you give this Orange Cheesecake recipe a try. It’s a testament to how simple ingredients can come together to create something truly extraordinary. Happy baking!
Frequently Asked Questions:
Q: Can I make this Orange Cheesecake ahead of time?
Absolutely! This cheesecake is ideal for making ahead. In fact, it often tastes even better after chilling overnight, allowing the flavors to meld. Ensure it’s well-covered to prevent it from absorbing any odors in the refrigerator. It can typically be stored in the fridge for up to 3-4 days.
Q: My cheesecake cracked on top. Is it ruined?
Don’t worry about cracks! While visually appealing, a perfectly smooth top isn’t essential for taste. Cracks usually happen due to overbaking or sudden temperature changes. Simply cover the top with your favorite toppings like whipped cream, fruit compote, or a chocolate ganache, and no one will be the wiser. The flavor will still be amazing!
Delicious Orange Cheesecake-Zesty & Creamy Dessert
A zesty and creamy orange cheesecake with a crisp graham cracker crust and vibrant citrus flavor.
Ingredients
-
2 cups graham cracker crumbs
-
½ cup melted butter
-
3 packs (8 oz each) cream cheese, softened
-
1 cup granulated sugar
-
3 large eggs
-
1 teaspoon vanilla extract
-
1 cup sour cream
-
¼ cup all-purpose flour
-
½ cup fresh orange juice
-
2 tablespoons orange zest
-
Orange food coloring (optional)
-
Orange slice (for garnish)
Instructions
-
Step 1
Prepare the crust: Combine 2 cups graham cracker crumbs with ½ cup melted butter until evenly moistened. Press firmly into the bottom and sides of a 9-inch springform pan. Chill for 10-15 minutes. -
Step 2
Make the filling: Beat 3 packs (8 oz each) softened cream cheese until smooth. Gradually add 1 cup granulated sugar and beat until light and fluffy. Add 3 large eggs one at a time, beating well after each. Stir in 1 teaspoon vanilla extract. -
Step 3
Combine sour cream and flour: In a separate bowl, whisk 1 cup sour cream with ¼ cup all-purpose flour until fully incorporated. Gently fold this mixture into the cream cheese batter. -
Step 4
Add orange flavor: Stir in ½ cup fresh orange juice and 2 tablespoons orange zest. Add orange food coloring if desired for a more vibrant hue. Gently fold until just combined. -
Step 5
Bake the cheesecake: Preheat oven to 325°F (160°C). Pour filling into the chilled crust. Wrap the springform pan tightly in foil and place in a larger roasting pan. Pour hot water into the roasting pan to create a water bath (about halfway up the sides of the springform pan). Bake for 60-75 minutes, or until the edges are set and the center has a slight wobble. -
Step 6
Cool and chill: Turn off the oven, leave the cheesecake inside with the door slightly ajar for 1 hour. Remove from water bath, cool completely at room temperature on a wire rack. Cover loosely and chill in the refrigerator for at least 6 hours, preferably overnight. -
Step 7
Serve: Carefully release the sides of the springform pan. Slice with a sharp knife dipped in hot water and wiped dry between cuts. Garnish with an orange slice.
Important Information
Nutrition Facts (Per Serving)
It is important to consider this information as approximate and not to use it as definitive health advice.
Allergy Information
Please check ingredients for potential allergens and consult a health professional if in doubt.

Leave a Comment