
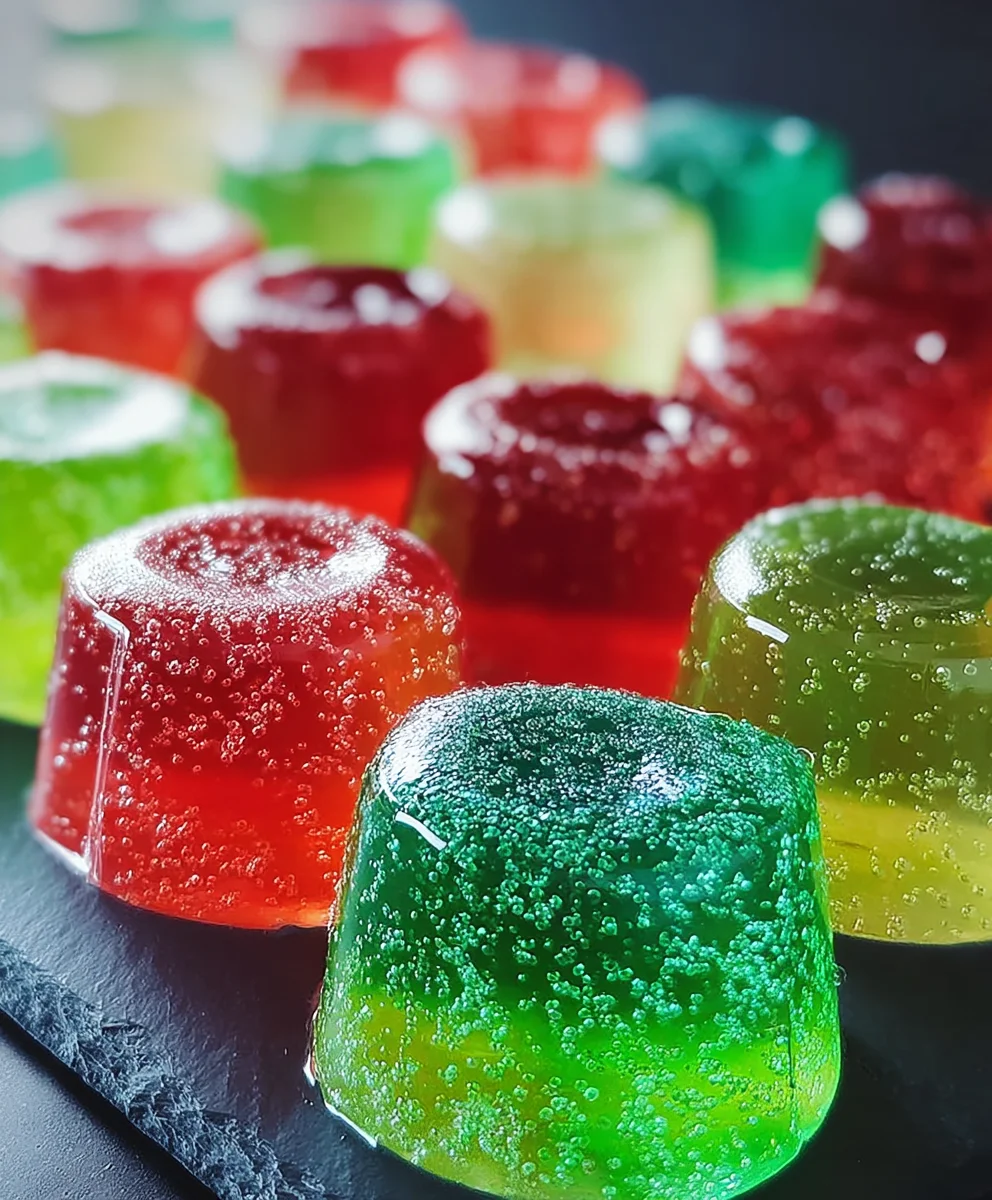
Boozy Jello Candy Melts – if you’re seeking a sophisticated yet undeniably fun treat that will captivate your guests and elevate any occasion, you’ve undoubtedly found your next culinary masterpiece. I’ve always been fascinated by how classic, nostalgic delights can be artfully transformed into something entirely new and exciting, and these elegant bites are a prime example of such a beautiful evolution. While Jell-O often conjures cherished memories of childhood parties and vibrant, wobbly desserts, we are here to give it a decidedly grown-up, gourmet makeover. This is far from your typical sweet treat; it’s an experience.
People adore this dish for so many reasons, and I believe you will too. The delicate balance of sweet fruit flavor, combined with the subtle warmth and depth of your chosen spirit, creates an utterly irresistible profile. Beyond the taste, they offer a delightful textural adventure—firm enough to hold their elegant shape, yet they dissolve beautifully on the tongue, releasing a burst of delightful flavor. These Boozy Jello Candy Melts are surprisingly easy to prepare, making them an ideal choice for impressive entertaining, festive celebrations, or simply a luxurious evening at home. They are more than just a dessert; they are a charming conversation starter, a delightful surprise, and a testament to creative culinary innovation.
Ingredients:
- For the Boozy Jello Base:
- 2 (6-ounce) packages flavored gelatin (I love using cherry and lime for a vibrant contrast, or even a mix of strawberry and lemon for a sweeter profile).
- 4 envelopes (7 grams each) unflavored gelatin (this is our secret weapon for firm, sliceable “Boozy Jello Candy Melts”).
- 3 cups boiling water (divided, but we’ll use 2 cups for the flavored gelatin and 1 cup for dissolving unflavored gelatin).
- 1 cup cold water (for blooming the unflavored gelatin).
- 1.5 cups cold alcohol of your choice (vodka, rum, or a flavored liqueur like peach schnapps work wonderfully. For a really fun twist, try a sparkling wine or champagne, but be aware it might slightly affect the final firmness).
- Optional: 1/4 cup granulated sugar, if you prefer a sweeter treat, especially with less sweet alcohol.
- For the Candy Melt Layers:
- 12 ounces white candy melts (these are fantastic for a clean, contrasting base layer).
- 12 ounces colored candy melts (choose colors that complement your Jello flavors, like green for lime, red for cherry, or blue for a fun surprise. You might even want to use a couple of different colors for a multi-layered effect!).
- 1 tablespoon coconut oil or paramount crystals (this helps achieve a smoother, more fluid consistency for pouring and spreading the candy melts).
- Equipment You’ll Need:
- 9×13 inch baking dish or a silicone mold with a flat bottom (for easier demolding, I highly recommend silicone molds, especially those with smaller, individual cavities if you want bite-sized treats).
- Large heatproof bowls (at least two, one for flavored Jello and one for unflavored gelatin).
- Measuring cups and spoons.
- Whisk.
- Small saucepan (for boiling water).
- Rubber spatula or silicone brush.
- Candy thermometer (optional, but helpful for precise melting of candy melts).
Preparation Phase 1: Crafting the Boozy Jello Base
- Prepare Your Molds:
First things first, let’s get our workspace ready! I always lightly grease my chosen 9×13 inch baking dish with a neutral oil or cooking spray, then line it with parchment paper, leaving an overhang on the sides. This parchment paper is going to be your best friend when it comes to lifting out your glorious “Boozy Jello Candy Melts” later on. If you’re using silicone molds, a light spray might still be helpful, but often isn’t strictly necessary. Trust me, this little step saves a lot of heartache!
- Bloom the Unflavored Gelatin:
In a medium heatproof bowl, sprinkle all 4 envelopes of unflavored gelatin over 1 cup of cold water. Let this sit for about 5-10 minutes. You’ll notice it start to “bloom” and thicken, becoming a sort of lumpy, jelly-like mass. This step is absolutely crucial because it ensures the gelatin dissolves smoothly later on, preventing any grainy texture in your finished “Boozy Jello Candy Melts”. Don’t rush this part; patience is a virtue in gelatin-making!
- Dissolve the Flavored Gelatin:
In a large heatproof bowl, empty the contents of your 2 packages of flavored gelatin. Carefully pour 2 cups of boiling water over the flavored gelatin powder. Whisk vigorously for about 2-3 minutes, or until the gelatin is completely dissolved. You want to see no granules remaining at the bottom of the bowl. This creates a vibrant, flavorful base for our “Boozy Jello Candy Melts”.
- Incorporate the Bloomed Gelatin:
Now, let’s go back to our bloomed unflavored gelatin. We need to fully dissolve it. You have two options here: you can either place the bowl of bloomed gelatin over a saucepan of simmering water (creating a double boiler effect) and stir until it’s completely liquid, or you can microwave it in 15-second intervals, stirring after each, until it’s fully dissolved and clear. Once dissolved, pour this into the bowl with your dissolved flavored gelatin. Whisk again until everything is thoroughly combined. This extra unflavored gelatin is what gives our “Boozy Jello Candy Melts” their impressive firmness, allowing them to hold their shape beautifully.
- Add the Cold Water and Sweetener (Optional):
Stir in 1 cup of cold water to the mixture. If you’re using the optional 1/4 cup of granulated sugar, add it now and whisk until it’s fully dissolved. Adding cold water helps to bring the temperature down before we introduce our alcohol, which is important for maintaining its potency and flavor profile.
- Introduce the Alcohol:
Once the gelatin mixture has cooled down slightly (it should still be warm but not scorching hot), it’s time for the fun part! Slowly pour in your 1.5 cups of cold alcohol. Whisk gently to combine. It’s important that the gelatin mixture isn’t boiling hot when you add the alcohol, as heat can cause some of the alcohol to evaporate, reducing its boozy kick. We want those “Boozy Jello Candy Melts” to live up to their name!
- Pour and Chill:
Carefully pour the boozy gelatin mixture into your prepared 9×13 inch baking dish or silicone molds. I like to pour slowly to avoid any air bubbles. Transfer the dish to the refrigerator and chill for a minimum of 3-4 hours, or preferably overnight, until the Jello is completely firm and set. This step is non-negotiable for achieving the perfect texture for our “Boozy Jello Candy Melts” base.
Preparation Phase 2: Layering the Candy Melts
This is where our “Boozy Jello Candy Melts” truly transform into something visually spectacular and texturally exciting. The candy melt layers add a delightful snap and a burst of complementary flavor.
- Prepare Your Candy Melts:
Once your boozy Jello base is completely firm, it’s time to work on the candy melt layers. Grab your white candy melts first. You can melt them using a double boiler method or in the microwave. For the double boiler: place the candy melts in a heatproof bowl set over a saucepan of simmering water (make sure the water doesn’t touch the bottom of the bowl). Stir frequently until smooth. For the microwave: place candy melts in a microwave-safe bowl and heat in 30-second intervals, stirring well after each interval, until melted and smooth. Be careful not to overheat, as this can cause them to seize or burn. Stir in about 1/2 tablespoon of coconut oil or paramount crystals to achieve a perfectly smooth, pourable consistency. Repeat this process with your colored candy melts, adding the remaining 1/2 tablespoon of coconut oil/crystals.
A Note on Melting Candy Melts:
Patience is key here. Overheating candy melts can lead to a thick, lumpy mess that’s impossible to work with. If they seem too thick, a tiny bit more coconut oil or paramount crystals (1/4 teaspoon at a time) can help, but avoid adding too much liquid, as it can cause them to seize. The goal is a flowing, silky texture perfect for coating our “Boozy Jello Candy Melts.”
- Apply the First Candy Melt Layer (Bottom):
Remove your set Jello from the refrigerator. If you used parchment paper, carefully lift the entire slab of Jello out of the baking dish and place it onto a cutting board. If you’re using individual silicone molds, you can demold them after the final candy layer, but for a 9×13 slab, demolding now makes it easier to work with. Now, generously brush or pour a thin, even layer of your white melted candy melts over the top surface of the firm Jello slab. Use a rubber spatula to spread it smoothly right to the edges. This white layer acts as a fantastic contrast and a solid base.
- Chill the First Layer:
Carefully transfer the Jello slab, candy-melt side up, back into the refrigerator. Let this layer set for about 10-15 minutes, or until it’s completely firm to the touch. You want it firm enough so that the next layer won’t cause it to bleed or mix. This chill time is crucial for creating distinct, beautiful layers in your “Boozy Jello Candy Melts.”
- Apply the Second Candy Melt Layer (Top/Colored):
Once the white candy melt layer is firm, remove the Jello from the fridge. Now, it’s time for your colored candy melts! Pour or brush a thin, even layer of your colored melted candy melts over the now-chilled white layer. Again, spread it smoothly right to the edges. If you’re feeling adventurous and want multiple colored layers, you would simply repeat steps 9 and 10 with different colored candy melts, ensuring each layer chills thoroughly before applying the next. This is how we get those vibrant, visually appealing “Boozy Jello Candy Melts” that are so much fun to look at!
- Final Chill for Candy Layers:
Return the Jello slab to the refrigerator for a final chill, allowing the colored candy melt layer to set completely. This usually takes another 15-20 minutes. You’ll know it’s ready when the candy layer is hard and cool to the touch. This firm candy shell is what makes these “Boozy Jello Candy Melts” so delightful to handle and eat.
Preparation Phase 3: Setting and Finishing Touches
The final steps involve carefully cutting and presenting your masterpiece. This is where your beautiful “Boozy Jello Candy Melts” truly come to life!
- Demold and Trim (if necessary):
Once all layers are completely firm, remove the Jello slab from the refrigerator. If you used parchment paper, simply lift the entire slab out of the dish using the overhangs. Carefully peel off the parchment paper from the bottom (Jello side). If using individual silicone molds, gently pop each “Boozy Jello Candy Melt” out. Sometimes the edges of the candy melt layers might be a little uneven; I like to use a sharp knife to carefully trim the edges for a perfectly neat presentation.
- Cut into Individual Servings:
Using a very sharp knife, cut the Jello slab into your desired shapes and sizes. Squares or rectangles are the easiest, but you could use small cookie cutters for fun shapes before or after applying the candy layer if your Jello is firm enough. For the cleanest cuts on the candy melt layers, I recommend heating your knife slightly by dipping it in hot water and wiping it dry between each cut. This prevents cracking and gives you beautifully defined “Boozy Jello Candy Melts.”
Pro Tip for Clean Cuts:
For an extra-clean cut on the candy melt, press the warm knife down firmly and steadily without sawing. If the candy layer is thick, a gentle rocking motion might be necessary, but try to minimize it to avoid crumbling.
- Storage:
Store your finished “Boozy Jello Candy Melts” in an airtight container in the refrigerator. They are best enjoyed within 3-5 days. The candy melt layers help to protect the Jello from drying out, keeping them fresh and delicious for longer. However, the alcohol content may diminish over time, so enjoying them sooner is always a good idea!
- Serve and Enjoy:
Arrange your vibrant “Boozy Jello Candy Melts” on a platter and serve chilled. They are perfect for parties, gatherings, or a fun adult treat. The combination of the firm, boozy Jello and the snappy, sweet candy melt is truly irresistible. My guests always rave about these!
Tips for Perfect Boozy Jello Candy Melts
Creating these delightful “Boozy Jello Candy Melts” is incredibly rewarding, but a few insider tips can elevate your results from good to absolutely phenomenal. I’ve learned these through trial and error, and I’m happy to share them with you!
- Temperature Control is King:
As I mentioned, the temperature of your Jello mixture before adding alcohol is critical. If it’s too hot, you’ll lose a lot of that lovely boozy kick. Aim for it to be warm to the touch, but not steamy. Conversely, ensuring your Jello base is completely firm before applying candy melts is non-negotiable. A wobbly Jello will make your candy layers crack or bleed. Patience during chilling phases will always pay off with beautiful, well-defined “Boozy Jello Candy Melts”.
- Alcohol Choices & Flavor Pairings:
The beauty of “Boozy Jello Candy Melts” is their versatility. Vodka is a classic choice because it’s neutral and lets the Jello flavor shine. However, don’t be afraid to experiment! Rum pairs wonderfully with tropical Jello flavors like pineapple or cherry. Peach schnapps or a flavored liqueur can add an extra dimension to fruit-flavored Jello. For a sophisticated touch, consider a dry gin with lime Jello. Just remember to use cold alcohol to maintain its integrity. For Jello flavors, think about complementary combinations: cherry Jello with dark chocolate candy melts, or lime Jello with white chocolate candy melts. The possibilities for your “Boozy Jello Candy Melts” are endless!
- Dealing with Seized Candy Melts:
If your candy melts seize and become thick and clumpy, it’s usually due to overheating or introducing even a tiny drop of water. Don’t despair! You can often rescue them by stirring in a small amount (1/2 teaspoon at a time) of paramount crystals or shortening (not butter or margarine) until they smooth out again. If they’re completely beyond repair, it’s best to start fresh rather than compromising the quality of your “Boozy Jello Candy Melts”.
- Creative Designs and Toppings:
Beyond simple layers, consider using edible glitter for a festive shimmer on your candy melt layer. You could also drizzle a contrasting color of candy melt over the top of the set colored layer for a marbled or striped effect. Before the final candy layer sets, sprinkle with tiny sprinkles or nonpareils for added texture and visual appeal. For the holidays, imagine “Boozy Jello Candy Melts” cut into festive shapes using cookie cutters – stars, hearts, or even mini Christmas trees! Just ensure your cookie cutter is sharp and lightly oiled for clean cuts.
- Humidity Awareness:
Gelatin and candy melts can both be sensitive to humidity. On a very humid day, your Jello might take longer to set, and your candy melts might bloom (develop a whitish film) or take longer to harden. Try to prepare these “Boozy Jello Candy Melts” on a dry day if possible, or ensure your kitchen environment is cool and dry. Proper storage in an airtight container helps mitigate humidity issues.
- Achieving the Perfect Firmness:
The ratio of unflavored gelatin to flavored gelatin is key for these “Boozy Jello Candy Melts” to be sliceable and hold up to the candy coating. If you find your Jello is too soft, next time you might add an extra 1/2 envelope of unflavored gelatin. Conversely, if it’s too rubbery, slightly reduce the unflavored gelatin. Practice makes perfect, and soon you’ll be a “Boozy Jello Candy Melts” master!
I genuinely hope these detailed instructions and tips help you create the most fabulous “Boozy Jello Candy Melts” you’ve ever imagined. They are truly a showstopper and always bring smiles (and a little bit of a giggle!) to any occasion. Happy crafting!

Conclusion:
And there you have it, my friends! After all our culinary adventures together, I truly believe this recipe for our special Jello treats stands out as an absolute game-changer for any occasion. It’s not just a dessert; it’s an experience, a conversation starter, and a burst of delightful flavor that will leave everyone smiling. What makes this recipe a definite must-try, you ask? Well, it’s the perfect trifecta of simplicity, vibrant presentation, and an unforgettable taste that manages to be both nostalgic and sophisticated at the same time. You’re taking something familiar and elevating it into a grown-up, gourmet delight with minimal effort, which is always a win in my book! Imagine the expressions of surprise and joy on your guests’ faces as they discover the delicious secret within each colorful bite. This isn’t just about satisfying a sweet tooth; it’s about crafting moments of shared enjoyment, laughter, and a touch of playful indulgence. It’s the kind of recipe that makes you look like a seasoned pro without having to spend hours slaving away in the kitchen, and that, to me, is pure magic.
The versatility of these little gems is truly one of their strongest suits. When it comes to serving, you have a plethora of fantastic options to explore. For a casual gathering, simply arranging them artfully on a chilled platter allows their vibrant colors to pop, inviting everyone to grab a treat. If you’re aiming for something a little more elegant, consider individual mini paper cups or even small, decorative shot glasses for a refined presentation that still hints at the fun to come. You could even layer different colors for a rainbow effect that’s absolutely stunning and incredibly festive, perfect for holidays or themed parties. Don’t forget about garnishes! A delicate dollop of whipped cream, a scattering of colorful sprinkles, or a single fresh berry can add that extra touch of flair and textural contrast that elevates them from simply delicious to truly spectacular. Chilling them thoroughly is key to achieving that perfect melt-in-your-mouth texture, so plan ahead and make sure they’ve had ample time to firm up beautifully.
Now, let’s talk about variations – this is where your creativity can truly shine! While the base recipe is phenomenal, feel free to experiment with different flavor combinations to suit any palate or party theme. Think about pairing a tangy lemon jello with a zesty limoncello, or a rich cherry jello with a dark rum for a more robust flavor profile. For those who prefer a lighter touch, a crisp white wine jello with a subtle elderflower liqueur can be absolutely divine. You’re only limited by your imagination when it comes to the boozy element; vodkas infused with various flavors, gin, tequila, or even various dessert liqueurs like Irish cream or amaretto can all find a delightful home here. And remember, you can always adjust the potency to your liking – a little less alcohol for a milder treat, or a touch more for a truly spirited indulgence. For a non-alcoholic version that’s equally delightful for all ages, simply substitute the alcohol with an equal amount of sparkling water, juice, or even a flavorful non-alcoholic spirit alternative; they’ll still retain that gorgeous color and irresistible texture. You can also play with the type of candy melts – dark chocolate, white chocolate, or even flavored candy melts like strawberry or mint can offer a completely different dimension to the final product. Imagine a peppermint flavored Boozy Jello Candy Melts around the holidays! The possibilities are endless, allowing you to tailor this treat perfectly to any celebration or personal preference.
So, what are you waiting for? I wholeheartedly encourage you to roll up your sleeves, gather your ingredients, and give this incredible recipe a try. You’ll be amazed at how simple it is to create something so visually appealing and utterly delicious. Trust me, these are more than just a dessert; they’re an experience waiting to happen, a guaranteed crowd-pleaser that will have everyone asking for your secret recipe. And please, once you’ve whipped up your own batch, I would absolutely love to hear about your experience! Share your successes, your creative variations, and especially your photos! Tag me or drop a comment below – there’s nothing I enjoy more than seeing your culinary creations come to life. Happy crafting, and most importantly, happy indulging!
Amazing Non-Alcohol Jello Candy Melts
These Non-Alcohol Jello Candy Melts transform nostalgic gelatin into an elegant, fun, and easy-to-make treat perfect for any occasion. They feature a delightful balance of sweet fruit flavor and a unique texture, encased in a snappy candy shell.
Ingredients
-
2 (6-ounce) packages flavored gelatin
-
4 envelopes (7 grams each) unflavored gelatin
-
3 cups boiling water, divided
-
1 cup cold water
-
1.5 cups cold non-alcoholic alternative (e.g., sparkling cider, fruit juice, non-alcoholic spirits)
-
1/4 cup granulated sugar (optional)
-
12 ounces white candy melts
-
12 ounces colored candy melts
-
1 tablespoon coconut oil or paramount crystals
Instructions
-
Step 1
Lightly grease a 9×13 inch dish and line with parchment. In a medium bowl, bloom 4 envelopes unflavored gelatin in 1 cup cold water for 5-10 minutes. In a separate large bowl, whisk 2 packages flavored gelatin with 2 cups boiling water until completely dissolved (2-3 minutes). -
Step 2
Dissolve the bloomed unflavored gelatin by either placing the bowl over simmering water or microwaving in 15-second intervals. Pour the dissolved unflavored gelatin into the bowl with the dissolved flavored gelatin, whisking until thoroughly combined. -
Step 3
Stir in 1 cup cold water and optional 1/4 cup granulated sugar until dissolved. Once the gelatin mixture has cooled slightly (should be warm, not hot), slowly pour in 1.5 cups cold non-alcoholic alternative. Whisk gently to combine. Carefully pour the mixture into the prepared dish and chill for a minimum of 3-4 hours, or preferably overnight, until completely firm. -
Step 4
Melt 12 ounces white candy melts using a double boiler or microwave. Stir in 1/2 tablespoon of coconut oil or paramount crystals for a smooth, pourable consistency. Repeat this process for 12 ounces colored candy melts, using the remaining 1/2 tablespoon of coconut oil/crystals. -
Step 5
Remove the firm Jello slab from the refrigerator; if using parchment, lift the entire slab onto a cutting board. Generously brush or pour a thin, even layer of the white melted candy melts over the top surface of the Jello. Spread smoothly to the edges. Transfer the Jello slab (candy-side up) back to the refrigerator and chill for 10-15 minutes until this layer is completely firm. -
Step 6
Once the white candy layer is firm, remove the Jello from the fridge. Pour or brush a thin, even layer of the colored melted candy melts over the chilled white layer. Spread smoothly to the edges. Return the Jello slab to the refrigerator for a final chill of 15-20 minutes, or until the colored candy layer is hard and cool to the touch. -
Step 7
Once all layers are completely firm, lift the Jello slab out of the dish (peeling off parchment if used). If desired, trim the edges for a neat presentation. Using a very sharp knife (heated slightly in hot water and wiped dry between cuts for cleanest results), cut the Jello slab into desired shapes (squares or rectangles are easiest). Store finished Jello Candy Melts in an airtight container in the refrigerator for 3-5 days. Serve chilled.
Important Information
Nutrition Facts (Per Serving)
It is important to consider this information as approximate and not to use it as definitive health advice.
Allergy Information
Please check ingredients for potential allergens and consult a health professional if in doubt.

Leave a Comment