
Chocolate Thumbprint Cookies hold a special place in the hearts of dessert lovers everywhere, and for good reason. I’m absolutely delighted to guide you through crafting these delightful treats today. There’s an undeniable charm to the classic thumbprint cookie, with its signature indentation cradling a sweet surprise, and this chocolate rendition elevates that experience to pure bliss. While the traditional thumbprint cookie, often known as ‘Hallongrotta’ in Sweden, typically features a bright jam filling, our version takes a decadent turn, embracing the rich, comforting essence of chocolate in every bite.
What makes these cookies so universally adored?
It’s the perfect symphony of textures and flavors that truly sets them apart.
Imagine a tender, melt-in-your-mouth chocolate cookie base, baked to perfection, providing a comforting warmth. Then, consider that signature dimple, generously filled with a luscious chocolate ganache or perhaps a velvety melted chocolate center, creating an irresistible contrast that is simply divine. They’re not just a feast for the taste buds; their charming, handcrafted appearance makes them a highlight on any dessert platter, perfect for holiday gatherings, special occasions, or simply a cozy evening indulgence. Get ready to fall in love with these incredible Chocolate Thumbprint Cookies, as they promise to become a cherished addition to your baking repertoire.
Ingredients:
- For the Chocolate Thumbprint Cookies:
- 1 cup (2 sticks) unsalted butter, softened to room temperature
- ½ cup granulated sugar
- ¼ cup packed light brown sugar
- 1 large egg yolk, room temperature
- 1 teaspoon pure vanilla extract
- 1 ¾ cups all-purpose flour
- ½ cup unsweetened cocoa powder (natural or Dutch-processed works beautifully here, though Dutch-processed will give a darker, less acidic chocolate flavor)
- ½ teaspoon baking soda
- ¼ teaspoon salt
- Optional: 2-3 tablespoons granulated sugar for rolling the cookie dough balls (for a slightly sparkly, textured edge)
- For the Rich Chocolate Ganache Filling:
- 6 ounces good quality semi-sweet or dark chocolate, finely chopped (chocolate chips can work, but chopped bar chocolate melts more smoothly)
- ¾ cup heavy cream (also known as whipping cream)
- 1 tablespoon unsalted butter, softened (optional, for extra gloss and richness)
- ¼ teaspoon pure vanilla extract (optional, to enhance chocolate flavor)
- Optional Garnish:
- Flaky sea salt (a delightful contrast to the sweet chocolate)
- Chocolate sprinkles or shavings
- Finely chopped nuts (such as pecans or walnuts)
Preparing the Rich Chocolate Thumbprint Cookie Dough
Creating the perfect base for our Chocolate Thumbprint Cookies begins with careful preparation of the dough. Trust me, every step here contributes to that wonderfully chewy, tender, and intensely chocolatey cookie you’re dreaming of.
Step 1: Sift Your Dry Ingredients for a Lighter Cookie
First things first, let’s get our dry ingredients ready. In a medium bowl, I like to whisk together the all-purpose flour, unsweetened cocoa powder, baking soda, and salt. Sifting these ingredients together is a step I never skip! It not only ensures that everything is evenly distributed, but it also aerates the flour and cocoa, which helps to create a lighter, more tender crumb in our finished Chocolate Thumbprint Cookies. You want to make sure there are no lumps of cocoa powder hiding in there, as that could lead to an uneven flavor or texture.
Step 2: Creaming Butter and Sugars to Perfection
Now, for the heart of our cookie dough: the fats and sugars. In the bowl of a stand mixer fitted with the paddle attachment, or with a large bowl and a good old-fashioned hand mixer, I combine the softened unsalted butter with both the granulated sugar and the light brown sugar. It’s incredibly important that your butter is truly at room temperature – not melted, not cold, but perfectly soft enough to indent easily with your finger. This allows it to cream properly with the sugars, incorporating air and creating a light, fluffy base. Beat these ingredients together on medium speed for about 2 to 3 minutes, or until the mixture is visibly light and fluffy. You’ll notice it changes from a dense, yellow mass to a pale, airy, and creamy consistency. This creaming process is crucial for the texture of our Chocolate Thumbprint Cookies, ensuring they’re tender and not dense.
Step 3: Incorporating Egg Yolk and Vanilla for Flavor and Structure
Next, I add the single large egg yolk and the pure vanilla extract to our creamed butter and sugar mixture. The egg yolk brings richness, helps bind the dough, and contributes to the chewiness that makes a great thumbprint cookie so satisfying. The vanilla, of course, enhances the chocolate flavor beautifully. Beat for another minute or so until the yolk and vanilla are fully incorporated and the mixture is smooth. Remember to scrape down the sides of the bowl with a spatula after adding these wet ingredients to ensure everything is evenly mixed.
Step 4: Gradually Adding Dry Ingredients to Form the Dough
With our wet ingredients perfectly combined, it’s time to bring in the dry mix. I add the flour and cocoa mixture to the wet ingredients in two additions, beating on low speed after each addition until just combined. The key here is not to overmix! Overmixing develops the gluten in the flour too much, which can lead to tough, dry Chocolate Thumbprint Cookies. As soon as you no longer see streaks of dry flour, stop mixing. The dough will be thick, rich, and deeply chocolatey. It might seem a little crumbly at first, but it will come together as you gently mix. Sometimes, I finish the last bit of mixing by hand with a spatula to ensure I don’t overwork it.
Step 5: Chilling the Dough for Optimal Handling and Flavor
Once your dough is ready, I transfer it to a bowl, cover it tightly with plastic wrap, and pop it into the refrigerator. This chilling step is absolutely non-negotiable for these Chocolate Thumbprint Cookies! It allows the butter to firm up, making the dough much easier to handle and preventing the cookies from spreading too much in the oven. More importantly, it gives the flavors a chance to meld and deepen, resulting in a more complex and delicious cookie. I recommend chilling the dough for at least 1 hour, but you can even chill it for up to 2 days if you want to prep ahead. If chilling for longer than a few hours, you might need to let it sit at room temperature for 10-15 minutes before rolling to make it more pliable.
Shaping and Baking Your Perfect Chocolate Thumbprint Cookies
Now for the fun part – transforming our chilled dough into those adorable little nests ready to be filled with glorious chocolate ganache. This stage is where our Chocolate Thumbprint Cookies really start to take their distinctive form.
Step 6: Preparing for Baking
Before you even think about touching that dough, preheat your oven to 350°F (175°C). Line two large baking sheets with parchment paper or silicone baking mats. This is important to prevent sticking and ensures even baking. If you plan to roll your cookies in extra granulated sugar, now is the time to pour a couple of tablespoons into a small, shallow bowl for easy access.
Step 7: Rolling the Dough Balls and Creating the Indentations
Take your chilled dough out of the refrigerator. Using a small cookie scoop (about 1.5 tablespoons) or simply by hand, roll the dough into uniform balls, each about 1 inch in diameter. Consistency in size is key for even baking, so try to make them as similar as possible. If desired, you can gently roll each ball in the extra granulated sugar at this stage. This gives the edges of your Chocolate Thumbprint Cookies a lovely sparkle and a slight textural crunch, which I find adds a wonderful dimension.
Place the rolled dough balls about 2 inches apart on your prepared baking sheets. Now comes the “thumbprint” part! I use my actual thumb, but for a more uniform and neat indentation, you can also use the back of a rounded teaspoon or even a ½ teaspoon measuring spoon. Gently press your thumb (or spoon) into the center of each dough ball to create a deep well. It’s important to make these indentations deep enough, as they will inevitably puff up slightly during baking. If you notice any cracks forming around the edges, gently smooth them out with your fingers. We want nice, defined wells ready for our ganache.
Step 8: Baking Your Chocolate Thumbprint Cookies to Perfection
Carefully place the baking sheets into your preheated oven. Bake for 10 to 12 minutes. The exact baking time can vary depending on your oven, so keep a close eye on them. You’re looking for cookies that are set around the edges but still appear slightly soft in the center. The deep chocolate color means it might be hard to see a golden brown, so rely on the firmness and the edges. They won’t look “done” like a typical sugar cookie, but rather just firm enough. When you take them out, the indentations might have puffed up a bit. This is perfectly normal! As soon as they come out of the oven, use the back of your spoon or thumb again to gently press down and redefine those wells. This is crucial for creating the perfect cavity for our ganache filling. This second pressing ensures that your Chocolate Thumbprint Cookies will hold a generous amount of filling.
Step 9: Cooling the Cookies
Allow the baked Chocolate Thumbprint Cookies to cool on the baking sheets for about 5 minutes before carefully transferring them to a wire rack to cool completely. They are delicate when warm, so handle them with care. Cooling completely is essential before adding the ganache, otherwise, your beautiful filling will simply melt and run everywhere.
Crafting the Silky Chocolate Ganache Filling
The filling is what truly elevates these from simple chocolate cookies to irresistible Chocolate Thumbprint Cookies. A luscious, silky smooth chocolate ganache is surprisingly easy to make and provides the perfect contrast to the chewy cookie base.
Step 10: Preparing Your Chocolate
Before you start, make sure your good quality chocolate is finely chopped. The smaller the pieces, the faster and more evenly it will melt when the hot cream is added. This prevents scorching and ensures a smooth ganache. Place the chopped chocolate in a medium, heat-proof bowl.
Step 11: Heating the Heavy Cream
In a small saucepan, pour in the heavy cream. Heat the cream over medium heat, stirring occasionally, until it just begins to simmer. You’ll see tiny bubbles forming around the edges of the pan. Do not let it boil vigorously! We just want it hot enough to melt the chocolate.
Step 12: Creating the Ganache Emulsion
As soon as the cream is simmering, immediately remove it from the heat and pour it directly over the chopped chocolate in your heat-proof bowl. Now, here’s a little trick for the smoothest ganache: let the mixture sit undisturbed for about 5 minutes. This allows the hot cream to thoroughly melt the chocolate without you having to stir it too much, which can sometimes lead to a grainy texture.
After 5 minutes, grab a whisk and starting from the center of the bowl, gently whisk in small circles, gradually working your way outwards. You’ll see the mixture transform from lumpy chocolate and cream into a glossy, smooth, and utterly irresistible ganache. If using, now is the time to whisk in the optional tablespoon of softened butter and the ¼ teaspoon of pure vanilla extract. The butter will add an extra layer of richness and a beautiful sheen, while the vanilla enhances the overall chocolate flavor. Continue whisking until the ganache is completely smooth, lump-free, and incredibly shiny.
Step 13: Cooling the Ganache to the Right Consistency
Once your ganache is perfectly smooth, it needs to cool slightly to reach a spoonable, yet firm enough consistency for filling our Chocolate Thumbprint Cookies. If it’s too warm, it will be too runny and seep into the cookie rather than sitting in the well. If it’s too cold, it will be too thick and difficult to work with. Let it sit at room temperature for about 20-30 minutes, stirring occasionally, until it has thickened to a consistency similar to a thick syrup or a soft pudding. It should still be pourable but hold its shape when spooned into the cookie wells. You can test it by spooning a tiny bit into a well to see how it sets. If you’re in a hurry, you can pop it into the fridge for 10-15 minutes, stirring every few minutes to ensure even cooling.
Assembling and Finishing Your Decadent Chocolate Thumbprint Cookies
This is the grand finale! The moment our patiently baked cookies meet their glorious chocolate filling, completing our exquisite Chocolate Thumbprint Cookies.
Step 14: Filling the Chocolate Thumbprint Cookies
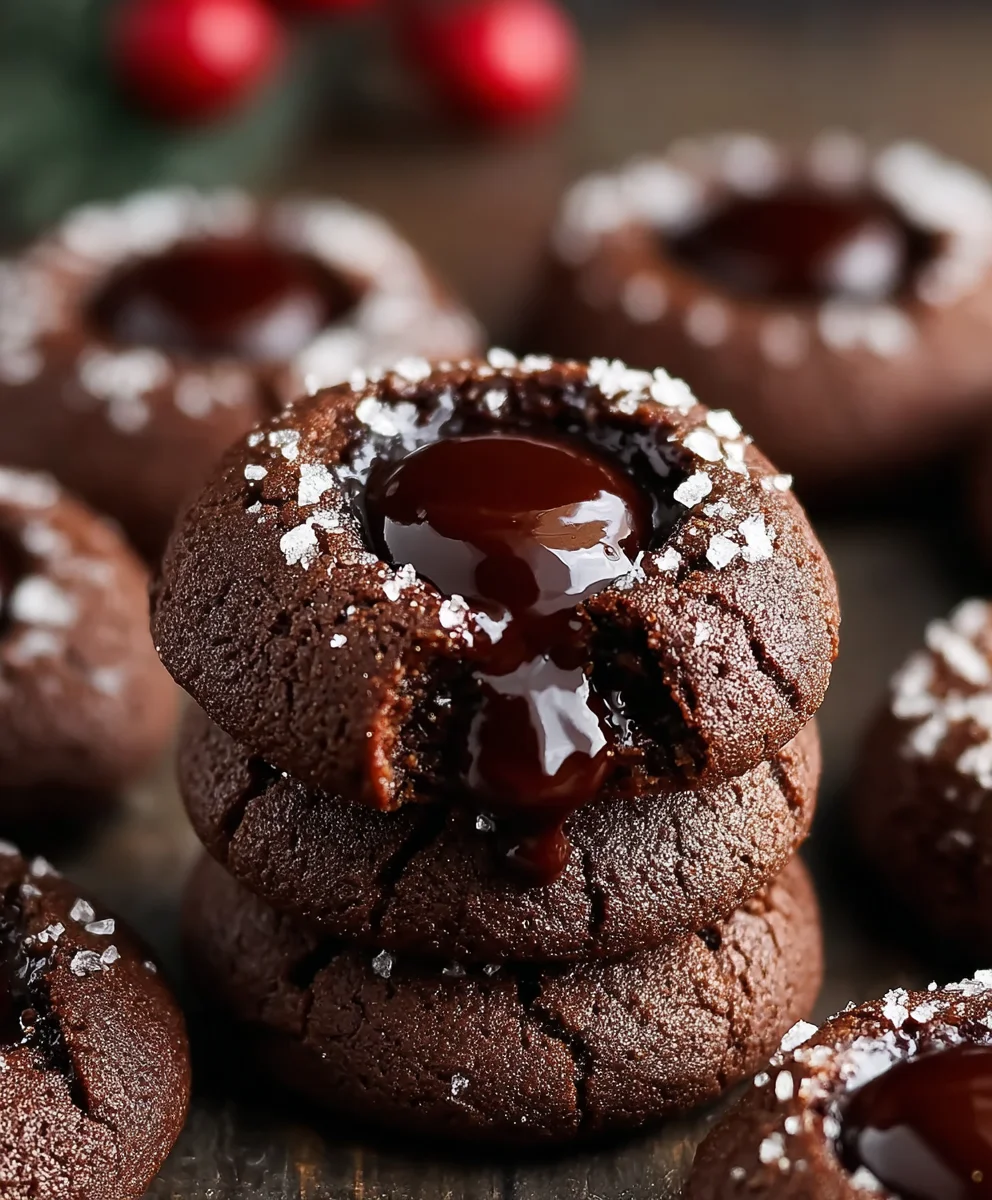
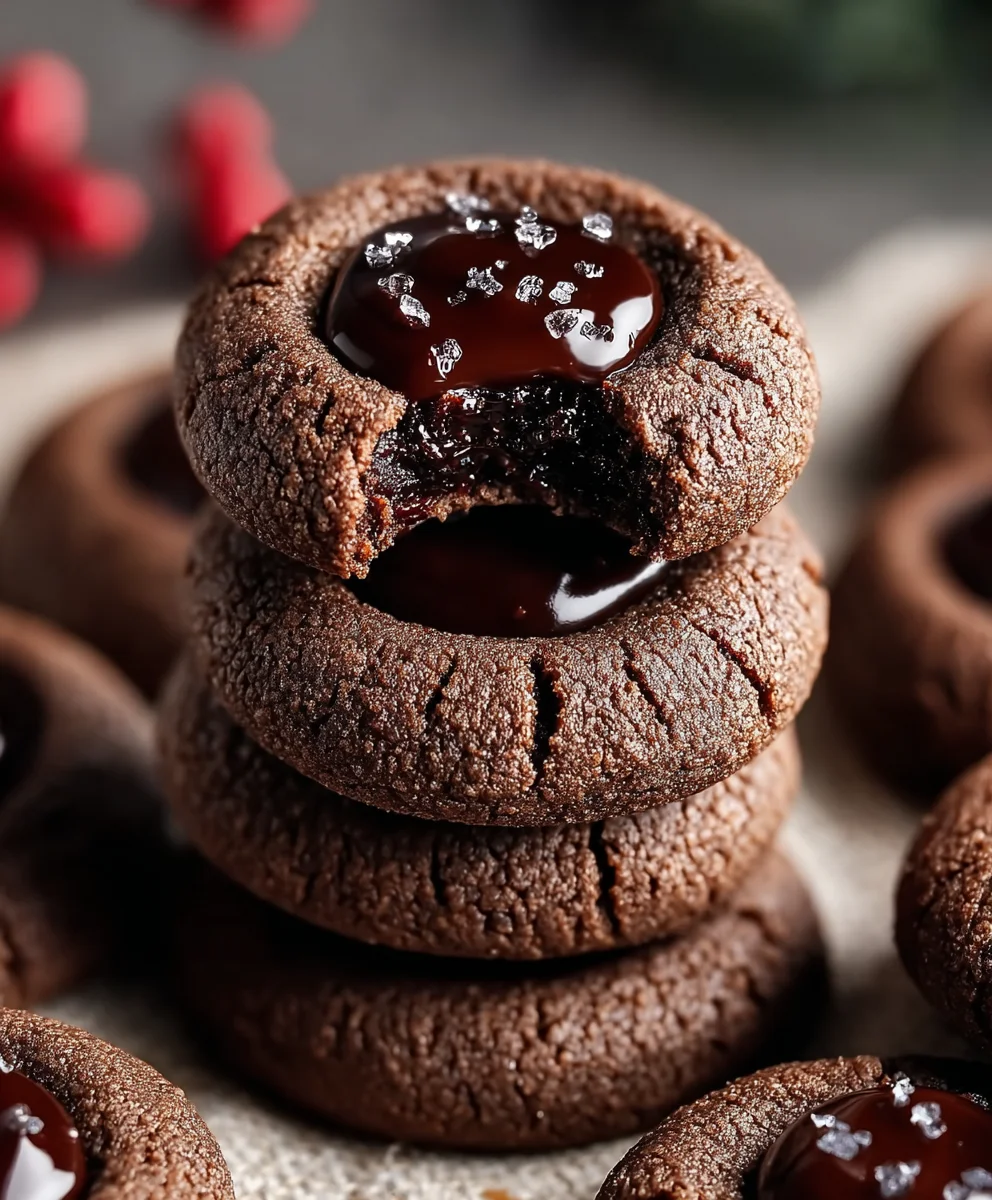
With both the cookies completely cooled and the ganache at the perfect spoonable consistency, it’s time to fill! You can use a small spoon, a piping bag with a small round tip (my preferred method for neatness), or even a Ziploc bag with a corner snipped off. Carefully spoon or pipe the cooled ganache into the defined wells of each Chocolate Thumbprint Cookie. I like to fill them generously, creating a slight dome of ganache that looks incredibly appealing. Take your time with this step, striving for neatness. The contrast between the dark cookie and the glossy ganache is truly stunning.
Step 15: Adding Optional Garnishes
For an extra touch of elegance and flavor, I often add a garnish to my Chocolate Thumbprint Cookies. Immediately after filling, while the ganache is still wet, sprinkle a tiny pinch of flaky sea salt over some of them – it’s a game-changer, enhancing the chocolate’s depth and providing a wonderful savory contrast. You could also add a few chocolate sprinkles, some delicate chocolate shavings, or even a sprinkle of finely chopped nuts. This not only makes them look beautiful but also adds another layer of texture and taste. Let your creativity shine!
Step 16: Setting and Storing Your Chocolate Thumbprint Cookies
Once all your Chocolate Thumbprint Cookies are filled and garnished, you’ll need to allow the ganache to set. You can leave them at room temperature for an hour or two, or for quicker setting, place the baking sheets in the refrigerator for about 15-30 minutes. The ganache should become firm to the touch, no longer liquid or sticky. Once set, these cookies are ready to be devoured!
To store your finished Chocolate Thumbprint Cookies, place them in an airtight container at room temperature for up to 3-4 days. If your kitchen is particularly warm, or if you prefer a firmer ganache, you can store them in the refrigerator for up to a week. Just be sure to let them come to room temperature for about 15-20 minutes before serving for the best texture and flavor. They also freeze exceptionally well for up to 2 months. Simply place them in a single layer in an airtight container with parchment paper between layers. Thaw overnight in the refrigerator or for a few hours at room temperature before enjoying. These decadent Chocolate Thumbprint Cookies are a true crowd-pleaser and perfect for any occasion!
Conclusion:
And there you have it, my friends! We’ve journeyed together through the simple yet profound magic of creating these exquisite cookies. I truly believe that this particular recipe for Chocolate Thumbprint Cookies is an absolute must-try for anyone who appreciates the finer things in life, especially when those things involve a perfect harmony of flavors and textures in a delightful, bite-sized package. What makes them so irresistible, you ask? It’s the impeccable balance of a buttery, tender, melt-in-your-mouth shortbread-style base that provides the ideal canvas for a rich, luscious, and deeply satisfying chocolate center. There’s a comforting familiarity in their shape and a surprising depth of flavor that belies their unassuming appearance. They aren’t just a treat; they’re an experience, a little moment of pure joy that brightens any day. Every time I pull a batch from the oven, the aroma alone is enough to bring a smile to my face, and the first bite confirms their status as a firm family favorite. They consistently disappear faster than any other cookie on the platter, and I often find myself making a double batch just to keep up with demand!
I find these delightful morsels to be incredibly versatile, fitting seamlessly into almost any occasion. Imagine serving them at your next casual gathering; they’re elegant enough to impress but friendly enough to feel inviting. They pair absolutely beautifully with a steaming mug of strong, dark coffee or a delicate cup of herbal tea for an afternoon pick-me-up. For the little ones (and the young at heart!), a tall glass of cold milk is their perfect companion, creating that classic, comforting snack time bliss. If you’re feeling particularly indulgent, try serving a warm cookie with a scoop of premium vanilla bean ice cream – the contrast of temperatures and the melting chocolate against the creamy ice cream is nothing short of divine. They also make magnificent edible gifts, thoughtfully presented in a pretty tin or box for neighbors, teachers, or loved ones. Trust me, a homemade gift like these Chocolate Thumbprint Cookies speaks volumes and leaves a lasting, delicious impression that store-bought simply cannot replicate. They are a testament to the fact that the most cherished gifts are often those made with love and a little bit of chocolate!
Endless Possibilities: Your Creative Twist!
But the fun doesn’t stop there! While the classic chocolate filling is undeniably a star, I wholeheartedly encourage you to get creative and make these cookies truly your own. Think beyond the usual and let your imagination guide you. For the cookie base itself, you could experiment with adding a hint of almond extract for a marzipan-like nuance, or perhaps some orange zest for a bright, citrusy lift that complements the chocolate wonderfully. A pinch of espresso powder can also deepen the chocolate flavor without making it overtly coffee-like. When it comes to the thumbprint filling, the possibilities are truly endless! Instead of just chocolate, consider a dollop of raspberry jam for a classic pairing, a swirl of dulce de leche for a caramel dream, or even a spoonful of lemon curd for a tangy contrast that will surprise and delight your taste buds. Peanut butter or Nutella are also fantastic alternatives for those who crave a richer, nuttier profile. And for an extra flourish, don’t hesitate to sprinkle a tiny bit of flaky sea salt over the chocolate before it sets – it truly elevates the flavor to another level, enhancing the sweetness and complexity. Chopped toasted nuts like pecans or walnuts can also add a delightful textural crunch to the top, transforming each cookie into a mini masterpiece of flavor and texture.
Your Turn to Bake and Share!
Now that I’ve shared all my secrets and enthusiasm for these wonderful cookies, it’s your turn to experience the magic firsthand. I cannot stress enough how much I urge you to set aside some time, gather your ingredients, and bake a batch (or two!) of these incredible treats. Don’t be intimidated; the process is incredibly rewarding, and the results are consistently spectacular. I am genuinely excited for you to discover the joy of creating these cookies in your own kitchen. Once you’ve baked them, please, please share your experience with me! What did you love most about them? Did you try any exciting variations? Did they become a new favorite in your household? I adore hearing your stories and seeing your culinary creations. Snap a picture, leave a comment, or tell your friends – let’s spread the cookie love far and wide. Happy baking, my dear readers, and I truly hope these delightful Chocolate Thumbprint Cookies bring as much warmth and happiness to your home as they do to mine!
Chocolate Thumbprint Cookies
Classic chocolate thumbprint cookies featuring a tender, melt-in-your-mouth chocolate base with a luscious chocolate ganache filling. These delightful treats offer a perfect symphony of textures and rich flavors, ideal for any occasion.
Ingredients
-
1 cup (2 sticks) unsalted butter, softened
-
½ cup granulated sugar
-
¼ cup packed light brown sugar
-
1 large egg yolk
-
1 teaspoon pure vanilla extract
-
1 ¾ cups all-purpose flour
-
½ cup unsweetened cocoa powder
-
½ teaspoon baking soda
-
¼ teaspoon salt
-
Optional: 2-3 tablespoons granulated sugar (for rolling)
-
6 ounces semi-sweet or dark chocolate, finely chopped
-
¾ cup heavy cream
-
Optional: 1 tablespoon unsalted butter, softened
-
Optional: ¼ teaspoon pure vanilla extract
-
Optional Garnish: Flaky sea salt, chocolate sprinkles or shavings, finely chopped nuts
Instructions
-
Step 1
In a medium bowl, whisk together flour, cocoa powder, baking soda, and salt. In a stand mixer, cream softened butter with granulated and light brown sugar for 2-3 minutes until light and fluffy. Beat in egg yolk and 1 tsp vanilla until combined. Gradually add dry ingredients to wet mixture on low speed until just combined; do not overmix. -
Step 2
Transfer dough to a bowl, cover, and chill in the refrigerator for at least 1 hour (up to 2 days) to firm up. -
Step 3
Preheat oven to 350°F (175°C). Line two baking sheets with parchment. Roll chilled dough into 1-inch balls; optionally roll in granulated sugar. Place balls 2 inches apart on baking sheets. Gently press a deep indentation into the center of each dough ball using your thumb or a ½ tsp measuring spoon. -
Step 4
Bake for 10-12 minutes until edges are set. Immediately re-press indentations with a spoon to redefine wells. Cool on baking sheets for 5 minutes, then transfer to a wire rack to cool completely before filling. -
Step 5
Place chopped chocolate in a heat-proof bowl. In a small saucepan, heat heavy cream over medium heat until it just simmers (do not boil). Pour hot cream over chocolate and let sit undisturbed for 5 minutes. Whisk gently from the center outwards until smooth. Whisk in optional 1 tbsp butter and ¼ tsp vanilla. Let ganache cool at room temperature for 20-30 minutes, stirring occasionally, until thick but still pourable. -
Step 6
Spoon or pipe cooled ganache into the wells of the completely cooled cookies. Immediately add optional garnishes like flaky sea salt, chocolate sprinkles, or chopped nuts while ganache is wet. -
Step 7
Allow ganache to set at room temperature (1-2 hours) or refrigerate (15-30 minutes). Store cookies in an airtight container at room temperature for 3-4 days, or refrigerate for up to a week. Cookies can be frozen for up to 2 months.
Important Information
Nutrition Facts (Per Serving)
It is important to consider this information as approximate and not to use it as definitive health advice.
Allergy Information
Please check ingredients for potential allergens and consult a health professional if in doubt.


Leave a Comment