
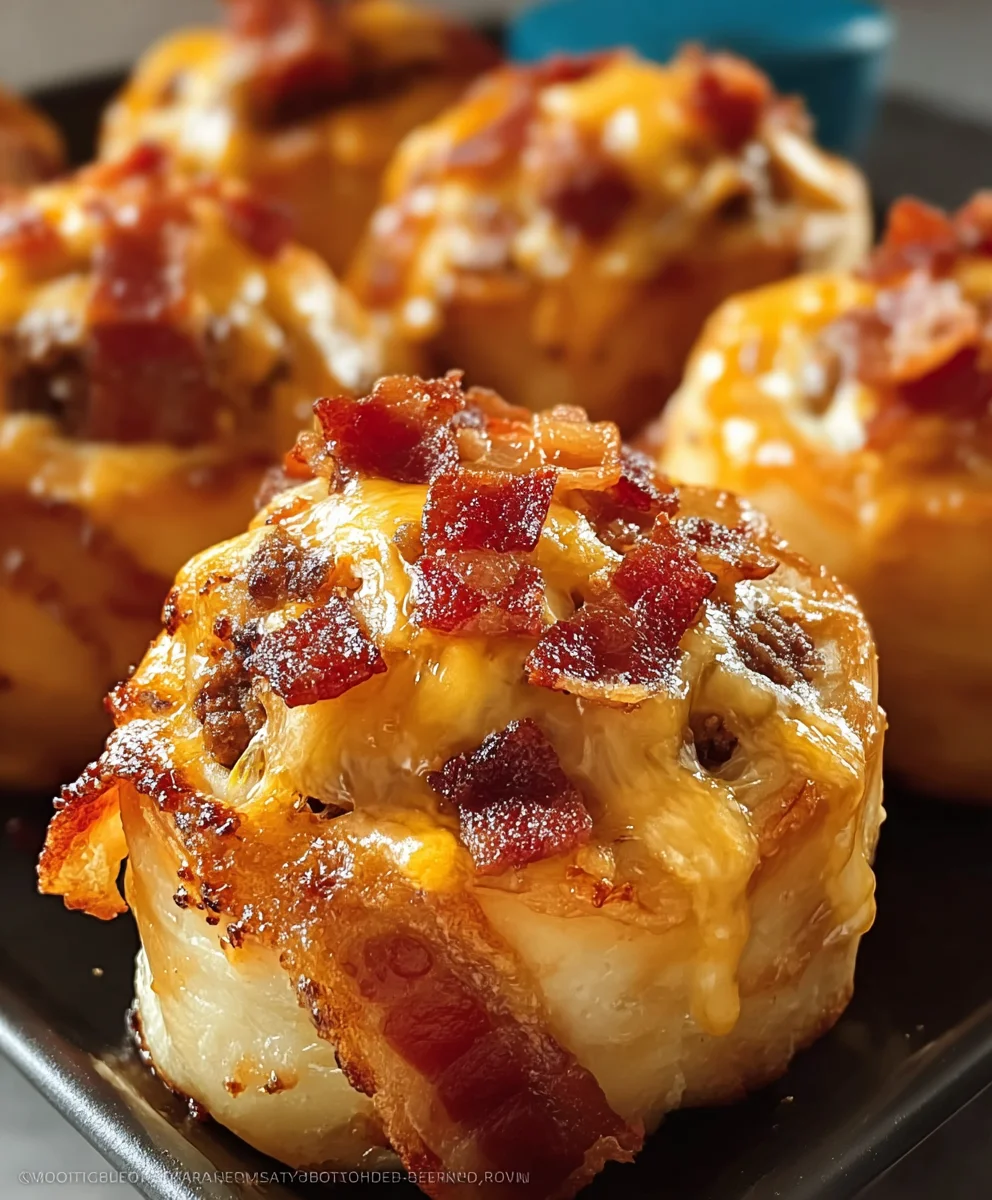
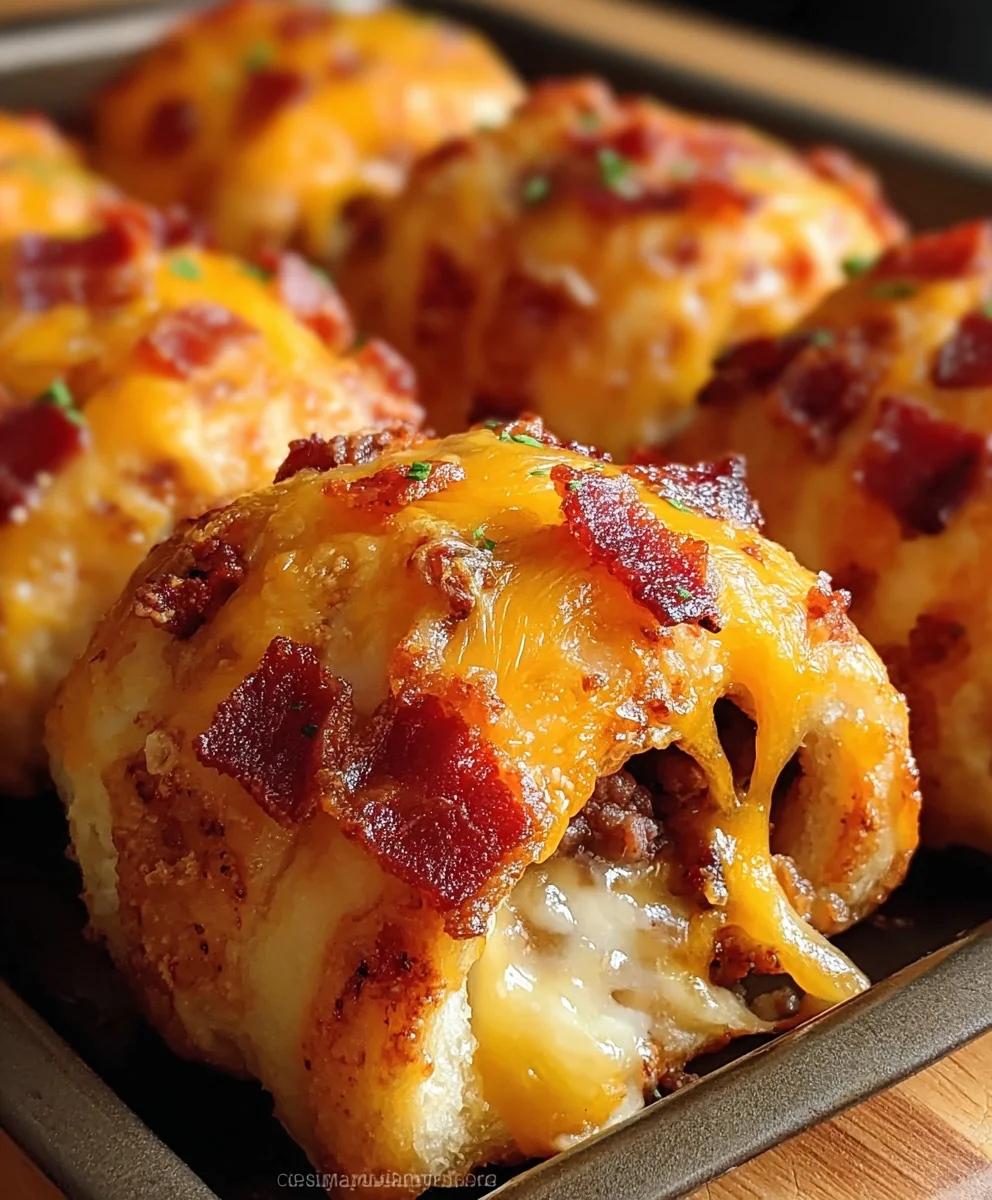
Crispy Cheesy Beef Baconrolls. Imagine biting into a perfectly golden, crunchy exterior, followed by a burst of savory beef and a luscious ooze of melted cheese, all wrapped up in smoky bacon. That’s the irresistible experience waiting for you with this incredible recipe, a true celebration of comforting flavors and satisfying textures.
These aren’t just any rolls; they’re a symphony of textures and flavors designed to delight. While the exact origins of combining these specific elements into a ‘baconroll’ might be a modern culinary innovation, the concept of delicious fillings wrapped in savory pastry or meat is a time-honored tradition found across cultures, from ancient Roman ‘placenta cakes’ to modern-day spring rolls. Our version elevates this concept, marrying the comforting heartiness of beef with the irresistible allure of crispy bacon and gooey cheese.
The Irresistible Appeal of Crispy Cheesy Beef Baconrolls
I’ve found that people instantly fall in love with the dynamic contrast – the satisfying crunch from the bacon and the outer layer, giving way to the tender, well-seasoned beef and the gloriously melted cheese center. These Crispy Cheesy Beef Baconrolls are not only a fantastic main course, perfect for a cozy family dinner, but also an absolutely sensational appetizer that vanishes quickly at any gathering. The sheer joy of preparing and sharing this dish is something truly special, making it a recurring favorite in my kitchen and, I’m sure, soon to be in yours too.
Ingredients:
- For the Beef Filling:
- 1.5 lbs (approximately 680g) ground beef, an 80/20 lean-to-fat ratio is truly ideal for flavor and tenderness.
- 1 large yellow onion, finely diced.
- 3 cloves garlic, minced (freshly minced always makes a difference!).
- 1 red bell pepper, finely diced.
- 1 tablespoon olive oil.
- 1 teaspoon smoked paprika.
- 1/2 teaspoon cumin powder.
- 1/4 teaspoon cayenne pepper (feel free to adjust this based on your personal preference for heat).
- 1/2 cup beef broth (or water if you don’t have broth on hand, but broth adds a richer depth).
- 2 tablespoons tomato paste.
- 1 tablespoon Worcestershire sauce.
- Salt and freshly ground black pepper to taste.
- 2 tablespoons fresh parsley, chopped, for garnish (optional, but I find it adds a lovely pop of freshness).
- For the Creamy Cheese Layer:
- 2 cups shredded sharp cheddar cheese.
- 1 cup shredded mozzarella cheese.
- 1/2 cup grated Parmesan cheese.
- 1/4 cup cream cheese, softened (this is my secret ingredient for an ultra-creamy, stable cheese mixture!).
- For the Baconrolls Assembly:
- 12-16 slices of thick-cut bacon (streaky bacon works absolute wonders for crispiness and flavor, and holds its shape well).
- 12-16 small or medium flour tortillas (about 6-7 inches in diameter, choose soft ones that roll easily).
- Optional: 1 egg, lightly beaten, for an egg wash (this helps with golden browning and ensures the bacon adheres perfectly).
- Essential Equipment:
- A large skillet or a Dutch oven for the beef filling.
- Two mixing bowls (one for the beef, one for the cheese).
- A sturdy baking sheet.
- Parchment paper or a silicone baking mat (to prevent sticking and make cleanup so much easier!).
- Toothpicks (these are super handy if you need a little extra help securing your rolls).
Preparing the Hearty Beef Filling for Your Crispy Cheesy Beef Baconrolls
This beef filling is the soul of our Crispy Cheesy Beef Baconrolls, so let’s give it the love and attention it deserves! The goal is a deeply flavorful, slightly rich, and perfectly seasoned mixture that will complement the cheese and bacon beautifully.
- Sauté the Aromatics to Build a Flavor Base: My first step is always to place a large skillet or a Dutch oven over medium heat. I add the tablespoon of olive oil, and once it shimmers, in go the finely diced yellow onions. I let them cook gently for about 5-7 minutes, stirring occasionally, until they become beautifully translucent and sweet. This slow caramelization really helps to build a foundational flavor for our filling. You’ll notice the kitchen filling with that irresistible aroma of cooking onions – it’s a great start!
- Introduce the Garlic and Bell Pepper: Once the onions are soft and sweet, I add the minced garlic and the finely diced red bell pepper to the skillet. I continue to cook this mixture for another 3-4 minutes, allowing the garlic to become wonderfully fragrant and the bell pepper to soften just slightly, retaining a bit of texture. It’s important to keep an eye on the garlic here; we want it golden and aromatic, not browned or, worse, burnt, as burnt garlic can introduce a bitter note that we definitely want to avoid.
- Brown the Ground Beef for Richness: Now, for the star of our filling – the ground beef! I add it to the skillet, breaking it up with a wooden spoon or spatula to ensure it cooks evenly. I cook the beef until it’s thoroughly browned all over, which usually takes about 8-10 minutes. As it cooks, you’ll see some fat rendering. If there’s an excessive amount, I like to carefully drain off most of it, leaving just a little behind for flavor and moisture. This browning step is absolutely crucial; it develops deep, complex flavors that are essential for the ultimate Crispy Cheesy Beef Baconrolls.
- Season and Infuse Deeper Flavors: Once the beef is perfectly browned, I stir in the smoked paprika, cumin powder, and a touch of cayenne pepper. These spices are carefully chosen to give our beef filling a warm, savory, and slightly smoky depth. I let them toast with the beef for about 1 minute, stirring constantly to prevent burning and to really “wake up” their flavors. Then, I mix in the tomato paste and Worcestershire sauce. The tomato paste provides a concentrated umami kick and a pleasant acidity, while the Worcestershire sauce adds a layer of complex savory notes. I continue to cook for another 2 minutes, allowing the tomato paste to caramelize slightly and lose any raw tomato flavor. This is where the magic really starts to happen, creating a incredibly robust flavor profile.
- Simmer, Reduce, and Perfect the Filling: Finally, I pour in the beef broth. I bring the mixture to a gentle simmer, then reduce the heat to low. I let the filling cook, uncovered, for about 10-15 minutes, or until most of the liquid has evaporated and the mixture has thickened considerably. We’re aiming for a rich, moist, but definitely not watery, filling. This simmering stage is vital; it allows all the beautiful flavors to meld together and intensify. Before taking it off the heat, I always taste the filling and adjust the seasoning with salt and freshly ground black pepper as needed. Proper seasoning at this stage is truly vital for the overall success and deliciousness of your Crispy Cheesy Beef Baconrolls. Once satisfied, I remove it from the heat and, if using, stir in the fresh parsley. I then set the beef filling aside to cool slightly. It’s much, much easier to work with a cooled filling when we move on to assembling the rolls, as it prevents sogginess and helps everything hold together better.
Preparing the Creamy Cheese Mixture for Your Crispy Cheesy Beef Baconrolls
This isn’t just any cheese layer; it’s a creamy, dreamy blend designed to melt perfectly and add an incredible richness to every bite of your Crispy Cheesy Beef Baconrolls. The cream cheese is the secret to its luscious texture!
- Combine the Cheeses for a Flavorful Blend: In a medium mixing bowl, I combine the shredded sharp cheddar cheese, shredded mozzarella cheese, and the grated Parmesan cheese. This particular combination is fantastic because the sharp cheddar provides a robust, tangy flavor, the mozzarella offers that irresistible stretchy, gooey melt, and the Parmesan contributes a salty, nutty depth that rounds everything out beautifully.
- Add the Cream Cheese for Unbeatable Creaminess: Now, for the ingredient that truly elevates this cheese mixture: I add the softened cream cheese to the bowl. Using my hands (which I find works best for this!) or a sturdy spatula, I mix all the cheeses together until they are thoroughly combined and you have a relatively uniform, spreadable mixture. The cream cheese is brilliant because it acts as a binder, making the cheese mixture extra creamy and ensuring it doesn’t just ooze out excessively during cooking. It truly elevates the cheesiness factor in our Crispy Cheesy Beef Baconrolls, creating that perfect interior. Make sure your cream cheese is softened to room temperature; this makes it significantly easier to incorporate smoothly without lumps.
Assembling the Irresistible Crispy Cheesy Beef Baconrolls
This is where all our hard work comes together! Careful assembly ensures beautiful, well-structured, and utterly delicious Crispy Cheesy Beef Baconrolls. Take your time with each step – it’s worth it!
- Prepare Your Workspace and Oven: First things first, I lay out my small flour tortillas on a clean, spacious work surface. It’s always good to have everything ready before you start rolling. I then preheat my oven to a steady 375°F (190°C). Lastly, I line a large baking sheet with parchment paper or a silicone baking mat. This step is super important, as it prevents any delicious cheesy or bacony bits from sticking and makes cleanup an absolute breeze!
- Layer the Creamy Cheese Generously: I take one tortilla and spread a generous tablespoon or two of our creamy cheese mixture evenly across its entire surface, making sure to leave a small border around the edges. Don’t be shy with the cheese here – this is precisely where the “cheesy” in Crispy Cheesy Beef Baconrolls truly shines. A good amount of cheese ensures that lovely molten interior!
- Add the Rich Beef Filling: Next, I spoon about 2-3 tablespoons of the cooled beef filling in a line across the center of the cheese-covered tortilla. I try to keep this line relatively neat and not too close to the very edges, as we need that extra space for rolling and sealing. Using cooled beef filling is key here, as hot filling can make the tortilla soggy and difficult to handle.
- Roll ‘Em Up Tightly: Carefully but firmly, I roll up the tortilla, starting from one edge and rolling it tightly to create a compact log. The tighter you roll it, the less likely it is to fall apart during the cooking process. If you find your rolls feel a bit loose, or if you want extra security, you can certainly secure them with a toothpick, though with a good, tight roll, it’s often not necessary. I repeat this process for all the tortillas, creating all my delightful beef-and-cheese-filled rolls.
- Wrap with Bacon for Ultimate Crispiness: This is truly where the magic happens and we fully embrace the “baconrolls” part of Crispy Cheesy Beef Baconrolls! I take one slice of thick-cut bacon. Starting at one end of a rolled tortilla, I carefully wrap the bacon slice around the entire length of the tortilla roll, spiraling it until the whole roll is covered. I make sure to tuck the end of the bacon underneath or secure it with a toothpick if needed. It’s important to ensure the bacon is wrapped snugly. The bacon not only adds incredible flavor and an amazing crispy texture but also helps to hold the tortilla together during baking. If your bacon slices are particularly long, one might be sufficient. For shorter slices, you might need to overlap slightly with two pieces to fully cover the roll.
- Prepare for Baking (Optional Egg Wash for Extra Gold): If I’m aiming for an even crispier, more gorgeously golden-brown finish, I lightly brush each bacon-wrapped roll with a beaten egg wash. This optional step also provides a bit of ‘glue,’ helping to seal the ends of the bacon and ensuring it stays perfectly wrapped during the baking process. I then place the assembled Crispy Cheesy Beef Baconrolls seam-side down on my prepared baking sheet. It’s important to leave a little space between each roll for even cooking and optimal crisping of that glorious bacon.
Cooking Your Crispy Cheesy Beef Baconrolls to Golden Perfection
We’re almost there! This is the stage where our Crispy Cheesy Beef Baconrolls transform into golden, crispy, and utterly irresistible treats. Patience is a virtue here, as we want that bacon perfectly rendered and crisp.
- Bake in the Oven for Initial Cooking: I carefully transfer the baking sheet, laden with my beautifully assembled Crispy Cheesy Beef Baconrolls, to the preheated oven. They will bake for an initial period of 25-35 minutes. During this time, the heat will begin to work its magic, cooking the bacon and melting the cheese within.
- Achieve Ultimate Crispiness and Golden Perfection: Throughout the baking process, the bacon will gradually cook, crisp up beautifully, and render its delicious fat, which will infuse into the tortilla. Simultaneously, the cheese inside will melt into a gooey, savory dream. I always recommend checking them around the 25-minute mark. You’re looking for the bacon to be deeply golden brown and wonderfully crispy – this is the “crispy” part of our Crispy Cheesy Beef Baconrolls! The tortillas underneath should also have developed some delightful crunch from absorbing the bacon fat. If, after 25-30 minutes, the bacon isn’t quite crispy enough to your liking, I often suggest increasing the oven temperature to 400°F (200°C) for the last 5-10 minutes. Alternatively, you can briefly turn on the broiler for 1-2 minutes, but please, watch them very carefully under the broiler, as they can go from perfectly golden to burnt in a flash!
- Rest Before Serving for Optimal Enjoyment: Once your Crispy Cheesy Beef Baconrolls have reached their peak crispiness and have that desirable golden hue, I carefully remove the baking sheet from the oven. It’s tempting to dive right in, but I always recommend letting the rolls rest on the baking sheet for about 5 minutes before serving. This short resting period allows the internal heat to redistribute, the molten cheese to set just slightly (making them much easier to handle without the cheese oozing out everywhere), and for all the incredible flavors to fully settle and intensify. If you used any toothpicks to secure the rolls, remember to remove them before presenting your culinary masterpieces!
Serving Suggestions and Tips for Your Perfect Crispy Cheesy Beef Baconrolls
Now that your Crispy Cheesy Beef Baconrolls are out of the oven, hot and delicious, let’s talk about how to best enjoy them and some useful tips for future endeavors!
- Presentation is Key for Maximum Appeal: These Crispy Cheesy Beef Baconrolls are absolutely fantastic when served warm, straight from the oven. I love to arrange them artfully on a platter, perhaps with a sprinkle of fresh chopped parsley over the top. This not only adds a lovely pop of color but also a fresh herbaceous note that cuts through the richness beautifully.
-
Dipping Delights to Elevate the Experience: For an extra layer of flavor and to make the eating experience even more fun and interactive, I highly recommend offering a variety of dipping sauces! Some of my personal favorites that truly complement the savory, cheesy, and crispy notes include:
- Cool and creamy sour cream or plain Greek yogurt (for a delightful cooling contrast to the richness).
- A zesty salsa or a creamy, spicy sriracha mayo for a little kick.
- Freshly made guacamole or a simple avocado cream for a smooth, rich accompaniment.
- A tangy BBQ sauce for a smoky, sweet, and savory twist.
- Even a simple hot sauce can add that perfect fiery touch that many people enjoy!
- Pairing Ideas for a Complete Meal: These Crispy Cheesy Beef Baconrolls are quite hearty on their own, making them absolutely perfect as an impressive appetizer for a gathering, a delicious party snack that disappears quickly, or even a satisfying light meal. If I’m serving them as a main course, I usually balance the richness by pairing them with a fresh, crisp green salad tossed in a light vinaigrette, or perhaps a side of seasoned rice to make it a more substantial offering.
-
Making Ahead and Storage Solutions:
- Preparation in Advance: You can certainly prepare the beef filling and the creamy cheese mixture a day or two in advance. Store them separately in airtight containers in the refrigerator. This forward planning makes the assembly process much quicker and less stressful on the day you plan to bake and serve your glorious Crispy Cheesy Beef Baconrolls.
- Assembling Ahead: You can also assemble the entire Crispy Cheesy Beef Baconrolls (up to the point of baking) and refrigerate them on the baking sheet (covered tightly with plastic wrap) for a few hours. If you’re baking them directly from the cold refrigerator, you might need to add an extra 5-10 minutes to the total baking time to ensure they’re heated through and perfectly crispy.
- Storing Leftovers: Any leftover Crispy Cheesy Beef Baconrolls can be stored in an airtight container in the refrigerator for up to 3 days. They make for a fantastic next-day snack or lunch!
- Reheating for Best Results: To reheat, I highly recommend placing them back in a preheated oven at 350°F (175°C) for 10-15 minutes, or until they are heated through and the bacon has crisped up beautifully again. While microwaving is an option for convenience, the bacon will inevitably lose its crispiness, so I generally advise against it if you want to maintain that signature “crispy” texture.
-
Important Tips for Success:
- Resist Overfilling: While it’s tempting to pack in as much filling as possible, overfilling the tortillas can make them incredibly difficult to roll neatly and significantly more prone to bursting open during baking. Stick to the recommended amount of filling for best results.
- Ensure Filling is Cooled: Always make sure your beef filling has cooled sufficiently before you begin the assembly process. Hot filling can make the tortillas soggy and cause the cheese to become too runny before it even has a chance to hit the oven, leading to a less-than-perfect roll.
- Even Bacon Wrap is Key: Try to wrap the bacon as evenly and snugly as possible around each roll. This not only helps hold everything together but also ensures that you achieve consistent crisping all around, preventing any undesirable raw or undercooked spots.
- Adjust Spice to Your Palate: Feel absolutely free to adjust the amount of cayenne pepper in the beef filling to match your personal preferred level of heat. For more of a fiery kick, add a pinch more; if you prefer it milder, you can omit it entirely.
- Explore Cheese Variations: While my chosen cheese blend is truly fantastic, don’t hesitate to experiment with other good melting cheeses like Monterey Jack, Pepper Jack (if you want an extra subtle zing!), or even a smoked Gouda for a different, intriguing flavor profile. Just ensure that whatever cheeses you choose are known for melting well.
There you have it! A comprehensive and friendly guide to creating truly exceptional and unforgettable Crispy Cheesy Beef Baconrolls that are absolutely sure to be a crowd-pleaser at any gathering or a special treat for your family. Enjoy every savory, crispy, and delightfully cheesy bite!
Conclusion:
And there you have it, friends! We’ve journeyed through the simple steps to create a truly unforgettable appetizer, snack, or even a delightful main course. If you’ve been searching for that perfect dish to impress guests, bring to a potluck, or simply treat yourself to something extraordinary, look no further. This recipe isn’t just about combining ingredients; it’s about crafting an experience. The moment these come out of the oven, golden and fragrant, you’ll understand exactly why they’ve become such a beloved staple in my kitchen. It’s the harmonious blend of textures and tastes – the initial crunch, the yielding, savory beef, and that glorious, gooey cheese, all brought together by the smoky perfection of bacon. This is more than just a recipe; it’s an invitation to elevate your culinary game with minimal fuss and maximum flavor impact.
I genuinely believe that the Crispy Cheesy Beef Baconrolls stand out as a must-try for anyone who appreciates bold flavors and satisfying textures. Imagine biting into that golden-brown exterior, hearing the subtle crisp, and then experiencing the burst of rich, seasoned beef intertwined with melted cheese. It’s a symphony for the senses, delivering comfort and excitement in every single bite. This dish isn’t just delicious; it’s incredibly versatile and surprisingly easy to master. You don’t need to be a gourmet chef to achieve spectacular results with these rolls. My hope is that you’ll feel empowered and excited to bring this delightful creation to life in your own home. They have a universal appeal that makes them perfect for almost any occasion, turning an ordinary meal into something special without requiring hours of work.
Serving Suggestions for Your Crispy Cheesy Beef Baconrolls:
These incredible rolls are fantastic on their own, but they also play well with others! For a casual gathering, serve them with a variety of dips. A classic marinara sauce is always a hit, offering a tangy counterpoint to the rich beef and cheese. Don’t shy away from a creamy ranch or a zesty sriracha aioli for those who love a little kick. If you’re aiming for a heartier meal, they make an excellent accompaniment to a fresh, crisp green salad with a light vinaigrette, balancing out the richness beautifully. They’re also superb alongside a bowl of warm, chunky tomato soup on a chilly evening. For a more sophisticated presentation, arrange them artfully on a platter with a garnish of fresh chopped chives or parsley. Think about turning them into sliders by serving them in small, toasted buns with a dollop of your favorite sauce. They are truly the chameleons of the appetizer world, adapting to whatever mood or occasion you have in mind.
Exciting Variations to Explore:
While the classic recipe is divine, don’t be afraid to experiment and make these rolls truly your own. One simple variation is to play with the cheese – try a sharper cheddar, a smoky provolone, or even a blend of mozzarella and Monterey Jack for extra stretch. If you like a little heat, finely chopped jalapeños or a pinch of red pepper flakes can be added to the beef mixture. For a gourmet twist, consider adding a layer of caramelized onions or sautéed mushrooms before rolling. You could also experiment with different seasonings for the beef; a touch of smoked paprika, garlic powder, or even a dash of Worcestershire sauce can deepen the flavor profile. If you’re feeling adventurous, try swapping out the ground beef for ground turkey or even finely minced mushrooms for a vegetarian option, though you’d likely want to adjust the seasoning to match. The beauty of this recipe lies in its adaptability, allowing you to tailor it to your personal preferences and dietary needs, ensuring that these rolls remain a fresh and exciting addition to your culinary repertoire every time you make them.
So, now it’s your turn! I wholeheartedly encourage you to roll up your sleeves, gather your ingredients, and give these amazing Crispy Cheesy Beef Baconrolls a try. I promise you won’t regret it. The joy of cooking comes not just from the eating, but from the process of creation and sharing. Once you’ve made them, I would absolutely love to hear about your experience. Did you add any unique twists? How did your family and friends react? Share your photos, your stories, and your tips in the comments below or tag us on social media! Your insights and creativity inspire me and our entire community of food lovers. Let’s make some delicious memories together, one perfectly crisp, cheesy, beefy bite at a time. Happy cooking, everyone!
Crispy Cheesy Beef Baconrolls
Imagine biting into a perfectly golden, crunchy exterior, followed by a burst of savory beef and a luscious ooze of melted cheese, all wrapped up in smoky beef bacon. These irresistible rolls are a true celebration of comforting flavors and satisfying textures, perfect for dinner or as an appetizer.
Ingredients
-
1.5 lbs ground beef (80/20 lean-to-fat ratio)
-
1 large yellow onion, finely diced
-
3 cloves garlic, minced
-
1 red bell pepper, finely diced
-
1 tbsp olive oil
-
1 tsp smoked paprika
-
1/2 tsp cumin powder
-
1/4 tsp cayenne pepper (adjust to taste)
-
1/2 cup beef broth
-
2 tbsp tomato paste
-
1 tbsp Worcestershire sauce
-
Salt and freshly ground black pepper to taste
-
2 tbsp fresh parsley, chopped (optional)
-
2 cups shredded sharp cheddar cheese
-
1 cup shredded mozzarella cheese
-
1/2 cup grated Parmesan cheese
-
1/4 cup cream cheese, softened
-
12-16 slices thick-cut beef bacon
-
12-16 small or medium flour tortillas (approx. 6-7 inches)
-
1 egg, lightly beaten (optional, for egg wash)
Instructions
-
Step 1
Sauté 1 large yellow onion in 1 tbsp olive oil for 5-7 min. Add 3 cloves minced garlic and 1 finely diced red bell pepper; cook 3-4 min. Add 1.5 lbs ground beef; brown 8-10 min, then drain fat. Stir in 1 tsp smoked paprika, 1/2 tsp cumin, 1/4 tsp cayenne pepper; cook 1 min. Add 2 tbsp tomato paste and 1 tbsp Worcestershire sauce; cook 2 min. Pour in 1/2 cup beef broth. Simmer 10-15 min until thickened. Season with salt/pepper. Stir in 2 tbsp fresh parsley (optional). Cool completely. -
Step 2
In a bowl, combine 2 cups shredded sharp cheddar, 1 cup shredded mozzarella, 1/2 cup grated Parmesan, and 1/4 cup softened cream cheese. Mix until uniform and spreadable. -
Step 3
Preheat oven to 375°F (190°C). Line a baking sheet with parchment paper. On each 6-7 inch tortilla, spread 1-2 tbsp cheese mixture, then spoon 2-3 tbsp cooled beef filling in a line across the center. Roll tortilla tightly into a log. -
Step 4
Wrap each tortilla roll snugly with one slice of thick-cut beef bacon, tucking the end underneath. Secure with toothpicks if needed. (Optional) Brush with 1 lightly beaten egg. Place seam-side down on the prepared baking sheet, leaving space between rolls. -
Step 5
Bake 25-35 minutes, until beef bacon is deeply golden and crispy, and cheese is melted. For extra crispiness, increase oven to 400°F (200°C) for 5-10 min, or broil 1-2 min (watch closely). -
Step 6
Let rolls rest 5 minutes before serving. Remove toothpicks. Serve warm, optionally with dipping sauces like sour cream, salsa, guacamole, or BBQ sauce.
Important Information
Nutrition Facts (Per Serving)
It is important to consider this information as approximate and not to use it as definitive health advice.
Allergy Information
Please check ingredients for potential allergens and consult a health professional if in doubt.


Leave a Comment