
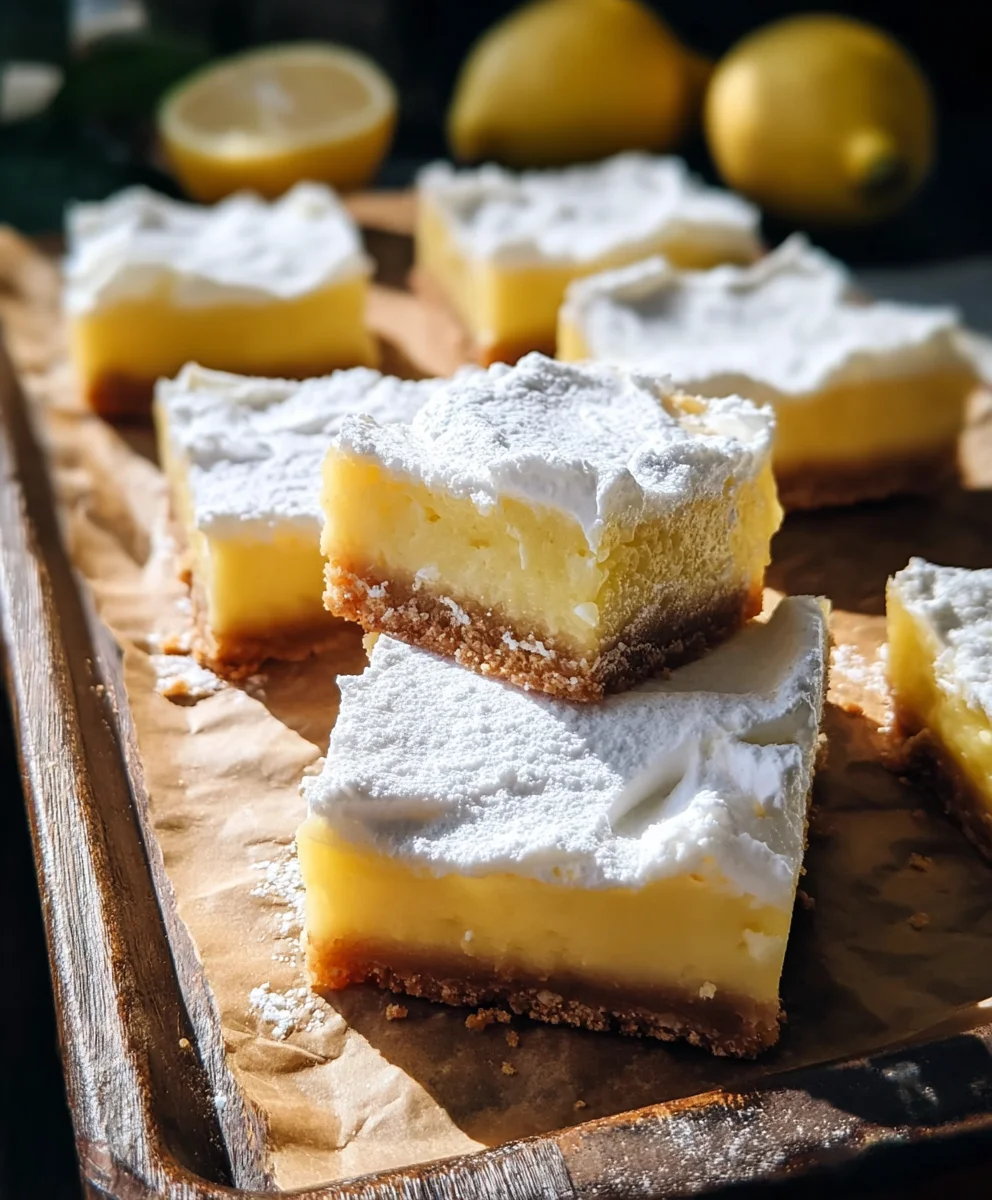
Small Batch Lemon Bars are truly a ray of sunshine on any given day, offering that perfect balance of zesty brightness and comforting sweetness we all crave. Imagine indulging in a dessert that perfectly captures the essence of fresh lemons—a treat so vibrant it almost sparkles. I’ve always found something incredibly special about these iconic bars. They’ve graced countless bake sales, family gatherings, and casual brunches, becoming a beloved staple in American dessert culture for their timeless simplicity and universally adored flavor profile.
What makes this specific rendition so utterly delightful? It’s the harmonious blend: a crisp, buttery shortbread crust that provides the perfect foundation, giving way to a velvety, intensely tangy lemon filling, often finished with a delicate cloud of powdered sugar.
Why are Small Batch Lemon Bars the ideal choice?
Because sometimes, you just crave that specific burst of citrusy delight, but a full pan feels like too much commitment or too many leftovers. This recipe offers all the vibrant flavor and satisfying texture you adore, scaled down perfectly for personal enjoyment or a cozy moment shared with just one other person. It’s the ultimate solution for satisfying that sweet and tart craving without any fuss!

Ingredients:
- For the Shortbread Crust:
- 1 cup (120g) all-purpose flour, spooned and leveled
- 1/4 cup (50g) granulated sugar
- 1/4 teaspoon fine sea salt
- 1/2 cup (113g) unsalted butter, very cold and cut into 1/2-inch cubes (about 1 stick)
- For the Lemon Filling:
- 3 large eggs, at room temperature
- 3/4 cup (150g) granulated sugar
- 2 tablespoons (16g) all-purpose flour, spooned and leveled
- 1/4 teaspoon fine sea salt
- 1/2 cup (120ml) fresh lemon juice (from about 2-3 medium lemons)
- 1 tablespoon finely grated lemon zest (from about 1-2 medium lemons)
- For Dusting:
- 2-3 tablespoons powdered sugar (confectioners’ sugar)
Preparing the Shortbread Crust: Your Foundation for Flavor
- Preheat and Prepare Your Pan: First things first, let’s get our oven ready. Preheat your oven to 350°F (175°C). For this small batch of delicious lemon bars, I find a 9×5-inch loaf pan works absolutely perfectly, yielding wonderfully thick and satisfying bars. Line your chosen pan with parchment paper, making sure to leave an overhang on the two longer sides. This overhang will act as handles, making it incredibly easy to lift the entire batch of baked bars out of the pan later on, which is a little trick that saves so much fuss! If you don’t have a 9×5-inch loaf pan, a smaller square pan, like a 7×7-inch, or even a mini 8×4-inch loaf pan, could also work, though baking times might need slight adjustment, and the thickness of your bars will vary. Using parchment paper is truly a non-negotiable step for clean removal.
- Combine Dry Ingredients: In a medium-sized mixing bowl, measure out your 1 cup of all-purpose flour, 1/4 cup of granulated sugar, and 1/4 teaspoon of fine sea salt. Give these dry ingredients a good whisk together. Whisking ensures that everything is evenly distributed, which is crucial for a uniformly flavored crust. This seemingly simple step actually contributes to the consistent texture of your shortbread.
-
Incorporate the Cold Butter: Now for the star of the crust – the butter! Add your 1/2 cup (113g) of very cold unsalted butter, which you’ve already cut into 1/2-inch cubes, into the dry ingredients. The key here is that the butter must be very cold. Cold butter is essential for creating a tender, flaky shortbread crust. You have a few options for incorporating it:
- Using a Pastry Blender: If you have one, a pastry blender is your best friend here. Cut the butter into the flour mixture until it resembles coarse meal with some pea-sized pieces of butter remaining.
- Using Your Fingertips: This is my preferred method for a truly hands-on baking experience. Use your fingertips to rub the butter into the flour mixture. Work quickly to prevent the butter from getting too warm from the heat of your hands. You’re aiming for that same coarse meal texture with small butter pieces. This method allows you to feel the texture develop, ensuring you don’t overmix.
- Using a Food Processor: For a super quick method, pulse the dry ingredients and cold butter together in a food processor until the mixture resembles coarse crumbs. Be careful not to over-process, or you’ll risk warming the butter too much.
No matter which method you choose, the goal is to have a mixture that holds together when you squeeze a small amount in your hand, but still looks crumbly.
- Press into the Pan: Once your shortbread mixture is ready, transfer it into your prepared 9×5-inch loaf pan. Use the bottom of a flat-bottomed glass, a measuring cup, or even your clean fingers to press the mixture firmly and evenly into the bottom of the pan. It’s really important to compact it well so that your crust is sturdy and doesn’t crumble apart when you cut the bars. Ensure it’s an even layer across the entire bottom. Then, take a fork and gently prick the entire surface of the pressed crust a few times. This helps prevent the crust from puffing up excessively during baking.
- Pre-Bake the Crust: Place the pan with the pressed crust into your preheated 350°F (175°C) oven. Bake for about 18-22 minutes, or until the edges are lightly golden brown and the crust looks set. Pre-baking the crust is a crucial step for lemon bars. It ensures that your shortbread foundation is perfectly crisp and golden, providing a sturdy base for the luscious lemon filling and preventing any sogginess that could compromise the texture of your final bars. While the crust is pre-baking, you can start preparing the lemon filling.
Crafting the Luscious Lemon Filling: The Zesty Heart of the Bars
- Zest and Juice Your Lemons: Before you dive into mixing, let’s get those lemons ready. For the 1 tablespoon of finely grated lemon zest, use a microplane grater to carefully remove only the bright yellow part of the lemon peel. Avoid grating the white pith underneath, as it can impart a bitter flavor to your filling. The zest provides a concentrated burst of lemon aroma and flavor that really elevates the bars. For the 1/2 cup of fresh lemon juice, roll your lemons firmly on your countertop for a few seconds before slicing them in half. This helps to release more juice. Then, juice them using a citrus reamer or juicer. Always strain your fresh lemon juice to catch any seeds or pulp; we want a perfectly smooth filling!
- Whisk the Eggs: In a medium-sized mixing bowl, crack your 3 large eggs. Give them a good whisk with a fork or a small whisk until they are lightly beaten and just combined. You don’t need to whip them extensively, just break up the yolks and whites so they can easily integrate with the other ingredients. Make sure your eggs are at room temperature, as this helps them combine more smoothly and evenly with the other ingredients, creating a more uniform emulsion.
- Combine Dry Ingredients for Filling: In a separate small bowl, whisk together the 3/4 cup of granulated sugar, 2 tablespoons of all-purpose flour, and 1/4 teaspoon of fine sea salt for the filling. Whisking these together ensures that the flour is evenly distributed and helps prevent lumps when it’s added to the wet ingredients. The small amount of flour in the filling is what gives it that perfectly set, yet still incredibly creamy, texture. It acts as a stabilizer and thickener.
- Integrate Wet and Dry Ingredients: Gradually pour your fresh lemon juice and add the lemon zest into the lightly beaten eggs. Whisk gently to combine. Then, slowly add the dry sugar and flour mixture to the wet ingredients, whisking continuously until everything is thoroughly combined and you have a smooth, lump-free filling. Take your time with this step, ensuring there are no hidden pockets of dry flour. The mixture will be relatively thin, but don’t worry, it will thicken beautifully in the oven. This bright, sunshine-yellow liquid is truly the heart of your “Small Batch Lemon Bars”.
Baking and Cooling: The Patience Game for Perfect Bars
-
Pour and Bake: Once your shortbread crust has finished its pre-bake and looks lightly golden, carefully remove it from the oven. Reduce your oven temperature to 325°F (160°C). Immediately and gently pour the prepared lemon filling evenly over the warm, pre-baked crust. Be mindful not to splash or disturb the crust too much. Carefully place the pan back into the oven. Bake for approximately 25-30 minutes. The baking time can vary depending on your oven and the exact thickness of your bars in your specific pan.
How to Tell When Your Lemon Bars Are Done:
The bars are ready when the edges of the filling are set and firm, but the very center still has a slight, delicate jiggle when you gently shake the pan. The top might also appear lightly golden in spots or have a slightly opaque, matte finish. Avoid overbaking, as this can lead to a rubbery texture rather than that desirable creamy, custardy filling. Remember, these will continue to set as they cool.
-
The Critical Cooling Process: This is arguably the most crucial step for achieving those perfectly sliced, beautiful lemon bars. Once the bars are baked, carefully remove the pan from the oven.
- Initial Cooling: Let the lemon bars cool completely at room temperature, right there in their pan, for at least 2 to 3 hours. During this time, the filling will continue to firm up and set. Resist the urge to touch or move them too much.
- Refrigeration: Once they are at room temperature and no longer warm to the touch, transfer the pan to the refrigerator. Chill them for a minimum of 3 to 4 hours, or ideally, overnight. This extended chilling period is absolutely vital for the filling to fully set and solidify. Trying to cut them before they are thoroughly chilled will result in a messy, gooey disaster, and we’ve put too much love into these “Small Batch Lemon Bars” for that to happen!
Serving and Storage: The Sweet Reward
- Dust with Powdered Sugar: Once your lemon bars are completely chilled and firm, use the parchment paper overhang to carefully lift the entire slab out of the pan and transfer it to a cutting board. Now for the final flourish! Generously dust the top of the lemon bars with powdered sugar using a fine-mesh sieve. This adds a beautiful, elegant finish and a delicate sweetness that perfectly complements the tart lemon filling. You can apply a light dusting or a thicker blanket, depending on your preference.
- Cutting the Bars: To achieve clean, professional-looking slices, here’s a little secret: use a long, sharp knife. For each cut, dip your knife into hot water, wipe it clean and dry with a paper towel, and then make your cut. Repeat this process for every single slice. This technique prevents the filling from sticking to the knife and creates beautifully defined edges. For our 9×5-inch loaf pan batch, I usually aim for 6-8 substantial, thick bars. You can slice them into squares, rectangles, or even triangles if you’re feeling fancy!
- Storage: These “Small Batch Lemon Bars” are best enjoyed fresh, but they store wonderfully! Place any leftover lemon bars in an airtight container. Keep them refrigerated for up to 3-4 days. While they are safe to eat after that, the texture and freshness are optimal within this timeframe. The flavors tend to deepen and meld even further after a day in the fridge, making them almost even better on the second day! You can also freeze them for longer storage; individually wrap them in plastic wrap, then place them in an airtight container for up to 1-2 months. Thaw in the refrigerator before serving.
Conclusion:
    So, there you have it! We've journeyed through the simple steps of creating what I genuinely believe are some of the most delightful lemon bars you'll ever taste. This recipe isn't just another dessert; it's a testament to the idea that incredible flavor doesn't have to come with a hefty time commitment or a mountain of ingredients. It’s a celebration of convenience, allowing you to indulge in a classic treat without the pressure of baking for a crowd or dealing with an abundance of leftovers. The beauty of these bars lies in their perfect balance: a buttery, tender shortbread crust that provides a delightful counterpoint to the vibrant, tangy, and irresistibly sweet lemon filling. Every bite is a burst of sunshine, guaranteed to brighten even the cloudiest day.

    Why These Small Batch Lemon Bars Are an Absolute Must-Try
    For me, what makes this recipe a true gem is its sheer practicality combined with its undeniable deliciousness. How many times have you craved a homemade dessert but been put off by the thought of a huge batch taking over your kitchen, or the guilt of wasting food if you can't finish it all? This recipe for Small Batch Lemon Bars is the perfect antidote to those dilemmas. It delivers all the comforting, nostalgic flavors of traditional lemon bars in a manageable quantity, ideal for a quiet evening at home, a sweet treat for two, or a thoughtful surprise for a single friend. The process itself is incredibly satisfying – from mixing the simple crust ingredients to watching the lemon filling magically set in the oven. There’s a certain joy in creating something so beautiful and delicious with such minimal fuss. Plus, the bright, citrusy aroma that fills your kitchen while these are baking is an experience in itself, promising the deliciousness to come.

    Creative Ways to Savor and Customize Your Lemon Bar Experience
    While these lemon bars are absolutely divine on their own, a simple dusting of powdered sugar (applied generously, of course!) is the classic and arguably perfect finish. But why stop there? If you're feeling adventurous, consider a dollop of freshly whipped cream, perhaps infused with a hint of vanilla or a touch of a complementary herb like basil or mint, for an extra layer of luxury. A handful of fresh berries – raspberries, blueberries, or sliced strawberries – can add a beautiful splash of color and a fresh, fruity counterpoint to the lemon's tang. For a truly decadent treat, a small scoop of good quality vanilla bean ice cream melting alongside a warm lemon bar is an experience I highly recommend. On the customization front, don't be afraid to experiment! You could grate a little ginger into your shortbread crust for a subtle spicy kick, or add a whisper of lavender extract to the lemon filling for an elegant, floral note. If you're a fan of other citrus, a mix of lemon and lime zest in the filling can create a wonderfully complex "limon-lime" bar. These bars keep well in an airtight container in the refrigerator for several days, making them perfect for preparing ahead of time or enjoying throughout the week as a delightful little pick-me-up.

    Now, it's your turn! I genuinely hope I’ve inspired you to roll up your sleeves and give these fantastic lemon bars a try. There's a profound satisfaction that comes from baking something from scratch, and this recipe makes that journey incredibly accessible and rewarding. Imagine the moment you pull that golden tray from the oven, the sweet and tart aroma wafting through your home, and then that first exquisite bite. It's a small moment of pure bliss, a testament to the simple pleasures of homemade treats.

    And when you do create your own batch, please don't keep it a secret! I would absolutely love to hear all about your baking adventure. Did you make any creative adjustments? What was your favorite part of the process? How did they turn out for you? Share your thoughts, your experiences, and even your photos in the comments section below. Your feedback not only helps me, but it also creates a vibrant community where we can all learn from and inspire each other. Let's celebrate the joy of baking and the deliciousness of these perfect little bars together. Happy baking!
Small Batch Lemon Bars
Small Batch Lemon Bars offer a perfect balance of zesty brightness and comforting sweetness. This recipe provides a crisp, buttery shortbread crust with a velvety, intensely tangy lemon filling, scaled down for personal enjoyment or sharing.
Ingredients
-
1 cup (120g) all-purpose flour
-
1/4 cup (50g) granulated sugar
-
1/4 teaspoon fine sea salt
-
1/2 cup (113g) unsalted butter, very cold, cut into 1/2-inch cubes
-
3 large eggs, at room temperature
-
3/4 cup (150g) granulated sugar
-
2 tablespoons (16g) all-purpose flour
-
1/4 teaspoon fine sea salt
-
1/2 cup (120ml) fresh lemon juice (from about 2-3 medium lemons)
-
1 tablespoon finely grated lemon zest (from about 1-2 medium lemons)
-
2-3 tablespoons powdered sugar (confectioners’ sugar), for dusting
Instructions
-
Step 1
Preheat oven to 350°F (175°C). Line a 9×5-inch loaf pan with parchment paper, leaving an overhang on the longer sides for easy removal. -
Step 2
In a medium bowl, whisk 1 cup all-purpose flour, 1/4 cup granulated sugar, and 1/4 tsp fine sea salt. Add 1/2 cup very cold, cubed unsalted butter and cut it in (using a pastry blender, fingertips, or food processor) until mixture resembles coarse crumbs. Press firmly and evenly into the prepared pan. Prick the surface a few times with a fork. -
Step 3
Bake the crust for 18-22 minutes, or until the edges are lightly golden brown and the crust looks set. While the crust is baking, prepare the lemon filling. -
Step 4
Grate 1 tablespoon of lemon zest, avoiding the white pith. Roll lemons and extract 1/2 cup (120ml) fresh lemon juice; strain to remove seeds/pulp. In a medium bowl, whisk 3 large room-temperature eggs. In a separate small bowl, whisk 3/4 cup granulated sugar, 2 tablespoons all-purpose flour, and 1/4 teaspoon fine sea salt. -
Step 5
Gradually pour the fresh lemon juice and add the lemon zest into the lightly beaten eggs, whisking gently. Slowly add the dry sugar/flour mixture to the wet ingredients, whisking continuously until thoroughly combined and lump-free. -
Step 6
Remove the pre-baked crust from the oven and reduce oven temperature to 325°F (160°C). Immediately and gently pour the prepared lemon filling evenly over the warm crust. Bake for 25-30 minutes, until the edges of the filling are set and firm, but the very center still has a slight jiggle. Avoid overbaking. -
Step 7
Carefully remove the pan from the oven. Let the lemon bars cool completely at room temperature in their pan for 2-3 hours. Once no longer warm, transfer the pan to the refrigerator and chill for a minimum of 3-4 hours, or ideally overnight. This extended chilling is vital for the filling to fully set and solidify for clean slices. -
Step 8
Once completely chilled and firm, use the parchment paper overhang to carefully lift the entire slab of bars out of the pan onto a cutting board. Generously dust the top with 2-3 tablespoons powdered sugar using a fine-mesh sieve. For clean, professional-looking slices, use a long, sharp knife, dipping it into hot water, wiping it clean and dry for each cut. Slice into 6-8 bars. -
Step 9
Store leftover lemon bars in an airtight container in the refrigerator for up to 3-4 days; place parchment paper between layers if stacking. For longer storage, freeze individually wrapped bars for up to 1-2 months. Thaw in the refrigerator before serving.
Important Information
Nutrition Facts (Per Serving)
It is important to consider this information as approximate and not to use it as definitive health advice.
Allergy Information
Please check ingredients for potential allergens and consult a health professional if in doubt.


Leave a Comment