
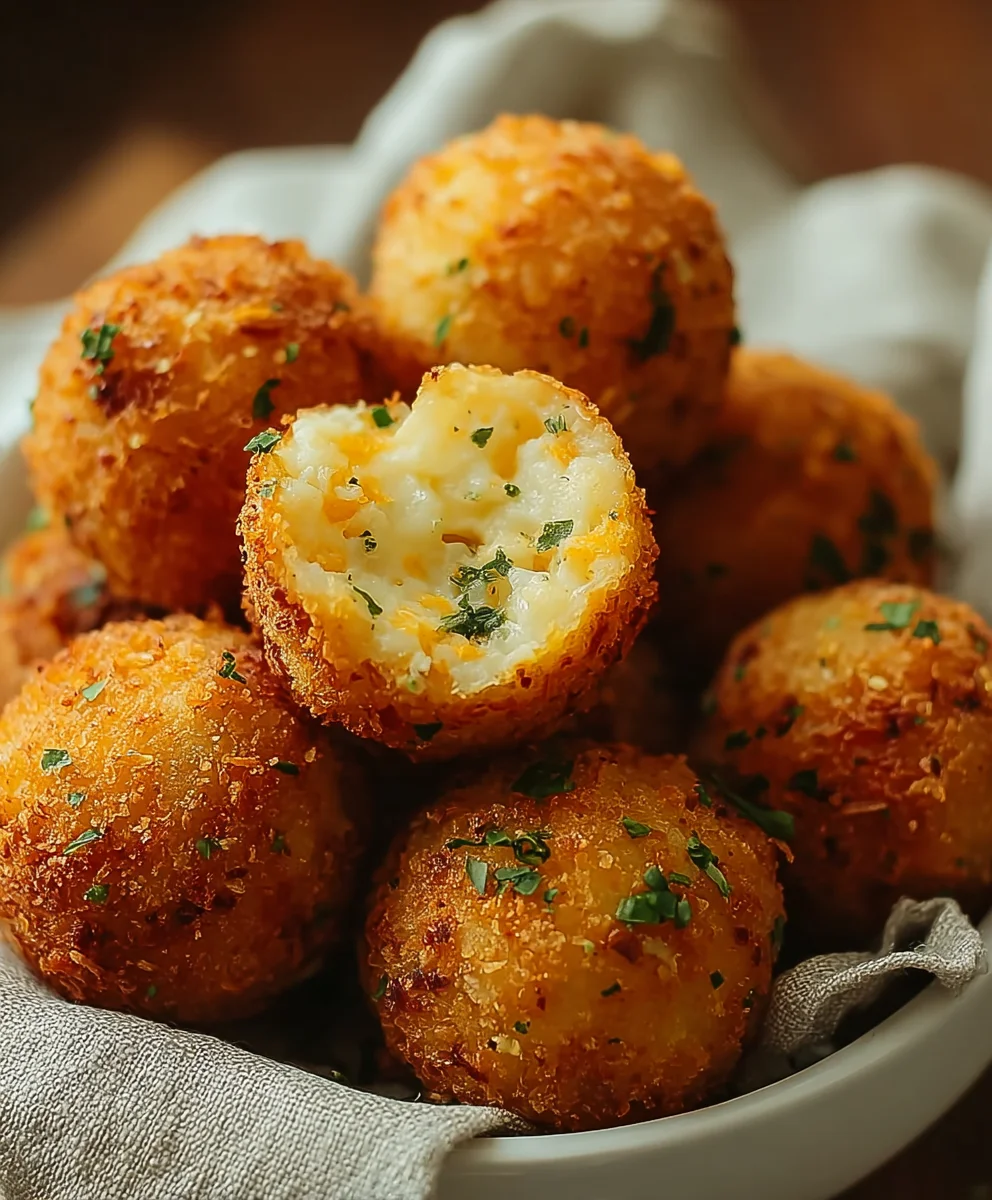
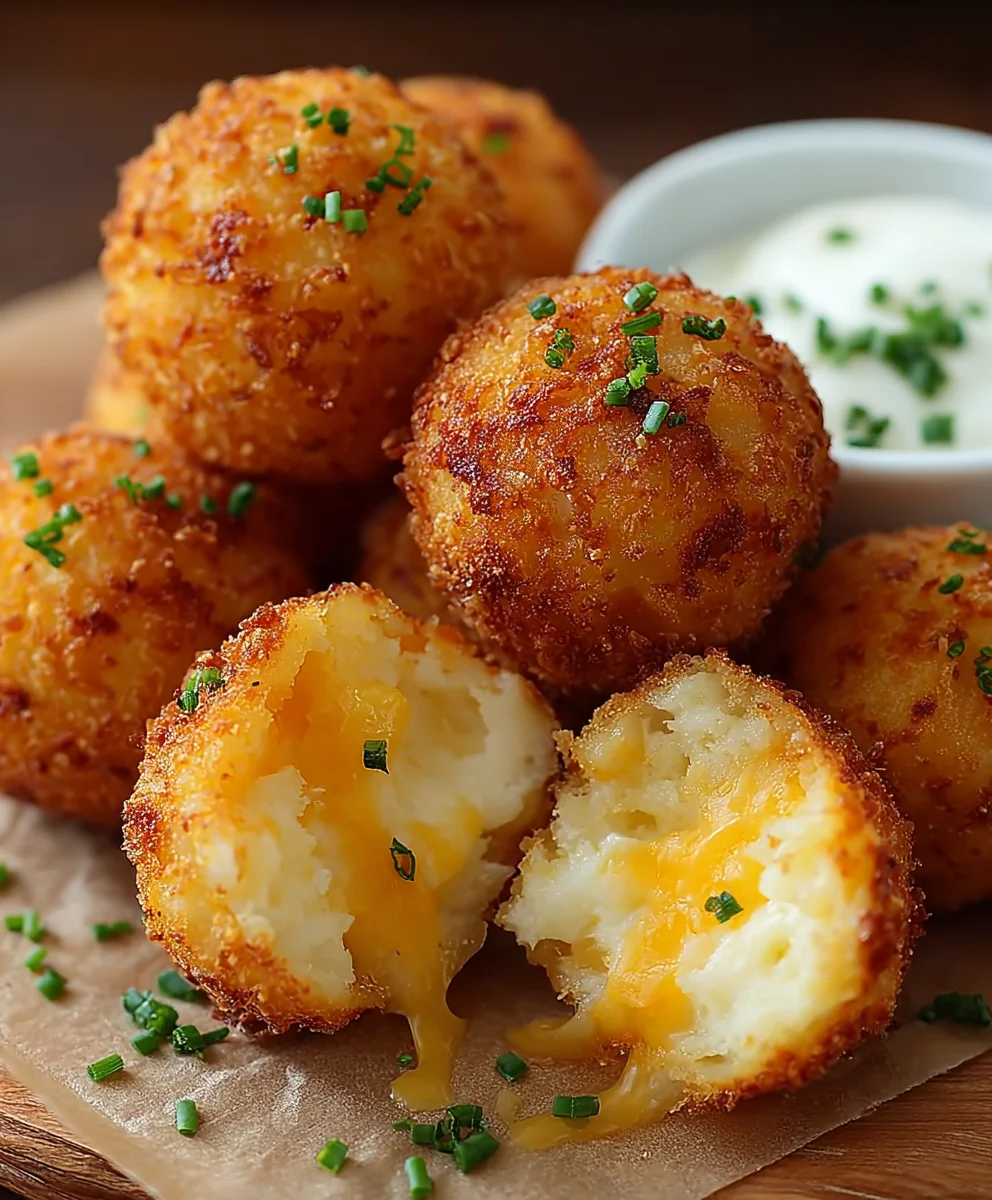
Potato Cheese Balls are more than just a simple appetizer; they’re a hug in a bite-sized package. There’s an undeniable comfort that comes from biting into that perfectly golden, crispy exterior, only to discover a molten, cheesy, and wonderfully tender potato center. It’s no wonder why these little gems are a perennial favorite at parties, family gatherings, or even just as a satisfying solo snack. What truly sets these Potato Cheese Balls apart is the delightful contrast in textures and flavors – the satisfying crunch gives way to a creamy, savory goodness that’s utterly addictive. Whether you’re a seasoned cook or just dipping your toes into the culinary waters, mastering this recipe will undoubtedly earn you rave reviews and a permanent spot on your go-to snack rotation.
Ingredients:
- 2 cups mashed potatoes (ensure they are cooled and not too watery)
- 1 cup cheddar cheese, shredded (medium or sharp cheddar both work wonderfully)
- 1/4 cup bacon, cooked and crumbled (crispy bacon adds fantastic texture and flavor)
- 2 green onions, finely chopped (both the white and green parts are great here)
- 1/2 teaspoon garlic powder (for that savory depth)
- 1/2 teaspoon salt (adjust to your taste, especially if your mashed potatoes were already seasoned)
- 1/4 teaspoon black pepper (freshly ground is always best)
- 1 cup all-purpose flour (for dredging)
- 2 large eggs, beaten (these act as our binder)
- 1 cup breadcrumbs (panko breadcrumbs will give you the crispiest coating)
- Cooking spray or olive oil (for frying or baking)
Preparing the Potato Cheese Ball Mixture
Let’s get started by preparing the heart of our Potato Cheese Balls. In a large mixing bowl, combine the cooled mashed potatoes with the shredded cheddar cheese. It’s important that your mashed potatoes are at room temperature or slightly cooled; warm potatoes can make the cheese melt too quickly and become greasy, affecting the texture of our balls. Gently mix them together until they are just combined. Overmixing can sometimes lead to a gummy consistency, so be gentle here.
Next, we’ll introduce the flavor boosters. Add the cooked and crumbled bacon to the potato and cheese mixture. This is where you get those delightful salty and smoky notes in every bite. Follow this with the finely chopped green onions. Their fresh, mild onion flavor complements the richness of the cheese and bacon beautifully. Now, sprinkle in the garlic powder, salt, and black pepper. These seasonings are crucial for bringing all the flavors together and creating a well-balanced appetizer. Once all these ingredients are in the bowl, mix everything together gently but thoroughly. You want to ensure that the cheese, bacon, and seasonings are evenly distributed throughout the mashed potatoes. The mixture should be firm enough to hold its shape. If it seems a bit too soft, you can always add a tablespoon more of mashed potato if you have any leftover, or even a tiny bit more cheese.
Forming the Potato Cheese Balls
Now comes the fun part – shaping our Potato Cheese Balls! Take about one tablespoon of the potato mixture at a time. Roll it between your palms to form a neat ball, roughly the size of a large walnut or a small golf ball. The size is really up to you; smaller ones are perfect for snacking, while slightly larger ones can be a more substantial appetizer. As you form each ball, place it onto a parchment-lined baking sheet or a clean plate. Don’t worry if they aren’t perfectly uniform; a little rustic charm is part of their appeal. Once you’ve formed all your balls, it’s time to set up your dredging station. This is a three-step process that will give our cheese balls that golden, crispy exterior.
Coating the Potato Cheese Balls
Prepare three shallow dishes or bowls. In the first dish, place the all-purpose flour. In the second dish, whisk the two large eggs until they are well beaten. In the third dish, place the breadcrumbs. If you’re using panko breadcrumbs, you’ll achieve an extra-crisp texture. Now, take each potato cheese ball and carefully roll it in the flour, coating all sides. Gently shake off any excess flour. Next, dip the floured ball into the beaten eggs, ensuring it’s fully submerged. Let any excess egg drip off. Finally, roll the egg-coated ball in the breadcrumbs, pressing gently so the breadcrumbs adhere well. Make sure each ball is completely covered with breadcrumbs. Place the coated balls back onto your parchment-lined baking sheet. This step is vital for achieving that satisfying crunch when cooked.
Cooking the Potato Cheese Balls
You have two delicious options for cooking your Potato Cheese Balls: frying or baking. For frying, heat about 2-3 inches of cooking oil in a heavy-bottomed pot or deep fryer to 350°F (175°C). Carefully lower a few cheese balls at a time into the hot oil, being careful not to overcrowd the pot, as this will lower the oil temperature and result in greasy balls. Fry them for about 3-5 minutes, or until they are golden brown and crispy. Use a slotted spoon to remove them from the oil and place them on a wire rack set over a baking sheet to drain any excess oil. For baking, preheat your oven to 400°F (200°C). Arrange the coated cheese balls on a baking sheet that has been lightly greased or sprayed with cooking spray. You can also spray the tops of the cheese balls with cooking spray for extra crispiness. Bake for 15-20 minutes, flipping them halfway through, until they are golden brown and heated through. Both methods will yield wonderfully delicious results, so choose the one that best suits your preference or kitchen setup.
Serving Your Golden Potato Cheese Balls
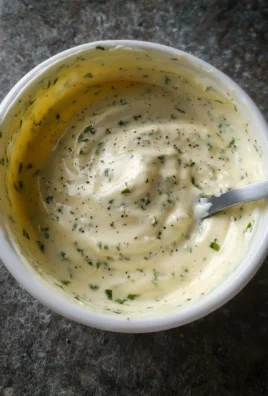
Once your Potato Cheese Balls are cooked to a perfect golden-brown, they are ready to be enjoyed! Allow them to cool slightly before serving, as the inside will be very hot and molten. These are best served warm, allowing the cheese to be wonderfully gooey and the exterior to be delightfully crisp. They are fantastic on their own, but they also pair exceptionally well with a variety of dipping sauces. A classic sour cream and chive dip is a wonderful choice, or you could opt for a spicy marinara sauce for a little kick. A garlic aioli or even a simple ketchup are also popular choices. Garnish with a sprinkle of fresh parsley or a few extra chopped green onions if desired for a pop of color and freshness. These Potato Cheese Balls are perfect for parties, game nights, or just as a comforting snack any time of day.
Conclusion:
And there you have it! These Potato Cheese Balls are more than just a snack; they’re a delightful little package of comfort and flavor, perfect for sharing or savoring all to yourself. We’ve covered the simple steps to create these golden, crispy delights, and I truly hope you enjoy making and tasting them as much as I do. Their versatility makes them an absolute winner for any occasion. Serve them piping hot with your favorite dipping sauces – a tangy marinara, a creamy ranch, or even a spicy sriracha mayo are all fantastic pairings. For a more substantial meal, imagine them as a side dish to a hearty stew or a delicious appetizer before a celebratory dinner.
Don’t be afraid to experiment with variations! Feel free to add finely chopped chives or parsley to the mixture for a burst of freshness, or a pinch of smoked paprika for a smoky undertone. You can also try different cheeses – a sharp cheddar or a Monterey Jack would be wonderful additions. The goal is to make these Potato Cheese Balls your own. So, gather your ingredients, get your hands a little messy, and prepare to be rewarded with a batch of truly irresistible treats. Happy cooking!
Frequently Asked Questions:
Q: Can I make the Potato Cheese Balls ahead of time?
A: Yes, you absolutely can! You can prepare the dough and form the balls ahead of time, then store them on a baking sheet in the refrigerator, covered tightly with plastic wrap, for up to 24 hours. When you’re ready to cook, you can bake them directly from the fridge, adding a few extra minutes to the cooking time. For best results, avoid freezing the uncooked dough as it can affect the texture upon baking.
Q: My Potato Cheese Balls didn’t get as crispy as I expected. What could be the reason?
A: Several factors can influence crispiness. Ensure your oil is hot enough for frying (around 350-375°F or 175-190°C) before adding the balls. Overcrowding the pan can also lower the oil temperature, leading to less crispy results. Additionally, make sure the potato mixture isn’t too wet; if it feels sticky, you might have too much moisture. For baking, ensure you’re using a hot oven and consider lightly greasing or spraying them with oil before baking for a crispier exterior.
Crispy Potato Cheese Balls-Easy Appetizer Recipe
Easy and delicious crispy potato cheese balls with bacon and green onions, perfect as an appetizer.
Ingredients
-
2 cups mashed potatoes
-
1 cup cheddar cheese, shredded
-
1/4 cup beef, cooked and crumbled
-
2 green onions, finely chopped
-
1/2 teaspoon garlic powder
-
1/2 teaspoon salt
-
1/4 teaspoon black pepper
-
1 cup all-purpose flour
-
2 large eggs, beaten
-
1 cup breadcrumbs
-
Cooking spray or olive oil
Instructions
-
Step 1
In a large mixing bowl, combine cooled mashed potatoes with shredded cheddar cheese. Gently mix until just combined. Add cooked and crumbled beef, finely chopped green onions, garlic powder, salt, and black pepper. Mix everything gently but thoroughly until evenly distributed. -
Step 2
Take about one tablespoon of the potato mixture at a time and roll it between your palms to form a ball, about the size of a large walnut. -
Step 3
Set up three shallow dishes: one with all-purpose flour, one with beaten eggs, and one with breadcrumbs. Roll each potato cheese ball first in flour, then dip in beaten eggs, and finally coat thoroughly in breadcrumbs. -
Step 4
For frying: Heat 2-3 inches of cooking oil in a pot to 350°F (175°C). Fry cheese balls in batches for 3-5 minutes until golden brown and crispy. Drain on a wire rack. -
Step 5
For baking: Preheat oven to 400°F (200°C). Arrange coated cheese balls on a greased baking sheet. Bake for 15-20 minutes, flipping halfway, until golden brown and heated through. -
Step 6
Allow to cool slightly before serving. Best served warm with your favorite dipping sauce.
Important Information
Nutrition Facts (Per Serving)
It is important to consider this information as approximate and not to use it as definitive health advice.
Allergy Information
Please check ingredients for potential allergens and consult a health professional if in doubt.

Leave a Comment