
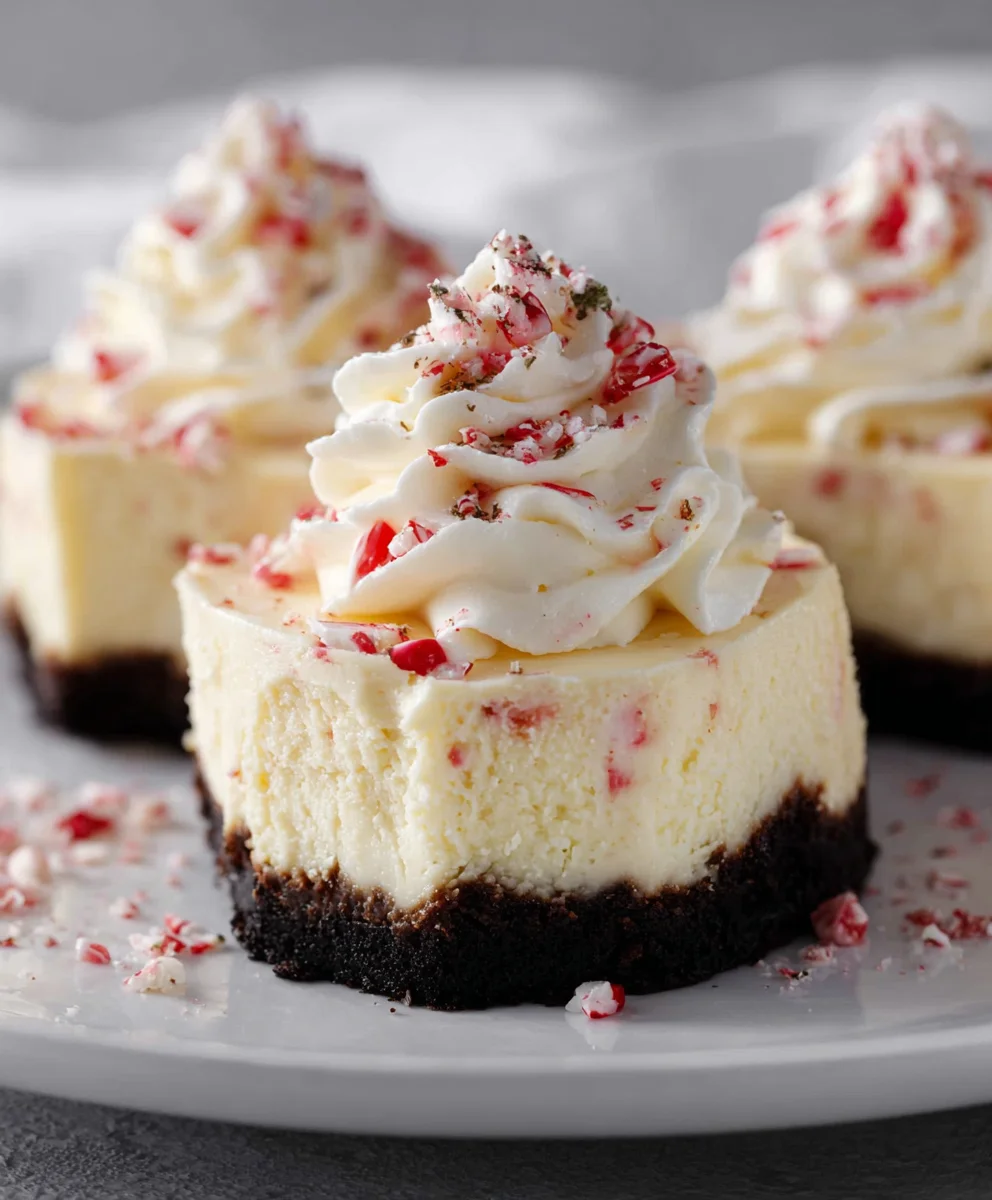
Peppermint Cheesecake Recipe. Oh, how I adore this time of year, and nothing says the holidays are truly here like the invigorating, sweet, and cooling embrace of peppermint infused into a rich, creamy dessert. This Peppermint Cheesecake Recipe isn’t just a treat; it’s a celebration in every slice. Imagine a velvety smooth, impossibly rich cheesecake, its subtle tang perfectly balanced by the vibrant burst of peppermint. It’s that wonderful contrast, that delightful dance between creamy indulgence and refreshing mint, that has cemented its place as a beloved classic for so many. What makes this particular Peppermint Cheesecake Recipe so special? It’s the effortless elegance it brings to any gathering, the way it can transform an ordinary dessert into an extraordinary experience, and the sheer joy it sparks with every bite.
Ingredients:
- 20 Oreo cookies
- 5 Tablespoons unsalted butter, melted
- 1 cup cold heavy whipping cream
- 2 packages cream cheese, softened (8 ounces each)
- 1 ½ cups white chocolate chips
- ½ teaspoon peppermint extract
- ½ cup chopped Andes Peppermint Crunch, plus additional for topping
- Whipped cream, for topping
Prepare the Crust
Step 1: Crushing the Oreos
The foundation of our delicious Peppermint Cheesecake Recipe starts with a perfectly crushed Oreo crust. Begin by placing your 20 Oreo cookies into a food processor. Pulse them until they are finely crushed into crumbs. If you don’t have a food processor, you can place the cookies in a sturdy zip-top bag, seal it tightly, and then use a rolling pin to crush them into fine crumbs. The goal is to have uniform crumbs, not large chunks, for the best texture.
Step 2: Mixing the Crust Ingredients
Once your Oreos are finely crushed, transfer them to a medium-sized bowl. Add the 5 tablespoons of melted unsalted butter to the cookie crumbs. Stir them together thoroughly with a fork or spatula until all the crumbs are evenly moistened. This mixture should resemble wet sand and will hold together when you press it.
Step 3: Pressing the Crust into the Pan
Now, take an 8 or 9-inch springform pan. This type of pan is ideal for cheesecakes as it allows for easy removal once the cheesecake is set. Pour the Oreo and butter mixture into the bottom of the prepared pan. Using the bottom of a glass or a measuring cup, firmly press the crumbs evenly across the bottom of the pan. You want to create a compact and sturdy crust. You can also press the crumbs slightly up the sides of the pan if you prefer a more substantial crust. Place the pan in the freezer while you prepare the filling. This chilling step helps the crust set firmly.
Making the Cheesecake Filling
Step 4: Melting the White Chocolate
In a microwave-safe bowl, combine the 1 ½ cups of white chocolate chips with 2 tablespoons of the cream cheese. Microwave in 30-second intervals, stirring well after each interval, until the white chocolate is completely melted and smooth. Be careful not to overheat the white chocolate, as it can seize and become grainy. Alternatively, you can melt the white chocolate chips and cream cheese using a double boiler method. Set aside to cool slightly.
Step 5: Creaming the Cream Cheese and Adding Flavors
In a large mixing bowl, beat the 2 packages (8 ounces each) of softened cream cheese with an electric mixer on medium speed until it is completely smooth and creamy, with no lumps. This is a crucial step for a silky-smooth cheesecake texture. Gradually add the melted white chocolate mixture to the cream cheese, continuing to beat until well combined and smooth. Now, gently fold in the ½ teaspoon of peppermint extract, ensuring it is evenly distributed throughout the filling. Finally, stir in the ½ cup of chopped Andes Peppermint Crunch. Be sure to reserve some extra Andes Peppermint Crunch for topping later.
Step 6: Whipping the Cream and Incorporating It
In a separate, clean bowl, whip the 1 cup of cold heavy whipping cream with an electric mixer on medium-high speed until stiff peaks form. Be careful not to over-whip, or you’ll end up with butter. Gently fold the whipped cream into the cream cheese and white chocolate mixture until just combined. Again, avoid overmixing; you want to maintain the airy texture from the whipped cream.
Assembling and Baking the Cheesecake
Step 7: Pouring and Baking
Retrieve the chilled crust from the freezer. Pour the prepared cheesecake filling evenly over the crust. Smooth the top with a spatula. Place the springform pan on a baking sheet to catch any potential drips. Bake in a preheated oven at 325°F (160°C) for 50-60 minutes, or until the edges are set and the center is still slightly jiggly. It’s important not to overbake, as this can lead to a dry cheesecake.
Step 8: Cooling and Chilling
Once baked, turn off the oven and let the cheesecake cool in the oven with the door slightly ajar for about an hour. This gradual cooling prevents cracking. Then, remove the cheesecake from the oven and let it cool completely on a wire rack. Once cooled to room temperature, cover the cheesecake loosely with plastic wrap and refrigerate for at least 4 hours, or preferably overnight, to allow it to set fully.
Step 9: Decorating and Serving
When ready to serve your Peppermint Cheesecake Recipe, carefully run a knife around the edge of the pan before releasing the springform side. Top generously with whipped cream and sprinkle with the reserved chopped Andes Peppermint Crunch for that extra festive touch. Slice and enjoy this delightful peppermint creation!

Conclusion:
There you have it – your guide to creating a spectacular Peppermint Cheesecake Recipe! We’ve walked through every step, from crafting a buttery graham cracker crust to achieving that perfectly creamy, no-bake filling infused with refreshing peppermint. This dessert is a true showstopper, guaranteed to impress at any gathering, from holiday parties to casual get-togethers. Its festive flavor profile makes it especially delightful during the cooler months, but honestly, who can resist a slice of decadent cheesecake year-round?
For serving suggestions, consider a drizzle of chocolate ganache, a sprinkle of crushed candy canes, or even a dollop of freshly whipped cream. These small additions can elevate your Peppermint Cheesecake Recipe from delicious to divine. Don’t be afraid to get creative with variations! You could experiment with different crusts, like gingersnap or shortbread, or even add a swirl of raspberry coulis for a pop of color and tartness. The possibilities are endless, and the joy of baking (or in this case, no-baking!) is in making it your own. Give this recipe a try – you might just find it becomes a new favorite!
Frequently Asked Questions:
Q: Can I bake this peppermint cheesecake recipe instead of making it no-bake?
A: While this recipe is designed to be no-bake for ease and speed, you absolutely could adapt it for baking. You would likely need to incorporate eggs into the filling and bake at a moderate temperature until set. However, the no-bake method yields a wonderfully smooth and creamy texture that’s perfect for this flavor profile.
Q: How long does the peppermint cheesecake recipe need to chill before serving?
A: For the best results and a firm set, I recommend chilling the cheesecake for at least 6-8 hours, or preferably overnight. This allows all the flavors to meld beautifully and ensures the cheesecake is perfectly sliceable.
Q: Can I use peppermint extract instead of peppermint flavoring oil?
A: Yes, you can use peppermint extract, but you’ll need to adjust the quantity. Peppermint extract is typically less potent than flavoring oil, so start with about half the amount called for and taste the filling before adding more. Be careful not to overdo it, as it can become overpowering!
Decadent Peppermint Cheesecake Recipe
An easy and delicious peppermint cheesecake with a decadent Oreo crust and a creamy white chocolate peppermint filling, perfect for the holidays.
Ingredients
-
20 Oreo cookies
-
5 Tablespoons unsalted butter, melted
-
1 cup cold heavy whipping cream
-
2 packages cream cheese, softened (8 ounces each)
-
1 ½ cups white chocolate chips
-
½ teaspoon peppermint extract
-
½ cup chopped Andes Peppermint Crunch, plus additional for topping
-
Whipped cream, for topping
Instructions
-
Step 1
Crush 20 Oreo cookies into fine crumbs using a food processor or a rolling pin in a zip-top bag. Mix the crumbs with 5 tablespoons of melted unsalted butter until evenly moistened and resembling wet sand. -
Step 2
Press the Oreo crumb mixture firmly and evenly into the bottom of an 8 or 9-inch springform pan. Place the pan in the freezer while preparing the filling. -
Step 3
Melt 1 ½ cups white chocolate chips with 2 tablespoons of cream cheese in a microwave-safe bowl in 30-second intervals, stirring until smooth. Set aside to cool slightly. -
Step 4
Beat 2 packages (8 ounces each) of softened cream cheese until smooth. Gradually add the melted white chocolate mixture, beating until combined. Stir in ½ teaspoon peppermint extract and ½ cup chopped Andes Peppermint Crunch. -
Step 5
In a separate bowl, whip 1 cup of cold heavy whipping cream until stiff peaks form. Gently fold the whipped cream into the cream cheese mixture until just combined. -
Step 6
Pour the filling over the chilled crust and smooth the top. Bake at 325°F (160°C) for 50-60 minutes, until the edges are set and the center is slightly jiggly. -
Step 7
Turn off the oven and let the cheesecake cool in the oven with the door ajar for about an hour. Then, let it cool completely on a wire rack. Cover and refrigerate for at least 4 hours, or preferably overnight. -
Step 8
Before serving, run a knife around the edge of the pan and release the springform side. Top with whipped cream and the reserved chopped Andes Peppermint Crunch.
Important Information
Nutrition Facts (Per Serving)
It is important to consider this information as approximate and not to use it as definitive health advice.
Allergy Information
Please check ingredients for potential allergens and consult a health professional if in doubt.

Leave a Comment