
Easter Rice Krispie Treats are more than just a simple no-bake dessert; they are a nostalgic embrace of childhood, a vibrant centerpiece for any spring celebration, and frankly, an irresistible confection that brings smiles to faces young and old. There’s a universal joy associated with these chewy, crispy delights, a comforting familiarity that instantly transports us to happier times. What truly sets our Easter Rice Krispie Treats apart is the playful twist we’re adding for the season. Forget the plain old squares! We’re infusing them with the festive spirit of Easter, transforming them into delightful shapes and dazzling colors that are perfect for your holiday table or as a sweet surprise for an Easter egg hunt. Get ready to create edible magic that’s as fun to make as it is to devour.
Ingredients:
- 16 ounces marshmallows (jumbo or mini both work)
- 7 cups Rice Krispies cereal
- 2 tablespoons unsalted butter
- ½ cup unsalted butter
- 3-4 cups powdered sugar
- ¼ cup milk
- 1 teaspoon vanilla extract
- Green food coloring
- Easter egg candies (mini chocolate eggs or jelly beans)
Preparation: The Base
Melting the Marshmallows
Before we can create these delightful Easter Rice Krispie Treats, the first crucial step is to prepare our marshmallow base. Take a large, heavy-bottomed pot or a Dutch oven and place it over low heat on your stovetop. Add the 2 tablespoons of unsalted butter to the pot. Allow the butter to melt completely. It’s important to use low heat here to prevent the butter from browning or burning, which can affect the final flavor of your treats. Once the butter is fully melted and shimmering, add all 16 ounces of marshmallows to the pot.
Continue to stir the marshmallows gently and continuously with a rubber spatula or wooden spoon. The goal is to encourage even melting without scorching. You’ll notice the marshmallows will start to soften and puff up. Keep stirring until the marshmallows are completely smooth and there are no lumps remaining. This should take about 5-10 minutes, depending on the type of marshmallows you’re using. If you’re using jumbo marshmallows, they might take a little longer to melt down. Once the mixture is a glossy, uniform liquid, remove the pot from the heat. This immediate removal is key to stopping the cooking process and preventing the marshmallows from becoming tough.
Incorporating the Cereal
Now that we have our smooth, melted marshmallow mixture, it’s time to add the star crunchy element. While the marshmallow mixture is still hot and pliable, gradually add the 7 cups of Rice Krispies cereal to the pot. It’s best to add the cereal in batches, stirring gently after each addition. This ensures that every single piece of cereal gets coated in the gooey marshmallow goodness. Don’t be tempted to rush this step; thorough coating is what gives you those perfectly cohesive treats.
Continue to stir everything together until the cereal is evenly distributed and well-coated. You want to see a beautiful, uniform mixture where no dry cereal is visible. Once everything is thoroughly combined, it’s time to move on to the next stage of shaping our Easter treats.
Assembly: Shaping the Fun
Preparing Your Pan
Before you transfer the Rice Krispie mixture, it’s essential to prepare your workspace. Lightly grease a 9×13 inch baking pan with butter or cooking spray, or line it with parchment paper. If you’re using parchment paper, leave some overhang on the sides to make it easier to lift the treats out later. This step is vital to prevent the sticky Rice Krispie mixture from adhering to the pan, ensuring clean edges and easy removal. You can also lightly grease your hands with butter or cooking spray, or use a greased spatula or the back of a spoon to press the mixture into the pan.
Carefully transfer the Rice Krispie cereal and marshmallow mixture into the prepared pan. Working quickly, but gently, press the mixture evenly into the pan. Avoid pressing down too hard, as this can result in dense, hard treats. The aim is to create a compact yet still slightly airy layer. You can use a greased spatula or your hands (lightly greased, of course!) to achieve an even surface. Once the mixture is pressed into the pan, set it aside to cool slightly while we prepare our festive topping.
Decoration: The Easter Magic
Crafting the Green Glaze
Now for the fun part – transforming these classic treats into vibrant Easter delights! In a medium bowl, combine the ½ cup of unsalted butter with the 3-4 cups of powdered sugar. You’ll want to start with 3 cups of powdered sugar and add more if you desire a thicker consistency. Add the ¼ cup of milk and the 1 teaspoon of vanilla extract.
Whisk all the ingredients together until you achieve a smooth, thick glaze. If the glaze is too thick, you can add a tiny bit more milk, a teaspoon at a time, until it reaches your desired drizzling or spreading consistency. Conversely, if it’s too thin, add more powdered sugar, a tablespoon at a time, until it thickens up. This is your base glaze for the Easter Rice Krispie Treats.
Coloring and Decorating
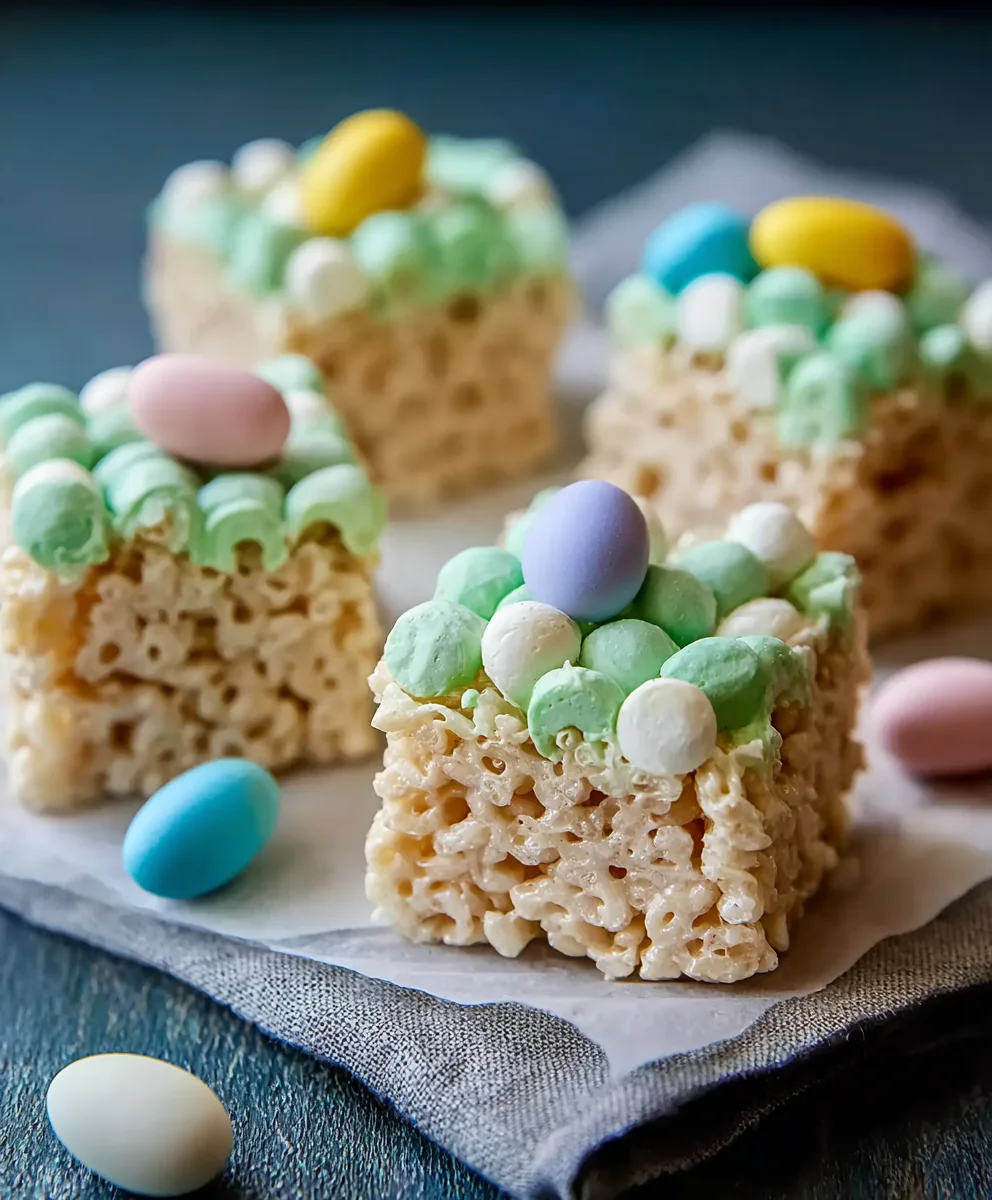
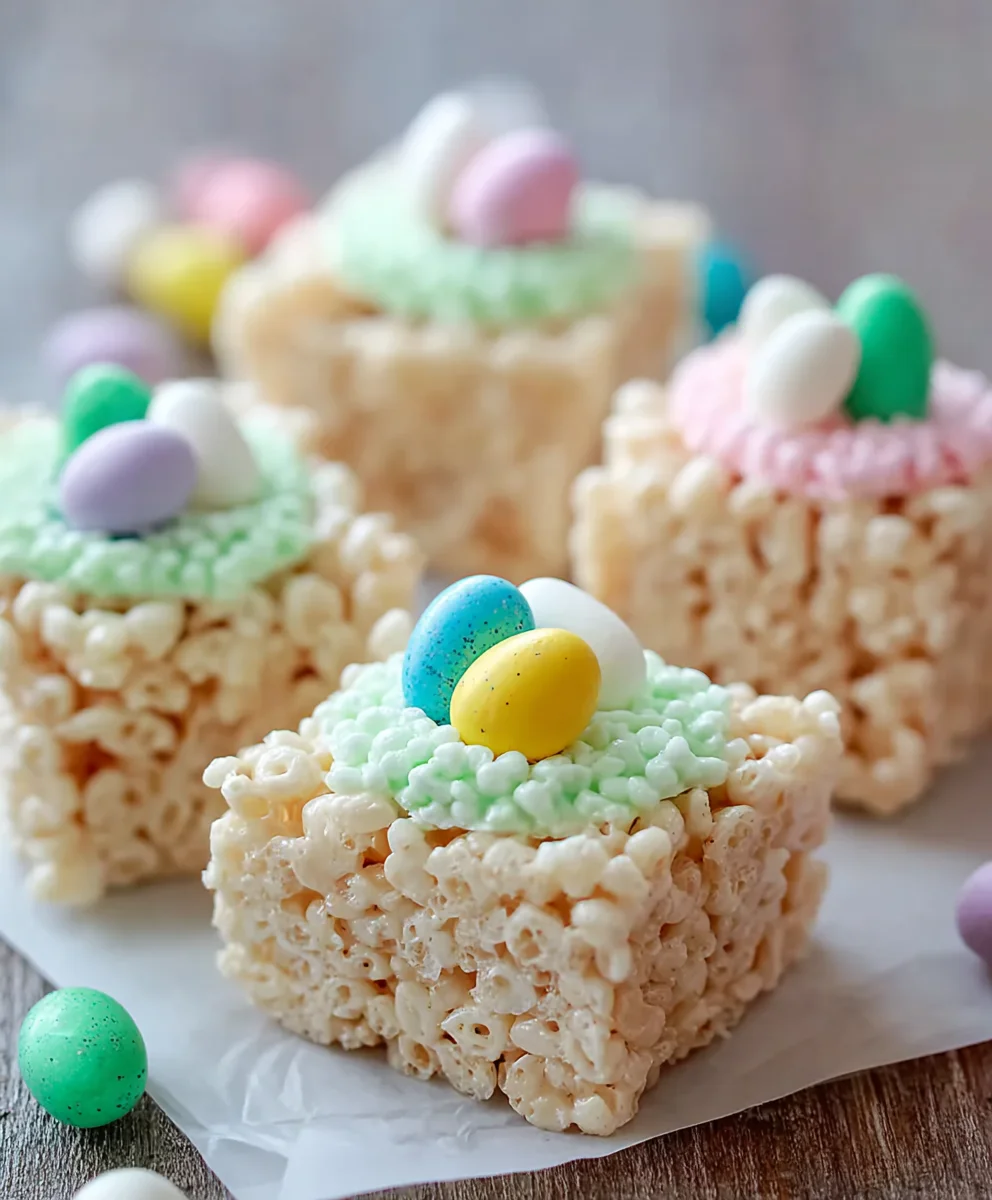
Once your glaze is the perfect consistency, it’s time to add a pop of Easter color. Divide the glaze into two bowls. In one bowl, add a few drops of green food coloring. Stir the food coloring in thoroughly until you achieve a uniform, vibrant green hue. This green glaze will give our treats a fresh, grassy appearance, perfect for spring.
Now, take your slightly cooled Rice Krispie treats from the pan. You can either drizzle the green glaze over the top in a decorative pattern, or spread it evenly to cover the entire surface like frosting. Once the green glaze is applied, immediately scatter your Easter egg candies over the wet glaze. The glaze will help the candies adhere. Get creative with your placement! You can arrange them like a nest, sprinkle them randomly, or create fun patterns. If you want a contrasting effect, you can reserve a small amount of white glaze and drizzle it over the green glaze before adding the candies, or vice versa. Allow the glaze to set completely before cutting your Easter Rice Krispie Treats into squares or desired shapes. This ensures clean cuts and prevents the toppings from shifting.
Conclusion:
And there you have it – your guide to creating the most delightful Easter Rice Krispie Treats! This recipe is incredibly simple, making it a perfect activity for families and a guaranteed hit at any Easter gathering. The classic crispy, chewy texture combined with festive pastel colors and fun shapes is a winning combination. Remember, the magic of these Easter Rice Krispie Treats lies not just in their taste but also in the joy of making them together.
For serving, consider arrangin extractg these festive treats on a colorful platter or individual paper doilies. They pair wonderfully with a glass of milk or can be the sweet highlight of your Easter dessert table. Feel free to get creative with your decorations! Beyond the basic pastel colors, you can add sprinkles, edible glitter, or even drizzle them with melted white chocolate for an extra touch of elegance. Don’t be afraid to experiment with different cookie cutters to create unique Easter shapes.
We hope you have a fantastic time making and sharing these Easter Rice Krispie Treats. Happy Easter, and enjoy every delicious, chewy bite!
Frequently Asked Questions about Easter Rice Krispie Treats:
Q1: Can I make these Easter Rice Krispie Treats ahead of time?
Yes, absolutely! Easter Rice Krispie Treats can be made one to two days in advance. Store them in an airtight container at room temperature. If you cut them into shapes, you can layer them with parchment paper to prevent sticking. They are best enjoyed within a couple of days for optimal freshness and texture.
Q2: How can I achieve vibrant pastel colors for my Easter Rice Krispie Treats?
To get those beautiful pastel hues, use gel food coloring. Gel coloring is more concentrated than liquid coloring, so you’ll need less to achieve a vibrant shade. Add the gel coloring a few drops at a time to the melted marshmallows and stir thoroughly until the color is evenly distributed. You can also divide the marshmallow mixture into separate bowls before adding the color to create multiple pastel shades.
Easter Rice Krispie Treats-Festive & Fun Recipe
A festive and fun recipe for classic Rice Krispie treats decorated with a green glaze and Easter egg candies, perfect for spring celebrations.
Ingredients
-
16 ounces marshmallows
-
7 cups Rice Krispies cereal
-
2 tablespoons unsalted butter
-
½ cup unsalted butter
-
3-4 cups powdered sugar
-
¼ cup milk
-
1 teaspoon vanilla extract
-
Green food coloring
-
Easter egg candies
Instructions
-
Step 1
Melt 2 tablespoons of unsalted butter in a large, heavy-bottomed pot over low heat. Add marshmallows and stir until completely smooth and lump-free, about 5-10 minutes. Remove from heat immediately. -
Step 2
Gradually add 7 cups of Rice Krispies cereal to the hot marshmallow mixture, stirring gently after each addition until all cereal is evenly coated. Continue stirring until no dry cereal is visible. -
Step 3
Lightly grease a 9×13 inch baking pan or line it with parchment paper. Transfer the Rice Krispie mixture into the prepared pan and gently press it evenly into the pan. Avoid pressing too hard. Set aside to cool slightly. -
Step 4
Prepare the glaze: In a medium bowl, combine ½ cup unsalted butter, 3 cups powdered sugar (add more for thicker consistency), ¼ cup milk, and 1 teaspoon vanilla extract. Whisk until smooth and thick. Adjust consistency with more milk or powdered sugar as needed. -
Step 5
Divide the glaze into two bowls. Add a few drops of green food coloring to one bowl and stir until a vibrant green hue is achieved. -
Step 6
Drizzle or spread the green glaze over the slightly cooled Rice Krispie treats. Immediately scatter Easter egg candies over the wet glaze. Allow the glaze to set completely before cutting into squares.
Important Information
Nutrition Facts (Per Serving)
It is important to consider this information as approximate and not to use it as definitive health advice.
Allergy Information
Please check ingredients for potential allergens and consult a health professional if in doubt.

Leave a Comment